


Swift Chassis DB-1 & DB-6
L15A7 Engine Installation Manual
28
8/2010
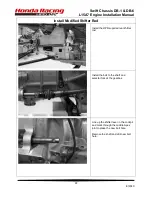
Engine Side Cover Blister Installation
cont’d
1. The blisters are made approximately one inch oversize to give the installer maximum flexibility to
match the body lines of the engine side covers. Feel free to trim the pieces during installation to
best match your car's side cover body lines. A pneumatic cut-off tool with a 3" x 3/64" narrow kerf
metal cutting wheel works well to make the holes, as well as to trim the blisters. A sanding block,
dremel or die grinder is also handy for making fine adjustments during fitting.
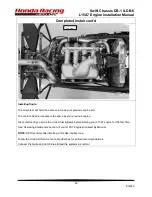
2. Before attempting to match the blister to each side cover, fit the side cover to the chassis with the
Honda Fit engine fully installed and mark the inside of the side cover where the obstruction
strikes it. Remove the side cover from the chassis and carefully cut away a minimum of material
to clear the obstruction. Several fittings may be needed to cut away just enough. Once the hole is
large enough to clear the obstruction, ensure the side cover can be fully installed and uninstalled
without the side cover hitting the obstruction. Measure and record how much clearance is needed
on either side to clear the obstruction.
3. With the trimmed side cover installed on the chassis, place the appropriate blister over the
opening and slide it around on the side cover to best match the side cover body lines, as well as
clear the obstruction. The flanges are left over sized, so the installer may need to trim them to
ensure a good fit. If trimming is needed, go slowly and trim just a little at a time to prevent
trimming too much from the blister. Once the blister is trimmed to best match the body lines, trace
the outline of the trimmed blister on the side cover and set the blister aside.
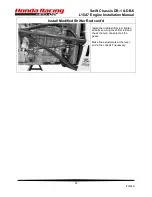
4. Remove the side cover from the chassis and carefully cut slightly inside the marked outline of the
trimmed blister with the cut-off wheel. Work slowly to ensure you don't remove too much material.
When the hole is roughly cut out inside the line a pneumatic die grinder with a porting stone or
flap wheel works well for final trimming. Or use sand paper held in the hand. Do not use a disc as
it can easily remove too much material. Once satisfied that trimming is complete and that there is
a close fit between the side cover and the blister, set the blister aside and invert the side cover so
that the inner surface (the surface facing the engine) is facing upwards, and support the side
cover on a work bench.
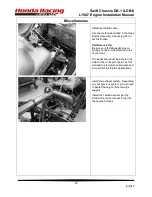
5. Trace a line around the opening approximately 2" outside the trimmed edge of the hole. Scrub the
area with acetone to remove all traces of dirt, grease and oil. It is critical to a successful
installation that all traces of dirt, oil and grease be removed from this area, or the new resin will
not properly adhere. Next, using a sanding block with medium grit paper or a die grinder and flap
wheel, abrade the surface inside the 2" line down to raw resin and/or glass. Remove just enough
material to get clean resin/glass. Don't grind through to the surface! Once the sanding is
complete, vacuum the area to remove the dust. Lightly abrade the inner face of the blister to
ensure a fresh bonding surface.
6. Place the trimmed blister on the fiberglass cloth you will use to make the bonding patch. Trace a
line approximately 1.5" outside the blister's outline and cut the fabric to match the line, then cut
out a matching outline approximately 1.5" inside the outline of the blister. You will now have a
roughly donut shaped piece of fiberglass cloth approximately 3" wide. Repeat the process to
produce two more donuts, approximately 2" wide and 1.5" wide. All three layers can be the full
width, but narrower strips will save a little weight. Three layers should do the job, but you may
add additional layers if you wish, so long as they do not conflict with the chassis tubes or engine
installation. Alternatively, if there is internal clearance, you may wish to use 3 solid patches
covering out to approximately 1.5" outside the blister outline. Cutting out the inside of the patches
(the "donut hole") is not critical...it just saves a little weight.