Audio System
Operating the CD Player
You operate the CD player with the
same controls used for the radio.
With the ignition switch in
ACCESSORY (I) or ON (II), insert
the disc into the CD slot. Push the
disc in halfway, the drive will pull it
in the rest of the way and begin to
play. The number of the track that is
playing is shown in the display.
You can also play 3-inch (8-cm) discs
without using an adapter ring. In all
cases, play only standard round discs.
Odd-shaped CDs may jam in the
drive or cause other problems.
When the system reaches the end of
the disc, it will return to the begin-
ning and play that disc again.
Comfort and Convenience Features
CONTINUED
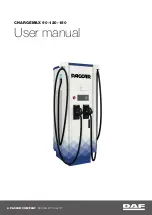
AM/FM BUTTON
CD SLOT
TUNE BAR
EJECT BUTTON
SEEK/SKIP
BAR
A.SEL/RDM BUTTON
CD BUTTON
RPT BUTTON
Содержание 2001 CR-V
Страница 8: ...4...
Страница 100: ...96...
Страница 200: ...196...
Страница 212: ...Required Maintenance Record for Normal and Severe Schedules Maintenanc e...
Страница 258: ...254...
Страница 268: ...264...
Страница 292: ...Fuses INTERIOR FUSE BOX Canadian model Taking Care of the Unexpected...
Страница 293: ...Fuses UNDER HOOD FUSE BOX ABS FUSE BOX For some types Taking Care of the Unexpected...
Страница 299: ...Specification s Technical Information page 287 page 288...