background image

Changing a Flat Tire (cont'd)

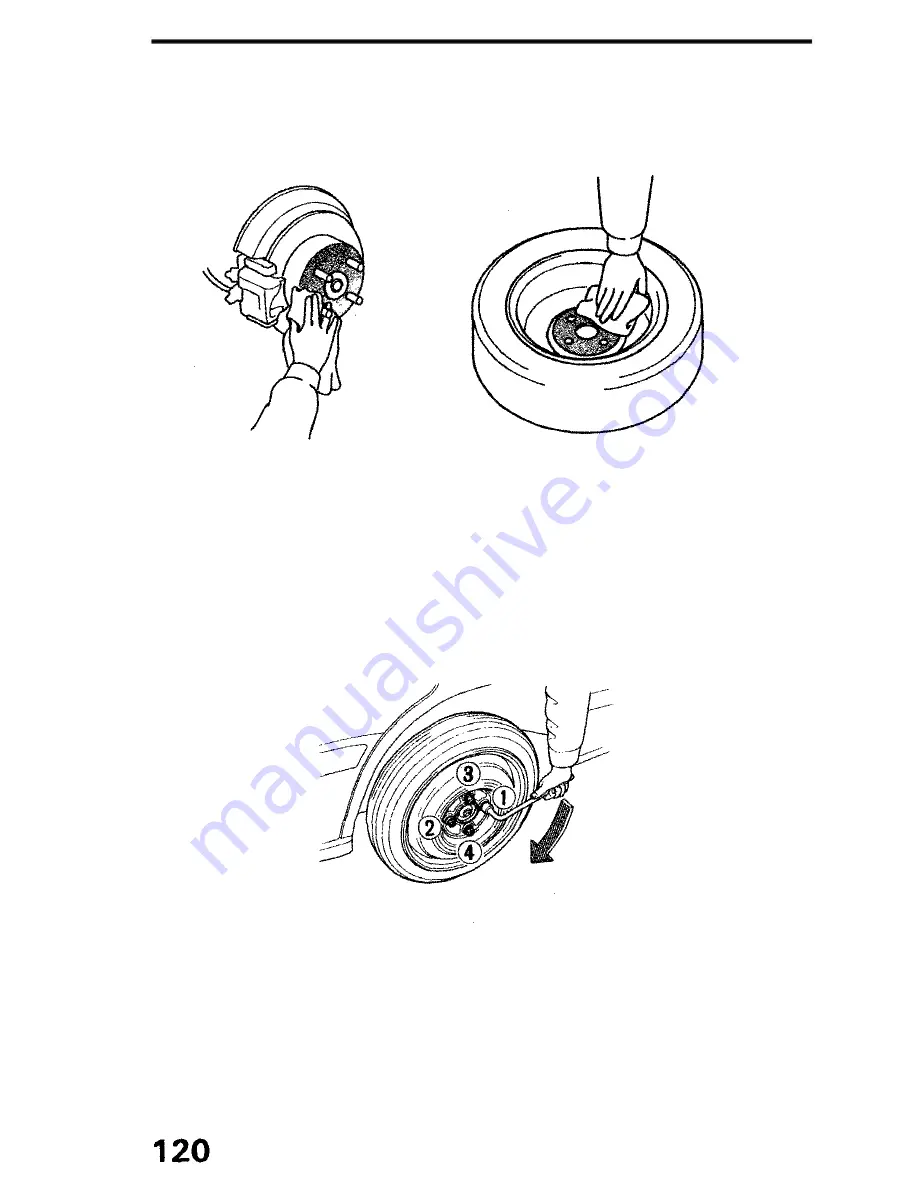
9. Everytime you install the wheel on the brake hub, use a rag

to wipe any dirt off the mounting surface of the hub and
the wheel. This will assure a tight, even contact between
the wheel and hub.

10. Install the spare, and lug nuts hand tight.
1 1 . Lower the car, remove the jack, then tighten the lug nuts

securely in an  " X " pattern as shown.

12. Tighten the lug nuts securely. The recommended torque

is: 110 N.m (80 Ib-ft). If a torque wrench was not used,
ask an authorized Honda dealer to verify the torque as
soon as possible.

TIGHTENING TORQUE

110 N.m (80 lb-ft)

Содержание 1991 Accord Coupe

Страница 1: ...ow before driving your car Starting Driving 60 What gas to use how to change gears etc Maintenance 80 The Required Maintenance Schedule and some items you can service Emergency Service 116 Changing a...

Страница 2: ...rst 600 miles 1 000 km of driving avoid full throttle starts and cruising for extended periods at a constant speed NOTE This break in procedure also applies to exchanged or over hauled engines During...

Страница 3: ...e down the numbers stamped on both keys and keep the information in your wallet or purse in case you ever need to have duplicates made Both the master and valet keys are double edged so you can insert...

Страница 4: ...cked by operating the master door lock switch located on each door MASTER DOOR LOCK SWITCH In addition the passenger door will lock automatically when the tab on the driver s door is pushed forward or...

Страница 5: ...de put the master key in the lock and turn clockwise The trunk lid opener lever is lockable with the master key MASTER KEY Keep the trunk lid closed while driving to keep poisonous carbon monoxide exh...

Страница 6: ...up on the lever at the outside edge of the seat and leaning forward or back Release the lever and let the seat lock into place when it reaches the desired angle Seat belts are most effective when the...

Страница 7: ...ent while sitting in your normal driving posi tion before driving away To Get In Out of Rear Seat For easier access to or from the rear seat pull up the angle ad justment lever on each front seat to s...

Страница 8: ...button next to the restraint s height bar while pushing the restraint down Adjust so the top of the restraint is approx imately level with the tops of your ears If a head restraint must be removed for...

Страница 9: ...back is returned to its normal position Weight limits shown on the label on the driver s door jamb must be observed The total weight of passengers and cargo must not exceed the total weight limit on...

Страница 10: ...ally injured Make sure you and all your passengers ALWAYS put on the seat belts before driving away CAUTION Be careful the seat belts are not damaged by catching or entangling in the door or seat mech...

Страница 11: ...enter of the seat Normal movement of the shoulder belt buckle may cause injury Be sure all parts of your body especially fingers and hands are clear of the shoulder buckle while it is moving CAUTION I...

Страница 12: ...l lock If this happens allow the belt to retract then pull it out more slowly 4 Push the tongue plate into the buckle until it clicks locked Position the belt across your lap low on your hipbone and b...

Страница 13: ...an one person child or adult Comfort clips sold on the open market are not recommended since they could impair the function and safety of the belts Make sure the strap of the shoulder belt and the lap...

Страница 14: ...ill also release and travel to its off position when the door is opened Emergency Belt Release The shoulder belt should al ways remain buckled In case of an emergency however the shoulder belt can be...

Страница 15: ...e plate and pull the belt across your lap Be sure the belt is not twisted or caught on anything 2 Push the tongue plate into the buckle until it clicks locked The seat belt should fit snugly against y...

Страница 16: ...lt length to fit snugly but comfortably when buckled A slack belt will greatly reduce the protection afforded to the wearer Hold the tongue plate perpendicular to the belt as shown To shorten pull the...

Страница 17: ...from its front off position to its rear locked position Automatic Shoulder Belt Malfunction Indicator The warning light will flash and the beeper will sound rapidly if either shoulder belt buckle stop...

Страница 18: ...Children who have outgrown the child restraint system should use one of the seat belts Make sure the belt is snug against the child s body with the shoulder portion going over the shoulder and across...

Страница 19: ...en the car s seat back and the base of the child seat and secure the child seat with the lap belt only Children could be endangered in a crash if their child restraints are not properly secured Follow...

Страница 20: ...any injuries that do occur Make sure the buckles retractors tongue plates guides and anchors all work properly Don t let anything get inside the buckle or the retractor it could cause latch or retract...

Страница 21: ...GHTER TACHOMETER SPEEDOMETER MAINTENANCE INDICATOR ODOMETER WIPER WASHER SWITCH HAZARD WARNING SWITCH DIGITAL CLOCK SUNROOF SWITCH EX IGNITION SWITCH FUSE BOX ASHTRAY PANEL BRIGHTNESS CONTROL KNOB HEA...

Страница 22: ...eginning of the RED ZONE indicates the max imum allowable engine R P M Do not run the engine with the tachometer indicator needle in the RED ZONE Fuel Gauge FUEL TANK CAPACITY Approx 64 5 17 0 US gal...

Страница 23: ...ion in the transmission avoid rapid acceleration and have the transmission checked by an authorized Honda dealer as soon as possible see page 72 Turn Signal Hazard Warning Indicator Lights When the tu...

Страница 24: ...se it stays on see page 17 Oil Pressure Warning Light A severe fluctuation in engine oil pressure will cause this light to flash on and off You should stop as soon as possible check the oil level and...

Страница 25: ...nents may be hot enough to burn you Keep hands away from the radiator fan The fan may start automatically without warning and run for up to 15 minutes even after the engine is turned off NOTE If neces...

Страница 26: ...the brake pedal with the ignition on the indicator will stay on until you have the lamp repaired or replac ed Have the brake lights checked as soon as possible It is dangerous to drive your car with...

Страница 27: ...ed MAINTENANCE REQUIRED is to be used as a reminder that there are items in addition to the engine oil and filter that re quire service each 7 500 miles 12 000 km See the maintenance schedule on page...

Страница 28: ...it while adjusting the steering wheel to the desired position 2 Hold the steering wheel in the desired position and pull the lever all the way up to lock it in place Do not adjust the steering wheel p...

Страница 29: ...ill shut off as soon as you release the lever Push down Washer Pull the wiper switch lever toward you to turn on the washer On the LX and EX the windshield wipers will sweep when the washer is operate...

Страница 30: ...warm the windshield with the defrosters before using the washer This will help prevent icing which could seriously impair visibility Rear Window Defogger Push the switch to turn the defogger on or of...

Страница 31: ...o select day or night position On the DX the outside mirror can be adjusted by moving the knob on the inside of the driver s door Power Mirrors LX EX With the ignition switch in the II position move t...

Страница 32: ...or a burned out bulb or fuse Headlights Turn the light switch to the first position for taillights side marker lights position lights license plate lights and instrument panel lights Turn to the secon...

Страница 33: ...indicator lights will flash Push the switch again to turn the system off Panel Brightness Control When the light switch is in either of the two o n posi tions the intensity of the in strument lights...

Страница 34: ...erior Light The interior light has a three position switch The light is off all the time in the OFF position In the middle position it goes on only when a door is opened In the ON position it is on al...

Страница 35: ...the speed the Cruise Con trol will hold You can then fine tune the set speed by briefly holding and releasing the SET switch to decrease it a few mph or pushing the RESUME switch to slightly increase...

Страница 36: ...pedal conventionally When you want to return to the set speed take your foot off the ac celerator and coast without applying the brakes The Cruise Control automates the function of the accelerator pe...

Страница 37: ...the hood and prop it open with the support rod To close take the support rod down place it back in its holder lower the hood until it is ap proximately one foot from the closed position then let it d...

Страница 38: ...ng or closing a win dow push and hold either the u p or down side of the switch until the window reach es the desired position then release NOTE The driver s window can be opened fully without the dri...

Страница 39: ...he lid 2 Push the minute button M and hold it until the numbers advance to the desired minutes 3 Push the hour button H and hold it until the numbers advance to the desired hour 4 The RESET button all...

Страница 40: ...r Your car is equipped with a beverage holder for use while the car is stopped Drinking while driving or driving with a beverage in the holder may be hazardous Open the holder by pushing it NOTE Use o...

Страница 41: ...ge toward you To remove it pull it out further while pushing down on the spring loaded plate inside Rear Ashtray The rear ashtray is located at the rear of the center console It is opened by pulling o...

Страница 42: ...e flow through ventilation system can provide fresh air to the interior when the car is moving or stopped even with the windows closed NOTE For proper air flow the flow through vents must not be cover...

Страница 43: ...p or down and their louvers turned right or left to change the direction of air flow The amount of air flow from the corner and center vents can be regulated by the control located beside each vent co...

Страница 44: ...ever Buttons Slide the lever on the DX model or push the appropriate button on the LX and EX models to direct air to and from the heater defroster and vents There is an indicator light in each functio...

Страница 45: ...ed if the heater or air conditioner is on and you want to warm up or cool down the interior more quickly or keep smoke or dust out of the car without losing the heat or cool function simply push the b...

Страница 46: ...center vents To change air distribution switch to the position and outside air will also flow from the heater ducts at the floor level LX EX Turn the temperature control dial counterclockwise and push...

Страница 47: ...ush the button on so inside air will recirculate to the air conditioner for maximum cooling When the interior has cooled sufficiently switch the fan to the desired speed then change to the setting to...

Страница 48: ...ct the position and warmed air will begin flowing from the floor outlet On the LX and EX models a small amount of warmed air will also flow from the windshield defroster vent DX LX EX To warm up the i...

Страница 49: ...cold weather to help defog the windows Just switch the fan on push the A C button on select the desired function and adjust the temperature lever control dial to a comfortable setting NOTE This setti...

Страница 50: ...ght on the DX model or turn the temperature control dial clockwise on the LX and EX models select defrost function and switch the fan on If there is actual frost on the windows first select the positi...

Страница 51: ...reduce the temperature of the air exiting the dash corner vents without appreciably affecting the heat to your leg and foot area Continue to adjust the temperature and fan speed to find the most comf...

Страница 52: ...ion or sudden application of the brakes severe personal in jury could result To avoid the possibility of injury while closing the sunroof never allow any part of your body to extend through the openin...

Страница 53: ...l kit into the socket 3 Turn the wrench until the sunroof seats in the closed position 4 Replace the plug Maintenance Periodically pour a little water down the drain holes to make sure they are not pl...

Страница 54: ...ch clockwise to in crease volume and counterclockwise to decrease volume On the EX model push the switch up to increase volume and down to decrease volume Balance Control Balances sound between left a...

Страница 55: ...requency station Push the button to tune to a higher frequency station NOTE If you hold either button for more than half a second the tuning frequency will count up or down rapidly Seek Tuning Each ti...

Страница 56: ...e used Auto Select Button EX only If you are visiting a new broadcast area you can quickly enter into memory the stronger stations in that area by simply pushing the Auto Select Button The radio will...

Страница 57: ...play Auto Reverse Feature The tape direction automatically reverses when the end of the tape is reached in play or FF mode and plays the other side Fast Forward Rewind FF REW Note which Tape Directio...

Страница 58: ...tape Push upward to automatically advance to the begin ning of the next song or downward to return to the beginning of the song just played NOTE Tapes that contain short silent passages between songs...

Страница 59: ...ffort to eject a faulty tape During this process the tape will either eject fully or rise to the loading level and have to be pulled out manually In either case discard the tape re use may damage the...

Страница 60: ...gasoline If the spark knock persists consult your Honda dealer Failure to do so is considered misuse and misuse is not covered under the New Car Warranty Occasionally you may notice light spark knock...

Страница 61: ...soline that contains alcohol or one that you think contains alcohol switch to an unleaded gasoline as recommended on page 60 Operation In Foreign Countries In order to comply with U S Federal Emission...

Страница 62: ...pressure escaping from the fuel tank Open the cap slowly and remove the cap after the hissing stops Fuel spray may cause injury Do not overfill the tank fill only until the gas pump clicks off automat...

Страница 63: ...use fresh air from the dash vents to keep cool when driving open windows or use of the air conditioning optional on DX both affect fuel economy Keep the tires adjusted to the recommended pressure Tir...

Страница 64: ...e the key while the car is in motion the steering wheel can lock causing a loss of directional control and an ac cident could result I ACCESSORY position In this position the accessory cir cuit is on...

Страница 65: ...t within 15 seconds or starts but fails to continue to run push the accelerator pedal halfway and hold it there while cranking the engine Once the engine starts release the accelerator gradually as th...

Страница 66: ...speed during night hours and bad weather Follow at a safe distance don t tailgate Get off the highway when you are tired stop and take a rest When stopping for repairs Park the car well off the road T...

Страница 67: ...i ble If you must drive under these conditions drive only with all windows fully open Do not drive with the trunk lid open An open trunk lid may draw exhaust gases into the passenger compartment If yo...

Страница 68: ...d shift allow time for the gears to syn chronize To prevent grinding gears when shifting into reverse hold the clutch pedal depressed briefly before shifting or shift the lever into one of the forward...

Страница 69: ...or best fuel economy and effective emission control shift at the speeds shown Maximum Allowable Speeds The speeds shown are the maximum at which the car can be driven or downshifted in each gear witho...

Страница 70: ...u cannot shift out of Park with the brake pedal depressed and the ignition switch in the II position 1 Turn the ignition switch off and remove the key 2 Insert the key in the Shift Lock Release locate...

Страница 71: ...ke an extra shift as the clutch engages CAUTION Shift into P only after the car has come to a complete stop Shift into or out of R only after the car has come to a com plete stop Do not rev up the eng...

Страница 72: ...the floor the transmission will automatically shift down according to load and engine speed This applies to both D4 and D3 ranges S Mode Pushing the Sports switch while driving in the D4 or D3 range w...

Страница 73: ...10 km h 1 1st This position is to be used when stronger engine braking is needed The maximum recommended speed in 1st gear is 31 mph 50 km h R Reverse CAUTION Shift into or out of reverse only after t...

Страница 74: ...gage and passengers in the car as well as the tongue load and hitch weight should also be considered in terms of the GAWR which is the maximum amount of weight that should be supported over the front...

Страница 75: ...nd the trailer Leave suffi cient slack in the chain so that it does not bind in sharp turns The chain should cross under the trailer tongue to prevent the tongue from dropping to the ground Tires Make...

Страница 76: ...act your Honda dealer CAUTION Connections to your car s electrical system should be made by your Honda dealer or a qualified electrician Improper installation may damage your vehicle s electrical syst...

Страница 77: ...may cause trailer jackknifing and loss of control Avoid jerky starts and rapid acceleration If your car has a manual transmission always start out in first gear and release the clutch at moderate engi...

Страница 78: ...long grades Do not make sudden downshifts Pay strict attention to the coolant temperature gauge when going up hills Because of the added load of the trailer your car s engine may overheat on hot days...

Страница 79: ...n first or reverse manual transmission or P automatic transmis sion CAUTION Parking on an incline is not recommended and should be done only if it cannot be avoided Follow all precau tions mentioned a...

Страница 80: ...es which occur due to a lack of maintenance will not be covered under the New Car Warranty The Required Maintenance Schedule specifies all mainte nance required to keep your car in peak operating cond...

Страница 81: ...signals and back up lights 3 Tires for correct pressures including spare inspect for cuts and uneven or excessive wear Rotate every 7 500 miles 12 000 km in the pattern shown on page 109 4 Steering f...

Страница 82: ...Maintenance Schedule and Records cont d Check oil and coolant level at each fuel stop Under severe driving conditions service these items twice as often See page 84...

Страница 83: ...Required Maintenance Record Have your servicing dealer record all Required Maintenance below Keep receipts for all work done on your car cont d...

Страница 84: ...conditions include A Repeated short distance driving B Driving in dusty conditions C Driving in severe cold weather D Driving in areas using road salt or other corrosive materials E Driving on rough a...

Страница 85: ......

Страница 86: ...UID DIPSTICK Yellow Loop ENGINE OIL FILLER CAP RADIATOR RESERVE TANK RADIATOR CAP BRAKE FLUID RESERVOIR CLUTCH FLUID RESERVOIR Manual Transmission only ENGINE OIL DIPSTICK Orange Loop WASHER FLUID RES...

Страница 87: ...o not overfill 2 Reinstall the cap and twist clockwise until it stops CAUTION Be sure the oil filler cap is correctly replaced before starting the engine Engine oil is a major factor affecting the per...

Страница 88: ...change be done by a skilled mechanic 1 Start the car to warm up the engine then shut it off 2 Remove the engine oil filler cap and drain bolt and drain the oil A warmed up en gine and the oil in it ar...

Страница 89: ...or reclamation Do not throw it in the trash or pour it on the ground CAUTION Used motor oil may cause skin cancer if repeatedly left in contact with the skin for prolonged periods Although this is unl...

Страница 90: ...erfill Since the transmission and differential are in the same hous ing you are actually checking both oil fluid levels in one pro cedure Change transmission oil fluid according to the Mainte nance Sc...

Страница 91: ...ion housing Remove the dipstick and wipe it off Insert the dipstick and remove it The fluid level should be be tween the upper and lower marks If necessary add fluid and recheck Use only DEXRON II Aut...

Страница 92: ...reezing Concentrations of greater than 60 coolant will impair cooling efficiency and are not recom mended Low mineral drinking water or distilled water should be mixed with the antifreeze coolant Cool...

Страница 93: ...ieved remove the cap by pressing down and again turning it counterclockwise Add enough coolant to fill the radiator and reinstall the cap Be sure to tighten it securely Fill the reserve tank up to the...

Страница 94: ...securely 6 Mix the recommended antifreeze with an equal amount of low mineral or distilled water and fill the reservoir to maximum as illustrated 7 Loosen the air bleed bolt in the thermo case then f...

Страница 95: ...unless you intend to brake This causes excessive brake wear and can damage or lead to loss of braking effectiveness through overheating Your brake lights may also confuse drivers behind you Driving t...

Страница 96: ...ndication of brake pad wear or of brake fluid leakage You should have your brakes checked if the brake fluid reservoir is low before re filling it CAUTION The arrow on the reservoir cap must be pointi...

Страница 97: ...w speed NOTE You may feel a slight clunk or knock when turning the wheel with the engine off This is a normal condition due to the design of the system Power Steering Fluid Check the power steering fl...

Страница 98: ...t with a new filter Reinstall the cover and tighten the bolts FILTER Fuel Filter The fuel filter is located in the engine compartment on the right center of the lower dashboard It should be replaced a...

Страница 99: ...lity Replace plugs one at a time so you don t get the wires mixed up 1 Clean any dirt from around the spark plug base 2 Disconnect the plug cap then remove and discard the old plug 3 Check the gap of...

Страница 100: ...he blade toward the base of the arm 2 Firmly grasp the end of the blade rubber and pull until the tabs are free of the metal support 3 Remove the metal retainers from the worn out blade rub ber and pu...

Страница 101: ...adequate ventilation when charging or using the battery in an enclosed space The battery contains sulfuric acid electrolyte Contact with skin or eyes may cause severe burns Wear protective clothing an...

Страница 102: ...f the ignition and all other switches 2 If you find a blown or possibly faulty fuse use the fuse remover stored beside the spare fuse to pull the blown fuse out of its clips 3 Check all other fuses as...

Страница 103: ...compart ment If the circuits from the battery are ever overloaded by a short in the system drawing too much current for example a main fuse will blow preventing damage to the entire wiring harness If...

Страница 104: ...See page 129 for bulb specifications Front turn signal lights Front side marker and turn signal lights posi tion lights Rear turn signal brake and taillights Brake and taillights back up lights Licen...

Страница 105: ...Interior light Sunvisor light LX EX Door courtesy lights LX EX High mount brake light Trunk light...

Страница 106: ...imit shown These pressures were chosen to provide you with the best combination of tread life riding comfort and stability under normal driving conditions Improper inflation can reduce both tire life...

Страница 107: ...snow tires please contact your Honda dealer Tire Chains Use chains only when you have to Check with local authorities or Provinces for requirements prior to installing tire chains Make sure the chain...

Страница 108: ...about 12 7 mm 1 2 in wide when the tire tread depth is less than 1 6 mm 1 16 in When indicators ap pear across two or more grooves in a row you should replace the tire Driving on worn out tires is ver...

Страница 109: ...may wear unevenly when used for a long time in the same position on the car To avoid this rotate the tires every 7 500 miles 12 000 km If abnormal or uneven wear develops between rotations the cause s...

Страница 110: ...gh water pressure or brush Compressor Drive Belt Check the compressor belt tension monthly during periods when you use the air conditioner a lot If the engine has been running some engine com ponents...

Страница 111: ...ide of the compressor and to verify that the system is functional If the air conditioner is not cooling properly it may indicate an undercharged system Have your dealer check the system for leaks then...

Страница 112: ...horizontally along the wires not up and down Dry the windows with a lint free cloth or paper towel Keep all the windows clean for maximum visibility Exterior Care Washing Rinse all loose dirt off the...

Страница 113: ...e treated with a protective finish Wash them with a low phosphate detergent and sponge Do not use abrassive cleaners or stiff brushes Always install aluminum wheels in sets of four If mixed with other...

Страница 114: ...ng Preventive Service Check all drain holes in the doors and body panels for clogging and clear if necessary When washing your car also clean the underside of the car by using high pressure water abov...

Страница 115: ...the following conditions may apply There is no assurance that imitation parts will equal the fit and finish of Genuine Honda sheet metal parts and in our experience they often do not There is no assur...

Страница 116: ...late if there is a leak more rapidly check its pressure often and add air gradually if it needs any The COMPACT spare tire has a different tire size air pressure requirement tread life and maximum spe...

Страница 117: ...ecially for your car do not use it on any other vehicle do not install any other tire on this wheel which is not identical to the original in size and construction and do not use the COMPACT spare tir...

Страница 118: ...t from its mount 3 Remove the lug wrench jack handle and jack handle exten sion from the tool bag 4 Remove the spare tire 5 Place blocks in front and back of the wheel diagonally op posite the tire yo...

Страница 119: ...y the jack 7 Place the jack under the car as shown and raise the car by turning the handle clockwise until the tire is slightly off the ground To reduce the possibility of injury be sure to use the ja...

Страница 120: ...contact between the wheel and hub 10 Install the spare and lug nuts hand tight 11 Lower the car remove the jack then tighten the lug nuts securely in an X pattern as shown 12 Tighten the lug nuts secu...

Страница 121: ...t in its original position then put the spare back in the car CAUTION Always stow the jack tools and tire securely to prevent them from becoming dangerous projectiles in an accident 14 Secure the tire...

Страница 122: ...to jump start a vehicle with a frozen battery The battery could rupture and explode If you suspect a frozen battery remove the vent caps and check the fluid If there seems to be no fluid or if you see...

Страница 123: ...wn 4 To remove the cables reverse the above procedures exactly DO NOT push or tow a car to start it The forward surge when the engine starts could cause a collision Also under some conditions the cata...

Страница 124: ...pages 90 91 and tow with the transmission in neutral N and the ignition key in the I position CAUTION To avoid serious damage on automatic transmis sion cars first start the engine and shift to D4 the...

Страница 125: ...ne and allow the wheels to spin freely at high speed Severe transmission damage may result if the wheels are allowed to spin for more than a few seconds DO NOT try to free a car with automatic transmi...

Страница 126: ...does not work 3 If the fuse has blown replac ing it with a new fuse of the same amperage should allow the shoulder belt buckle motor to work However if the fuse hasn t blown or if a new fuse did not...

Страница 127: ...ounterclockwise until the shoulder belt buckle reaches its rear locked position NOTE After the manual operation make sure that the seat belt warning light is off and the shoulder belt buckle is seated...

Страница 128: ...Specifications 1 Including the coolant in reserve tank 0 6 0 6 US qt and that remaining in the engine 2 Excluding the oil remaining in the engine but including that in the oil filter...

Страница 129: ...page 99...

Страница 130: ...amb as well as under the hood on the body directly behind the engine NOTE The V I N is also provided in bar code on the Certifica tion label VEHICLE IDENTIFICATION NUMBER CERTIFICATION LABEL The Engin...

Страница 131: ...t course For example a tire graded 150 would wear one and one half 1 1 2 times as well on the government course as a tire graded 100 The relative performance of tires depends upon the actual con ditio...

Страница 132: ...re can lead to sudden tire failure The grade C corresponds to a level of per formance which all passenger car tires must meet under the Federal Motor Vehicle Safety Standard No 109 Grades B and A repr...

Страница 133: ...systems on your new Honda were designed built and certified to conform with the Federal regulations implementing the Clean Air Act Honda recom mends only the use of new genuine Honda parts or their eq...

Страница 134: ...to the cylinders and deter mines the amount of fuel to be injected to provide the op timum air fuel ratio for all engine needs Ignition Timing Control System This system automatically controls the ign...

Страница 135: ...d gas as explained on page 60 CAUTION The converter can be overheated and damaged if it s fed too much unbumed fuel mixture from the engine so Don t push or tow the car to start it if the battery is d...

Страница 136: ...arranty details pertaining to your car can be found in the Warranty booklet provided with your new car except the re quired maintenance schedule which is contained here in the Owner s Manual If you ar...

Страница 137: ...n the inside of the back cover When contacting American Honda please pro vide the Zone Office with the following information Vehicle Identification Number Servicing Dealer Name and Address Date of Pur...

Страница 138: ...in vestigation and if it finds that a safety defect exists in a group of vehicles it may order a recall and remedy campaign However NHTSA cannot become involved in individual pro blems between you yo...

Страница 139: ...Warning Light 24 Brakes Brake Failure Warning Light 24 BrakeFluid 96 Brake System Design 95 BrakeWear 95 Brake Wear Indicators 95 Parking Brake 37 Parking Brake Warning Light 24 Break in Period 2 Bulb...

Страница 140: ...uel Filler Door and Cap 62 Filter 98 Gasohol 60 Gasoline 60 Gauge 22 Requirement 60 Reserve Warning Light 25 Fuse Checking and Replacing 102 Specification 129 Gasoline See Fuel Gas Station Information...

Страница 141: ...Shifting 68 Meters Gauges See Gauges Mirrors Power Mirrors 31 Rearview Mirrors 31 Numbers Identification 130 Octane Rating Gasoline See Fuel Odometer 22 Oil Clutch Fluid 96 Engine Oil 87 Fluid Locati...

Страница 142: ...Lumbar Support 7 Front Seat 6 Head Restraints 8 Trunk Access from Rear Seat 9 Shift Lever Position Indicator 23 Shifting Automatic 70 5 Speed 68 Spare Tire Changing a Flat Tire 118 COMPACT Spare Tire...

Страница 143: ...id 5 Lid Warning Light 26 Turn Signals 32 Vehicle Identification Number 130 Ventilation 42 Warning Lights 23 Warranty Service 136 Washer Reservoir Capacity 29 Windshield Washer 29 Washing 112 Waxing 1...

Страница 144: ...t Michigan 48207 or call 313 883 1430 Service Manual This manual covers maintenance and recommended procedures for repair to engine and chassis components It is written for the journeyman mechanic but...

Страница 145: ...this form you can order the materials desired You can pay by check or money order or charge to your credit card Mail to Helm Incorporated at the address shown below P O BOX 07280 DETROIT MICHIGAN 4820...

Страница 146: ...235 5533 Mid Atlantic Zone 902 Wind River Lane Suite 200 Gaithersburg Maryland 20878 301 990 2020 Southeastern Zone 1500 Morrison Parkway Alpharetta Georgia 30201 404 442 2045 North Central Zone 601...

Страница 147: ...0 preferred see page 90 for complete viscosity recommendations Capacity Including differential 1 9 l 2 0 US qt Automatic Transmission Fluid Use DEXRON II type Automatic Transmission Fluid ATF Remove d...

Отзывы: