


7
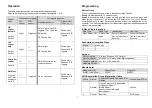
Sensor Type
Precision
Scale
Size
Sensor value
0x01
1
1
2
-4 ~ +122°F
Read back the LUX level measured
Sensor Type
Precision
Scale
Size
Sensor value
0x03
0
1
2
< 900
Command Classes
The module supports Command Classes including
1.
COMMAND_CLASS_ZWAVEPLUS_INFO_V2
2.
COMMAND_CLASS_ASSOCIATION_V2
3.
COMMAND_CLASS_ASSOCIATION_GRP_INFO_V1
4.
COMMAND_CLASS_TRANSPORT_SERVICE_V2
5.
COMMAND_CLASS_VERSION_V3
6.
COMMAND_CLASS_MANUFACTURER_SPECIFIC_V2
7.
COMMAND_CLASS_DEVICE_RESET_LOCALLY_V1
8.
COMMAND_CLASS_POWERLEVEL_V1
9.
COMMAND_CLASS_SECURITY_2
10.
COMMAND_CLASS_SUPERVISION_V1
11.
COMMAND_CLASS_FIRMWARE_UPDATE_MD_V4
12.
COMMAND_CLASS_NOTIFICATION_V8
13.
COMMAND_CLASS_SWITCH_BINARY_V1
14.
COMMAND_CLASS_SENSOR_MULTILEVEL_V5
15.
COMMAND_CLASS_CONFIGURATION_V1
16.
COMMAND_CLASS_SENSOR_BINARY_V1
17.
COMMAND_CLASS_MULTI_CHANNEL_ASSOCIATION_V3
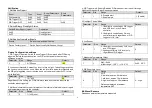
Troubleshooting
Table below lists typical problems encountered:
Symptom
Possible Cause
Recommendation
Floodlight does not
turn on for 5
seconds after
power is connected.
Power is not
connected properly.
Check if wall switch is on.
Confirm wiring is correct.
Check supply breaker / fuse.
Cannot carry out
inclusion and
association
Floodlight already
paired to another
Z-Wave Controller.
Perform a factory reset.
Floodlight flashes
on and off
The unit’s lux sensor
is being triggered off
by reflected light
Change the angle and direction of
the lamps.
Z-wave controller
cannot
communicate with
the unit
Out of range.
1. Relocate the controller closer
to the unit.
2. Install a Z-wave repeater such
as smart plugs or other AC
devices that can operate as a
Repeater.
Floodlight remains
on
PIR detector
triggered by
unknown heat
source.
1. Check time setting
2. Cover the PIR Detector with
black insulating tape. If after
the timer expires and the
floodlight turns off this
indicates that the PIR
Detector can see a moving
heat source e.g: radiator,
heater, boiler outlet, open
window, open exterior door or
moving branches or bushes
retaining heat from the
daytime period.
Manual Inclusion/Exclusion
The table below lists the several steps involved when adding or removing the unit
from the Z-wave network.
Action/Status
Description
LED indication
No node ID
The Z-Wave Controller does not
allocate a node ID to the unit.
2-second on,
2-second off for 2
minutes.
Auto Inclusion
The power is applied for the first time
and no node ID has been stored in the
module, or after executing reset. This
process times out in 30 seconds.
LED blinks rapidly
during Inclusion, LED
stops blinking when
Inclusion is complete.
Manual
Inclusion
1. Put the Z-Wave controller into
inclusion mode.
LED blinks rapidly
during Inclusion, LED
stops blinking when
Inclusion is complete
2. Press the Link button 3 times within
1.5 seconds to put the unit into
inclusion mode.
Exclusion
1. Put the Z-Wave Controller into
exclusion mode.
2. Press the Link button 3 times within
1.5 seconds to put the unit into


