


6
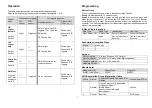
Notification
1. Notification Report
Event
Type
Event
Event Parameters
Length
Event
Parameters
First power up
0x08
0x01
0x00
PIR Trigger ON
0x07
0x08
0x00
PIR Trigger OFF
0x07
0x00
0x01
0x08
2. Switch Binary: Floodlight Status
Switch Binary Report (value)
Description
0x00
Floodlight is off
0xFF
Floodlight is on
3. Notification from other Events
Events
Z-wave commands/notification
Device Factory reset
Device Reset Locally Notification:
Group 1
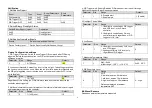
Z-wave Configuration settings
1. PIR Trigger Off period: Period to send Trigger Off command after PIR being
triggered. Before this period expires, the PIR will not be able to detect any
subsequent motion.
Parameter Size
Range
Default
1
2
8~720 secs
180
2. Lux sensor threshold: Ambient Lux level to turn on light. This setting overwrites
the Lux level set by the Lux knob. When the lux level falls below this threshold and
the PIR gets triggered, the unit emits a basic set command (value=0xFF) to turn
on its floodlight.
Parameter Size
Range
Default
2
2
10 ~ 900
50
Regardless of this setting, the PIR will always send a notification report to the
controller when triggered.
3. Multilevel sensors auto report interval: set the interval of periodic lux level report
and temperature report to the controller.
Parameter Size
Range
Default
3
2
1~1440 (min.)
10
4. PIR Trigger alert : Enable/Disables PIR alerts sent from the unit through
Notification report or Basic Report commands
Parameter Size
Range
Default
4
1
0 : Disable alert
1 : Enable alert
1 (Enable)
5.Floodlight Control Mode
Parameter
Size
Range
Default
5
1
1 : floodlight is controlled by PIR trigger
and LUX level, or by Z-wave
controller
0 : floodlight is controlled by Z-wave
controller directly, regardless of PIR
trigger or LUX level
1
6. Lux Sensor
Parameter
Size
Range
Default
6
1
0 : floodlight is controlled by LUX Level
and PIR trigger
1: lighting control via LUX level only,
regardless of PIR trigger
0
7. Measured Temperature Offset
Parameter
Size
Range
Default
7
1
0x9C - 0x64
(offset range : -10.0°C ~ +10.0°C)
0x00
:
0.0°C
8.
PIR Sensitivity Level
Parameter
Size
Range
Default
8
1
0/1/2
0: low level, approx. 6m distance
1: mid level, approx. 10m distance
2: high level, approx. 20m distance
Distance measured at ambient
temperature 68°F
2
:
High
Multilevel Sensors
Read back ambient temperature measured


