background image

39

The device is battery-operated, meaning it can be 
used flexibly and in any location.

The headlight flasher sensor should only 
be installed in locations where it can still be 

operated at a later point in time.

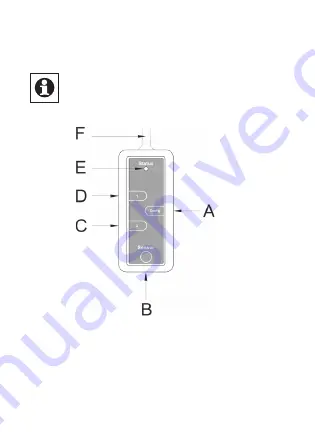
(A) Teach-in button
(B) Cable bushing for monitored wire
(C) Operating button, channel 2
(D) Operating button, channel 1
(E) Status LED
(F) Antenna

Содержание HM-Sen-EP

Страница 1: ...Montage und Bedienungs anleitung S 2 Installation and Operating Manual p 34 Lichthupensensor Funk Sensor f r elektrische Impulse Headlight flasher sensor radio sensor for electrical pulses HM Sen EP...

Страница 2: ...de Bedienungsan leitung noch drucktechnische M ngel oder Druck fehler aufweist Die Angaben in dieser Bedienungs anleitung werden jedoch regelm ig berpr ft und Korrekturen in der n chsten Ausgabe vorge...

Страница 3: ...atic Komponenten 11 7 Montage 12 7 1 Allgemeine Montagehinweise 12 7 2 Montage im Fahrzeug 14 8 Bedienung und Einstellung 19 8 1 Allgemeines zu Blinkfolgen 19 8 2 Einstellen von Blinkfolgen 20 8 3 L s...

Страница 4: ...Betrieb nehmen Bewahren Sie die Anleitung zum sp teren Nach schlagen auf Wenn Sie das Ger t anderen Personen zur Nutzung berlassen bergeben Sie auch diese Bedienungs anleitung Benutzte Symbole Achtun...

Страница 5: ...nen Im Motorraum ist insbesondere auf Riemen L fter und die Abgasanlage zu achten Au erdem d rfen durch das HomeMatic Ger t keine Lufteinl sse versperrt werden Es ist weiter darauf zu achten dass das...

Страница 6: ...rische Garagentor zu ffnen oder zu schlie en F r fortgeschrittene Nutzer ist es dar ber hinaus m glich die optischen Quittungssignale des Autos bei Bedienen der Zen tralverriegelung auszuwerten und so...

Страница 7: ...und ortsunabh ngig einsetzbar Der Lichthupensensor sollte nur dort ein gebaut werden wo er zu einem sp teren Zeitpunkt noch bedienbar ist A Anlerntaste B Kabeldurchf hrung f r berwachte Leitung C Bedi...

Страница 8: ...ausgeliefert Dar ber hinaus ist die Funktion des Ger tes ber ein Programmierger t und Software konfigurierbar Welcher weitergehende Funktions umfang sich damit ergibt und welche Zusatzfunkti onen sic...

Страница 9: ...der Montage innerhalb eines Fahrzeugs kann stark von der im Freifeld abweichen Au er der Sendeleistung und den Empfangseigenschaften der Empf nger spielen Umwelteinfl sse wie Luftfeuch tigkeit neben...

Страница 10: ...ann siehe Abschnitt 8 Kanal 1 ist mit einer Einschaltdauer von 1 Sekunde f r das Ansteuern eines Garagentores vorgesehen Taster Kanal 2 ist mit einer Einschaltdauer von 3 Minuten z B f r eine Au enbel...

Страница 11: ...als Die Status LED blinkt nun orange das Ger t befindet sich im Anlernmodus Hat die anzulernende Komponente das Anlernen best tigt leuchtet die Status LED des Lichthu pensensors gr n und das Anlernen...

Страница 12: ...uchtung wird bei modernen Kfz blicherweise mit einem modulierten Strom betrieben der die Funktion des Lichthupensensors beeintr chtigen kann Daher ist Gl hlampenlicht z B von H7 Fern scheinwerfern Neb...

Страница 13: ...er Lichthupensensor vor Feuchtigkeit gesch tzt werden muss also entweder wasserdicht eingepackt oder an einem garantiert trockenen Ort platziert ist Der Lichthupensensor sollte nicht in der N he des S...

Страница 14: ...an der Farbe erkennen kann Alternativ kann man die ben tigte Leitung mit einer Pr flampe suchen Tabelle 1 Leitungsfarben vieler deutscher Kfz Hersteller Klemmen bezeichnung Beschreibung Farbe L Blinke...

Страница 15: ...ben auf der Ger te r ckseite Der Stromsensor L 1 befindet sich am unteren Ende der Platine Nehmen Sie die gew nschte Leitung aus dem Kabelbaum heraus formen Sie diese mit der erforderlichen Windungsan...

Страница 16: ...en tigt Ziehen Sie nicht mit Gewalt an der Leitung Um die ben tigte L nge zu erhalten muss ggf ein anderer Einbauort gesucht werden an dem mehr Leitungsl nge zur Verf gung steht Wenn man ein Garagento...

Страница 17: ...r Fahrt erh ht Wenn man sich sicher ist dass sich die Sequenz zum ffnen des Tores von den blichen Vorg ngen w hrend der Fahrt ausreichend unterscheidet kann man den Lichthupensensor so betreiben Legen...

Страница 18: ...18 ca 1 W ca 100 mA 10 Windungen ca 10 W ca 1 A 1 Windung ca 100 W ca 10 A 3 cm Abstand So hat eine Lampe vom Fernlicht z B 60 W F r eine solche Lampe w rde also eine Windung ausreichen...

Страница 19: ...or Feuchtigkeit zu sch tzen Beachten Sie dabei die Gefahrenhinweise siehe Abschnitt 2 Setzen Sie zum Betrieb des Lichthupen sensors nur hochwertige Alkaline Batterien LR03 ein Diese sind auslaufsicher...

Страница 20: ...r sind Generell sollte man f r sicherheitsrelevante Funktionen wie z B das ffnen von T ren und Toren m glichst lange Sequenzen mit kleinen Toleranzen verwenden Einfache Sequenzen mit gro en Toleranzen...

Страница 21: ...leuchtet die LED f r 20 Sekunden orange F hren Sie die gew nschte Blinkfolge aus indem Sie die Zentralverriegelung oder die Lichthupe bet tigen Die LED beginnt f r etwa 20 Sekunden orange zu leuchten...

Страница 22: ...e 1 mit 1 Sekunde die Toleranz betr gt somit 0 5 Se kunden Die Blinkfolge und die Toleranz k nnen direkt ber das Ger t oder die Kanalparameter der HomeMatic WebUI eingestellt und ver ndert werden In V...

Страница 23: ...leranzwert Anschlie end werden die Mittel werte von der gespeicherten und der wiederhol ten Blinkfolge als neue Blinkfolge gespeichert Die Status LED verlischt wenn Sie nach der zwei ten Eingabe der B...

Страница 24: ...Da sich die Blinkfolge bei der zweiten Bet tigung der Zentralverriegelung kaum ver ndert ergibt sich eine sehr enge Toleranz Auf diese Weise sendet der Lichthupensensor keine Signale beim Blinken w h...

Страница 25: ...ur Identifikation der Blinkfolge Ist die eingestellte Blinkfolge z B zweimal Blinken dann wird bei dreimal Blinken aufgrund der Warte zeit kein Schaltbefehl gesendet 8 3 L schen von Sequenzen Falls ei...

Страница 26: ...senden Durch die angelernte Blinkfolge wird mit einer Verz gerung von min 1 Sekunde der Schaltbefehl f r den jeweiligen Kanal ausgesendet Dabei leuchtet die Status LED orange solange die Funk bertragu...

Страница 27: ...beginnt nun schneller rot zu blinken Wollen Sie das Zur cksetzten abbrechen k nnen Sie das mit einem kurzen Tastendruck auf die Anlerntaste tun oder Sie warten 15 Sekunden In beiden F llen stoppt das...

Страница 28: ...das Ger t zun chst einen Selbsttest durch Dies dauert ca 2 Sekunden Danach erfolgt die Initialisierung Den Abschluss bildet die LED Test Anzeige rot gr n orange jeweils f r eine halbe Sekunde Tritt e...

Страница 29: ...lungen Batteriespannung zu gering Im Anlernmodus 2 Sek rotes Aufleuchten Kein direktes Anlernen m glich Zentralen sperrung s u Beim Zur cksetzen in den Auslieferungs zustand dauerhaftes rotes Blinken...

Страница 30: ...bereits an eine Zen trale angelernt so ist er f r direktes Anlernen gesperrt Der Anlernmodus kann zwar aktiviert werden nach Dr cken einer Bedientaste leuchtet die Status LED jedoch f r 2 Sekunden ro...

Страница 31: ...ren Verschmutzungen kann das Tuch leicht mit lauwarmem Wasser angefeuchtet werden Verwenden Sie keine l sungsmittelhaltigen Reinigungsmittel das Kunststoffgeh use und die Beschriftung k nnen dadurch a...

Страница 32: ...ind entsprechend der Richtlinie ber Elektro und Elektronik Altger te ber die rtlichen Sammelstellen f r Elektronik Altger te zu entsorgen Das CE Zeichen ist ein Freiverkehrszeichen das sich ausschlie...

Страница 33: ...33...

Страница 34: ...nt of the publisher Typographical and printing errors cannot be excluded However the information contained in this manual is reviewed on a regular basis and any necessary corrections will be implement...

Страница 35: ...Matic components 42 7 Installation 44 7 1 General notes on installation 44 7 2 Installation in a vehicle 46 8 Operation and setting 51 8 1 General information on flashing sequences 51 8 2 Setting flas...

Страница 36: ...eMatic components Keep the manual so you can refer to it at a later date should you need to If you hand over the device to other persons for use please hand over the operating manual as well Symbols u...

Страница 37: ...f the vehicle In the engine area pay particular attention to the belts fans and exhaust system Additionally the HomeMatic device must not block any air inlets You must also ensure that the HomeMatic d...

Страница 38: ...electrical garage door can be opened or closed For advanced users it is also possible for the visual acknowledgement signals of the car to be evaluated during operation of the central locking mechani...

Страница 39: ...n any location The headlight flasher sensor should only be installed in locations where it can still be operated at a later point in time A Teach in button B Cable bushing for monitored wire C Operati...

Страница 40: ...configuration The functionality of the device can also be config ured with a programming device and software The additional functions that can be made available in this way and the supplementary func...

Страница 41: ...in buildings or in the case of installation in a vehicle can deviate greatly from open air distances Besides the transmitting power and the reception characteristics of the receiver environmental fact...

Страница 42: ...can have an individual flashing sequence set for it see Section 8 Channel 1 has an ON time of 1 second for controlling a garage door pushbutton Channel 2 has an ON time of 3 minutes e g for switching...

Страница 43: ...ED will now flash orange and the device will enter teach in mode Once the component being taught in has con firmed that teaching in has been carried out the status LED on the headlight flasher sensor...

Страница 44: ...ually operated by means of a modulated current which can have a negative effect on the function of the headlight flasher sensor For this reason conventional bulb lights such as the kinds used for H7 h...

Страница 45: ...e area you must make sure that it is protected against moisture by either wrapping it up so that it is watertight or positioning it in a location that is guaranteed to be dry The headlight flasher sen...

Страница 46: ...ich wire you need based on its colour Alterna tively you can search for the required wire using an indicator lamp Table 1 Wire colours used by many German vehicle manufacturers Terminal designation De...

Страница 47: ...two housing screws on the rear of the device The current sensor L 1 is located on the lower part of the PCB Remove the required wire from the wire harness create a loop of around 1 cm in diameter from...

Страница 48: ...st it even once Do not pull forcefully on the wire It may be necessary to find another installation location with a longer wire in order to obtain the length you need If you wish to control a garage d...

Страница 49: ...ses the risk of unintentional triggering during driving If you are sure that the sequence for opening the door is sufficiently different from standard processes used during driving you can use the hea...

Страница 50: ...mA 10 twists Approx 10 W approx 1 A 1 twist Approx 100 W approx 10 A 3 cm clearance This means that one twist would be sufficient for a 60 W high beam lamp for example Single twist Multiple twists Sin...

Страница 51: ...st moisture Observe the hazard information when doing this see Section 2 Only use high quality alkaline batteries LR03 for operating the headlight flasher sensor These are leak proof and have a long s...

Страница 52: ...which are as long as possible and have low tolerance values should be used for safety related functions such as opening doors and gates Simple sequen ces with high tolerance values may be triggered ac...

Страница 53: ...nnel the LED will light up orange for 20 seconds Perform the required flashing sequence by activating the central locking mechanism or headlight flasher The status LED starts to light up orange for ar...

Страница 54: ...shortest value is pause 1 which is 1 second long so the tolerance value is 0 5 seconds The flashing sequence and tolerance may be set and changed directly using the device or the channel parameters o...

Страница 55: ...tween the individual pulse and pause lengths in relation to the values stored previously as the new tolerance value The mean values based on the stored and repeated flashing sequences are then stored...

Страница 56: ...he flashing sequence barely changes when the central locking mechanism is activated for a second time the tolerance level is very low This prevents the headlight flasher sensor from sending any signal...

Страница 57: ...ng sequence If the set flashing sequence consists of activating the indicator light twice for example then this delay stops a switching command from being sent if the indicator light is activated thre...

Страница 58: ...uence that has been taught in plus a delay of at least 1 second results in a switch ing command being transmitted for the relevant channel During this process the status LED lights up orange for as lo...

Страница 59: ...art to flash red faster If you want to cancel the reset procedure you can either press the teach in button briefly or wait for 15 seconds In both cases the red flash ing will stop Release the button T...

Страница 60: ...will take about two seconds Initialisation is carried out once the self test has finished The LED test display will indicate that initialisation is complete the LED will light up red green and orange...

Страница 61: ...ery voltage too low In teach in mode LED lights up red for 2 sec Direct teaching in not possible central control unit block see below When resetting to the initial state permanent red flashing Resetti...

Страница 62: ...n taught in to a central control unit it is blocked for direct teach in Although teach in mode can be activated when an operating button is pressed the status LED lights up red for two sec onds to sig...

Страница 63: ...d dry You may dampen the cloth a little with lukewarm water in order to remove more stubborn marks Do not use any detergents containing solvents as they could corrode the plastic housing and label 13...

Страница 64: ...electronic equipment in compliance with the Waste Electrical and Electronic Equipment Directive The CE Marking is simply an official symbol relating to the free movement of a product it does not warra...

Отзывы: