background image

44

6.3 Mounting the push button 

You can either use screws or adhesive strips to mount 
the Homematic push button to a wall in the frame 
supplied or integrate it into an existing switch (see sec. 
6.4 for suitable switches).

6.3.1 Adhesive strip mounting 

•  Choose a site for installation. The surface on 

which you are mounting the push button must be 
clean, dry and greaseless.

•  For mounting of the assembled push button, 

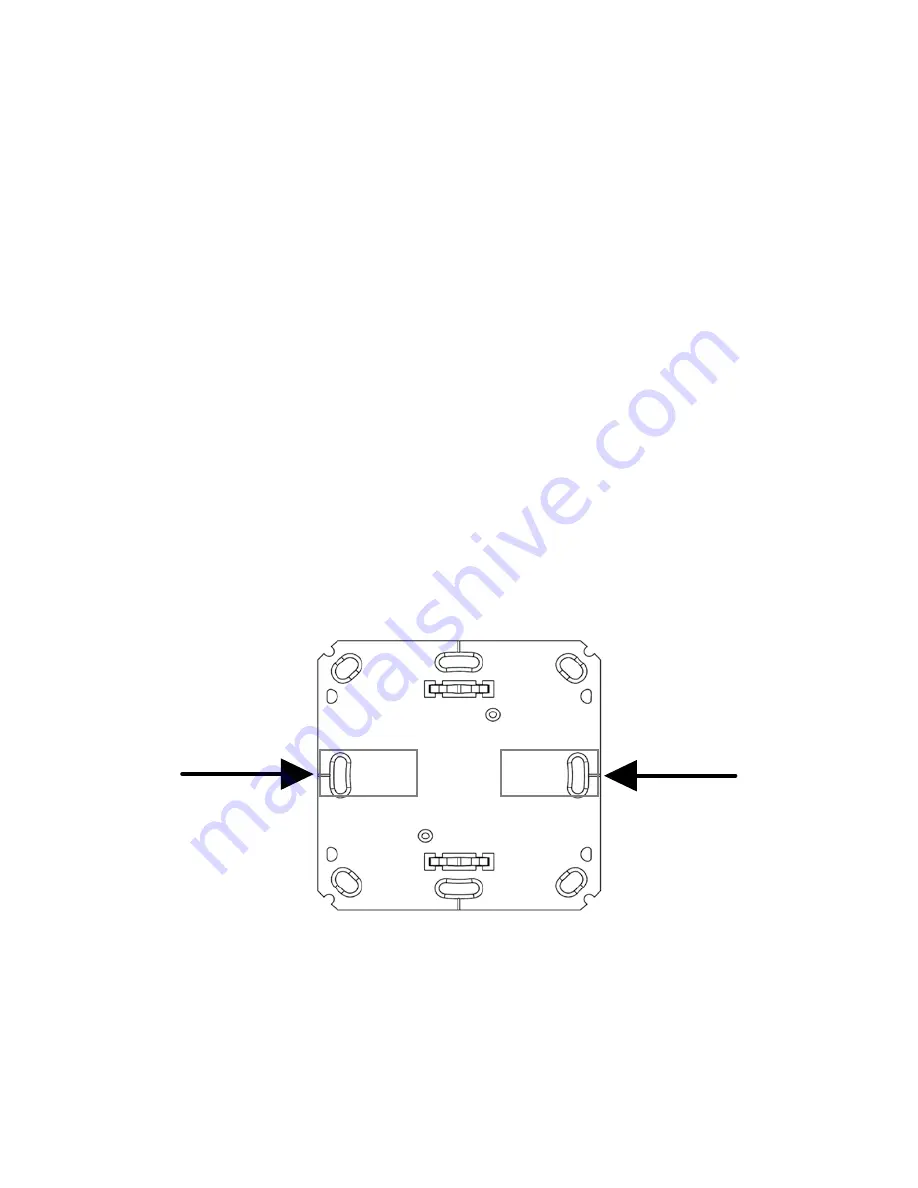
attach the adhesive strips to the back side of the 
mounting plate. You should be able to read the 

letters on the back side (according to figure).

<PA66> 

• 

Remove the protective film from the adhesive strip.

•  Press the assembled push button with the back 

side to the wall in the position where it should 
subsequently be attached.

Содержание HM-PB-6-WM55

Страница 1: ...Montage und Bedienungsanleitung S 2 Installation and operating manual p 35 Funk Wandtaster 6 fach Wireless Push Button 6 channel HM PB 6 WM55...

Страница 2: ...werden Es ist m glich dass das vorliegende Handbuch noch drucktechnische M ngel oder Druckfehler aufweist Die Angaben in diesem Handbuch werden jedoch regelm ig berpr ft und Korrekturen in der n chste...

Страница 3: ...6 3 Wandtaster montieren 11 6 4 Montage in Mehrfachkombinationen 13 7 Inbetriebnahme 16 7 1 Batterien einlegen wechseln 16 7 2 Verhalten nach Batteriewechsel 17 7 3 Anlernen 18 8 Bedienung 25 9 Zur ck...

Страница 4: ...sanleitung Benutzte Symbole Achtung Hier wird auf eine Gefahr hingewiesen Hinweis Dieser Abschnitt enth lt zus tzliche wichtige Informationen 2 Gefahrenhinweise Betreiben Sie das Ger t nur in Innenr u...

Страница 5: ...bzw auszuschalten und Rollladen rauf bzw runter zu fahren Die Funktionen der 6 Tasten k nnen frei gew hlt werden An eine Taste k nnen dabei mehrere Ger te angelernt werden Dadurch k nnen ber einen ei...

Страница 6: ...rlich Die Wandmontage kann im mitgelieferten Rahmen erfolgen Zus tzlich ist es auch m glich den Homematic Wandtaster in bestehende Schalterserien zu integrieren siehe Abschnitt 6 4 Bedienelemente A B...

Страница 7: ...Systems und arbeitet mit dem bidirektionalen Home matic Funkprotokoll Alle Ger te werden mit einer Standardkonfiguration ausgeliefert Dar ber hinaus ist die Funktion des Ger tes ber ein Programmierge...

Страница 8: ...Die Reichweite in Geb uden kann stark von der im Freifeld abweichen Au er der Sendeleistung und den Empfangseigenschaf ten der Empf nger spielen Umwelteinfl sse wie Luftfeuchtigkeit neben baulichen Ge...

Страница 9: ...ben 3 0 x 30 mm 2 St ck D bel 5 mm 2 LR03 Batterien Micro AAA LR03 Beschriftungsvorlagen 6 2 Beschriftungsvorlage einlegen wechseln Um die beiliegende Beschriftungsvorlage einzulegen bzw zu wechseln g...

Страница 10: ...er auf die Elektro nikeinheit auf Achten Sie darauf dass die Rastna sen in die daf r vorgesehenen L cher einrasten ON OFF ON OFF ON OFF Die beigef gte Beschriftungsvorlage sowie eine Vorlage f r indiv...

Страница 11: ...tung der kompatiblen Schalterserien siehe Abschnitt 6 4 integrieren 6 3 1 Klebestreifen Montage W hlen Sie einen beliebigen Ort zur Befestigung aus Der Untergrund muss sauber trocken und fettfrei sein...

Страница 12: ...tellen Sie sicher dass in der Wand keine Lei tungen verlaufen Halten Sie die Montageplatte an die gew nschte Montageposition Achten Sie darauf dass der Pfeil auf der Vorderseite der Montageplatte nach...

Страница 13: ...R ck seite der Elektronikeinheit nach oben zeigen und die Klammern der Montageplatte in die ffnungen der Elektronikeinheit rasten 6 4 Montage in Mehrfachkombinationen Sie k nnen den Wandtaster sowohl...

Страница 14: ...Arc M Star M Plan JUNG A 500 AS 500 A plus A creation Sollten f r die Montage bzw Installation des Ger tes nderungen oder Arbeiten an der Hausinstallation z B Ausbau berbr cken von Schalter oder Steck...

Страница 15: ...an einen Elektroinstallateur 1 Erforderliche Fachkenntnisse f r die Installa tion F r die Installation sind insbesondere folgende Fach kenntnisse erforderlich die anzuwendenden 5 Sicherheitsregeln Fre...

Страница 16: ...einlegen wechseln In montiertem Zustand l sst sich der Taster ein fach aus dem Rahmen und von der Montageplatte ziehen Fassen Sie den Taster seitlich an und zie hen sie ihn aus dem Rahmen heraus Ein...

Страница 17: ...start ca 2 Sekunden durch Die LED blinkt kurz rot gr n orange auf LED Test Anzeige Danach erfolgt die Initialisierung Bei niedriger Batteriespannung wird sofern es der Spannungswert noch zul sst trotz...

Страница 18: ...r Homematic System inte griert werden und mit anderen Homematic Ger ten kommunizieren kann muss das Ger t zun chst angelernt werden Sie k nnen den Wandtaster direkt an andere Homematic Ger te oder an...

Страница 19: ...an und ziehen Sie ihn aus dem Rahmen heraus Drehen Sie den Taster auf die R ckseite Halten Sie den Wandtaster in einem Abstand von min 1 m vom Aktor entfernt Der Wandtaster und der Aktor m ssen nachei...

Страница 20: ...Dr cken einer linken Taste z B die Funktion Aus und f r die rechte Taste automatisch die Funktion Ein angelernt wird Dies gilt ebenso f r die anderen beiden Tastenpaare Bringen Sie jetzt den Aktor in...

Страница 21: ...eits an eine Zentrale angelernt und damit f r direktes Anlernen gesperrt kann er zwar wie oben beschrieben in den Konfigurationsmodus gebracht werden nach Dr cken einer Bedientaste leuchtet die Ger te...

Страница 22: ...cm einhalten Zum Anlernen Ihres Ger tes an die Zentrale gehen Sie wie folgt vor ffnen Sie die WebUI Bedienoberfl che in Ihrem Browser Klicken Sie auf den Button Ger te anler nen im rechten Bildschirmb...

Страница 23: ...gelernte Ger te konfigurieren beschrieben Neu angelernte Ger te konfigurieren Nachdem Sie Ihr Ger t an die Homematic Zentrale angelernt haben wird es in den Posteingang ver schoben Hier muss Ihr Ger t...

Страница 24: ...det sich nur der Wandtaster im Anlern modus Bringen Sie das anzulernende Ger t eben falls in den Anlernmodus Schnelles oranges Blinken gefolgt von 1 s gr nes oder 2 s rotes Leuchten je nach Erfolg Bei...

Страница 25: ...ei hat die jeweils rechte Taste die Funktion An Heller Hoch und die linke Taste Aus Dunkler Runter Mit dem Homematic Wandtaster k nnen Sie Licht an bzw ausschalten TP 1 Licht heller bzw dunkler dimmen...

Страница 26: ...u r ckzusetzen gehen Sie wie folgt vor Halten Sie die Anlerntaste mindestens 5 Sekunden gedr ckt Die LED des Wandtasters beginnt lang sam rot zu blinken A 5 s Wollen Sie an dieser Stelle das Zur ckset...

Страница 27: ...es gr nes oran ges Blinken vergleiche Kapitel 6 1 3 Verhalten nach Batteriewechsel ist der Wandtaster zur ck gesetzt und einsatzbereit M gliche Fehlermeldungen Der nachfolgende Fehler kann nur auftret...

Страница 28: ...tes gr nes und oranges Blinken LED Test Anzeige Nachdem die Test Anzeige erloschen ist k nnen Sie fort fahren 5 x kurzes rotes Blinken Batterie fast leer Tauschen Sie die Batterie aus Kapitel 7 1 2 1...

Страница 29: ...unkpart ner Bringen Sie das anzulernende Ger t in den An lernmodus Schnelles oranges Blinken Konfigura tions oder Anlernmodus Daten werden empfangen Warten Sie bis der Vorgang be endet ist LED blinkt...

Страница 30: ...r 1 s gr n bei fehlerhafter bertragung f r 2 s rot auf Bei fehlerhafter bertragung versuchen es Sie bitte erneut 1 s gr nes Leuchten Alle Aktoren haben den letzten bidirek tionalen Befehl best tigt Si...

Страница 31: ...Cycle berschritten Der Duty Cycle beschreibt eine gesetzlich geregelte Begrenzung der Sendezeit von Ger ten im 868 MHz Bereich Das Ziel dieser Regelung ist es die Funktion aller im 868 MHz Bereich ar...

Страница 32: ...s Ger tes u ern Nach kurzer Zeit max 1 Stunde ist die Funktion des Ge r tes wiederhergestellt 11 Wartung und Reinigung Das Produkt ist f r Sie bis auf einen eventuell erfor derlichen Batteriewechsel w...

Страница 33: ...ebensdauer ca 5 Jahre Schutzart IP20 Umgebungstemperatur 10 bis 55 C Abmessungen 85 5 x 85 5 x 21 5 mm Abmessungen Tastereinheit 55 x 55 x 20 mm Gewicht 70 g ohne Batterien Funkfrequenz 868 3 MHz Empf...

Страница 34: ...nd entsprechend der Richtlinie ber Elektro und Elektronik Altger te ber die rtlichen Sammelstellen f r Elektronik Altger te zu entsorgen Das CE Zeichen ist ein Freiverkehrszei chen das sich ausschlie...

Страница 35: ...f the publisher It is quite possible that this manual has printing errors or defects The details provided in this manual are checked regularly and corrections are done in the next edition We do not as...

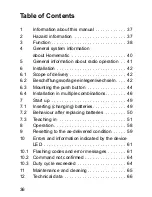
Страница 36: ...chseln 42 6 3 Mounting the push button 44 6 4 Installation in multiple combinations 46 7 Start up 49 7 1 Inserting changing batteries 49 7 2 Behaviour after replacing batteries 50 7 3 Teaching in 51 8...

Страница 37: ...mbols used Attention This indicates a hazard Note This section contains additional important information 2 Hazard information This device is to be operated indoors only and keep away from the influenc...

Страница 38: ...and shutters can be moved up or down The functions of the 6 buttons can be freely configured A single button can be taught in to work with one or more componen ts At the push of a button several func...

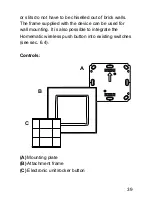
Страница 39: ...lls The frame supplied with the device can be used for wall mounting It is also possible to integrate the Homematic wireless push button into existing switches see sec 6 4 Controls A B C A Mounting pl...

Страница 40: ...vice is a part of the Homematic smart home system and works with the bidirectional Homematic wireless protocol All devices are delivered in a stan dard configuration The functionality of the device ca...

Страница 41: ...ces The range of transmission within buildings can greatly deviate from open air distances Be sides the transmitting power and the reception characteristics of the receiver environmental influences su...

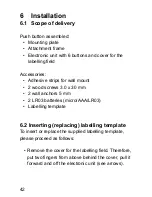
Страница 42: ...s for wall mount 2 wood screws 3 0 x 30 mm 2 wall anchors 5 mm 2 LR03 batteries micro AAA LR03 Labelling template 6 2 Inserting replacing labelling template To insert or replace the supplied labelling...

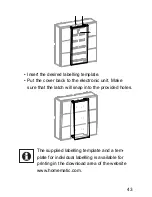
Страница 43: ...e cover back to the electronic unit Make sure that the latch will snap into the provided holes ON OFF ON OFF ON OFF The supplied labelling template and a tem plate for individual labelling is availabl...

Страница 44: ...or installation The surface on which you are mounting the push button must be clean dry and greaseless For mounting of the assembled push button attach the adhesive strips to the back side of the moun...

Страница 45: ...ng plate is pointing upwards Use a pen to mark the positions of 2 bore holes A diagonally opposite in the mounting plate on the wall The bore holes B can be used for installation with a flush mounting...

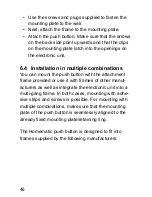
Страница 46: ...combinations You can mount the push button with the attachment frame provided or use it with frames of other manuf acturers as well as integrate the electronic unit into a multi gang frame In both cas...

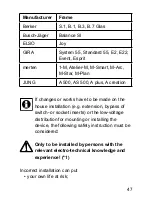
Страница 47: ...plus A creation If changes or works have to be made on the house installation e g extension bypass of switch or socket inserts or the low voltage distribution for mounting or installing the device th...

Страница 48: ...fety rules to be used Disconnect from mains Safeguard from switching on again Check that system is deenergised Earth and short circuit Cover or cordon off neighbouring live parts Select suitable tool...

Страница 49: ...according to the illustration After removing the old batteries please wait ap prox 10 seconds before inserting the new ones Insert 2 LR03 micro AAA batteries in the battery compartments making sure th...

Страница 50: ...ge value permits it Depending on the par ticular load it may be possible to send trans missions again repeatedly once the battery has been allowed a brief recovery period If you are using weak batteri...

Страница 51: ...irectly in to other Homematic devices or to the Homematic central control unit 7 3 1 Teaching directly in to Homematic devices If you would like to teach the wireless push button in to one or more Hom...

Страница 52: ...utton and the actuator have to be put into teach in mode one after the other Press the teach button A shortly The configuration mode is indicated with a flashing green device LED Turn the electronic u...

Страница 53: ...right button automatically This also applies to the other two pairs of buttons Now the actuator has to be put into teach mode If teaching of rocker buttons is successful it is indicated with an illumi...

Страница 54: ...tion mode as described above but the device LED will light up red for 2 seconds when a control button is pressed Direct teach in is no longer possible for other devices 7 3 2 Teaching in to a Homemati...

Страница 55: ...the central control unit pro ceed as follows Open the WebUI user interface in your browser Click the Teach in devices button on the right hand side of the screen The teach in mode will be started auto...

Страница 56: ...ht in devices Configuring newly taught in devices Once you have taught your device in to the Homema tic central control unit it will be moved to the inbox Here you must configure the device and its as...

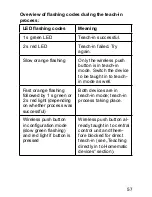
Страница 57: ...t in to teach in mode as well Fast orange flashing followed by 1 s green or 2 s red light depending on whether process was successful Both devices are in teach in mode teach in process taking place Wi...

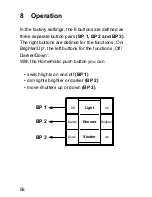
Страница 58: ...The right buttons are defined for the functions On Brighter Up the left buttons for the functions Off Darker Down With the Homematic push button you can switch lights on and off BP 1 dim lights bright...

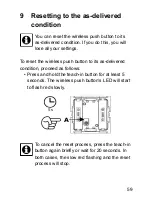
Страница 59: ...reset the wireless push button to its as delivered condition proceed as follows Press and hold the teach in button for at least 5 seconds The wireless push button s LED will start to flash red slowly...

Страница 60: ...Behaviour after repla cing batteries the wireless push button will be reset and ready for operation Possible error messages The errors listed below can only occur if you have taught the wireless push...

Страница 61: ...t display Once the test display has stop ped you can continue 5 x short red flashes Battery almost empty Replace the battery Section 6 1 2 1 x long 2 x short red flashes The wireless push button is de...

Страница 62: ...ode Fast orange flashing Configuration or teach in mode data being re ceived Wait until the process is com plete LED flashing red slowly Stage before resetting to fac tory settings Device is waiting f...

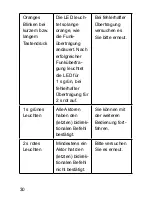
Страница 63: ...lete the LED lights up green for 1 s If transmission was not suc cessful it lights up red for 2 s If transmission was not suc cessful please try again 1 s lighting up green All actuators have confirme...

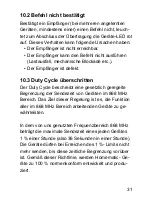
Страница 64: ...The receiver is defective 10 3 Duty cycle exceeded The duty cycle is a legally regulated limit of the trans mission time of devices in the 868 MHz range The aim of this regulation is to safeguard the...

Страница 65: ...self in the device temporarily wor king incorrectly The device will start working correctly again after a short period max 1 hour 11 Maintenance and cleaning The product is maintenance free besides po...

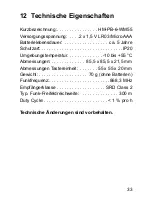
Страница 66: ...5 years Degree of protection IP20 Ambient temperature 10 to 55 C Dimensions 85 5 x 85 5 x 21 5 mm Dimensions electronic unit 55 x 55 x 20 mm Weight 70 g not incl battery Wireless frequency 868 3 MHz R...

Страница 67: ...c devices are to be disposed off in accordance with the guidelines concerning electrical and electronic devices via the local collecting point for old electronic devices The CE sign is a free trading...

Страница 68: ...68 Bevollm chtigter des Herstellers Manufacturer s authorised representative eQ 3 AG Maiburger Stra e 29 26789 Leer GERMANY www eQ 3 de...

Отзывы: