background image

5

6

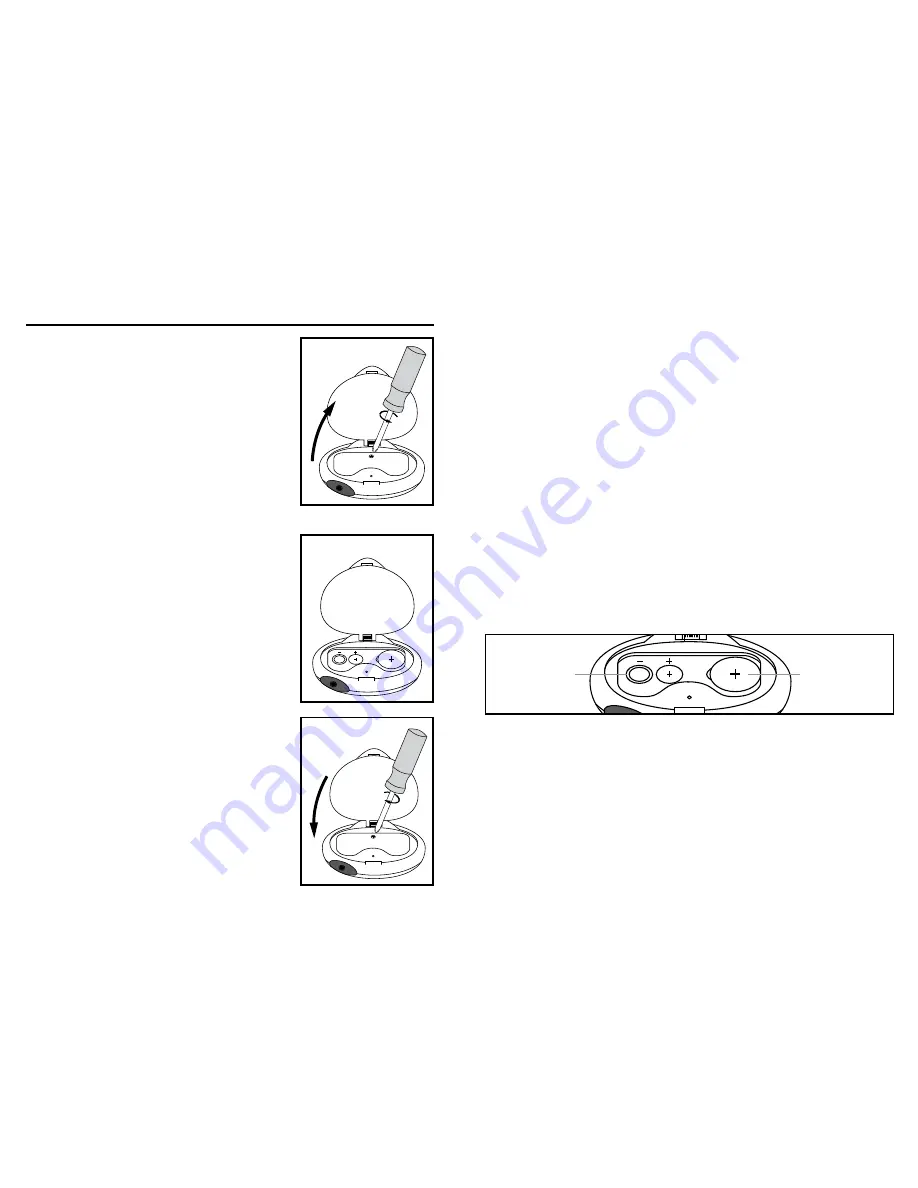
INSTALLING THE BATTERIES

1.  The battery cover is 

located under the clip 

section of this pedometer. 

Lift up the clip, unscrew 

the battery compartment 

and remove the cover. 

Fig. A 

2.  Replace the batteries 

according to the polarity 

indications inside the 

compartment. 

Battery 

Type: One 3V Lithium 

CR2032 and two 1.5V 

alkaline LR44 batteries. 

Fig. B

3.  Replace the battery 

compartment cover and 

fasten the screw. Fig. C

Fig. C

Fig. A

Fig. B

Important Notes: 

•  The batteries that are used for the FM 

radio are located on the left of the battery 

compartment. The battery that is used for 

the pedometer is located on the right side 

of the battery compartment.

•  Replace the pedometer battery when 

nothing appears on the display.

•  Replace the radio batteries when the radio 

is not functioning. 

•  Batteries are hazardous waste. Do 

not dispose of them together with the 

household garbage.


Pedometer
Battery

Radio

Batteries

•   LR44 batteries are also known as AG13 or   

 L1154 button cell batteries.

Use only CR2032 Lithium and Alkaline LR44 

batteries for this pedometer. Remove the 

batteries when the unit is not in use for the 

extended periods of time. All user information, 

including the date and time, will need to be 

reset if the pedometer battery is removed 

or replaced. Clean contact on batteries and 

in battery compartment with a soft dry cloth 

each time you install the batteries.

Содержание PDM-200

Страница 1: ... P l e ase Take A Moment N o w Register Your Product At www homedics com register Your valuable input regarding this product will help us create the products you will want in the future El manual en español empieza en la página 32 ...

Страница 2: ...5 Pedometer Modes 7 Calculating Stride Length 8 Setting the Date Time 9 Setting User Information 11 OPERATING THE PEDOMETER Time Mode 14 Walk Run Modes 15 Pacer Mode 18 Alarm Mode 19 Stopwatch Function 20 User Information Mode 20 Memory Mode 21 Backlight Feature 22 Sleep Mode 22 Using the FM Radio 23 Care Maintenance Cleaning 25 Specifications 27 Default Settings 27 Potential for Electromagnetic I...

Страница 3: ...uture reference For promoting good health including weight loss it is recommended that adults should walk 10 000 steps a day When you start to walk or run this pedometer will automatically begin displaying your steps taken distance traveled Calories burned average speed and exercise time American Heart Association 4 A D J U S T R E S E T L IG H T Earbud Jack Mode Button Reset Button Volume Control...

Страница 4: ...pedometer is located on the right side of the battery compartment Replace the pedometer battery when nothing appears on the display Replace the radio batteries when the radio is not functioning Batteries are hazardous waste Do not dispose of them together with the household garbage Pedometer Battery Radio Batteries LR44 batteries are also known as AG13 or L1154 button cell batteries Use only CR203...

Страница 5: ...IDE LENGTHS and DAILY STEP GOAL Memory Mode Displays the number of STEPS TAKEN CALORIES BURNED DISTANCE TRAVELED AVERAGE SPEED and of GOAL COMPLETED for the past 30 days CALCULATING STRIDE LENGTH In order to display accurate DISTANCE traveled you need to measure and input your stride length in inches How to calculate your Stride Length To properly calculate your stride length measure a predetermin...

Страница 6: ...e TIME and STEPS are displayed on the screen 1 While in TIME mode press and hold the ADJUST button for 2 seconds The word ADJUST will be displayed followed up the number representing the HOUR will start to blink 2 To increase the HOUR press the ADJUST button Each press will increase the number by one in a cycling manner Pressing the MODE button will confirm the entry 3 Change the MINUTE YEAR MONTH...

Страница 7: ...e displayed in Metric format 4 After selecting the unit format the number representing the WEIGHT will start to blink Press the ADJUST button to increase the selection in a cycling manner and press MODE button to confirm entry 5 Next the word WALK will be displayed on the screen followed by the number representing the WALK STRIDE LENGTH will start to blink Adjust this number in the same way as des...

Страница 8: ...at the bottom of the screen Note This information automatically resets at midnight By pressing the ADJUST button you can toggle through the following information beneath the time STEPS TAKEN How many steps you have taken in the current day OF GOAL COMPLETED How much of your daily goal you have accomplished during the current day of Run steps of Walk steps Daily goal target of Goal Completed FORMUL...

Страница 9: ... Before walking make sure your pedometer is set to WALK mode RUN MODE The pedometer uses the 16 RUN STRIDE LENGTH to determine CALORIES BURNED and DISTANCE TRAVELED Before running make sure your pedometer is set to RUN mode Refer back to the SETTING USER INFORMATION section of this manual to set your STRIDE LENGTHS Note By pressing the ADJUST button you can toggle through the following information...

Страница 10: ...ACER MODE This function will help motivate you to keep walking or running at the same pace you want during exercising by using a repeating beep sound This beeping represents the number of beeps steps per minute The default is 80 beeps per minute To turn this feature ON press the ADJUST button To customize this setting press and hold the ADJUST button for 2 seconds You will see the number represent...

Страница 11: ...ressing the ADJUST button will increase this number by 1 in a cycling manner Press the MODE button to confirm entry Repeat this step for the MINUTES Stopwatch Clear On Pause USER INFORMATION MODE In this mode you will be able to customize this pedometer with your personalized information such as AGE WEIGHT RUN and WALK STRIDE LENGTHS and DAILY GOAL STOPWATCH FUNCTION To use the stopwatch during yo...

Страница 12: ...mation from past days other information such as CALORIES BURNED DISTANCE TRAVELED AVERAGE SPEED EXERCISE TIMER and OF GOAL COMPLETED can be accessed in a cycling manner by pressing the RESET button To clear the memory press and hold the MODE and RESET buttons for 3 seconds to erase all data stored in memory BACKLIGHT FEATURE To help view the pedometer screen in darker lighting conditions this pedo...

Страница 13: ...est FM frequency press the RADIO RESET button located on the front of the device Note By removing the earbuds connector from the jack on the pedometer the radio will automatically turn OFF If at any time you insert the earbuds and you don t hear any sound follow the below steps Make sure the volume is loud enough for you to hear Press the RADIO SCAN button to check if you hear the radio changing f...

Страница 14: ... for a long time Follow local ordinances and recycling instructions regarding disposal or recycling of the device and device components including batteries If the unit is stored near freezing allow it to acclimate to room temperature before use Do not immerse the unit in water as this will result in damage to the unit Do not wrap the earbuds around any part of the body To avoid accidental strangul...

Страница 15: ...TIALFORELECTROMAGNETIC INTERFERENCE To avoid inaccurate results caused by electromagnetic interference between electrical and electronic equipment do not use the device near a cell phone or microwave oven This device complies with Part 15 of the FCC Rules Operation is subject to the following two conditions 1 this device may not cause harmful interference and 2 this device must accept any interfer...

Страница 16: ...ted by HoMedics LLC 3000 Pontiac Trail Commerce Township MI 48390 Printed in China LIMITED ONE YEAR WARRANTY HoMedics sells its products with the intent that they are free of defects in manufacture and workmanship for a period of one year from the date of original purchase except as noted below HoMedics warrants that its products will be free of defects in material and workmanship under normal use...

Страница 17: ...OR PARTS WHICH ARE FOUND TO BE DEFECTIVE WITHIN THE EFFECTIVE PERIOD OF THE WARRANTY NO REFUNDS WILL BE GIVEN IF REPLACEMENT PARTS FOR DEFECTIVE MATERIALS ARE NOT AVAILABLE HOMEDICS RESERVES THE RIGHT TO MAKE PRODUCT SUBSTITUTIONS IN LIEU OF REPAIR OR REPLACEMENT This warranty does not extend to the purchase of opened used repaired repackaged and or resealed products including but not limited to s...

Страница 18: ...M 200B Podómetro De Lujo Tridimensional T ó m ese un momento aho r a Registre su producto en www homedics com Su valioso aporte sobre este producto nos ayudará a crear los productos que desee en el futuro ...

Страница 19: ...os 50 Modo Alarma 51 Función Cronómetro 52 Modo Información de usuario 52 Modo Memoria 53 Característica de luz de fondo 54 Modo Sleep hibernación 54 Uso de la radio FM 55 Cuidado mantenimiento y limpieza 57 Especificaciones 59 Configuración predeterminada 59 Potencial de interferencia e lectromagnética 60 Garantía limitada por 1 año 62 33 Podómetro de lujo tridimensional Establezca metas y contro...

Страница 20: ...otal y un almacenamiento de memoria de 7 días entre muchas otras características útiles Lea con atención este manual antes de usar el podómetro Le sugerimos que conserve este manual para referencia futura Para fomentar la buena salud incluida la pérdida de peso se recomienda que los adultos caminen 10 000 pasos por día Cuando comience a caminar o correr este podómetro automáticamente mostrará los ...

Страница 21: ...to de las baterías La batería que se usa para el podómetro se encuentra en el lado derecho del compartimiento de las baterías Cambie la batería del podómetro cuando no aparezca nada en la pantalla Cambie las baterías de la radio cuando la radio no funcione Las baterías son desechos peligrosos No las deseche junto con la basura del hogar Las baterías LR44 también se conocen como baterías de botón A...

Страница 22: ...uario Muestra la EDAD el PESO las LONGITUDES DE PASOS AL CAMINAR y CORRER Y LA META DE PASOS DIARIA Modo Memory memoria Muestra la CANTIDAD DE PASOS REALIZADOS LAS CALORÍAS QUEMADAS LA DISTANCIA RECORRIDA LA VELOCIDAD PROMEDIO y EL PORCENTAJE DE META COMPLETADO durante los últimos 30 días distancia recorrida en pies cantidad de pasos realizados longitud de pasos en pies Registre su longitud de pas...

Страница 23: ...ra presione y mantenga presionado el botón ADJUST ajuste durante 2 segundos Se visualizará la palabra ADJUST ajuste en pantalla y a continuación comen zará a parpadear el número que representa la HORA 2 Para aumentar la hora presione el botón ADJUST ajuste Cada vez que lo presione aumentará en uno el número de manera cíclica Al presionar el botón MODE modo se confirmarán los datos ingresados 3 Cam...

Страница 24: ...rico 4 Después de seleccionar el formato de las unidades de medida comenzará a parpadear el número que representa el PESO Presione el botón ADJUST ajuste para aumentar la selección de manera cíclica y el botón MODE modo para confirmar los datos ingresados 5 A continuación aparecerá en pantalla la palabra WALK caminar y comenzará a parpadear el número que representa la LONGITUD DE PASOS AL CAMINAR ...

Страница 25: ...a información se reajusta automáticamente a la medianoche Si presiona el botón ADJUST ajuste puede alternar la siguiente información que se encuentra debajo de la hora STEPS TAKEN pasos realizados cuántos pasos ha realizado en el día actual OF GOAL COMPLETED porcentaje de meta completado qué porcentaje de su meta diaria ha logrado durante el día actual FÓRMULA Cant de pasos corridos cant depasos c...

Страница 26: ...é en el modo WALK caminar MODO RUN correr El podómetro usa la LONGITUD DE PASOS AL CORRER para determinar las CALORÍAS QUEMADAS y la DISTANCIA RECORRIDA Antes de correr asegúrese de que su podómetro esté ajustado en el modo RUN correr Vuelva a la sección CONFIGURACIÓN DE LA INFORMACIÓN DE USUARIO de este manual para establecer sus LONGITUDES DE PASOS Nota Si presiona el botón ADJUST ajuste puede a...

Страница 27: ...tón ADJUST ajuste para aumentar la selección de manera cíclica Presione el botón MODE modo para confirmar nuevamente los datos ingresados Nota Puede continuar usando el modo PACER marcar pasos mientras usa otros modos MILE milla La distancia RECORRIDA se encuentra en la línea del medio y los PASOS REALIZADOS se encuentran en la línea inferior MPH o KM H La VELOCIDAD PROMEDIO se encuentra en la lín...

Страница 28: ...r el botón ADJUST ajuste aumentará el número en 1 de manera cíclica Presione el botón MODE modo para confirmar los datos ingresados Repita este paso para los minutos FUNCIÓN STOPWATCH cronómetro Para usar el cronómetro durante su entrenamiento presione el botón ADJUST ajuste para comenzar y colocar en pausa el reloj Presione el botón RESET reajuste para reiniciar el reloj MODO USER INFORMATION inf...

Страница 29: ...tener acceso a otro tipo de información como por ejemplo CALORÍAS QUEMADAS DISTANCIA RECORRIDA VELOCIDAD PROMEDIO TIEMPO DE EJERCICIO Y PORCENTAJE DE META COMPLETADO de manera cíclica presionando el botón RESET reajuste Para borrar la memoria presione y sostenga el botón MODE modo y RESET reajuste durante 3 segundos para borrar todos los datos almacenados en la memoria FUNCIÓN DE LUZ DE FONDO Para...

Страница 30: ...s bajas presione el botón RADIO RESET reajuste de radio que se encuentra en la parte delantera del dispositivo NOTA Si retira el conector de los audífonos del enchufe de entrada del podómetro la radio se apagará automáticamente Si en algún momento se coloca los audífonos y no escucha ningún sonido siga los pasos que se incluyen a continuación Asegúrese de que el volumen esté lo suficientemente fue...

Страница 31: ...erca de lugares fríos permita que se adapte a la temperatura ambiente antes de usarla Cumpla con las ordenanzas locales y siga las instrucciones de reciclaje relacionadas con el desecho o reciclaje del dispositivo y de los componentes del dispositivo incluidas las baterías No sumerja la unidad en agua ya que puede dañarla No enrolle los auriculares en cualquier parte del cuerpo Para evitar una est...

Страница 32: ...LDEINTERFERENCIA ELECTROMAGNÉTICA Para evitar resultados inexactos debido a la interferencia electromagnética entre los equipos eléctricos y electrónicos no use el dispositivo cerca de un teléfono celular o un horno microondas Este dispositivo cumple con la sección 15 de las normas de la FCC El funcionamiento está sujeto a las dos condiciones siguientes 1 este dispositivo no puede causar interfere...

Страница 33: ...n defectos de material ni de mano de obra en condiciones de uso y servicio normales Esta garantía se extiende únicamente a consumidores y no a minoristas Para obtener servicio de garantía en su pro ducto HoMedics póngase en contacto con un Representante de Relaciones con el Consumidor por el teléfono 1 800 466 3342 para obtener asistencia Asegúrese de tener a mano el número de modelo del producto ...

Страница 34: ...ENCIA DE ESTA GARANTÍA NO SE EFECTUARÁN REEMBOLSOS SI NO HAY PIEZAS DE REPUESTO DISPONIBLES PARA LOS MATERIALES DEFECTUOSOS HOMEDICS SE RESERVA EL DERECHO DE REALIZAR SUSTITUCIONES EN VEZ DE REPARAR O CAMBIAR Esta garantía no se extiende a la compra de productos abiertos usados reparados embalados otra vez y o abiertos y vueltos a cerrar incluyendo entre otras cosas la venta de dichos productos en...

Страница 35: ...IB PDM200B ...

Отзывы: