background image


                                                                                  8 / 67 

1.4 Connection 


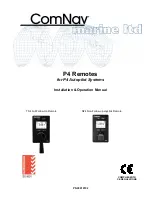
1.4.1 Connect to Computer 

(1) Make sure the player is powered on; 

(2) Plug in the mini connector of the USB cable to this player’s USB DEVICE port; 

(3) Plug in the big connector of the USB cable to Computer. 


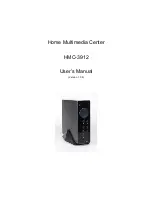
1.4.2 USB Mass Storage Device (like U disk, MP3, USB HDD etc.) Connection 

(1) Make sure the player is powered on; 

(2) Plug in the U disk or USB HDD etc. to one of the USB host ports of this player. 
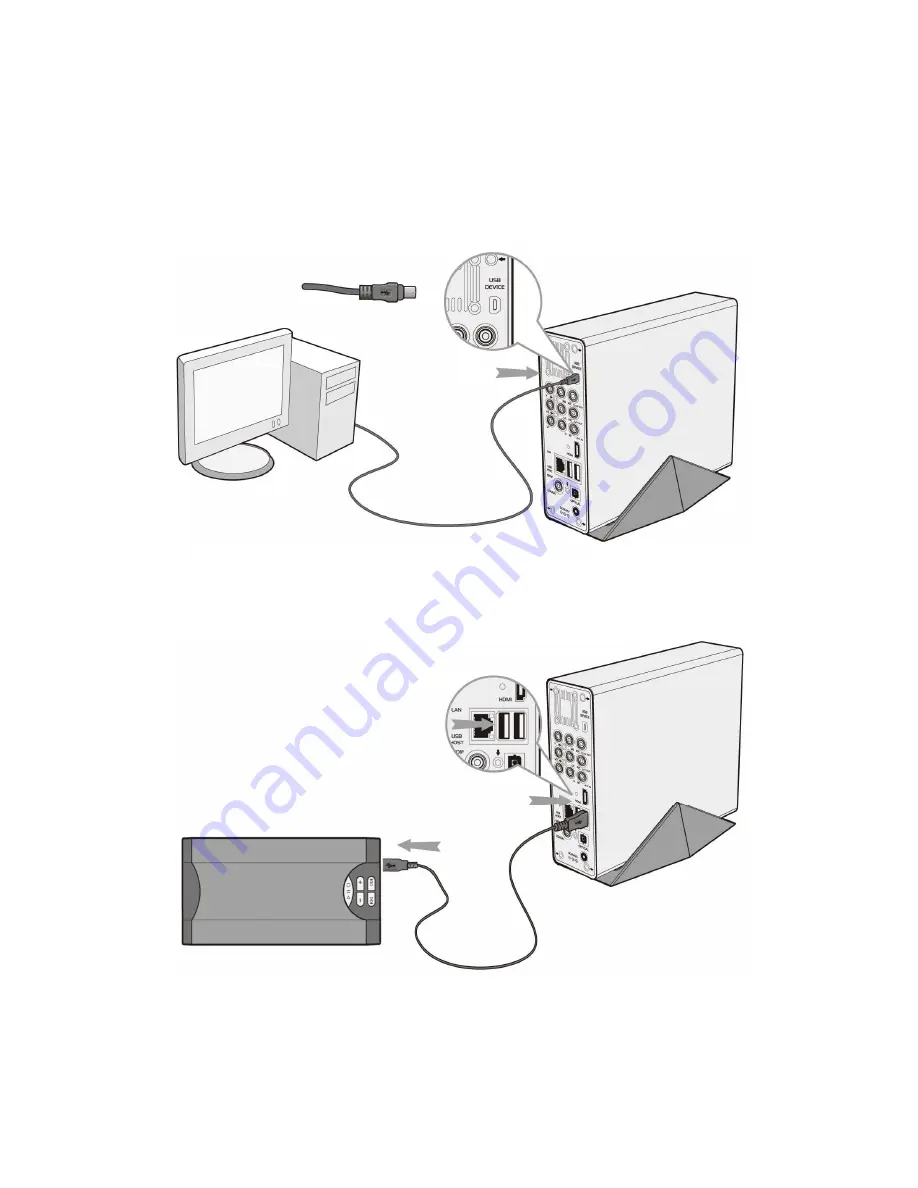
 

1.4.3 TV connection 

1. A/V IN   

(1) Follow the picture and plug in the 3 color connector to the player’s A/V IN jack; 

(2) Follow the picture and plug in the 3 color connector to the A/V OUT jack of the TV/IPTV 

Содержание HMC-3912

Страница 1: ...Home Multimedia Center HMC 3912 User s Manual Version 1 0 5 ...

Страница 2: ...Title List Menu for Recorded Videos 24 4 1 Title List Menu 24 4 2 Playing Back Titles 25 4 3 Deleting Titles 25 4 4 Renaming Titles 25 4 5 Sorting Files 26 4 6 Title Edit Menu 27 4 7 Tools 30 4 8 Saving Your Recorded Titles 30 5 Timer Record Menu 31 5 1 Create a New Schedule 31 5 2 Editing Schedule 31 5 3 Deleting Schedules 32 5 4 Viewing Schedule Status 32 5 5 Viewing Recording History 33 6 Setup...

Страница 3: ...rowsing via Network 53 8 Playlist Menu 56 9 File Copy Menu 57 10 NAS Function 59 11 Upgrading the Firmware 60 12 Appendixes 62 12 1 Specifications 62 12 2 Frequently Asked Questions 63 12 3 Copyrights and Trademarks 66 12 4 Warranty 67 ...

Страница 4: ...mpg format also can edit the recorded titles Time shifting function Movie Playback supports VOB DVD IFO DVD MPG MPEG 2 1 AVI MPEG 4 ASP XviD DAT VCD and MPEG 2 TS files resolution up to 1080i Music Playback supports MP3 OGG and WMA files supports one button playlist music playback Photo Playback supports digital camera JPEG and BMP files Data Storage works as a portable hard disk using USB 2 0 por...

Страница 5: ...DMI cable 1 optional USB cable 1 Remote Control 1 Remote Control Battery 2 AC DC adaptor 1 AC DC adaptor Power Cord 1 User Manual 1 Quick Installation Guide 1 Driver CD 1 Wireless LAN USB Adapter 1 optional Note The actual contents in the package might be different from the packing list in this manual ...

Страница 6: ...ence The design of this player has followed the FCC CE standard and has followed the following rules 1 This player may not cause harmful interference 2 This player could accept some interference received including interference that may cause undesired operation 1 3 4 Repair If the player has a problem you should take it to an appointed repair center and let the specialists do the repair never repa...

Страница 7: ...llage Electronic products are vulnerable when using please avoid shaking or hitting the player and do not press the buttons too hard Do not let the player come into contact with water or other liquid Do not disassemble the player repair the player or change the design of the player any damage done will not be included in the repair policy Do not press the buttons of the player too hard Avoid hitti...

Страница 8: ...able to Computer 1 4 2 USB Mass Storage Device like U disk MP3 USB HDD etc Connection 1 Make sure the player is powered on 2 Plug in the U disk or USB HDD etc to one of the USB host ports of this player 1 4 3 TV connection 1 A V IN 1 Follow the picture and plug in the 3 color connector to the player s A V IN jack 2 Follow the picture and plug in the 3 color connector to the A V OUT jack of the TV ...

Страница 9: ...IN jack In this way you can enjoy the content in the player on TV or other display devices 3 Y Pb Pr Component OUT 1 Follow the picture and plug in the 3 color connector to the player s Y Pb Pr jack 2 Follow the picture and plug in the 3 color connector to the TV s Y Pb Pr jack Audio Connection while using Y Pb Pr Video out First method use the audio output from the A V OUT jack Second method use ...

Страница 10: ...ther connector on your HDMI cable to the TV s HDMI jack In this way you can have the highest quality video and audio via a single cable 1 4 4 Digital Audio Device connection 1 Follow the picture and plug in the RCA connector on your coaxial cable to the player s S PDIF Coaxial jack Or if you use optical fiber please plug in the Toslink connector on your optical fiber to the player s S PDIF Optical...

Страница 11: ...ptor to the player s DC IN jack 2 Follow the picture and plug in the AC adaptor to the power outlet 1 4 6 Ethernet connection To connect to a LAN Local Area Network you require a cat5 cat5e or cat6 network cable not supplied 1 Connect one of the crystal plugs on the cable to the player s RJ45 LAN socket 2 Connect the other crystal plug on the cable to a RJ45 LAN port on your router switch or hub d...

Страница 12: ...12 67 1 4 7 WLAN connection 1 Make sure the player is powered on 2 Plug the Wireless LAN USB Adapter i e Wi Fi USB Dongle to the USB HOST port of the player ...

Страница 13: ...y cord the player will soon enter standby mode and the red STANDBY indicator on the front panel will turn on Then press the POWER STANDBY button on the front panel or remote control to wake up the system wait for a couple of seconds to enter the system and the blue ON indicator on the front panel will turn on 2 Power off When the system is running press the POWER STANDBY button on the front panel ...

Страница 14: ...r details on each button and its function 1 POWER STANDBY 2 DISPLAY 3 MENU 4 MUSIC 5 TV SYSTEM 6 BROWSER 7 GUIDE 8 ENTER 9 Numeric buttons 10 TIME SHIFT 11 REC 12 PLAY 13 TIMER 14 PAUSE STEP 15 REC LIST 16 INS REPLAY 17 A B 18 SUBTITLE 19 F1 20 SOURCE 21 AUDIO 22 FF 23 REPEAT 24 FR 25 CM SKIP 26 NEXT 27 SLOW 28 PREV 29 STOP 30 GOTO 31 Navigation buttons 32 RETURN 33 VOL 34 VOL 35 ZOOM 36 COPY 37 M...

Страница 15: ...annel number and time Press during time shifting to turn the time shifting bar on off 3 MENU button Press to activate tools menu Press in the Browser Menu to rename and delete files or add music to playlists Press in My_Shortcuts in NET of the Browser Menu to add shortcuts for network access 4 MUSIC button When the machine is not playing recording or connected with PC by a USB cable press the butt...

Страница 16: ...orded to the HDD or USB device as long as space is available Press to activate TIME SHIFT function and wait for the PLAY arrow to appear on the screen Press and the program will be paused Press to resume viewing the program Time shift mode remains active until you press 11 RECORD button Press to begin recording or to resume when recording has been paused Press repeatedly to set one touch recording...

Страница 17: ...t 20 SOURCE button Press to select input source See 3 1 Selecting Video In for more details 21 AUDIO button Press to select an audio track 22 FAST FORWARD button Press to fast forward the current playback Press repeatedly to select speeds 23 REPEAT 1 ALL button Press to set repeat option 24 FAST REWIND button Press to fast rewind the current playback Press repeatedly to select speeds 25 CM SKIP bu...

Страница 18: ...l buttons Press the arrow buttons to select menu options 32 RETURN button Press to return to the previous screen when navigating menus 33 VOL button Press to increase the volume 34 VOL button Press to decrease the volume 35 ZOOM button Press to zoom in out the image photo or video 36 COPY button Press to enter the File Copy Menu 37 MUTE button Press to mute audio output and press again to resume 3...

Страница 19: ... MUSIC indicator Indicator blue turns on during music playback 4 REC indicator Indicator red turns on when recording starts 5 LEFT button Move the highlight left 6 DOWN button Move the highlight down 7 CANCEL button Cancel exit 8 STOP button Press to stop playback 9 MUSIC button Press the button to start playback music in the first nonempty playlist Press the button again to switch ...

Страница 20: ... button Press to enter standby mode or wake up 12 REC button Press to begin recording 13 TV SYSTEM button Press to switch between NTSC PAL 480P 576P 720P and 1080I 14 PLAY button Press to begin playback of a title 15 ENTER button Enter play 16 RIGHT button Move the highlight right 17 UP button Move the highlight up ...

Страница 21: ...ck 4 L2 Audio OUT jack Left Channel 5 V1 Video IN jack 6 L1 Audio IN jack Left Channel 7 HDMI jack 8 RJ45 LAN socket 9 S PDIF Coaxial jack 10 DC IN jack 11 S PDIF Optical jack 12 USB HOST port x 2 13 R1 Audio IN jack Right Channel 14 R2 Audio OUT jack Right Channel 15 USB SLAVE port MINI B ...

Страница 22: ...page 3 2 Selecting Playback Playback and Edit Recorded Titles A clip recorded in HDD or USB device is called a Title Playback the recorded video you can also Merge Split Delete Edit all the recorded video titles Press on the remote control or select Playback button on the guide menu page to access Title List 3 3 Selecting Browser Playback Multimedia Files You can browse all the multimedia Videos M...

Страница 23: ...Setup To enter the setup menu select on the remote control or select Setup button on the guide menu page 3 5 Selecting Playlist Music Playlist To enter the music playlist menu select Playlist button on the guide menu page ...

Страница 24: ... to scroll through the menu Here you can Play Delete Rename Sort Edit a recorded title 2 Title Lists Here lists all recorded titles Here you can see thumbnail length quality recorded channel recorded date time of a title A sign shows this recorded title has not been watched A sign shows this title is been recording now 3 Information Here you can see a playback progress bar of a title the remained ...

Страница 25: ...screen 4 3 Deleting Titles To delete a title do the following 1 Press and on the remote control to select the Delete tab from the menu bar 2 Press and on the remote control to select the title you wish to delete 3 Press to confirm and delete the file 4 A confirmation message appears Press or and select OK 5 Press to delete the selected file To cancel delete select Return 4 4 Renaming Titles To ren...

Страница 26: ...ntered the new name select OK and press to confirm all changes If you want to cancel the naming during the process press 4 5 Sorting Files Press and on the remote control to select the Sorting tab from the menu bar Press and the menu appears Return Select to return to the main screen Title Number Select to sort all files according to title numbers Recording Time Select to sort all files according ...

Страница 27: ...ote control to select the Title Edit tab from the menu bar Press and the menu appears Return Select to return to the main screen Set Thumbnail Select to change a thumbnail of the selected video Press or on the remote control to select Set Thumbnail an editing screen appears You can press or to fast forward or fast rewind when searching a proper point When you reach the point at which you wish to i...

Страница 28: ...start for the section to be deleted Select SET B and press to mark the end of the section to be deleted Select CONFIRM and press to delete the section Split Title Select a title and divide them into sections When you reach the point at which you wish to split the track press to confirm ...

Страница 29: ... file A chapter mark is a marker inserted into the title You can jump between marked sections by pressing or on the remote control An editing screen appears When you reach the point at which you wish to add the mark press to confirm Remove Chapter Mark Remove a chapter mark that you have inserted An editing screen appears Use and button to select the mark you wish to remove and press to delete ...

Страница 30: ...ears Return Select to return to the main screen Delete All Title Select to delete all titles 4 8 Saving Your Recorded Titles All the recorded titles are stored temporarily in a recording disc partition UDF format which cannot be identified by personal computers If you want to share the recorded titles on your computer please copy the titles from the recording disc to the multimedia disc which is i...

Страница 31: ...ng Start Time Enter the date and time of the recording Length Enter the length of the recording Repeat Select how often you want the schedule to record Choose from Once Everyday Mon Fri Mon Sat or for an individual day of the week Quality Select the recording quality Choose from HQ SLP EP LP and SP The higher the quality the more space required on the hard drive See HDD Free Space on the left of t...

Страница 32: ...s and on the remote control to select the Delete tab from the menu bar Select the schedule you want to delete and press A confirmation message appears Select CANCEL Delete the selected schedule or Delete all schedules Press to confirm 5 4 Viewing Schedule Status Press and on the remote control to select the Status tab from the menu bar The schedule list is displayed Select a schedule and press ...

Страница 33: ...ser s setting or Pause the selected schedule Press to confirm 5 5 Viewing Recording History Press and on the remote control to select the History tab from the menu bar Here you can view a complete history of all recordings that were set ...

Страница 34: ...ab from the menu bar Aspect Ratio Select to set aspect ratio Press and to select from Pan Scan 4 3 Letter Box 4 3 or 16 9 Press to confirm Pan Scan 4 3 Display a wide picture on the entire screen and cuts off the redundant portions Select when a standard 4 3 TV is connected Letter Box 4 3 Display a wide picture with two black borders on the top and bottom of 4 3 screen Select when a standard 4 3 T...

Страница 35: ... onscreen Press to confirm Contrast Select to set contrast levels Press and to adjust contrast The new setting is previewed onscreen Press to confirm Video Output Select to adjust video output type Press and to set the video output type depending on your viewing preferences Press to confirm Video System Select to adjust TV system ...

Страница 36: ...g preferences Press to confirm 6 2 Changing Audio Settings Press and on the remote control to select the Audio tab from the menu bar Night Mode Select to set night mode Press and to select from Off On and Comfort Press to confirm S PDIF Select to set S PDIF mode ...

Страница 37: ... Quality Select to set the default recording quality setting Press and to select the quality setting you require The highest quality setting is HQ which requires the most storage space The other settings reduce recording quality sequentially but also require less storage space Press to confirm Auto Chapter Select to add chapter marks automatically at set intervals ...

Страница 38: ...cording Press to confirm Record Device Select to set device to restore the recorded files Press and to select from HDD and USB Press to confirm Timeshift Device Select to set Time Shift device Press and to select from HDD and USB Press to confirm 6 4 Changing Network Settings Press and on the remote control to select the Network tab from the menu bar ...

Страница 39: ...puter 3 Please turn off your PC s firewall 4 Please enable your PC s Guest account 5 Please share the folders which you wish to browse on your PC and make sure that Everyone or Guest has the right to access Press and to select DHCP IP AUTO or FIX IP MANUAL Press to confirm DHCP IP AUTO Set the IP address by auto Press to confirm Wired LAN Setup FIX IP MANUAL ...

Страница 40: ...ore configuring the WLAN settings please check the following 1 Make sure the WLAN USB Adapter is connected to the USB HOST port 2 Make sure there is a wireless router or an AP Access Point on the network or your PC is equipped with a wireless network adapter card 3 Make sure your player is in the effective range of the WLAN Select Modify if it is your first time to connect to a wireless network Th...

Страница 41: ...network with the help from wireless router or access point 1 Get SSID Name Select Auto to search for an existing SSID Service Set Identifier Select the access point you wish to access from the SSID list Note In the Security list WEP Wired Equivalent Privacy and WPA Wi Fi Protected Access means the network is encrypted i e an encryption key is needed to access the network NONE means it is an open s...

Страница 42: ...wise select Shared Key WEP or WPA Key to enter the encryption key 4 Wireless Address Setup Select DHCP IP AUTO to set the IP address automatically Or select FIX IP MANUAL to set the IP address manually 5 Setting List The Setting List displays the network settings just now you configured ...

Страница 43: ...er Ad Hoc Peer to Peer mode which is also called Ad Hoc mode or computer to computer mode is used to connect wireless clients directly together without the need for a wireless router or access point 1 Ad Hoc Setup Select Manual if you wish to change the default settings Then set the Wireless SSID Wireless Security and Host IP for the Ad Hoc connection ...

Страница 44: ...are a common SSID and be put into the same IP range 2 Save and Startup Select OK to confirm the above settings If the test is ok the network information will be displayed 6 5 Changing System Settings Press and on the remote control to select the System tab from the menu ...

Страница 45: ... the OSD On Screen Display language Press and to select the language Press to confirm Text Encoding Select to set text encoding Press and to select from Unicode Chinese GBK BIG5 and etc Press to confirm Time Select to set the system time ...

Страница 46: ...al setup Enter the system menu and press and to select each field and the up and down navigation arrows to adjust each setting Press to confirm Select to format the HDD Press and to select HDD Format Press to confirm HDD Format ...

Страница 47: ... of time shift buffer Press and to select NEXT and to confirm Press and to adjust the capacities of recording and multimedia partitions Press and to select NEXT and to confirm Press and to adjust the capacities of FAT32 and NTFS partitions Press and to select NEXT and to confirm ...

Страница 48: ...ayer to PC via a USB cable and copy the sys folder from the firmware folder to the first multimedia partition HDD1 FAT32 In this way you can gain enhanced font support and the NAS function Restore Default Select to restore factory defaults A confirmation message appears Select OK and press Enter to restore all settings to defaults 6 6 Miscellaneous Press and on the remote control to select the MIS...

Страница 49: ...49 67 ...

Страница 50: ...ct the device on which the media is stored Choose from HDD USB NET and press When data on HDD USB device is connected or connect the system to Network you can also browse photos listen to music and watch movies 7 1 Browsing All Use and on the remote control to select the All tab All directories and supported contents will be displayed Press and to select the directory or file you wish to browse an...

Страница 51: ...ries and supported audio files in current directory will be displayed Press and to select the file you want to play and press Press and a tools menu appears which enables you to add the current music to the playlists 7 3 Browsing Photos Use and on the remote control to select the Photos tab ...

Страница 52: ...hile listening to music files you can browse the photos at the same time While browsing a photo you can press or to rotate a photo in any angle Besides rotating a photo you can press to zoom in out that photo Four zoom levels are available 7 4 Browsing Movies Use and on the remote control to select the Movies tab All directories and supported video files in current directory will be displayed Pres...

Страница 53: ...Before viewing the following please make sure that you have read 6 5 Changing Network Settings and made the right settings When selecting NET in the Browser menu there are two ways to locate the multimedia files shared on your local network One way is to browse through workgroup the other way is to browse through My_Shortcuts 7 5 1 Browsing through Workgroup You can choose the workgroup which your...

Страница 54: ...k conditions sometimes the workgroup might not be accessed or shown in the list And then you need to use My_Shortcuts to browse shared files 7 5 2 Browsing through My_Shortcuts You can also set Specific File Server IP and access it from My_Shortcuts in the menu Press and a tools menu appears Network Browser Select to set Net User ID Net Password and Specific File Server IP which enables to browse ...

Страница 55: ...e letters Press to delete a letter Press to insert a space Press to input each letter or number Select Net Password and the entry screen will appear See above Select Specific File Server IP and use Navigational and Numeric buttons to enter IP address You can also select Detail to set the Label Domain and Host Name of the shortcut Then select OK and press to confirm ...

Страница 56: ...irm Then select the shared multimedia file that you want to browse 8 Playlist Menu The Playlist menu allows you to browse and play your favourite music in the playlists To enter the menu select Playlist from the Guide menu There are a total of 5 playlists ...

Страница 57: ...enter the File Copy menu which allows you to copy files between HDD USB devices and Network Step 1 Select the source device and destination device Press and to select device Press to cancel and for next step Step 2 Select the source files you want to copy ...

Страница 58: ...nd to next step Step 3 Select the destination folder to store the above files Press and to select folder Press to cancel and for next step Step 4 Proceed to copy selected files Press and to select OK press to confirm And the copy will start ...

Страница 59: ...t menu or the address bar of Internet Explorer on your PC For example if the IP address of the player is 192 168 0 9 please type 192 168 0 9 or NAS and click OK or press the Enter button on the keyboard Then you can view and edit the files stored on the hard disk installed on the player In this way you can also playback and copy files via network between your PC and the player Note 1 Partitions of...

Страница 60: ...Pen Drive for firmware upgrade Copy the 5 files for upgrade to the root directory of your USB Pen Drive Step 2 Connect the USB Pen Drive Plug the USB Pen Drive into one of the USB HOST ports of the player Step 3 Hold the POWER STANDBY button Press and hold the POWER STANDBY button on the front panel and do not loosen Step 4 Connect the power cable Plug the power cable into the DC IN jack wait for ...

Страница 61: ...on will be completed the LED indicators will go off and the player will be powered off automatically Then you can press the POWER button to turn on the player and enjoy Note Do not turn off the power during installation The USB Pen Drive is not allowed to be unplugged during installation ...

Страница 62: ...XviD AUDIO CODECS SURPORTED MP2 MP3 OGG Vorbis WMA Standard DRM Pro Advanced Profile not supported PCM SUBTITLE FORMATS SURPORTED SRT SMI SSA IDX SUB SUB RECORDABLE DEVICES SUPPORTED Built in HDD USB HDD VIDEO RECORDING MODE Mode 80 GB HDD 120 GB HDD 160 GB HDD HQ 16hrs 24hrs 33hrs SP 32hrs 48hrs 66hrs LP 48hrs 72hrs 99hrs EP 64hrs 96hrs 132hrs SLP 96hrs 144hrs 198hrs VIDEO RECORDING FORMAT HQ SP ...

Страница 63: ...on Total Harmonic Distortion 1kHZ 85dB GENERAL Power Supply Power Consumption Operating Temperature Operating Humidity AC 100 240V 50 60Hz Approx 35 W 5 C to 35 C 36 F to 95 F 5 to 80 RH Hard Disk Dimensions W H D Net Weight 3 5 SATA HDD 61x198x171mm Approx 1 5 kg Note The specifications and design of this product are subject to change without notice 12 2 Frequently Asked Questions Question 1 My c...

Страница 64: ... likely the player s file allocation table FAT has been corrupted This might be due to the player shutting down due to low battery power while reading or writing to your computer by the USB connection Windows and Macintosh often write extra files to the hard disk such as finder def or System volume info These are normal and will not do any harm to the player Question 4 I used my player to transfer...

Страница 65: ...will not be stable and will cause the TV screen to flash some TV s will treat this as no signal and will display a blue screen or screensaver Question 8 Why when I switch to Y Pb Pr 480P 576P 720P 1080I does the TV screen display an unwatchable picture Answer Please check if your TV supports Y Pb Pr 480P 576P 720P 1080I output if your TV does not support please use the A V signal display instead p...

Страница 66: ...communicate with the player on the network To test if your firewall is preventing network communication including PING and access shared folders try disabling it to see if you can connect If you can connect with the firewall disabled you may need to add the player to the Trusted list or configure the firewall for local intranet access Worst case disable your firewall long enough to use the player ...

Страница 67: ...anty does not cover Acts of nature such as fire static discharge Damage from unauthorized repair alteration or accident Damage from misuse or neglect A unit that has been modified or incorporated into other products or is used for institutional or other commercial purposes Loss of customer s software firmware information or memory data Improper handling or installation ...

Отзывы: