background image


ITEM # ACNS18V BRAD NAILER/STAPLER 

SPECIFICATIONS


Model 

ACNS18V   


Battery Charge 

100-240V, 50/60Hz 

Input Voltage 

20V DC,    2000mAh 

Firing Speed 

Average 60 nails/min ; Max 100 nails/ min 

Magazine Capacity 

Holds up to 100 maximum nails/staples 

Length of Brad Nails 

Use only 3/4” – 2”    18 Gauge Brad Nails 

Length of Staples 

Use only 3/4” – 1-1/2” 18 Gauge Light Duty Staples 

Overall Dimensions: 

10.75” W x 10” H x 3.5” D 


PACKAGE CONTENTS


1 - Brad Nailer/Stapler 
1 - Pack (18 Ga Staples / 1-1/2” 200 Pieces) (18 Ga Brad Nails / x 2” 200 Pieces) 
1 - Battery 
1 - Charger 

 
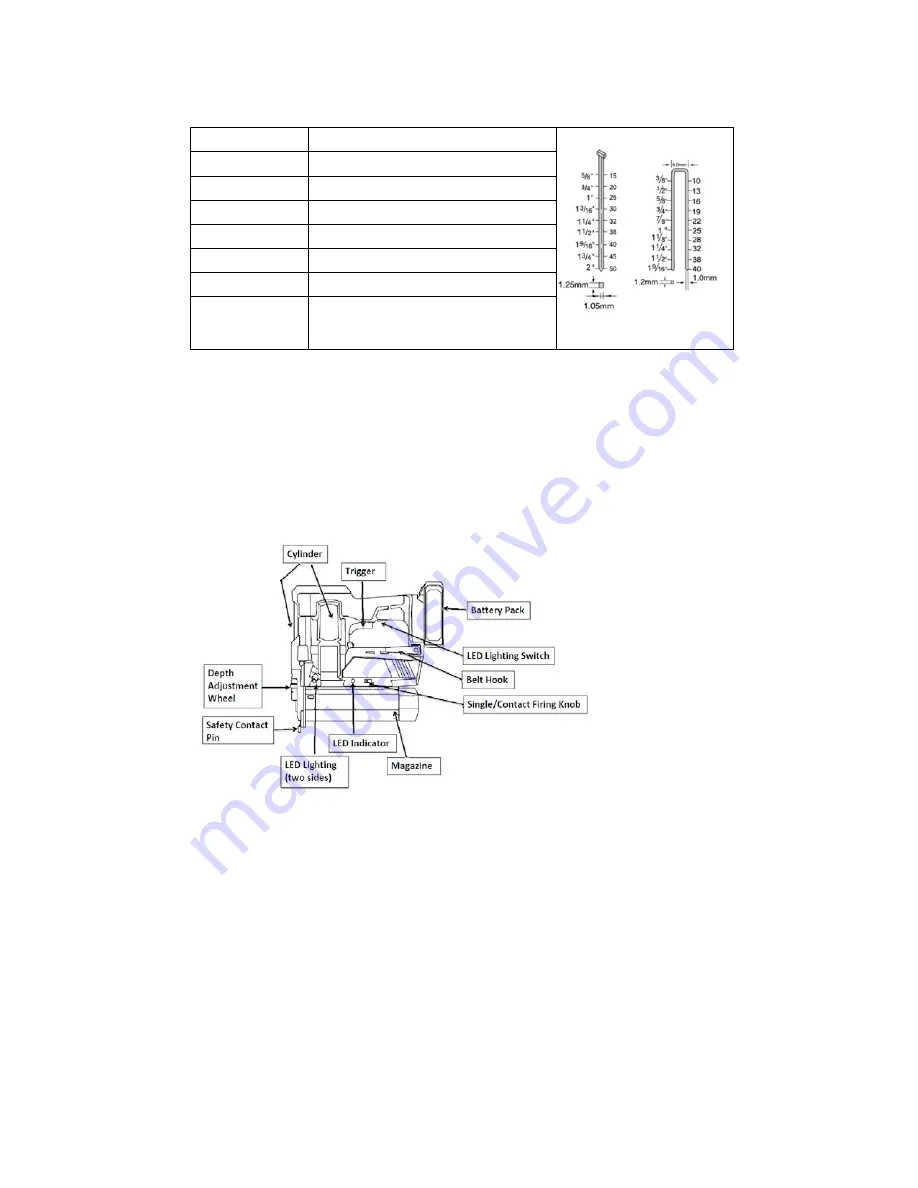
FEATURE DIAGRAM


Содержание ACNS18V

Страница 1: ...d situation that may occur We reserve the right to change this product at any time without prior notice IF THERE IS ANY QUESTION ABOUT A CONDITION BEING SAFE OR UNSAFE DO NOT OPERATE THIS PRODUCT HAVE QUESTIONS CALL US FIRST FOR ASSISTANCE If you experience a problem have questions or need parts for this product call Customer Service at 636 532 9888 Monday Friday 8 AM 4 PM Central Time A copy of t...

Страница 2: ...ils min Magazine Capacity Holds up to 100 maximum nails staples Length of Brad Nails Use only 3 4 2 18 Gauge Brad Nails Length of Staples Use only 3 4 1 1 2 18 Gauge Light Duty Staples Overall Dimensions 10 75 W x 10 H x 3 5 D PACKAGE CONTENTS 1 Brad Nailer Stapler 1 Pack 18 Ga Staples 1 1 2 200 Pieces 18 Ga Brad Nails x 2 200 Pieces 1 Battery 1 Charger FEATURE DIAGRAM ...

Страница 3: ...fy the plug in any way Do not use any adapter plugs with earthed grounded power tools Unmodified plugs and matching outlets will reduce risk of electric shock f Do not keep the trigger or safety depressed during loading fasteners or the unintentional firing of a fastener would cause personal injury g Disconnect the tool from the power source before making any adjustments changing accessories or st...

Страница 4: ...cidentally occurs flush with water If liquid contacts eyes flush them with clean water for at least 10 minutes then seek immediate medical attention Liquid ejected from the battery may cause irritation or burns g Care when charging Make sure cord for the charger is located so that it will not be stepped on tripped over or otherwise subjected to damage or stress Do not operate charging system with ...

Страница 5: ...ger will be red battery is charging b When batteries become fully charged about 1 1 5 hours the indicator on the charger will turn green Unplug the charger from power supply and remove the battery pack NOTE A battery that is new or has not been used for a longer period does not develop its full capacity until after approx 5 charge discharge cycles Do not recharge the batteries after use if they ar...

Страница 6: ...ce and press the machine without pulling the trigger the machine should not fire Take the machine from the workpiece the contact pin should spring back automatically Pull the trigger the machine should not fire Inserting Staples or Nails into the magazine NOTE The number of staples or nails left in the magazine can be read using the viewing window a Remove battery pack from the tool b Press the re...

Страница 7: ...til it engages with the release button e Reattach battery pack to tool Warning Do not place fasteners of different length Do not place staples and nails mixed together A Loading staples B Loading nails Instructions for use Prior to operation make sure your battery pack is fully charged Check whether the fasteners are placed in the magazine correctly Nailing or Stapling Hold handle firmly with maga...

Страница 8: ...hift single contact firing knob to left side it is on Single Firing mode Single Firing is good for precision placement Step 1 Push the drive shift to left side Step 2 Depress the safety contact pin against the work piece Step 3 Squeeze the trigger to fire the staple or nail ...

Страница 9: ...le or nail repeat step 2 step 4 The safety contact pin must be depressed before the trigger is squeezed 2 Contact Firing Mode Push the drive shift single contact firing knob to right side it is on Contact Firing mode Contact Firing is good for conveniently and quickly firing Step 1 Push the drive shift to right side ...

Страница 10: ...tep 2 Squeeze the trigger keep squeezing and don t release Step 3 Depress the safety contact pin against the work piece to fire the nail or staple Step 4 Keep squeezing the trigger all the time but released safety contact pin after firing ...

Страница 11: ...he trigger must be keep squeezing all the time during the safety contact pin is being depressed time by time Do not keep the trigger depressed when the tool is not in use to prevent accidental firing when the tool is not in use A significantly reduced working period after charging indicated that the battery is used and must be replaced Depth Adjustment Wheel Depth adjustment helps protect work sur...

Страница 12: ...wards to the nail staple will be fired into wood in less depth Removing a jammed nail or staple Note You must remove any jammed nail staple before using the tool any further Otherwise it could cause damage to the mechanism Remove the battery pack from the tool Open the magazine remove the staples or nails in channel Then to remove the jammed fasteners ...

Страница 13: ...d fasteners pieces Remove the jammed nail with pliers if necessary After the jammed nail has been successfully removed then re tighten the nose piece with hex screws securely Keep opening the magazine insert in the battery to shot two or three times Then reload in the staples nails close the magazine to shot will be ok Do not dispose of power tools into household waste Recycle unwanted materials i...

Страница 14: ...his happens it is important not to discard your old battery tool or battery pack in a hazardous manner To preserve natural resources please recycle or dispose of batteries properly These battery packs should be collected recycled or disposed of in an environmental friendly manner Warning Do not attempt to destroy or disassemble battery pack or remove any of its components Also never touch the batt...

Отзывы: