


13
HOMEDEPOT.COM/HOMEDECORATORS
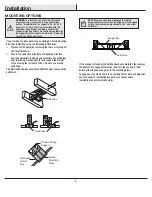
Please contact 1-800-986-3460 for further assistance.
Operating Your Fan and Remote Control
2. Speed functions
+
button, increases the fan speed
□
Pressing and releasing the + button one time will increase the speed of the fan. Each setting increase will cause the LED bar to illuminate
slightly more, until the fan has reached the maximum speed setting. At that time the LED bar will be fully illuminated.
□
Pressing and holding the + button will increase the fan speed automatically through the speed settings and the increments will be denoted
on the LED bar. When the LED bar is fully illuminated, the fan has reached maximum speed setting.
□
Pressing the + button while in Comfort Breeze
TM
mode, will automatically cancel the Comfort Breeze
TM
mode and resume normal fan
operation.
–
button, decreases fan speed
□
Pressing and releasing the - button one time will decrease the speed of the fan. Each setting decrease will cause the LED bar to dim
slightly more, until the fan has reached the minimum speed setting. At that time the LED bar will be approximately 25% illuminated.
□
Pressing and holding the - button will decrease the fan speed automatically through the speed settings and the increments will be denoted
on the LED bar. When the LED bar is 25% illuminated, the fan has reached the minimum speed setting.
□
Pressing the - button while in Comfort Breeze
TM
mode, will automatically cancel the Comfort Breeze
TM
mode and resume normal fan
operation.
3. Comfort Breeze
TM
There are three Comfort Breeze
TM
settings. Pressing the button will activate the Comfort Breeze
TM
mode.
□
Setting 1: Alternates through speeds 1 – 3, the LED bar should fill approximately 33%.
□
Setting 2: Alternates through speeds 1 – 6, the LED bar should fill approximately 66%.
□
Setting 3: Alternates through speeds 1 – 9, the LED bar should be fully illuminated.
NOTE
: If you are currently using Comfort Breeze
TM
mode,
pressing the
button will cancel Comfort Breeze
TM
mode and resume normal fan operation.
NOTE:
You must turn the fan on prior to using the timer
function.
1. Fan button.
- Press and release the
button to turn the fan on
or off.
□
Fan on. The fan memory function will resume the speed set on the
fan prior to the power being turned off. The LED bar will display the
current settings for 5 seconds after the button is released.
□
Fan off. The fan memory function will store the current setting for
the next time the fan is in use.
NOTE
: On start up your ceiling fan will oscillate back
and forth. This is NORMAL OPERATION for DC ceiling fan
as it goes through its calibration cycle. The fan is NOT
DEFECTIVE.
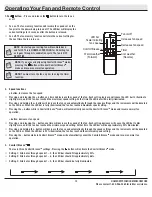
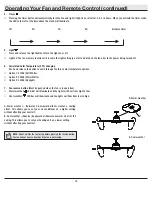
Timer
Decreases fan speed
Increases fan speed
Fan on/off
Warm weather
(Forward)
Comfort Breeze
TM
LED bar
Scale indicating
fan speed
Cool weather
(Reverse)


