background image

6

Installation

MOUNTING OPTIONS

WARNING:

 To reduce the risk of fire, electric shock, 

or personal injury, mount the fan to an outlet box 

marked “Acceptable for fan support of 35 lbs. (15.9 

kg) or less” and use the screws provided with the 

outlet box. An outlet box commonly used for the 

support of lighting fixtures may not be acceptable for 

fan support and may need to be replaced. If in doubt, 

consult a qualified electrician.

If your ceiling fan does not have an existing UL-listed mounting 

box, then install one using the following instructions:


Disconnect the power by removing the fuses or turning off 
the circuit breakers.


Secure the outlet box directly to the building structure. 
Use the appropriate fasteners and materials. The outlet box 

and its bracing must be able to fully support the weight 

of the moving fan (at least 35 lbs.). Do not use a plastic 

outlet box.

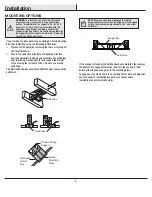
The illustrations below show three different ways to mount the 

outlet box.

If the canopy (C) touches the ball/downrod assembly (B), then remove 
the decorative canopy bottom cover and turn the canopy (C) 180° 
before attaching the canopy (C) to the mounting plate.
To hang your fan where there is an existing fixture but no ceiling joist, 
you may need an installation hanger bar as shown above
(available at any Home Depot store).

NOTE:

 You may need a longer downrod to maintain 

proper blade clearance when installing on a steep, sloped 

ceiling. The maximum angle allowable is 30° away from 

horizontal.

Outlet Box

Outlet Box

Recessed

Outlet

Box

Provide Strong

Support

Ceiling

Mounting

Plate

Outlet Box

Hanger Bar

Содержание CHASEWOOD 59724

Страница 1: ...THANK YOU We appreciate the trust and confidence you have placed in Home Decorators Collection through the purchase of this ceiling fan We strive to continually create quality products designed to enhance your home Visit us online to see our full line of products available for your home improvement needs Thank you for choosing Home Decorators Collection Item xxxx xxx xxx Model 59724 UL Model 72 CH...

Страница 2: ...nowledge or experience contact a licensed electrician WARNING Electrical diagrams are for reference only Optional use of any light kit shall be UL listed and marked suitable for use with this fan WARNING To reduce the risk of fire or electric shock this fan should only be used with fan speed control part no MDF40S H01S manufactured by Dawnsun Electronic Co LTD Safety Information Table of Contents ...

Страница 3: ...he warranty invalid There is no other express warranty Home Decorators Collection hereby disclaims any and all warranties including but not limited to those of merchantability and fitness for a particular purpose to the extent permitted by law The duration of any implied warranty which cannot be disclaimed is limited to the time period as specified in the express warranty Some states do not allow ...

Страница 4: ... Description Quantity AA Blade attachment screws 10 BB Plastic wire connector 3 CC Hanger pin 1 DD Locking pin 1 Pre Installation continued HARDWARE INCLUDED NOTE Hardware not shown to actual size AA BB CC DD ...

Страница 5: ...corative motor collar cover 1 E Fan motor assembly 1 IMPORTANT This product and or components are governed by one or more of the following U S Patents 5 947 436 5 988 580 6 010 110 6 046 416 6 210 117 and other patents pending Pre Installation continued PACKAGE CONTENTS Part Description Quantity F Blade 1 G Post with finial 1 H Decorative cap 1 I Remote control 1 J Battery 2 C H I J A B D E F G ...

Страница 6: ...Use the appropriate fasteners and materials The outlet box and its bracing must be able to fully support the weight of the moving fan at least 35 lbs Do not use a plastic outlet box The illustrations below show three different ways to mount the outlet box If the canopy C touches the ball downrod assembly B then remove the decorative canopy bottom cover and turn the canopy C 180 before attaching th...

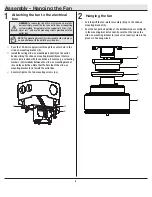
Страница 7: ...KK on the collar PP on top of the fan motor assembly E Install the downrod B by inserting it into the motor collar PP and turning it clockwise until the holes at the bottom of the ball downrod assembly B align with the holes in the collar on top of the fan motor assembly E Carefully insert the hanger pin CC through the holes in the collar and ball downrod assembly B Be careful not to jam the hange...

Страница 8: ... outlet box Securely tighten the two mounting screws JJ Carefully lift the fan motor assembly E up to the slide on mounting bracket A Seat the hanger ball portion of the ball downrod assembly B in the mounting bracket socket Ensure that the tab on the slide on mounting bracket A socket is properly seated in the groove in the hanger ball 1 2 WARNING To reduce the risk of fire electric shock or othe...

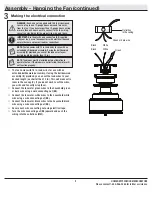
Страница 9: ...ng nut using electrical tape Turn the wire connecting nut BB upward and push the wiring into the outlet box MM WARNING Each wire nut supplied with this fan is designed to accept up to one 12 gauge house wire and two wires from the fan If you have larger than 12 gauge house wiring or more than one house wire to connect to the fan wiring consult an electrician forthe proper size wire nuts to use IMP...

Страница 10: ...nopy C and tighten firmly Install the decorative canopy ring FF by aligning the ring s slots with the screws in the canopy C Rotate the canopy ring FF clockwise to lock it in place 5 NOTE Follow this step ONLY if you did not cut the extra length off from the wires coming from the ceiling fan WARNING The locking slots of ceiling canopy are provided only as an aid to mounitng Do not leave the fan as...

Страница 11: ...re with screws AA Make sure all the screws are firmly tightened Repeat these steps for the remaining blades Remove the finial RR and rubber pad NN from the post G Attach the post G to the center hole of motor assembly E and turn it clockwise until it is tight NN RR G E G Assembly Attaching the Fan Assembly Attaching the fan assembly 1 Attach the decorative cap NN and the pad I through the center o...

Страница 12: ...ng Confirm that the power to the fan is off at either the wall switch or breaker box Return power to the fan at the wall switch or breaker box Press and release the Learn button located in the remote s battery compartment within 30 seconds If pairing is successful the fan s light kit will flash and the blades will begin to spin Replace the battery cover on the remote control Pairing the Remote Con...

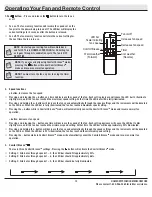
Страница 13: ... 25 illuminated the fan has reached the minimum speed setting Pressing the button while in Comfort BreezeTM mode will automatically cancel the Comfort BreezeTM mode and resume normal fan operation 3 Comfort BreezeTM There are three Comfort BreezeTM settings Pressing the button will activate the Comfort BreezeTM mode Setting 1 Alternates through speeds 1 3 the LED bar should fill approximately 33 S...

Страница 14: ...fan and light if light is on off after 2 4 or 8 hours When you activate the timer mode the LED to the left of the time above the clock will illuminate Off 2H 4H 8H Disables timer 5 Light Press and release the light button to turn the light on or off Light on The fan memory function will resume the light setting on or off and dim on the fan prior to the power being turned off 6 Correlated Color Tem...

Страница 15: ... point on the ceiling above the tip of one of the blades Measure from a point on the center of each blade to the point on the ceiling Rotate the fan until the next blade is positioned for measurement Repeat for each blade Any measurement deviation should be within 1 8 Run the fan for ten minutes If the fan continues to wobble please contact Customer Service and a balancing kit will be sent to you ...

Страница 16: ...blems missing parts Before returning to the store call Home Depot Customer Service 8 a m 7 p m EST Monday Friday 9 a m 6 p m EST Saturday 1 800 986 3460 HOMEDEPOT COM HOMEDECORATORS Retain this manual for future use ...

Отзывы: