background image

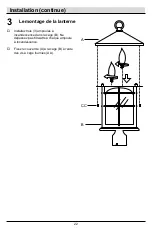
Le montage de la lanterne  

Installez trois (3) ampoules à 
incandescence dans la cage (B). Ne 
dépassez pas 60 watts à chaque ampoule 
à incandescence. 

Fixez le couvercle (A) à la cage (B) à l'aide 
des vis à cage fournies (AA). 

Installation (continue) 

22 

CC 

Содержание 272 775

Страница 1: ...________________________ EXTERIOR POST LANTERN THANK YOU We appreciate the trust and confidence you have placed in Home Decorators Collection through the purchase of this exterior LED wall lantern We strive to continually create quality products designed to enhance your home Visit us online to see our full line of products available for your home improvement needs Thank you for choosing Home Decor...

Страница 2: ...ot apply to any product that is found to have been improperly installed set up or used in any way not in accordance with the instructions supplied with the product This warranty shall not apply to a failure of the product as a result of an accident misuse abuse negligence alteration or faulty installation or any other failure not relating to faulty material or workmanship This warranty shall not a...

Страница 3: ...non abrasive surface such as carpet or cardboard NOTE Keep your receipt and these instructions for Proof of Purchase TOOLS REQUIRED HARDWARE INCLUDED NOTE Hardware not shown to actual size www homedepot com homedecorators Please contact 1 800 986 3460 for further assistance 3 Part Description Quantity AA Hood Screw 2 BB Wire Nut 3 CC Fixture Mounting Screw 2 Phillips Screwdriver Wire Cutter Wire S...

Страница 4: ...Pre Installation continued PACKAGE CONTENTS 4 Part Description Quantity A Hood 1 B Cage 1 A B ...

Страница 5: ...ect the fixture ground wire to the supply ground wire using a wire nut BB Wrap all wire connections with electrical tape for a more secure connection Carefully tuck all the wires and wire connectors into the post Slide the post cap of the fixture onto the post Secure the post cap to the post using the provided fixture mounting screws CC Installation 5 NOTE If you have electrical questions consult ...

Страница 6: ...cent candelabra light bulbs in the socket of the cage B Do not exceed a 60 watt incandescent light bulb Attach the hood A to the cage B using the provided hood screws AA Installation continued 6 Installation continued Installation continued 2 A B CC ...

Страница 7: ...ows or circuit breaker trips when light is turned on Check the wire connections Care and Cleaning EXTERIOR MAINTENANCE Use a dry or slightly dampened clean cloth and wipe the surface of the fixture INTERIOR MAINTENANCE Disconnect power to the fixture by turning off the circuit breaker or by removing the fuse at the fuse box Use a dry or slightly dampened clean cloth to wipe the interior surface of...

Страница 8: ...ing parts Before returning to the store call Home Decorators Collection Customer Service 8 a m 7 p m EST Monday Friday 9 a m 6 p m EST Saturday 1 800 986 3460 www homedepot com homedecorators Retain this manual for future use ...

Страница 9: ...___________________________ FAROL DE POSTE PARA EXTERIORES GRACIAS Le agradecemos la confianza que han depositado en Home Decorators Collection a través de la compra de este farol de pared LED para exteriores Nos esforzamos continuamente para crear productos de calidad diseñados para mejorar su casa Visite nuestra página web para ver nuestra completa línea de productos disponibles para mejorar tu ...

Страница 10: ...lquier producto que haya sido instalado de forma incorrecta o usado de manera que no conforme con las instrucciones suministradas con el producto Esta garantía no se aplicará a una falla del producto como resultado de un accidente mal uso abuso negligencia alteración o instalación defectuosa o cualquier otra falla no relacionada con defectos de material o mano de obra Esta garantía no se aplicará ...

Страница 11: ...no abrasiva como una alfombra o cartón NOTA Guarde su recibo y estas instrucciones para comprobante de compra HERRAMIENTA NECESARIAS FERRETERÍA INCLUIDA NOTA La ferretería no se muestra a tamaño actual www homedepot com homedecorators Para obtener asistencia llama al 1 800 986 3460 11 Desarmador de Cruz Cortador de Alambre Desarmador de Punta Plana Pelacables Gafas de Seguridad Cinta Aislante 3 Fo...

Страница 12: ...Pre Instalación continuado CONTENIDO DEL PAQUETE 12 Parte Descripción Cantidad A Cubierta 1 B Jaula 1 A B ...

Страница 13: ...ara cables BB Conecte el cable del luminario a tierra con el cable de alimentación a tierra usando una tuerca para cables BB Envuelva todas las conexiones de los cables con cinta de aislar para una conexión más segura Meta cuidadosamente todos los cables y los conectores de cables en el poste Asegure el tapón del poste en el poste utilizando los tornillos del luminario CC Instalación 13 CC B BB NO...

Страница 14: ...s en la jaula B No exceda 60 vatios en cada foco incandescente Fije la cubierta A en la jaula B utilizando los tornillos para la jaula AA que se incluyen Instalación continuado 14 Pre Instalación continuado Ensamblando la linterna A B CC ...

Страница 15: ...rna de manera de desconectando el disyuntor o quitando el fusible en la caja de fusibles Use un paño limpio y seco o ligeramente humedecido y limpie la superficie de la linterna Solución de Problemas 15 Problema Solución La luz no se enciende Asegúrese de que la energía eléctrica esté encendida Pruebe o cambie el interruptor Verifique los cableado El fusible se funde o el disyuntor de circuitos se...

Страница 16: ...de regresar a la tienda llama al Servicio al Cliente de Home Decorators Collection 8 a m 7 p m Hora del Este Lunes Viernes 9 a m 6 p m Hora del Este Sábado 1 800 986 3460 www homedepot com homedecorators Conserve este manual para futuras consultas ...

Страница 17: ...______ LANTERNE DU POST D EXTÉRIEUR MERCI Nous apprécions la confiance que vous avez placée dans Home Decorators Collection grâce à l achat de cette Lanterne Murale d extérieur DEL Nous nous efforçons de créer continuellement la qualité des produits conçus pour améliorer votre maison Rendez nous visite en ligne pour voir notre gamme complète de produits disponibles pour votre maison besoin d améli...

Страница 18: ...tie ne s applique pas à tout produit qui se trouve à avoir été incorrectement installé configuré ou utilisé de quelque façon pas conformément aux instructions fournies avec le produit Cette garantie ne s applique pas à une défaillance du produit à la suite d un accident un abus une négligence une modification ou une mauvaise installation ou tout autre manquement non liée à un défaut de matériau ou...

Страница 19: ...et non abrasif surface tels que tapis ou un morceau de carton NOTE Conservez votre reçu et ces instructions à la preuve d achat OUTILS REQUIS MATÉRIEL INCLUS NOTE Matériel non illustré à taille réelle www homedepot com homedecorators Veuillez contacter le 1 800 986 3460 pour obtenir plus aide 19 Tournevis Cruciforme Coupe fil Pince à Dénuder Tournevis à Tête Plate Lunettes de Protection Ruban Élec...

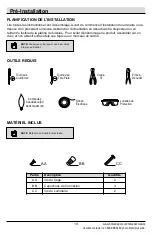
Страница 20: ...Pré Installation continue CONTENU DU PAQUET 20 Partie Description Quantité A Couvercle 1 B Cage 1 A B ...

Страница 21: ... terre du luminaire et le fil de terre de la boîte de sortie à l aide d un capuchon de connexion BB Enroulez toutes les connexions avec du ruban isolant pour plus de sécurité Rentrez soigneusement tous les fils et connecteurs de fils dans le poteau Faites glisser le capuchon du poteau du luminaire sur le poteau Fixez le capuchon du poteau au poteau à l aide des vis de montage du luminaire CC fourn...

Страница 22: ...nterne Installez trois 3 ampoules à incandescence dans la cage B Ne dépassez pas 60 watts à chaque ampoule à incandescence Fixez le couvercle A à la cage B à l aide des vis à cage fournies AA Installation continue 22 A B CC ...

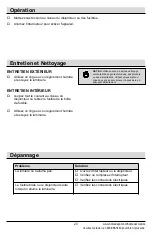
Страница 23: ...ns électriques ENTRETIEN EXTÉRIEUR Utilisez un linge sec ou légèrement humide et essuyez le luminaire ENTRETIEN INTÉRIEUR coupez tout le courant au niveau du disjoncteur ou retirez le fusible de la boîte de fusible Utilisez un linge sec ou légèrement humide et essuyez le luminaire Mettez sous tension au niveau du disjoncteur ou des fusibles Allumez l interrupteur pour activer l appareil NOTE N uti...

Страница 24: ... Avant de retourner au magasin appeler Home Decorators Collection Service à la clientèle 8 00 19 00 HNE Lundi Vendredi 9 00 18 00 HNE Samedi 1 800 986 3460 www homedepot com homedecorators Conserver ce manuel pour un utilisation ultérieure ...

Отзывы: