background image

3

3D Flips

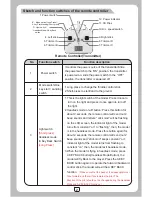
Left stick

4

5

6

7

8

9

10

11

12

Right stick

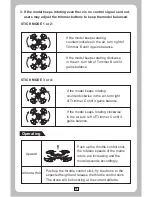
Trimmer  A

In stick Mode 2 and 4, this button is null.
In stick Mode 1 and 3, it helps to tune the model's 
forward and backward flight.

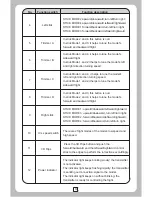
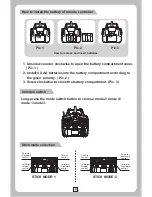
STICK MODE 2:upward/downward,turn left/turn right;
STICK MODE 4:upward/downward,leftward/rightward.
STICK MODE 1:forward/backward,turn left/turn right;
STICK MODE 3:forward/backward,leftward/rightward.

STICK MODE 1: upward/downward,leftward/rightward;
STICK MODE 3: upward/downward, turn left/turn right;
STICK MODE 2: forward/backward,leftward/rightward;
STICK MODE 4: forward/backward,turn left/turn right.

In stick Mode 3 and 4, it helps to tune the model's 
sideward flight.
In stick Mode 1 and 2,it helps to tune the model's left 
and right direction turning speed.

Trimmer  B

No.

Function switch

Function description

In stick Mode 1 and 3, this button is null.
In stick Mode 2 and 4, it helps to tune the model's 
forward and backward flight.

Trimmer  D

Power indicator

There are 2 flight modes of the model: low speed and 
high speed.

H/L  speed switch

In stick Mode 3 and 4,  it helps to tune the model's 
left and right direction turning speed.
In stick Mode 1 and 2,it helps to tune the model's 
sideward flight.

Trimmer  C

The indicator light keeps blinking slowly: the transmitter
is not activated.
The indicator light keeps flashing rapidly: the transmitter
is sending out connection signal to the model.
The indicator light keeps on without blinking: the
transmitter is ready for controlling the flight.

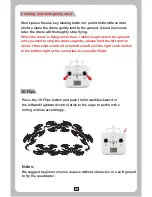
 Press the 3D Flips button and push the 
forward/backward and the leftward/rightward control 
stick to the edges to perform the roll actions accordingly.

Содержание X401H-V2

Страница 1: ...FPV REAL TIME HD IMAGES TRANSMISSION 6 AXIS GYRO QUADCOPTER MOBILE PHONE APP CONTROL BAROMETER HOLD ALTITUDE A KEY START LANDING ITEM NO X401H V2 ...

Страница 2: ... Replace the Motor 17 20 FPV Camera Assembly 17 21 FPV App Setting 19 22 App Control Functions 20 23 Recalibrate the Gyro 24 24 Trouble Shooting 24 6 WWW HOLYSTONE COM Content 1 Safety Guidelines 1 2 The LCD Remote Controller 1 2 1 Sketch of the Remote Controller 2 2 2 Functions of the Remote Controller 2 3 Battery Assembly 4 4 Four Control Modes Switch 4 5 Speed Modes Switch 6 Major Parts on the ...

Страница 3: ...nd maintenance easier Adopting 2 4G auto connection technology scores of model can be played at the same time Equipped with the newest 6 axis gyro control system this model has the characteristics of stable flight and easy operation Fully charged battery can support 7 5 minutes steady flight New functions Altitude Hold mode One key Start Landing and APP control Product spare parts included in this...

Страница 4: ...is model is being played by children Only batteries of the same or equivalent type as recommended are to be used Insert batteries with correct polarity Non rechargeable batteries are not to be charged the transmitter need 4 X AA batteries for work Do not mix old and new batteries Rechargeable batteries are to be removed from the toy before being charged Rechargeable batteries are only to be charge...

Страница 5: ...ote control will send out 2 beep sounds and stick mod keeps constant on indicator light of the model turns from flashing to constant on then the model exit headless mode 3 When the model is flying in headless mode press A KEY BACK button Headless Mode Button the model will fly Back to the player Press the A KEY BACK button again or operate the forward backward control stick the model will exit the...

Страница 6: ... and right direction turning speed Trimmer B No Function switch Function description In stick Mode 1 and 3 this button is null In stick Mode 2 and 4 it helps to tune the model s forward and backward flight Trimmer D Power indicator There are 2 flight modes of the model low speed and high speed H L speed switch In stick Mode 3 and 4 it helps to tune the model s left and right direction turning spee...

Страница 7: ...lockwise to close the battery compartment Pic 3 How to install the battery of remote controller Pic 1 Pic 2 Pic 3 How to remove and insert batteries STICK MODE 1 STICK MODE 2 Forward Backward control Forward Backward control Throttle control Throttle control Left Right turning control Left Right turning control Leftward Rightward control Leftward Rightward control Stick mode selection 4 modes swit...

Страница 8: ...tward Rightward control Leftward Rightward control There are 2 flight speeds available low speed and high speed Player can select the flight speed by pressing the H L speed button Flight speed selection The model Light Motor OFF ON Rotor blade B Rotor blade B Rotor blade A Rotor blade A Protecting frames Landing gear Camera Major parts of the model Low Speed High Speed ...

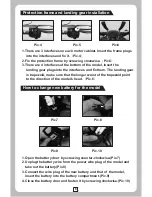
Страница 9: ...gear is trapezoid make sure that the longer waist of the trapezoid point to the direction of the model s head Pic 6 Pic 4 Pic 5 Pic 6 Pic 7 Pic 8 Pic 9 Pic 10 How to change new battery for the model 1 Open the battery door by screwing counter clockwise Pic 7 2 Unplug the battery wire from the power wire plug of the model and take out the battery Pic 8 3 Connect the wire plug of the new battery and...

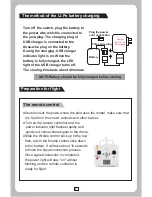
Страница 10: ...nnection is completed the power light will stay on without blinking and the remote controller is ready for flight The remote control NOTE Battery should be fully charged before storing Turn off the switch plug the battery to the power wire which is connected to the jack plug The charging plug of USB charger is connected to the three wire plug on the battery During the charging USB charger indicato...

Страница 11: ...lies up to the sky is named as upward The direction that the copter lands to the ground is named as downward Player s left side is named as left player s right side is named as right All the directions mentioned in this manual are subject to the definition above Make sure that the battery at the bottom of the drone is well installed and connected with power wire of drone The model is OFF Then turn...

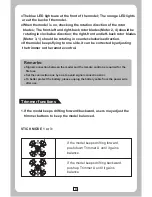
Страница 12: ...an be corrected by adjusting the trimmer on the remote control Remarks Signal connection between the model and the remote control is required for the first use Set the connection one by one to avoid signal connection error To better protect the battery please unplug the battery cable from the power wire after use Trimmer functions If the model keeps drifting forward push down Trimmer A until it ga...

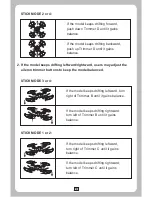
Страница 13: ...rifting leftward turn right of Trimmer B until it gains balance 2 If the model keeps drifting leftward rightward users may adjust the aileron trimmer buttons to keep the model balanced If the model keeps drifting rightward turn left of Trimmer B until it gains balance If the model keeps drifting leftward turn right of Trimmer C until it gains balance If the model keeps drifting rightward turn left...

Страница 14: ...ns to keep the model balanced If the model keeps rotating counterclockwise in the air turn right of Trimmer C until it gains balance If the model keeps rotating clockwise in the air turn left of Trimmer C until it gains balance Operating Upward Push up the throttle control stick the rotation speeds of the mains rotors are increasing and the model ascends accordingly Push up the throttle control st...

Страница 15: ... are decreasing and the model descends accordingly 12 Leftward flight Rightward flight Turn the sideward flight control stick to the left side the model will fly leftward Turn the sideward flight control stick to the right side the model will fly rightward Forward Backward When the model is flying push up the forward backward control stick the model will move forward When the model is flying push ...

Страница 16: ...to fly the quadcopter Short press the one key landing button or push the throttle control stick to make the drone gently land to the ground About 2 seconds later the drone will thoroughly stop flying When the drone is flying lower than 1 meter height above the ground and you need to stop the drone urgently please hold the left control stick of the remote control to the bottom left and the right co...

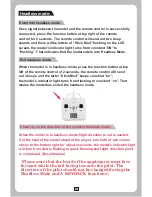
Страница 17: ...ill send out 3 beeps and the letter Stick Mod keeps constant on the model s indicator light turns from flashing to constant on That means the model has exited the headless mode When the model is in headless mode flight direction proof is needed Set the head of the model ahead of the player turn both of two control sticks to the bottom right for about 2 seconds the model s indicator light will turn...

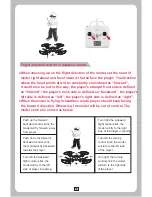
Страница 18: ...towards the player Push up the forward backward control stick the model will fly forward away from player When checking up on the flight direction of the model set the head of model right ahead and face forward the tail face the player The direction where the head points at will be constantly considered as forward it could also be put in this way the player s straight front side is defined as forw...

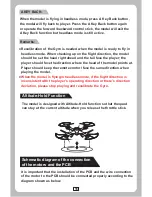
Страница 19: ... A Key Back button again or operate the forward backward control stick the model will exit the A Key Back function but headless mode is still active Remarks Recalibration of the Gyro is needed when the model is ready to fly in headless mode When checking up on the flight direction the model should be set the head right ahead and the tail face the player the player should face the direction where t...

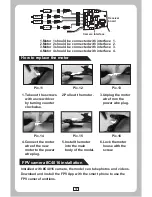
Страница 20: ...or to the power wire plug 5 Install the motor into the main body of the model 6 Lock the motor house with the screw Installed with C4016 camera the model can take photos and videos Download and install the FPV App with the smart phone to use the FPV camera functions FPV camera C4016 installation 1 Take out the screws with a screwdriver by turning counter clockwise 2 Pull out the motor 3 Unplug the...

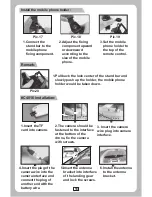
Страница 21: ...mote control 2 Adjust the fixing component upward or downward according to the size of the mobile phone 1 Connect the stand bar to the mobile phone fixing component 1 Pull back the lock center of the stand bar and slowly push up the holder the mobile phone holder would be taken down Install the mobile phone holder C4016 installation Remark Pic 17 Pic 18 Pic 19 Pic 20 5 Insert the antenna bracket i...

Страница 22: ...App HOLY STONE to your smart phone the photos and videos taken by the camera can be viewed on the smart phone screen alive when the model is flying Download and set the FPV real time App App Functions Pic 27 Pic 28 Pic 29 There are two modes of the HOLY STONE APP 1 Open the App HOLY STONE 3 Real time image is shown on the screen 2 Click the MONITOR button Real time images transmission mode Pic 30 ...

Страница 23: ...an also scan the QR Code to download the app for IOS system For Android system please visit our website WWW HOLYSTONE COM to download the from the product accordingly For Apple IOS system please go to the APP store to download the App HOLY STONE 20 QR CODE QR CODE IOS android ...

Страница 24: ...ontrol and then touch this icon to enter into high and low speed switch mode When the H L logo is in red color the drone is in high speed mode when the H L logo is in black color the drone is in low speed mode Gravity Sensor Control Mode Touch this icon to enter into the operation interface MOD 2 The left control stick is the throttle control and left right turning stick The right stick is the for...

Страница 25: ...d rightward flight stick MOD 3 The left control stick is the forward backward control and leftward rightward flight stick The right stick is the throttle control and leftward rightward flight stick MOD 4 The left control stick is the throttle control and leftward rightward flight stick The right stick is the forward backward flight and left right turning stick Low level medium level throttle switc...

Страница 26: ... speed In stick Mode 1 and 2 it helps to tune the model s sideward flight Trimmer C Turn on the APP control touch this icon to rotate the drone in low speed App control Touch this button the icon will be in red color while the mobile phone is sending out connection signal Once the drone s WIFI signal is successfully connected the drone indicate will be constant on Flight route Turn on the APP cont...

Страница 27: ...real time images transmission interface to take photo video Click CONTROL to enter into the APP control interface Touch the APP control icon The icon will be in red color while the mobile phone WIFI is sending out connectional signal Once the mobile phone is successfully connected with the drone s WIFI signal the drone indicator light will be in constant on Touch the one key start icon the drone w...

Страница 28: ...ro of the model is under signal detecting condition Set the model on a flat surface The lights are flashing on twice and flashing off once The model is not received the signal from the remote control or signal connection is interrupted The lights are flashing constantly The model is underpowered The rotor blade is out of shape The model is shaking Charge the battery or use another fully charged ba...

Страница 29: ...WWW HOLYSTONE COM 1 626 465 7134 Customer Support USA HOLYSTONE COM America CA HOLYSTONE COM Canada JP HOLYSTONE COM Japan EU HOLYST ONE COM Europe ...

Отзывы: