background image

I

MAGER

 D

UO

 M

AINTENANCE

5

Imager Duo Operator’s Manual

5.7

CLEANING THE CASSETTE MAPPING SENSOR

The cassette mapping sensor is the optical sensor on the robotic arm that senses 
the presence of slides in the slide cassettes. The lens of it should be wiped clean 
on a monthly basis or if cassette mapping errors occur (31--).

Note:

  Clean the sensor when there are no cassettes in the Imaging Station. 

Removing a partially processed cassette of slides could result in data 
loss.

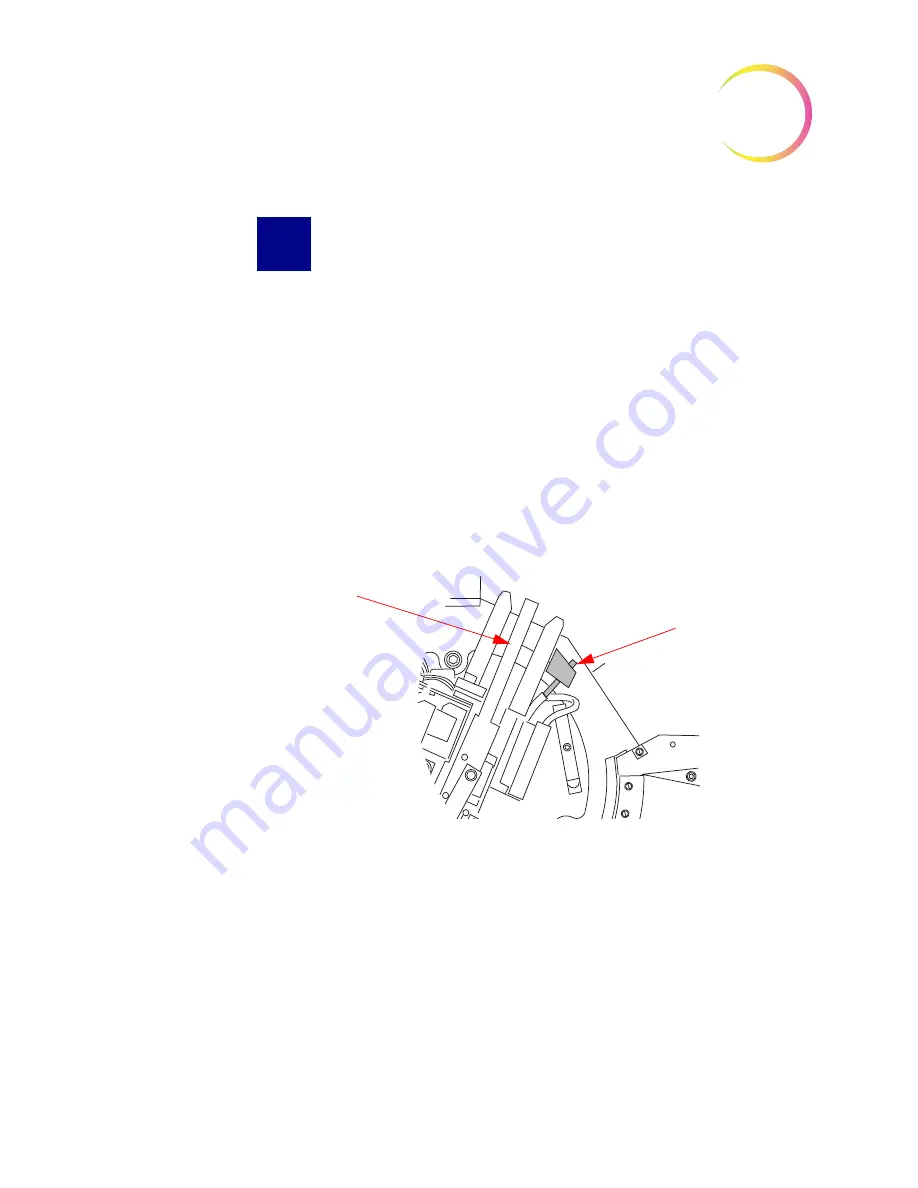
The sensor is located behind the robot shield. It is attached to the side of the 
slide transfer arm. Refer to Figure 5-11.

Open the right hand door of the Imaging Station.

Gently rotate the robot shield to the left.

Figure 5-11   Cassette Mapping Sensor (top view)

Locate the cassette mapping sensor. It is a round black object with a lens in the 
center. If the Imaging Station power is on, a red light shines out of the sensor.

Clean the end of the sensor with a lens paper.

The robot shield may be returned to its original position or just left as is. At the 
start of the new batch, it will automatically return to the correct position.

SECTION

D

Robot Arm

Cassette Mapping Sensor. 
Clean this end.

Содержание ThinPrep

Страница 1: ...Operator s Manual ThinPrep Imager Duo Imaging Station...

Страница 2: ...Duo Imaging System Operator s Manual HOLOGIC INC 250 CAMPUS DRIVE MARLBOROUGH MA 01752 USA TEL 1 800 442 9892 1 508 263 2900 FAX 1 508 229 2795 WEB WWW HOLOGIC COM For Use With Version 3 x y Software...

Страница 3: ...diagnosis that caused harm to a patient Hologic shall indemnify Customer for the compensatory damages paid by Customer to discharge the personal injury judgment with respect to Product Hologic Inc 20...

Страница 4: ...The ThinPrep Imaging System The ThinPrep Imaging System...

Страница 5: ...Operation Summary and Clinical Information The ThinPrep Imaging System...

Страница 6: ...ntifier is recorded and the x and y coordinates of 22 fields of interest are stored in the computer database This computer also coordinates the communication of information between the Image Processor...

Страница 7: ...em The slide coverslip should be dry and located correctly Slides that are broken or poorly coverslipped should not be used Slides used with the ThinPrep Imaging System must contain properly formatted...

Страница 8: ...9 550 met the requirements for inclusion in the descriptive diagnosis analysis During the study 7 1 732 10 359 slides could not be read on the Imager and required a manual review during the Imager Re...

Страница 9: ...iple imputation technique was used to adjust the numbers of true positives and true negatives for the 8 550 negative concordant cases based on the 5 of cases that were adjudicated3 Tables 2 4 below su...

Страница 10: ...erval of 5 0 to 4 0 The observed difference between sensitivities for LSIL varied among the sites from 6 3 with a 95 confidence interval of 14 7 2 1 to 8 1 with a 95 confidence interval of 4 0 20 1 Th...

Страница 11: ...SIL High grade Squamous Intraepithelial Lesion SQ CA Squamous Cell Carcinoma GL CA Glandular Cell Adenocarcinoma Table 5 6x6 True Negative Contingency Table For All Sites Combined All 786 Cases Determ...

Страница 12: ...tion Unadjudicated Manual Review Arm Diagnosis NEG ASCUS AGUS LSIL HSIL CA TOTAL NEG 4 12 1 17 ASCUS 13 16 20 1 50 AGUS 0 LSIL 8 20 115 12 155 HSIL 5 9 14 CA 0 TOTAL 21 40 0 152 23 0 236 Among the 236...

Страница 13: ...dy was conducted to compare the Bethesda System 2001 results obtained by a Cytotechnologist and a Cytopathologist when their review was limited to 22 fields that were selected by the ThinPrep Imaging...

Страница 14: ...rcinoma 1 Adenocarcinoma In situ Total 33 Total 33 Total 33 In the intended use of the ThinPrep Imaging System Imager the Cytotechnologist would perform a full manual slide review of each of these cas...

Страница 15: ...s 66 versus the Imager Review cases 29 The adjudicated results were used as a gold standard to define true specimen adequacy classifications of the Bethesda System SAT SBLB and UNSAT There were 58 tru...

Страница 16: ...inPrep Imager System Refer to the ThinPrep Imaging System Review Scope Operator s Manual for instructions on the proper use of these methods G 5 CYTOTECHNOLOGIST SCREENING RATES Daily Cytotechnologist...

Страница 17: ...specificity by site The table also presents the prevalence of ASCUS LSIL and HSIL among the reviewed slides and the respective screening daily rates of each review method The daily screening rates ar...

Страница 18: ...workload counting and for establishing workload limits It is the responsibility of the Technical Supervisor to evaluate and set workload limits for individual cytotechnologists based on laboratory cl...

Страница 19: ...adjudication review Adjudication was done at a facility that was not one of the study sites conducting the study Slides for adjudication were evenly divided between three 3 adjudication panels each c...

Страница 20: ...est 0 1 ASC US Positive Percent Agreement Negative Percent Agreement Lab CT Pathologist Imager Assisted 95 CI Manual 95 CI Difference 95 CI Imager Assisted 95 CI Manual 95 CI Difference 95 CI 93 8 95...

Страница 21: ...eement Lab CT Pathologist Imager Assisted 95 CI Manual 95 CI Difference 95 CI Imager Assisted 95 CI Manual 95 CI Difference 95 CI 93 9 90 0 3 9 86 1 85 3 0 8 1 215 229 206 229 9 229 509 591 504 591 5...

Страница 22: ...e Percent Agreement Lab CT Pathologist Imaged 95 CI Manual 95 CI Difference 95 CI Imaged 95 CI Manual 95 CI Difference 95 CI 93 7 88 3 5 4 86 7 86 7 0 0 1 104 111 98 111 6 111 615 709 615 709 0 709 87...

Страница 23: ...5 CI Manual 95 CI Difference 95 CI Imaged 95 CI Manual 95 CI Difference 95 CI 90 7 80 2 10 5 86 8 89 1 2 3 1 78 86 69 86 9 86 637 734 654 734 17 734 82 7 to 95 2 70 6 to 87 3 2 9 to 18 8 84 1 to 89 0...

Страница 24: ...itive ASC H two out of three rated it positive one out of three or none of them Table 21 Laboratory Cytotechnologist Pathologist Agreement All Results ASC H ASC H Manual Review Three lab CTs have read...

Страница 25: ...97 7 In Table 23 for ASCUS the number of specimens is shown for which various levels of agreement among the CTs occurred Either all three CTs rated the slide as positive ASCUS two out of three rated i...

Страница 26: ...the negative percent agreement percent of specimens of ASCUS diagnosis with Imager assisted review by a majority of laboratory CT Pathologists among all specimens of ASCUS diagnosis with manual revie...

Страница 27: ...ll cytologic diagnoses were determined in accordance with Bethesda System 2001 criteria Of the 1260 specimens enrolled 7 specimens were excluded 3 specimens were excluded because of expiration time an...

Страница 28: ...f cytotechnologist pathologist data Table 26 Sensitivity and Specificity for Genesis TIS and Genesis Manual Review Results with Genesis Diagnostic Threshold ASCUS In the study there were 556 specimens...

Страница 29: ...402 71 7 80 0 4 5 0 9 8 0 844 93 6 790 844 91 7 95 1 94 5 798 844 92 8 95 9 0 9 2 4 0 5 1 Genesis TIS Genesis Manual Table 28 Sensitivity and Specificity for Genesis TIS and Genesis Manual Review Resu...

Страница 30: ...3 6 5 0 6 12 4 1076 96 1 1034 1076 94 8 97 1 96 7 1041 1076 95 5 97 7 0 7 1 7 0 3 1 Genesis TIS Genesis Manual Table 30 Sensitivity and Specificity for Genesis TIS and Genesis Manual Review Results w...

Страница 31: ...Review method is equivalent to the Manual Reviewmethod For all sites combined for HSIL the improvement in specificity of the Imager Review method over the Manual Review method is statistically signif...

Страница 32: ...2002 287 2114 2119 2 Kurman RJ Solomon D The Bethesda System for Reporting Cervical Vaginal Cytologic Diagnoses Springer Verlag 1994 3 Schafer J L Multiple imputation a primer Statistical Methods in...

Страница 33: ...Table of Contents Table of Contents...

Страница 34: ...ATION SECTION A General 2 1 SECTION B Action Upon Delivery 2 1 SECTION C Preparation Prior to Installation 2 1 SECTION D Post Installation Storage and Handling 2 4 Chapter Three OPERATION OF THE IMAGE...

Страница 35: ...UO MAINTENANCE SECTION A Clean Verification Slide 5 1 SECTION B Replacing the User Accessible Fuses 5 3 SECTION C Replacing the Imaging Station Air Filter 5 6 SECTION D Clean the Cassette Mapping Sens...

Страница 36: ...Imager Duo Operator s Manual iii Chapter Eight SERVICE INFORMATION 8 1 Chapter Nine ORDERING INFORMATION 9 1 Chapter Ten REMOTE SITE SERVER USER S GUIDE 10 1 Index...

Страница 37: ...iv Imager Duo Operator s Manual This page intentionally left blank...

Страница 38: ...1 Introduction 1 Introduction...

Страница 39: ...atabase and communicates to the Review Scope The User Inter face is a menu driven graphical display used by the operator for operating the equipment The Imager Duo includes Imaging Station images the...

Страница 40: ...Imager Duo Operator s Manual Figure 1 1 The ThinPrep Imaging Station Image Processor Controller Server and User Interface Imaging Station User Interface Monitor Keyboard and Mouse Image Processor Con...

Страница 41: ...INTRODUCTION 1 Imager Duo Operator s Manual 1 3 ThinPrep Imager Duo System Laboratory Flow Figure 1 2 Lab Flow...

Страница 42: ...only perform slide screening and a Server is used at that location to import data from an imaging site The Cytotechnologist CT reviews slides at the Review Scope RS The RS con sists of elements of a s...

Страница 43: ...ensity will be stored in the computer s database The cell spot is imaged Slide review by the Cytotechnologist During Autolocate the system presents the 22 selected fields of view in geographic order t...

Страница 44: ...the stain and recommendations for coverslipping Special Precautions There are conditions that might result in a slide not being successfully imaged Some conditions may be prevented or corrected by fol...

Страница 45: ...Specimen sample the use of lubricants e g KY Jelly should be minimized prior to specimen collection Lubricants can adhere to the filter membrane and may cause poor cell transfer to the slide Stain do...

Страница 46: ...Operator s Manual Figure 1 4 Front View Imaging Station Imaging Station Power On Indicator Cassette Platform Divider Slide Cassette In Position 1 of 10 Positions Robot Shield Imaging Station Housing...

Страница 47: ...n Figure 1 6 Internal Components Covers Removed Fuses inside On Off Switch Power Cord Firewire USB Serial Interconnection Cables to Image Processor Controller Air Filter Model Rating Labels Serial Num...

Страница 48: ...t the Park Station with a Slide Robot Shield Removed OCR Station Hold Station Verification Slide Station Imaging Stage 0123456 7890049 Slide ThinPrep 7706024 8000253 Verification Slide ThinPrep Micros...

Страница 49: ...ions Figure 1 9 Imaging Station shown without doors Recommended clearances 3 76 2 mm on all sides Slide Cassette Dimensions Figure 1 10 Slide Cassette Loaded with Slides Approximate Weight 170 lbs 77...

Страница 50: ...etwork are other manufac turers products They will be unpacked and installed by Hologic personnel Please refer to the documents that came with them for specifications operation safety and maintenance...

Страница 51: ...an office or a clean laboratory environment Altitude 0 meters sea level to 2000 meters Atmospheric Pressure 1100 millibar to 500 millibar Power Voltage 100 240 Volts Alternating Current no selection...

Страница 52: ...e condition has been removed The PTCs locations and functions are as follows System Hardware Electromechanical Processor SHEMP F1 1A PTC 5V sensor power to sensor ports J4 and J5 F2 1A PTC 5V sensor p...

Страница 53: ...to sources of strong electromagnetic radiation e g unshielded intentional RF sources as these may interfere with the proper operation This product is in vitro diagnostic IVD medical equipment This pro...

Страница 54: ...an it periodically the operator does not use it Figure 1 13 Verification Slide Power On Self Test POST At the time the Image Processor Controller and the Imaging Station are pow ered on refer to Apply...

Страница 55: ...ctions or situations that could damage equipment produce inaccurate data or invalidate a procedure although personal injury is unlikely A Note provides useful information within the context of the ins...

Страница 56: ...vitro diagnostic medical device Indicates a medical device that is intended to used as an in vitro diagnostic medical device ISO 15223 1 Medical devices Symbols to be used with medical device labeling...

Страница 57: ...number so that the medical device can be identi fied ISO 15223 1 Medical devices Symbols to be used with medical device labeling and information to be supplied Section 5 1 6 Serial number Indicates t...

Страница 58: ...ring Information for fuse specification and ordering WARNING Moving Parts The instrument contains moving parts Keep hands loose clothing jewelry etc clear WARNING Grounded Outlet To ensure safe operat...

Страница 59: ...sed of in your laboratory refuse Disposal of instrument fuses No special instructions used fuses may be dis posed of in your laboratory refuse Disposal of the device Please contact Hologic Service ref...

Страница 60: ...1 INTRODUCTION 1 22 Imager Duo Operator s Manual This page intentionally left blank...

Страница 61: ...2 Installation 2 Installation...

Страница 62: ...DELIVERY Remove and read the Operating Instructions Prior to Installation sheet attached to the packing carton Inspect the packing cartons for damage Report any damage immediately to the shipper and o...

Страница 63: ...age Processor Controller the Imaging Station the monitor keyboard mouse the printer and a multiport Ethernet switch must be located in the same area so that interconnection cables easily reach each co...

Страница 64: ...re 2 2 The distance that Review Scopes may be located away from the Image Processor is determined by the requirements of the specific apparatus used to create the network The throughput of the extende...

Страница 65: ...then shut down the Imaging System refer to page 3 29 WARNING Grounded Outlet The uninterruptable power supply will be installed and setup at the time of instrument installation Please refer to the ma...

Страница 66: ...3 Operation 3 Operation...

Страница 67: ...indicates which slide s may require further operator attention At any time during slide processing the operator may interrupt and resume batch processing or interrupt and cancel processing System dat...

Страница 68: ...gure 3 1 Typical Batch Process Interrupt Resume Interrupt Cancel Power Off Open Doors Unload Cassettes Load Slide Cassettes Doors lock while warming up Doors unlock Power On View Print Reports Batch C...

Страница 69: ...plugged in to a grounded outlet and all devices are plugged into the UPS backup outlets Do not operate any devices if the UPS is not plugged in Application of power to the equipment must be performed...

Страница 70: ...on before turning on the Image Processor Controller Turning on power to the Imaging Station initiates a 2 minute warm up cycle During this time the sliding doors are locked to prohibit loading and unl...

Страница 71: ...omplete in 2 minutes please wait is displayed on the user interface Figure 3 6 Figure 3 6 Warmup in Progress Note When the warmup cycle ends the message disappears and the doors are unlocked To power...

Страница 72: ...ion is powered on the slide cassettes are loaded properly and the doors are securely closed prior to slide processing The Imaging Station images each slide and sends the data to the Image Processor Co...

Страница 73: ...mbers are removed from the patient database during a service visit so do not use that sequence Slide Barcode labels may be 1 or 2 dimensional see the table below for any restrictions required Refer to...

Страница 74: ...3 OPERATION OF THE IMAGER DUO 3 8 Imager Duo Operator s Manual Figure 3 8 Examples of How Barcodes Fit Onto a ThinPrep Slide 1 Dimensional barcode examples 2 D barcode example OCR format...

Страница 75: ...age and to provide a coordinate system for location of fields of view The same marks are used to ref erence the same slide data at a Review Scope Figure 3 9 ThinPrep Microscope Slide for Use With the...

Страница 76: ...t extend beyond the surface of the slide The label is applied smoothly without overhang Lifted edges may stick during handling causing broken slides or instrument malfunction The slide is appropriatel...

Страница 77: ...on open the left or right sliding door to access the desired platform location Figure 3 11 Figure 3 11 Imaging Station and Slide Cassette Loading Platform SECTION F Right Door Left Door Shown with doo...

Страница 78: ...2 Loading a Slide Cassette Into the Imaging Station 3 Push the cassette forward to seat the base firmly against the divider stops When it is fully inserted the cassette engages an optical sensor that...

Страница 79: ...ssettes into available positions on the Imaging Sta tion platform Note There are ten slide cassette positions Depending on the batch size load as many cassettes as necessary Each cassette can hold 25...

Страница 80: ...3 OPERATION OF THE IMAGER DUO 3 14 Imager Duo Operator s Manual Figure 3 14 Partial and Fully Loaded Cassette Locations 5 Fully close the Imaging Station sliding doors...

Страница 81: ...of the display position the cursor on the green GO button and click once Figure 3 15 Begin Slide Processing Go Button OR b At the top of the menu bar select Slide Processing and then in the drop down...

Страница 82: ...ocessed This checks that the slide imaging system is functioning properly During Slide Processing As slides are processed the color of the cassette graphic on the monitor changes from gray to blue to...

Страница 83: ...vent Log located on the right side of the user interface Refer to Figure 3 19 The Event Log lists unprocessed slides in sequence as they occur Each listing contains the event description event number...

Страница 84: ...rmine if there is any corrective action that would allow it to be successfully processed in another batch This may include Slide incorrectly loaded into the slide cassette Slide was not completely dry...

Страница 85: ...via the user interface A batch might be interrupted for reasons below CAUTION Do not remove a partially processed slide cassette Data may be lost To run a Stat slide refer to Stat Slide Processing on...

Страница 86: ...red STOP button and click once Figure 3 20 Figure 3 20 Slide Processing Stop Button OR b At the top of the menu bar select Slide Processing and then in the drop down menu click once on Interrupt Slid...

Страница 87: ...cessing at the current slide The slide will not be completed The slide will be put away and the Imaging Station mechanisms will come to an orderly halt The doors will unlock If the batch is resumed wi...

Страница 88: ...ive not high lighted Refer to Figure 3 23 Figure 3 23 Slide Processing Interrupted Note The duration of the interruption cycle is dependent on where in the pro cessing operation components are It may...

Страница 89: ...lides in the cassette must be rerun b If uncompleted slide cassettes are removed they must be reimaged at another time to be considered complete The system will start with the next unprocessed cassett...

Страница 90: ...Slide Processing 1 If the system is to be shut down remove the slide cassettes Run unpro cessed cassettes in a later batch Partially processed cassettes are considered unprocessed and must be run in...

Страница 91: ...o proceed with a stat slide or click Cancel to continue with the batch in progress A message is displayed that the batch is being interrupted The system will always interrupt by saving the cassette pr...

Страница 92: ...erator s Manual Figure 3 28 Run Stat Cassette Instructions Place the cassette in position 10 replacing the cassette already present at posi tion 10 if there is one close the doors and click the Contin...

Страница 93: ...ssing the stat slides Figure 3 29 The doors unlock when the system is ready A dialog box prompts the operator to remove the stat cassette and replace it with the original slide cassette if one was pre...

Страница 94: ...mpleted The green GO but ton on the menu bar is highlighted as available Refer to Figure 3 31 Figure 3 31 Slide Processing Complete The doors will unlock It is safe to open the Imaging Station and rem...

Страница 95: ...ed prior to equipment shut down Normal Shut Down Server Before shutting off the Server make sure that all other IPCs and Review Scopes that are networked to it are either turned off or not actively co...

Страница 96: ...er Shut Down Button 3 Select Yes to continue with shut down Figure 3 36 Figure 3 34 Confirm Shut Down Image Processor 1 To power off the Image Processor at the user interface use the mouse to pull dow...

Страница 97: ...ondition occurs the Uninterruptable Power Supply UPS issues an audible alarm when providing backup power There will be approxi mately 30 minutes of power provided Follow the instructions for shutting...

Страница 98: ...r s Manual REBOOTING THE SYSTEM If the Imager Duo is being rebooted for any reason 1 Shut down components as described in Section I 2 Allow 15 seconds to pass before powering on the monitor Server Ima...

Страница 99: ...4 Software Menu 4 Software Menu...

Страница 100: ...box expands to display the functions Note If a function is unavailable some functions cannot be performed during slide processing for instance the function will be visible but grayed out Clicking on t...

Страница 101: ...the results from a processed batch Up to 250 reports may be viewed from the report window in Data Management They are listed in chronological order starting with the most recent Refer to Figure 4 4 T...

Страница 102: ...eport to view or print by clicking on it to highlight it and then click ing the View button or by double clicking on the report date A report in the list that reads incomplete for End Time indicates t...

Страница 103: ...Totals Slides System Errors Slide Events Slides Ready for Review N A 83668809999025 74046379982 74046379982 System Errors Sep 20 2012 03 20 20 PM Error Number Description Date Time SlideNotFound 121 2...

Страница 104: ...2879902569 78234766393214 98745239678698 10004554576577 10013245684322 08456756495430 54894208423084 65743566788989 Cassette 3 7653622367855 76823451545675 12454608665446 00425856784356 66567547583111...

Страница 105: ...monitor keyboard and mouse connected to it Click on the Shut Down System option A confirmation window will appear Figure 4 8 Figure 4 8 Confirm Shut Down Click Yes to shut down the system The applicat...

Страница 106: ...System Menu select Shut Down Server Figure 4 9 Select Shut Down Server The Data Management Server window will appear Figure 4 10 Note You can navigate to the Data Management menu and click on System t...

Страница 107: ...ckup function enables the operator to make back ups of the database onto a CD DVD a USB drive or the NAS drive local area storage if your sys tem is configured with Hnet The backup media must be on th...

Страница 108: ...is example it shows that if the system detects more than one USB drive is present a drop down box prompts the operator to select which drive to write to If CD or USB is not present a message will prom...

Страница 109: ...14 Immediate Backup Backup Type Scheduled Scheduled backups are selected to occur at a future date and time and can be scheduled to recur daily weekly monthly or on a one time basis The schedule will...

Страница 110: ...ata records are selected for Archive Purge this could take a long time Plan to do this when you are not running batches Consider breaking a very large database into batches such as a year at a time No...

Страница 111: ...ta Management Menu Click on the Archive icon to launch the dialog window Figure 4 17 Archive Selection Screen Archive function available on Server Data Management menu Security feature is enabled The...

Страница 112: ...ion will be grayed out and cannot be selected To purge records without backing them up deselect the checkbox Figure 4 18 Backup Records Before Purge Option Select a date from which slide data records...

Страница 113: ...inted Click Close to return to the Archive win dow To proceed with the Archive function click on the Go button If the backup checkbox was not selected a message prompts the user to confirm that no bac...

Страница 114: ...the slide data records for the date range are purged Figure 4 23 Figure 4 23 Archive Delete Function in Process If a large number of data records have been selected for backup purge this function cou...

Страница 115: ...Duo Operator s Manual From a Server Data Management menu enable Security if it is not already acti vated Click on the Restore Archive icon in the menu Figure 4 25 Restore Archive on Server Data Manage...

Страница 116: ...ive field select which media the archived material is stored on A window with all bak files found will appear Select the archive file that is to be loaded by clicking on it Figure 4 27 Select which st...

Страница 117: ...aded it is available for browsing Note If this is a large file this step could take a long time A window listing the slide IDs appears Type the ID or part of the ID into the Search field of the browse...

Страница 118: ...may be saved to a DVD CD USB drive or to the NAS drive if your system is configured with Hnet The media containing exported data would accompany imaged slides to a remote site for slide review Only i...

Страница 119: ...num ber is often preceded or followed by fixed characters for example a date or a Lab ID code or by zeros These fixed and sequential numbers can be used for filtering the database for exporting data...

Страница 120: ...xt use the Slide ID Filter fields to add filter criteria to the range or even to filter just on variables Slide ID Filter Fields The filter fields allow you to select variables that may precede or fol...

Страница 121: ...012 and the accession id nothing else is needed If a single character always separates the date code from the accession number and you want the system to ignore it press the wild card single button to...

Страница 122: ...review data is exported only image data Figure 4 34 Confirm Export Before Writing If the Confirm export before writing checkbox is checked upon clicking on the Export button a window will display a li...

Страница 123: ...nstalled and turned on for the report to print out Figure 4 37 Use Detailed Export Log The Use Detailed Export Log checkbox ensures that a list of all slide IDs exported will be printed in the report...

Страница 124: ...emplates To use a template that has already been created click on the name of the tem plate in the Data Management menu The Export Parameters window will dis play with the filter profile parameters al...

Страница 125: ...is configured with Hnet If media is not already inserted in the Server computer you will be prompted for it As listed on the Export window the system checks the media prepares the data writes the data...

Страница 126: ...imported To access the Import window click on the Import icon in the Data Management menu See Figure 4 42 Figure 4 42 Import Window Place the media containing imaged data into the correct drive of the...

Страница 127: ...w To see the import data details click on the Details button A window will open to show the import data information and a table of slide IDs that will be imported Refer to Figure 4 44 Click on Print t...

Страница 128: ...button As listed on the Import window the system checks the media prepares the data updates the database and shows a completed progress bar when finished There will be a check mark next to each actio...

Страница 129: ...been imported into the database A conflict is a condition where a slide record is already in the database and has differing values from the slide record being imported The slide data is not imported a...

Страница 130: ...he Close button Lock Slides Specific slides and their slide data records can be selected and locked so that they are never purged from the database if the database is archived They can be deselected a...

Страница 131: ...HE SOFTWARE MENU 4 32 Imager Duo Operator s Manual Figure 4 47 Lock Slides Screen Slide IDs must be entered one at a time Click on the Lock button to exempt the slide and its associated data record fr...

Страница 132: ...e Maintenance option of the Data Management menu and the Main tenance window appears Figure 4 48 Enter Slide ID and click Lock button to prevent slides from being purged List of slide IDs that have be...

Страница 133: ...urn to the main interface User Accounts The User Accounts window is used to assign and retire User IDs needed for users to login to screening sessions at a Review Scope Click on the User Accounts sele...

Страница 134: ...ra tor first and last names in the appropriate fields and click on the Apply button To retire a user ID for instance if an employee no longer works in the lab select the ID by clicking on the name in...

Страница 135: ...ogs and History RS Users Slide Data Records Workload Rate Report and the Run Report Report Logs and History The Logs and History reports gives the operator access to information pertain ing to system...

Страница 136: ...e correct radio button and then click on the View button The report will display as many lines of data as selected in the report limit setting 500 to 5000 refer to System Lab Settings on page 4 56 Cli...

Страница 137: ...rt See Figure 4 52 Figure 4 52 System Error Log The errors are displayed with the most recent events at the top and older events following The report will display as many lines of data as selected in...

Страница 138: ...st displays the Review Scopes that are connected to the network Select one by clicking on the RS serial number listed Figure 4 53 Note An RS that is on the network but has not written an error to the...

Страница 139: ...The report will display as many lines of data as selected in the report limit setting 500 to 5000 refer to System Lab Settings on page 4 56 Click on the Print button to print the report Click on the S...

Страница 140: ...ed by their serial num bers the Image Processors are listed by their System IDs The report is a tally of all slides processed to date See Figure 4 55 Figure 4 55 System Usage History Report Click on t...

Страница 141: ...events following Each event entry shows which cassette number and which slot the slide was in what the Slide ID was time and date stamp and a brief error code description The report will display as m...

Страница 142: ...menu Click on the RS Users submenu to open the window see Figure 4 57 Figure 4 57 Report Operators Window Select which parameter you would like to have the database query lab name ID names and which o...

Страница 143: ...entries that end with a particular string of characters Click on the View button to view the report see Figure 4 58 Figure 4 58 Operators Report Click on Print to print the report Click on the Save to...

Страница 144: ...the Slide Data Records option from the Data Management menu to open the window Figure 4 59 Figure 4 59 Slide Data Record Window The slide data record report may be sorted by slide ID information by s...

Страница 145: ...ata reports may be sorted according to which Imager they were imaged on Select the Imager name from the drop down list Image date the report may be modified to show slide records for a particular date...

Страница 146: ...hat have not been reviewed or all slides regardless of whether they have been reviewed Review Scope Serial Number slide data reports may be sorted according to which Review Scope they were screened on...

Страница 147: ...ect which lab the data is associated with Operator ID the slide data report may be sorted according to which operator reviewed slides Select the operator ID number from the pull down list Figure 4 63...

Страница 148: ...the report click on the Print button Click on the Save to USB button to save the report to a USB key or the report may be saved the NAS drive if your system is config ured with Hnet To close the wind...

Страница 149: ...of time The review count is split into FOV field of view only screenings in which no cells were marked during Autolo cate and Full Review screenings in which cells were marked and a full scan Autosca...

Страница 150: ...key or the report may be saved to the NAS drive if your system is configured with Hnet To close the report click on the Close button to return to the Workload display The CT workload history generate...

Страница 151: ...History has a count of manual slide reviews CT Reviews The CT Review Report generates a list of selected RS User IDs or all User IDs plus a date range and scan type all full or FOV The report then di...

Страница 152: ...Report Rate Report The rate report takes the total number of errors imaging and system against the total number of slides imaged and calculates the percentage of errors The operator selects which Imag...

Страница 153: ...4 OPERATION OF THE SOFTWARE MENU 4 54 Imager Duo Operator s Manual Figure 4 69 Rate Report Window...

Страница 154: ...r the report may be saved to the NAS drive if your system is configured with Hnet To close the report click on the Close button to return to the Workload display Report Run Report The Run Report displ...

Страница 155: ...nter the Lab name which will appear on reports that use it set the date and time and the preferred date time format enter the Imager name turn the audible alarm on or off and choose how many lines of...

Страница 156: ...a batch If the wrong slide label type is selected and a batch begins after rejecting 3 slides an error will occur and the next cas sette is attempted The instrument will attempt to read all cassettes...

Страница 157: ...ort date time format to select the preferred format for the date and time click on the pull down list to see the options Select the desired format by click ing on it To save that setting click the App...

Страница 158: ...t to highlight it Any printed material will output on that printer Page size the drop down list will display the page sizes the selected printer can accommodate Select the desired page size by clickin...

Страница 159: ...ck on the Discover button to see what printers are on the network To install a printer select the printer by clicking on it and then click the Install button To install several printers at once hold t...

Страница 160: ...t this data The Security feature is system wide the Server and all workstations will have the same restrictions Enabling Security will reveal access to Slide Data Record Archiving The security feature...

Страница 161: ...the characters into the top field They will be substi tuted with dots on the display as they are typed Figure 4 80 Confirm the pass word by entering it again in the second field Click OK when finishe...

Страница 162: ...ank field is not allowed The password is case sensitive Note If your password is lost or forgotten a Hologic Service visit is required to disable the security Restricted Data When Data Management has...

Страница 163: ...4 OPERATION OF THE SOFTWARE MENU 4 64 Imager Duo Operator s Manual Figure 4 82 Slide Data Record Report Selection Criteria Slide Data Record Window Slide Data Record Window with Security Enabled...

Страница 164: ...te button See Figure 4 83 Figure 4 83 Validate Password Window If the password entered was not correct an Invalid password entry box is dis played Figure 4 84 Figure 4 84 Invalid Password Entry Click...

Страница 165: ...the Data Management pro gram To exit the access mode click on the Close button at the upper right of the data management window When Data Management is opened again security will be enabled When a pa...

Страница 166: ...ange button to enter a new password Figure 4 86 Figure 4 86 Change Password The password box will appear Enter a new password and click OK when done Figure 4 87 Enter New Password Note Only one passwo...

Страница 167: ...gure 4 88 Security Disable Window To disable the password security click on the Disable button A dialogue box will appear with the question Disable Security Click OK to disable the pass word protectio...

Страница 168: ...the server click on the Shutdown button Figure 4 90 Server Window System Service The SAM service feature is for use by Hologic Service personnel It is password protected Gather Diagnostics Gather Dia...

Страница 169: ...ure 4 91 Gather Diagnostics The instrument information will be gathered into a folder on the USB device titled ImagerDiagnostics zip The files in the folder are password protected The zip file can be...

Страница 170: ...use the system software is required in order to retrieve and return the verification slide for the operator Refer to Figure 4 92 Refer to the Clean Verification Slide procedure in Chapter Five for ins...

Страница 171: ...4 OPERATION OF THE SOFTWARE MENU 4 72 Imager Duo Operator s Manual This page intentionally left blank...

Страница 172: ...5 Maintenance 5 Maintenance...

Страница 173: ...de must be removed follow this procedure to remove and return it CAUTION Verification slides are NOT interchangeable Each slide is unique to the system it is run on If a verification slide is damaged...

Страница 174: ...d place it in the slide cassette A please wait message is displayed Figure 5 2 CAUTION Do not place the empty cassette into an empty slot until directed to do so by the system Figure 5 2 Retrieve Veri...

Страница 175: ...lace the verification slide into slot 1 of the cassette and install the cassette onto the loading platform of the Image Processor Note The slide must be placed in slot 1 the bottom slot of the slide c...

Страница 176: ...cord from the uninterruptable power supply 3 Remove the power cord from the receptacle on the instrument 4 Using the small 1 slotted screwdriver provided with the system carefully pry open the cover...

Страница 177: ...ert the fuse holder back into the power entry module The module can only be installed in one orientation 10 Close the access cover Figure 5 8 Install the Fuse Holder 11 Plug the power cord into the so...

Страница 178: ...1 Turn off power to the Imaging Station refer to Shutting Down the Image Processor on page 3 29 2 Loosen the four thumb screws at each corner of the air filter cover panel Figure 5 9 3 Lift off the co...

Страница 179: ...sor is located behind the robot shield It is attached to the side of the slide transfer arm Refer to Figure 5 11 Open the right hand door of the Imaging Station Gently rotate the robot shield to the l...

Страница 180: ...5 IMAGER DUO MAINTENANCE 5 8 Imager Duo Operator s Manual This page intentionally left blank...

Страница 181: ...6 Troubleshooting 6 Troubleshooting...

Страница 182: ...nd System Errors SLIDE EVENTS During batch processing slide events are logged in a file and displayed on the user interface in the Slide Processing Event Log window See Slide Processing Event Log page...

Страница 183: ...Image Processor the same slide cannot undergo Autoreview at the Review Scope The slide must be manually reviewed The Slide Processing Event Log displays slide events of the batch in progress Any Slide...

Страница 184: ...nto the cassette with the label face up and toward the opening OCR malfunction Contact Hologic Technical Support Slide already imaged The slide has been imaged The slide may undergo review at the Revi...

Страница 185: ...aded with the label up and toward the front opening of the cassette Load one slide per slot Slot has multiple slides Slides not loaded into the slide cassette correctly Slide with a lifted label edge...

Страница 186: ...re user or service personnel intervention During operation the system encounters an error condition for which it has a sequence of steps to perform to recover from the condition The system restarts th...

Страница 187: ...r Assessment dialog box is displayed Figure 6 3 If the audible alarm is enabled the instrument will beep intermittently until a recovery action is chosen CAUTION Do not remove any slides or cassettes...

Страница 188: ...me of the error condition At this point the operator may do one of the following Begin processing by clicking on the green GO button The system will start processing at the point where it left off Rem...

Страница 189: ...tton is available Figure 6 4 The system must be restarted Figure 6 4 User Assisted Shutdown Click on the button and allow the system to shut down The system will shut down the application and then exi...

Страница 190: ...an the edges of the slide Figure 6 5 ThinPrep Imaging Microscope Slide Dry Mounting Media The mounting media must be dry before loading slides into the cassettes and imaging them Wet or tacky mounting...

Страница 191: ...Label Format and Placement The slide label must have the correct accession ID format for the Imager to suc cessfully scan and read the ID Refer to SLIDE LABELING on page 3 7 The slide label must be po...

Страница 192: ...d and only one slide per slot If slide was loaded correctly see Section C Slide Preparation and Quality 3107 Three consecutive 3106 errors within a cassette generate a 3107 3111 Slot has multiple slid...

Страница 193: ...sette into any available position on the IS Close the doors and click the CONTINUE button The system will place the slide in the cassette When finished open the doors and remove the cassette If there...

Страница 194: ...secutive 4450 4451 4452 errors in any combination within a cassette generates a 5050 error See errors 4450 through 4475 for details 5051 Three consecutive 4453 4454 4455 errors in any combination with...

Страница 195: ...reparation and Quality 6618 Three consecutive 6617 errors within a cassette generate a 6618 error 6619 Vibration Error The imaging station is sensitive to vibrations Look for vibrating equipment such...

Страница 196: ...fail The imaging station is sensitive to vibrations Look for vibrating equipment such as a vortexer near the imaging station Be aware of other things slam ming doors high traffic area that may also ca...

Страница 197: ...port export backup An error occurred The task may not be complete An error occurred during the import export or backup Try the function again An unexpected error occurred An error occurred during impo...

Страница 198: ...to the media The media type failed to write properly Try again with a different DVD CD or USB depending on what type of media was used Make sure the storage media is in the Server drive Failed to del...

Страница 199: ...the export parameters to match slide IDs that are in the database Template has been deleted since last refresh Recreate the template The user tried to modify a tem plate that is no longer in the datab...

Страница 200: ...DVD CD or USB Unable to get import results The Results button was pressed while the server was still updating the database tables The server was still cleaning up processes Try the function again Una...

Страница 201: ...6 TROUBLESHOOTING 6 20 Imager Duo Operator s Manual This page intentionally left blank...

Страница 202: ...7 Defi nitions and Abbreviations 7 Defi nitions and Abbreviations...

Страница 203: ...esent in the slot on the loading platform Unknown Unknown with respect to their completion status may occur as the result of an unexpected loss of power This status applies to any cassettes depicted a...

Страница 204: ...ering which removes normal cells and recognized artifacts and undergone algorithmic rat ing An object of interest may be a single cell or a cluster Power Cycle Turning the Imager Duo off and then on a...

Страница 205: ...ide A specific brand of glass microscope slide that must be used with the ThinPrep system of instruments The slide has features on it that enable automated regis tration of the slide with the Image Pr...

Страница 206: ...7 DEFINITIONS AND ABBREVIATIONS 7 4 Imager Duo Operator s Manual This page intentionally left blank...

Страница 207: ...8 Service Information 8 Service Information...

Страница 208: ...e faxed to the attention of Customer Service at 508 229 2795 Warranty A copy of Hologic s limited warranty and other terms and conditions of sale may be obtained by contacting Customer Service at the...

Страница 209: ...8 SERVICE INFORMATION 8 2 Imager Duo Operator s Manual This page intentionally left blank...

Страница 210: ...9 Ordering Information 9 Ordering Information...

Страница 211: ...30 a m to 5 30 p m EST Monday through Friday excluding holidays Customer Service Product orders which include standing orders are placed through Customer Service by phone during business hours at 1 8...

Страница 212: ...ller Item Description Quantity Part Number Slide Cassette 10 pack Additional slide cassettes 1 pkg 70773 001 Operator s Manual Additional Operator s Manual ea MAN 08735 001 Fuse 5x20 mm Time Delay Gla...

Страница 213: ...10 Remote Site Server User s Guide 10 Remote Site Server User s Guide...

Страница 214: ...nto a Server PC and slide review is performed A remote site is equipped with a Server PC with monitor keyboard and mouse printer Uninterruptable Power Supply interconnection hub s and a Review Scope R...

Страница 215: ...component within 1 8 meters 6 feet of each other Refer to Figure 10 1 Review Scopes connected to the Server may be located up to 100 meters 328 feet away or extended another 100 meters using a second...

Страница 216: ...equirements of the specific apparatus used to create the net work The throughput of the extended network must be capable of 10Mbps or greater Note High level interconnecting devices routers and gatewa...

Страница 217: ...et The uninterruptable power supply will be installed and setup at the time of instrument installation Please refer to the manufacturer s guide for proper operation maintenance and disposal Note The u...

Страница 218: ...he illustration shown here The system is ready for use when the Data Management Program screen is dis played Refer to Figure 10 4 The printer and Review Scopes may be powered on before or after the Se...

Страница 219: ...apter 4 Section D DATA MANAGEMENT MENU for instructions on operating the Data Management functions Note The Server user interface only has the Data Management portion of the Imaging System application...

Страница 220: ...lick on Server Figure 10 6 Server Status and Shut Down Window Click on the Shutdown button A dialog box appears prompting confirma tion of shut down Are you sure that you want to shut down the server...

Страница 221: ...the Data Management window If Yes is chosen the Data Management application closes the computer Win dows XP application closes and then the power to the Server is shut off The monitor keyboard and mo...

Страница 222: ...Index Index...

Страница 223: ...ve 4 11 Auto print batch reports 4 5 B barcode format 3 7 Batch 7 1 Batch process diagram 3 2 C Cancel The Batch After Interrupting Slide Processing 3 24 Cassette 7 1 cassette locations 3 13 cassette...

Страница 224: ...mat 4 58 Dimensions 1 14 Disposal consumables 1 21 device 1 21 electrical and electronic equipment 1 21 During Slide Processing 3 16 E Environmental specifications 1 13 Errors 6 11 Event Log 3 17 Even...

Страница 225: ...g System Usage History 4 41 Import data 4 27 Install Printers 4 60 Installation 2 1 Interrupt Slide Processing 3 19 3 20 Items Required For Slide Image Processing 3 6 L Lab Settings 4 56 Loading Slide...

Страница 226: ...ocessing Interrupted 3 22 Protective Temperature Coefficient Devices 1 14 R Rate report 4 53 Rebooting the System 3 32 Remote site 10 1 Replace Clean Verification Slide 5 1 Replacing Fuses 5 3 Report...

Страница 227: ...already imaged 6 3 Slide Cassette 9 2 Slide Cassette Imaging Status 3 16 Slide Data Record 7 2 Slide Data Record Report 4 49 Slide Data Records Data Management menu 4 45 SLIDE EVENTS 6 1 Slide has bee...

Страница 228: ...o Recovery Errors 6 5 System Error Log 4 38 SYSTEM ERRORS 6 5 System Printers 4 59 System warmup 3 5 T Technical Support 2 1 8 1 Template export 4 24 Time setting 4 57 Troubleshooting 6 1 U UPS uninte...

Страница 229: ...Operator s Manual ThinPrep Imager Duo Imaging Station...

Страница 230: ...MAN 08735 001 Rev 001 Hologic Inc 250 Campus Drive Marlborough MA 01752 USA 1 800 442 9892 1 508 263 2900 www hologic com...

Отзывы: