background image

13 of 28

Operation and Settings 

(continued)

Setting Date and Time

The 

Aspect Wi-Fi Solar Pro 

is designed to obtain the local time from and to sync with the assigned 

internet time server. If you want to use this device offline, you can set the time and date manually:

1.  In 

Normal Mode

, press and hold 

CLOCK SET

 for 2 seconds to enter 

Date and Time Setting Mode

.

2.  Press 

GRAPH 

CHEVRON-UP

 or 

°F/°C 

CHEVRON-DOWN

 to adjust the value, or press and hold to change rapidly.

3.  While in 

Date and Time Setting Mode

, press 

CLOCK SET

 key to switch to the next setting.

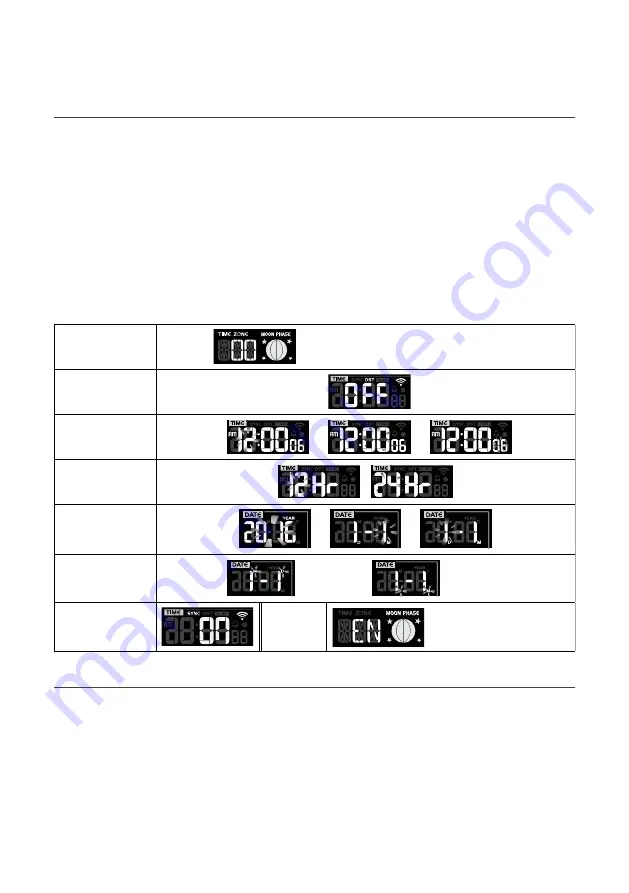
4.  The setting sequence is: 

TIME ZONE 

chevron-right

 DST ON/OFF 

chevron-right

 HOUR 

chevron-right

 MINUTE 

chevron-right

 SECOND 

chevron-right

 12/24 HOUR FORMAT 

chevron-right

 YEAR 

chevron-right

 MONTH 

chevron-right

 DATE 

chevron-right

 M-D/D-M FORMAT 

chevron-right

 TIME SYNC ON/OFF 

chevron-right

 LANGUAGE

5.  After completing the language setting, press 

CLOCK SET

 to save and exit.

Setting Alarm Time

TIME ZONE 

setting

  00H → 01H...23H → -23H...-01H → 00H

DST ON/OFF 

setting

Hour > Minute > 

Second setting


 → 

12/24Hr setting

 / 


Year > Month > 

Day setting


M-D/D-M setting

 Month-Day /  

 Day-Month

Internet time 

sync

Language


EN ↔ FR ↔ DE ↔ ES ↔ 

IT

 ↔ N

L

 ↔ RU ↔ EN


1.  In 

Normal Time Mode

, press and hold 

ALARM


for 2 seconds until the alarm hour digit flashes 
to enter 

Alarm Time Setting Mode

.

2.  Press 

CHEVRON-UP

 or 

CHEVRON-DOWN

 to adjust the value. The 

setting sequence is: 

HOUR 

chevron-right

 MINUTE

3.  Press 

ALARM

 to save and exit.




The alarm icon 

BELL

 will show when alarm is set.




Press 

ALARM/SNOOZE

 to stop the alarm and 

enter snooze. The alarm will sound again after 
5 minutes. The alarm will stop automatically 
without pressing any button in 2 minutes.




Hold 

ALARM/SNOOZE 

for 2 seconds to stop alarm.

Содержание Aspect Wi-Fi Solar Pro

Страница 1: ...1 of 28 User Guide WS5091W...

Страница 2: ...ted LCD display shows informative weather readings with advanced features such as high low alert alarm different weather index multi functional bar chart and maximum minimum records With the built in...

Страница 3: ...3 of 28...

Страница 4: ...OZE 4 INDEX 5 RAINFALL 6 LCD display 7 GRAPH CHEVRON UP 8 F C CHEVRON DOWN 9 HISTORY 10 MAX MIN 11 CHANNEL 12 Status LED 13 Wall mount 14 REFRESH 15 Wi Fi SENSOR 16 CLOCK SET 17 ALARM 18 ALERT 19 RESE...

Страница 5: ...ection and speed 5 Weather index 6 Time sunrise sunset and system status 7 Weather forecast 8 Barometer 9 Rainfall 10 Multi function historical bar chart Wireless Hygro Thermo Indoor Sensor 1 Transmis...

Страница 6: ...in 1 Wireless Outdoor Sensor 1 Wind vane 2 Wind cups 3 Antenna 4 Louvre shield 5 Pole mount fit 35 40mm pole not included 6 Hygro Thermo sensor 7 Battery door 8 Reset 9 Transmission status LED 10 Leve...

Страница 7: ...hang the sensor on Hang the sensor onto the screw by the wall mounting holder You can also place the sensor on a table by itself 6 in 1 Wireless Outdoor Sensor Your wireless outdoor sensor measures W...

Страница 8: ...ing up the Main Console 1 Plug the adaptor into the DC jack 2 Press RESET to restart the Main Console 3 After restart all LCD segments will show The Main Console will enter AP Access Point Mode and th...

Страница 9: ...search the sensors manually Wi Fi Connection Setup To connect the Aspect Wi Fi Solar Pro to Wi Fi it must be registered with Weather Underground Weather Underground setup instructions are correct as...

Страница 10: ...r s security type usually WAP2 Enter your router password Enter the Station ID assigned by Wunderground Enter the Station key assigned by Wunderground Select the direction e g EU countries Longitude i...

Страница 11: ...y type WEP WPA WPA2 open for routers with no password Viewing Live Weather Data 1 To view live data from the wireless outdoor sensor in a web browser visit https www wunderground com and enter your ST...

Страница 12: ...ain Console successfully connects to the Wi Fi router the Wi Fi signal icon WIFI will appear on the LCD display If the Wi Fi signal is not stable or the Main Console is trying to connect to the router...

Страница 13: ...chevron right DATE chevron right M D D M FORMAT chevron right TIME SYNC ON OFF chevron right LANGUAGE 5 After completing the language setting press CLOCK SET to save and exit Setting Alarm Time TIME Z...

Страница 14: ...Main Console where it can receive good sensor signal from the 6 in 1 Wireless Outdoor Sensor Wireless Outdoor Sensor Signal Strength Wireless Indoor Sensor Signal Strength Viewing Different Indoor Ch...

Страница 15: ...Speed Unit Mode and the unit will flash And then press CHEVRON UP or CHEVRON DOWN to change wind speed unit in this sequence m s chevron right km h chevron right KNOTS chevron right mph 2 Press WIND...

Страница 16: ...utdoor Sensor battery compartment for any reference to gain adjustment In this example shown a gain of 1 7 must be entered into the Main Console 1 In Normal Mode on the Main Console press and hold IND...

Страница 17: ...17 of 28 Weather Index continued Operation and Settings continued...

Страница 18: ...rate at which it evaporates The condensed water is called dew when it forms on a solid surface The dew point temperature is determined by the temperature and humidity data from the 6 in 1 Wireless Ou...

Страница 19: ...pressure digit flashes 5 Press CHEVRON UP or CHEVRON DOWN to change the value 6 Press BARO to save and exit When you change the RELATIVE atmospheric pressure value the weather indicators will change...

Страница 20: ...20 of 28 History Graph To view different graphs In Normal Mode press GRAPH to toggle between different types of graph Operation and Settings continued...

Страница 21: ...t MAX GUST chevron right MAX DEW POINT chevron right MIN DEW POINT chevron right MAX WIND CHILL chevron right MIN WIND CHILL chevron right MAX HEAT INDEX chevron right MIN HEAT INDEX chevron right MIN...

Страница 22: ...e user s convenience e g users in the Southern hemisphere it is possible to use the sensor with the wind vane pointing to South 1 Install the 6 in 1 Wireless Outdoor Sensor with its wind meter end poi...

Страница 23: ...he normal display screen 6 Remove the USB drive from the Main Console 7 Set the time zone on the Main Console 8 Enter the Weather Underground connection information and set the time server in the setu...

Страница 24: ...of wood may result in damage to its finishing for which manufacturer will not be responsible Consult the furniture manufacturer s care instructions for information The contents of this manual may not...

Страница 25: ...Through Internet time server to synchronise the UTC Weekday languages EN DE FR ES IT NL RU Hour offset 13 12 hour DST ON OFF Barometer Barometer unit hPa inHg and mmHg Measuring range 540 1100hPa rel...

Страница 26: ...Dew point UV index range 0 16 Beaufort scale 0 12 Wind Chill range 40 18 C wind speed 4 8km h Heat index range 26 50 C Dew point range 20 60 C Display modes Current Memory modes Historical Data of pas...

Страница 27: ...27 of 28 Weather Underground is a registered trademark of The Weather Channel LLC both in the United States and internationally The Weather Underground Logo is a trademark of Weather Underground LLC...

Страница 28: ...s operation please telephone our customer service helpline on 1300 716 188 Copyright 2019 Holman Industries Head Office Service 11 Walters Drive Osborne Park WA 6017 Ph 61 8 9416 9999 Fax 61 8 9416 99...

Отзывы: