


BULLETIN 1166
9/4/2015
Page 10 of 20
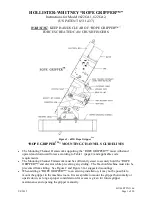
1)
Turn the “ROPE GRIPPER™” OMS lever to
Reset Release
. Observe A, B, and C above.
2)
With the car in the door zone, open the door or open the door lock circuit, then open the
door zone circuit, and observe A, B, and C above.
NOTE:
The controller’s safety
circuits should require a manual reset before the “ROPE GRIPPER™” reopens.
3)
Manually open the governor overspeed switch and observe A, B, and C above.
NOTE:
The governor will require a manual reset after this test. The controller’s safety circuits
should then require a manual reset before the “ROPE GRIPPER™” reopens.
SUGGESTED CONTROLLER CIRCUITS
NOTE
: The following describes circuits to meet code requirements and prevent nuisance
shutdowns. The controls circuit can also be configured so that the Rope Gripper also responds to
other errors.
Both the B44 and A17.1-2000 Codes and more recent codes require new circuitry for
activation of the “ROPE GRIPPER™”. It is the controller manufacturer’s responsibility to
provide proper circuitry that meets all applicable codes and laws for operating this device.
The function of the “ROPE GRIPPER™” when applied is to clamp the ropes and stop the
car. We recommend that the “ROPE GRIPPER™” is activated when an overspeed occurs or
when the car leaves the floor (door zone) with the doors open (hoistway door unlocked
and/or the car gate switch open). If the doors happen to open while the car is between floors,
the “ROPE GRIPPER™” need not be activated.
It is suggested that a manual reset of the Rope Gripper require a minimum of 10 seconds of
constant pressure activation, to allow the mechanic resetting the Rope Gripper to quickly
react to an unsafe condition. In other words, it is recommended that the reset control acts as a
constant pressure switch for the first ten seconds, before latching in the run condition after
ten seconds.
It is suggested that if the elevator controller has a monitor function for the machine brake,
that the rope gripper be activated immediately on sensing a stuck brake condition, rather than
waiting for unintended motion to occur.
The suggested circuits shown in Diagram 1 & Diagram 2 activate the “ROPE GRIPPER™”
by opening contacts RG1, RG2, DZ1, and DZ2. Relay coils RG1, RG2, DZ1 and DZ2 are
controlled by the Governor overspeed switch (GOS) and function blocks GRC1, GRC2,
DZC1, and DZC2, respectively.
GRC1 DESCRIPTION
If the car is not in the door zone when main line power turns “ON”, or when switching from
“Inspection” to “Normal Operation”, or when resetting the Governor overspeed switch; allow
a time interval, signal the door closure, and when the car gate or door interlock contact
makes, energize RG1.
Anytime the car is in the door zone (“Inspection” or “Normal Operation”), RG1 is de-
energized when both the car gate contact and door interlock contact are opened. Should the
car now leave the door zone (unintended motion), power to the “ROPE GRIPPER™” is
removed and the “ROPE GRIPPER™” is activated. In the door zone, when the car gate
contact or door interlock contact is made, energize RG1. If the car should leave the door
zone with RG1 energized then “ROPE GRIPPER™” activation is prevented. RG1 should
remain energized even if both the car and hoistway doors are opened while between floors.
When the car is in the door zone again, RG1 should function as above.
GRC2 DESCRIPTION
Redundant circuits are required by the 2000 A17.1 and B44 Codes. Circuits for RG2 function
identical to RG1 except separate logic for the timing function, door locks, gate switch and door
zone should be used. DZC1 logic could be used for circuits of RG1 and DZC2 for circuits of
RG2. (See NOTE in Diagram 3)