
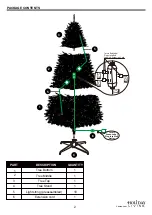


4
ASSEMBLY INSTRUCTIONS
SAVE THESE INSTRUCTIONS.
PREPARATION
Before beginning assembly of product, make sure all parts are present. Compare parts with package
contents list. If any part is missing or damaged, do not attempt to assemble the product.
SAFETY INFORMATION
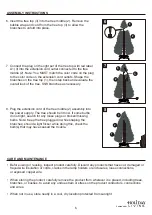
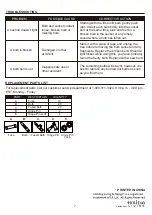
1. Remove the protective cap from the tree bottom (1). Insert the
tree bottom (1) into the tree stand (4). Screw the
preassembled eye bolt on the tree stand (4) through the hole
of the metal tab so it touches the trunk of the tree bottom (1).
Adjust the tree bottom (1) by screwing the eye bolt in or out.
1
Protective cap
1
4
Estimated Assembly Time: 5 minutes.
No Tools Required for Assembly.
FUSE REPLACEMENT INSTRUCTIONS:
• Grasp plug and remove from the receptacle or other outlet device.
Do not unplug by pulling on cord.
• Open fuse cover by sliding open the fuse access cover on top of
attachment plug toward blades.
• Turn fuse holder over and remove fuse carefully.
• Risk of fire. Replace fuse only with 3 amp, 125 Volt fuse for
decorative lighting string (provided with product).
• Close fuse cover by sliding closed the fuse access cover on top of
attachment plug.
New fuse
Burned fuse
Lowes.com
Click
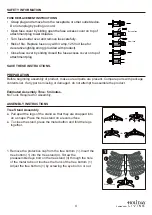
●
Pull apart the legs of the stand so that they are snapped into
an x-shape. Place the tree stand on a level surface.
●
To close the stand, press the metal button and fold the legs
together.
Tree Stand Assembly


