background image

English

   - 47 -

See  the  section,  “First  Time  Installation”  at  the 

beginning  of  instruction  book  for  more  information 

on the process.

Clear Service List (*)

(*) This setting is visible only when the Country option 

is set to Denmark, Sweden, Norway or Finland.

Use this setting to clear channels stored. Press “ ” or 

“ ” button to select Clear Service List and then press 

OK. The following OSD message will be displayed 

on the screen:

Press OK to cancel. Select Yes by pressing “

” or “ ” 

button and press OK to delete all of the channels.

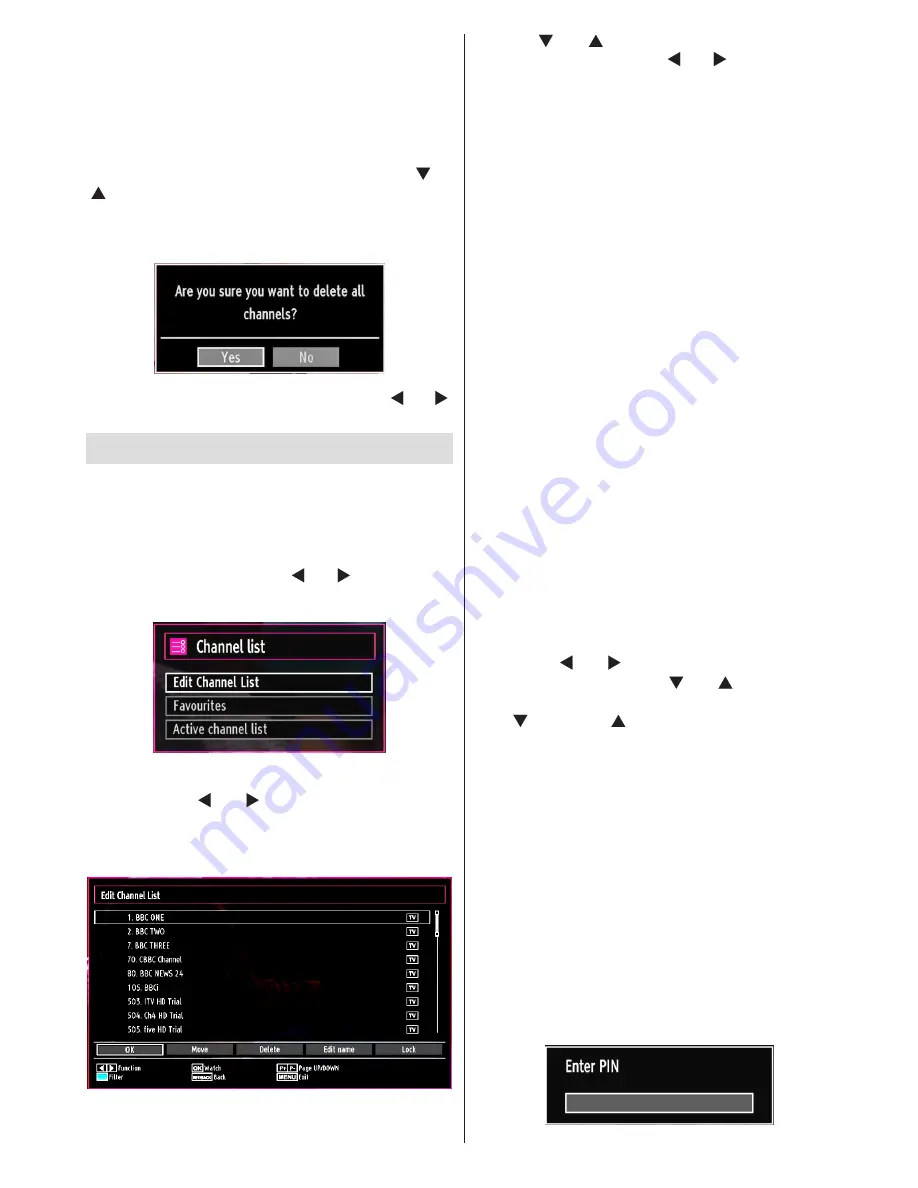
Managing Stations: Channel List

The TV sorts all stored stations in the Channel List. 

You can edit this channel list, set favourites or set 

active stations to be listed by using the Channel List 

options.

Press 

• 

“MENU”

 button to view main menu. Select 

Channel List item by using “ ” or “ ” button. Press 

OK

 to view menu contents.

Select 

Edit  Channel  List

  to  manage  all  stored 

channels. Use “ ” or “ ”  and 

OK

 buttons to select 

Edit Channel List.

Operating the Channel List

Press “

• 

” or “ ” button to select the channel that 

will be processed. Press “ ” or “ ” button to select 

a function on Channel List menu.
Use 

• 

P+/P-

 buttons to move page up or down.

Press 

• 

BLUE

 button to view filtering options.

Press 

• 

“MENU”

 button to exit.

Moving a Channel

First select the desired channel. Select Move option 

• 

in the channel list and press 

OK

 button.

Edit  Number  screen  will  be  displayed.  Enter  the 

• 

desired  channel  number  by  using  the  numeric 

buttons on the remote control. If there is a previously 

stored channel on that number, a warning screen 

will be displayed. Select Yes if you want to move the 

channel and press 

OK

Press 

• 

OK

 button to process. Selected channel is 

now moved.

Deleting a Channel

You  can  press 

GREEN

  button  to  tag/untag  all 

channels; 

YELLOW

 button to tag/untag channel. 

Select the channel that you want to delete and select 

• 

Delete

 option. Press 

OK

 button to continue.

A warning screen will appear. Select 

• 

YES 

to delete, 

select 

No

 to cancel. Press 

OK

 button to continue.

Renaming a Channel

Select  the  channel  that  you  want  to  rename  and 

• 

select 

Edit  Name

  option.  Press 

OK

  button  to 

continue.
Pressing “

• 

” or “ ” button moves to the previous/

next character. Pressing “ ” or “ ” button toggles 

the current character, i.e., ‘b’ character becomes ‘a’ 

by “

” and ‘c’ by “

”. Pressing the numeric buttons 

‘0...9’  replaces  the  highlighted  character  with  the 

characters printed above the button one by one as 

the button is pressed. 

When  finished,  press 

• 

OK

  button  to  save.  Press 

“MENU”

 to cancel.

Locking a Channel

You  can  press 

GREEN

  button  to  tag/untag  all 

channels; 

YELLOW

  button  to  tag/untag  a  single 

channel. 

Select the channel that you want to lock and select 

• 

Lock

 option. Press 

OK

 button to continue.

You will be asked to enter parental control PIN that 

• 

you  have  previously  defined  during  the  first  time 

installation.

Содержание H 32 LX 350D

Страница 1: ...MODE D EMPLOI OPERATING INSTRUCTIONS TELEVISEUR COULEUR A TELECOMMANDE COLOUR TELEVISION WITH REMOTE CONTROL H 32 LX 350D H 32 LX 350D ...

Страница 2: ...églage fin analogique 15 Effacer la liste des chaînes 15 Première installation 15 Gestion des chaînes Liste des chaînes 15 Fonctionnement de la liste des chaînes 15 Déplacer une chaîne 15 Supprimer une chaîne 16 Renommer une chaîne 16 Verrouiller une chaîne 16 Gestion des chaînes Favoris 16 Fonctions des boutons 16 Gestion des chaînes Trier une liste de chaînes 16 Information à l écran 17 Lecture ...

Страница 3: ...nserver ce manuel pour une utilisation ultérieure Au moment de vendre ou de donner cet appareil à quelqu un il est absolument important de l accompagner de ces consignes d utilisation Merci d avoir choisi cet appareil Ce manuel vous guidera pour une utilisation appropriée de votre téléviseur Lisez le minutieusement avant de procéder à l utilisation de votre appareil Veuillez le conserver dans un e...

Страница 4: ...assurer un fonctionnement fiable Pour éviter la surchauffe ces orifices ne doivent pas être obstrués ni couverts de quelque façon que ce soit Chaleur et flammes L appareil ne doit pas être placé à côté de flammes nues ou de sources de chaleur à l exemple d un radiateur Assurez vous qu aucune source de flamme vive telles que des bougies allumées ne soit placée sur le téléviseur Les piles ne doivent...

Страница 5: ...e plage de fréquence isolateur galvanique voir EN 60728 11 Le bouton Veille Marche ne sépare pas complètement cet appareil du secteur De plus l appareil continue de consommer de l électricité en mode veille Pour couper complètement l alimentation de l appareil du secteur débranchez sa fiche de la prise secteur Pour cette raison l appareil doit être installé de manière à garantir un libre accès à l...

Страница 6: ...téléviseur hors tension ou le débrancher de la prise secteur lorsqu il n est pas en marche Cette précaution réduira également la consommation d énergie Débranchez le complètement au moment de vous y éloigner pendant une durée prolongée Remarquez qu en un an l utilisation du téléviseur en mode d économie d énergie est moins économique que son débranchement de la prise secteur contrairement au mode ...

Страница 7: ...que de programme dans les 17 chaînes DVB Programme précédent Programme suivant 18 dans les chaînes DVB Minuteur de mise en veille 19 Sélection du mode image Change le mode 20 Image en mode vidéo du Navigateur média Ok Confirmer Retenir en mode TXT 21 Modifier la liste des chaînes Curseur Bas 22 Quitter Retour Page d index en mode TXT 23 Touche curseur vers la droite Souspage en 24 mode TXT Curseur...

Страница 8: ...odeur un magnétoscope ou un lecteur DVD Remarque Si un dispositif externe est branché à l aide d une prise PERITEL le téléviseur passera automatiquement au mode AV Remarque Pour raccorder un périphérique externe veuillez vous servir du câble de branchement péritel Les 3 entrées vidéo en composantes YPbPr sont utilisées pour connecter une vidéo en composantes Vous pouvez connecter les vidéos en com...

Страница 9: ...n haute définition à partir de dispositifs comme un récepteur satellite de haute définition ou un lecteur DVD Ces périphériques doivent être connectés via les prises HDMI ou les prises en composantes Ces prises peuvent accepter les signaux 720p ou 1080i Aucun branchement audio n est nécessaire pour une connexion HDMI à HDMI HDMI 2 Entrée HDMI 9 Affichage des branchements Connecteurs latéraux La fe...

Страница 10: ...eignez le téléviseur avant de brancher ou de débrancher un périphérique USB Branchez votre périphérique USB à l entrée USB du téléviseur Il est possible de connecter simultanément deux périphériques USB au téléviseur grâce aux entrées USB de l appareil Remarque Il est possible que certains types de lecteurs de disque dur ne soient pas pris en charge Connexion du téléviseur LCD à un PC Afin d affic...

Страница 11: ...rée La plupart des lecteurs de DVD sont branchés via des PRISES EN COMPOSANTES Utilisez un câble en composantes pour connecter l entrée vidéo Pour activer le son utilisez un câble audio en composantes tel qu illustré ci dessous Une fois le branchement effectué passez en source YPbPr Voir la section Sélection d entrée Vous pouvez également vous brancher au moyen de la prise PERITEL 1 ou PERITEL 2 U...

Страница 12: ...t différer selon le contenu du télétexte numérique Suivez les instructions affichées à l écran télétexte numérique Quand la touche Press SELECT Appuyez sur sélectionner ou un message similaire apparaît appuyez sur le bouton OK Quand le bouton est pressé la TV revient à la diffusion télévisée Avec la diffusion numérique terrestre TNT en plus de la diffusion télétexte numérique et de la diffusion no...

Страница 13: ...t sur le numéro de programme pour sélectionner à nouveau les programmes à un chiffre Affichage du Guide électronique de programme EPG Vous pouvez afficher le Guide électronique de programme EPG afin de voir les informations concernant les programmes disponibles Pour afficher le menu EPG veuillez appuyer sur la touche EPG de la télécommande Appuyez sur les touches pour parcourir les chaînes Appuyez...

Страница 14: ... et de confirmer un code PIN Le code PIN en question devra être un chiffre différent de 0000 Saisissez en un et confirmez le en le saisissant à nouveau Appuyez sur OK pour continuer Si les deux codes PIN correspondent l un à l autre votre code PIN master sera activé Ensuite l écran de sélection de la langue s affichera Utilisez les touches ou pour sélectionner votre langue et appuyez sur le bouton...

Страница 15: ...e fois que vous sélectionnez une recherche automatique et appuyez sur la touche OK un écran de confirmation apparaît à l écran Pour lancer le processus d installation sélectionnez Oui pour annuler sélectionnez Non en appuyant ou sur le bouton OK Après avoir réglé sélectionné et confirmé la recherche automatique de chaînes le processus d installation commencera et la barre de progression commencera...

Страница 16: ...yez sur OK pour supprimer toutes les chaînes Première installation Sélectionnez la ligne Première installation et appuyez sur le bouton OK Saisissez le code PIN que vous avez créé pendant la première installation Une fois le code PIN approprié saisi le processus d installation commence immédiatement Reportez vous à la section Première installation au début du mode d emploi pour de plus amples info...

Страница 17: ... les chaînes appuyer sur le bouton JAUNE pour sélectionner désélectionner une seule chaîne Sélectionnez la chaîne à verrouiller et choisissez l option Verrouiller Appuyez sur la touche OK pour continuer Vous serez invité à saisir le code PIN de contrôle parental que vous avez créé pendant la première installation Saisissez le code PIN Appuyez sur le bouton OK une fois la chaîne souhaitée mise en s...

Страница 18: ...veau l appareil Pour afficher la fenêtre du navigateur média appuyez sur la touche MENU de la télécommande et sélectionnez Navigateur média en appuyant sur le bouton ou Appuyez sur la touche OK pour continuer Les options du menu Navigateur média s affiche De même lorsque vous branchez un périphérique USB l écran du navigateur média s affiche automatiquement Vous pouvez lire des fichiers de musique...

Страница 19: ...aporama Pause Bouton Jaune Met le diaporama en pause Reprendre Touche verte Poursuit la lecture du diaporama Précédent Suivant Boutons Gauche Droit Passe au fichier du diaporama précédent ou suivant Pivoter Boutons Suivant Précédent Pivote l image à l aide des touches directionnelles Haut Bas Boucle Aléatoire touche Bleue Appuyez une fois pour désactiver la boucle Appuyez à nouveau pour désactiver...

Страница 20: ...odes zoom différents Appuyez sans interruption sur le bouton SCREEN pour modifier la taille de l image Les modes zoom disponibles sont listés ci dessous Automatique Lorsqu un signal WSS Signalisation d écran large qui indique le format de l image est inclus dans le signal de l émission ou dans le signal d un périphérique externe le téléviseur change automatiquement le mode ZOOM selon le signal WSS...

Страница 21: ...ne rubrique Appuyez sur la touche MENU pour quitter Eléments du menu Réglages d image Mode Pour vos besoins de visualisation vous pouvez régler l option de Mode y afférente Le mode Image peut être réglé sur l une de ces options Cinéma Jeux Dynamique et Naturel Contraste Règle les valeurs de l éclairage et de l obscurité de l écran Luminosité Règle la valeur de luminosité de l écran Définition Défi...

Страница 22: ...nez cette option pour afficher les éléments du menu Position du PC Position Auto Optimise automatiquement l affichage Appuyez sur OK pour optimiser Position Hori Cette rubrique change l image horizontalement vers le côté droit ou gauche de l écran Position Vert Cet élément déplace l image verticalement vers le haut ou le bas de l écran Fréquence Pi Les réglages de la fréquence pilote corrigent les...

Страница 23: ...es parentaux Minuteries Règles les minuteries des programmes sélectionnés Date Heure Sélectionne la date et l heure Sources Active ou désactive les options sources sélectionnées Autres réglages Affiche les autres options de réglage du téléviseur Utilisation du module d accès conditionnel IMPORTANT Insérez ou effacez le module CI uniquement lorsque le téléviseur est ETEINT Afin de regarder certaine...

Страница 24: ...églages de langue fonctionnera comme ci dessous Paramètres de Langue Dans le Menu Configuration mettez en surbrillance la rubrique Paramètres de langue en appuyant sur les boutons ou Appuyez sur OK et le sous menu Définition de la Langue sera affiché sur l écran Pour utiliser la recherche en mode de veille veuillez vous assurer d avoir activé cette option en sélectionnant Activé Remarques La langu...

Страница 25: ...assurez vous de le noter et de le conserver en lieu sûr Minuteries Pour afficher le menu Minuteries appuyez sur la touche MENU et sélectionnez l icône Liste des chaînes grâce à la touche ou Appuyez sur OK pour afficher le menu Liste des chaînes Utilisez le bouton ou pour sélectionner l option Minuteries et appuyez sur OK pour continuer Réglage de la minuterie sommeil Ce réglage sert à paramétrer l...

Страница 26: ...ut être paramétré sur AUTO ou MANUEL Lorsque AUTO est sélectionné les options Heure et Zone Horaire ne seront pas disponibles pour être réglées Si l option MANUEL est sélectionnée le zone horaire peut en pâtir En appuyant sur le bouton ou vous sélectionnez l option Zone Horaire Utilisez les boutons ou pour changer le zone horaire entre GMT 12 et GMT 12 L heure qui s affiche au dessus de la liste d...

Страница 27: ...léviseur est réglé en mode de veille Vous pouvez activer ou désactiver la mise à jour automatique en réglant l option Recherche auto Vous pouvez procéder à une recherche manuelle de nouveaux logiciels en sélectionnant l option Rechercher la mis a jour Malentendant Si le diffuseur active un quelconque signal particulier concernant le son vous pouvez activer ce paramètre afin de recevoir de tels sig...

Страница 28: ...orologiques mauvaises ou défavorables certaines erreurs textuelles peuvent se produire ou le mode télétexte peut être interrompu Les boutons de la fonction télétexte sont listés ci dessous Télétexte Mix Active le mode télétexte lorsque vous l appuyez une fois Appuyez une nouvelle fois pour mettre l écran du télétexte au dessus du programme mélange Si vous appuyez à nouveau vous quitterez le mode t...

Страница 29: ...ge en changeant la direction de l antenne Est ce que l image ou le télétexte sont méconnaissables Vérifiez si vous avez introduit la fréquence appropriée Veuillez régler à nouveau les chaînes La qualité d image peut se dégrader lorsque deux périphériques sont connectés au téléviseur en même temps Dans un tel cas déconnectez l un des périphériques Pas d image Est ce que l antenne est correctement b...

Страница 30: ...0 Hz Annexe B Compatibilité des signaux AV et HDMI types de signal d entrée Source Signaux pris en charge Disponible EXT 1 PERITEL 1 PAL 50 60 O NTSC 60 O RGB 50 O RGB 60 O EXT 2 PERITEL 2 PAL 50 60 O NTSC 60 O RGB 50 X RGB 60 X SIDE AV PAL 50 60 O NTSC 60 O YPbPr 480I 60Hz O 480P 60Hz O 576I 50Hz O 576P 50Hz O 720P 50Hz O 720P 60Hz O 1080I 50Hz O 1080I 60Hz O 1080P 50Hz O 1080P 60Hz O HDMI1 HDMI2...

Страница 31: ... 720p þ þ 1080i þ þ 1080p þ þ þ þ þ Annexe D Formats de fichier pris en charge pour le mode USB Lecteurs pris en charge Lecteur Stream Décodeur vidéo MSVD Décodeur audio MSAD Audio MP3 Aucun MP3 Audio WAV AIFF Aucun LPCM Windows Media en option WMA ASF VC1 WMA MPEG1 Program Stream MPEG 1 MPEG1 MP3 AC 3 et PCM MPEG2 Program Stream MPEG 2 MPEG2 MP3 AC 3 et PCM MPEG4 MPEG 4 H264 dans MP4 H264 et MPEG...

Страница 32: ...démarrage 2 Recherche à 3 00 H et mode de mise à jour Si l option Recherche automatique du menu Options de mise à jour est active le téléviseur se met automatiquement en marche à 3 heures du matin et lance la recherche de chaînes de diffusion pour la mise à jour du nouveau logiciel Si un nouveau logiciel est trouvé et téléchargé avec succès le téléviseur commence à fonctionner avec la nouvelle ver...

Страница 33: ...n numérique TNT Normes de transmission TNT MPEG2 TNT MPEG4 HD i DÉMODULATION Taux de symbole COFDM avec mode 2K 8K FFT Modulation 16 QAM 64 QAM FEC pour tous les modes DVB détectés automatiquement APPAREIL MHEG 5 conforme à l ISO IEC 13522 5 UK engine Profile RU uniquement Conforme aux normes ISO IEC 135818 6 et UK DTT profile RU uniquement Gamme de fréquence 474 850 MHz pour les modèles du RU ii ...

Страница 34: ...the Channel List 47 Moving a Channel 47 Deleting a Channel 47 Renaming a Channel 47 Locking a Channel 47 Managing Stations Favourites 48 Button Functions 48 Managing Stations Sorting Channel List 48 On Screen Information 48 Media Playback Using Media Browser 48 Viewing Videos via USB 49 Viewing Photos via USB 49 Media Browser Settings 50 Changing Image Size Picture Formats 50 Configuring Picture S...

Страница 35: ... Carefully keep the handbook as future reference When selling the device or giving it away absolutely give these direction for use Thank you for choosing this product This manual will guide you for the proper operation of your TV Before operating the TV please read this manual thoroughly Please do keep this manual in a safe place for future references This device is intended to receive and display...

Страница 36: ...n electric heater Ensure that no open flame sources such as lighted candles are placed on top of the TV Batteries should not be exposed to excessive heat such as sunshine fire or the like Lightning In case of storm and lightning or when going on holiday disconnect the power cord from the wall outlet Replacement Parts When replacement parts are required make sure that the service technician has use...

Страница 37: ...te the device completely from mains the mains plug has to be pulled from the mains socket Because of that the device should be set up in a way that an unobstructed access to mains socket is guaranteed so that in case of emergency the mains plug can be pulled immediately To exclude the danger of fire the power cord should principally be separated from the mains socket prior to a longer period of no...

Страница 38: ... in Power Save Mode When the TV is not in use please switch off or disconnect the TV from the mains plug This will also reduce energy consumption Disconnect power when going away for longer time Note that annually using the TV set in Power Save Mode has more power efficiency than disconnecting the TV from the mains plug instead of keeping stand by mode Therefore disconnect the TV from the mains pl...

Страница 39: ...ronic programme guide in DVB channels 17 Programme Up Page down in DVB channels 18 Sleep Timer 19 Picture mode selecion Changes picture mode 20 in Media Browser video mode Okay Confirm Hold in TXT mode Edit 21 Channel List Cursor Down 22 Exit Return Index page in TXT mode 23 Cursor Right Subpage in TXT mode 24 Cursor Up 25 Previous programme 26 Yellow button Pause in Media Browser 27 Timeline Sche...

Страница 40: ...ote To connect external device please use to supplied scart connection cable Component Video Inputs YPbPr 3 are used for connecting component video You can connect the component video and audio sockets with a device that has component output Connect the component video cables between the COMPONENT VIDEO INPUTS on on the TV and the component video outputs of your device While connecting be sure tha...

Страница 41: ...Viewing the Connections Side Connectors CI Slot is used for inserting a CI card A CI card allows you to view all the 1 channels that you subscribe to For more information see Conditional Access section Side USBs 2 Headphone jack is used for connecting an external headphone to the system 3 Connect to the HEADPHONE jack to listen to the TV from headphones optional Video Input is used for connecting ...

Страница 42: ... the USB device itself SIDE VIEW USB MEMORY USB Memory Connection IMPORTANT The TV should be switched off while plugging or unplugging a USB device Plug your USB device to the USB inputs of the TV You can connect two usb device to your TV by using the USB inputs of the TV at the same time Note It is possible certain types of hard disk drives are not supported Connecting the LCD TV to a PC For disp...

Страница 43: ...Remove the battery from remote control handset when it is not to be used for a long period Otherwise it can be damaged due to any leakage of batteries Remote range is approximately 7m 23ft Connecting to a DVD Player If you want to connect a DVD player to your LCD TV you can use connectors of the TV set DVD players may have different connectors Please refer to your DVD player s instruction book for...

Страница 44: ...ing together with the normal broadcasting there are also channels with just digital teletext broadcasting The aspect ratio picture shape when watching a channel with just digital teletext broadcasting is the same as the aspect ratio of the picture viewed previously When you press the button again the digital teletext screen will be displayed Analogue Teletext Use of teletext and its functions are ...

Страница 45: ... with blanks OK Options Displays programme options including Select Channel option INFO Event Details Displays the programmes in detail Green button Programme schedule will be listed Yellow button Display EPG data in accordane with timeline schedule Blue button Filter Views filtering options Red button Prev Time Slice Displays the programmes of previous time slice Green button Next Time Slice Disp...

Страница 46: ...fter selecting the language Welcome screen will be displayed requiring you to set Country Teletext Language and Scan Encrypted options By pressing or button select the country you want to set and press button to highlight Teletext Language option Use or button to select desired Teletext Language Press button after setting Teletext Language option Scan Encrypted will be then highlighted You can set...

Страница 47: ... will be displayed Select the desired Search Type using or button Manual search options will change accordingly Use button to highlight an item and then press or button to set an option You can press MENU button to cancel Digital Manual Search In manual channel scan the number of the multiplex or frequency are entered manually and only that multiplex or frequency are searched for the channels Afte...

Страница 48: ...hannel list and press OK button Edit Number screen will be displayed Enter the desired channel number by using the numeric buttons on the remote control If there is a previously stored channel on that number a warning screen will be displayed Select Yes if you want to move the channel and press OK Press OK button to process Selected channel is now moved Deleting a Channel You can press GREEN butto...

Страница 49: ...NFO button to display on screen information Details of the station and current programme will be displayed on the information banner The information banner gives information on the channel selected and the programmes on it The name of the channel is displayed along with its channel list number Hint Not all channels broadcast the programme data If the name and time of the programme are not availabl...

Страница 50: ...menu Viewing Photos via USB When you select Photos from the main options available image files will be filtered and listed on this screen Jump Numeric buttons Jump to selected file using the numeric buttons OK Views the selected picture in full screen Slideshow GREEN button Starts the slideshow using all images Loop Shuffle BLUE button Press once to enable Loop Press again to enable both Loop and ...

Страница 51: ...r down Subtitle Font Size Sets subtitle font size max 54pt Changing Image Size Picture Formats Programmes can be watched in different picture formats depending on the transmission received You can change the aspect ratio image size of the TV for viewing the picture in different zoom modes Press SCREEN button repeatedly to change the image size Available zoom modes are listed below Auto When a WSS ...

Страница 52: ... a menu item Use or button to set an item Press MENU button to exit Picture Settings Menu Items Mode For your viewing requirements you can set the related mode option Picture mode can be set to one of these options Cinema Game Dynamic and Natural Contrast Sets the lightness and darkness values of the screen Brightness Sets the brightness value for the screen Sharpness Sets the sharpness value for ...

Страница 53: ... side or left hand side of the screen V Position This item shifts the image vertically towards the top or bottom of the screen Dot Clock Dot Clock adjustments correct the interference that appear as vertical banding in dot intensive presentations like spreadsheets or paragraphs or text in smaller fonts Phase Depending on the resolution and scan frequency that you input to the TV set you may see a ...

Страница 54: ...the TV set Using a Conditional Access Module IMPORTANT Insert or remove the CI module only when the TV is SWITCHED OFF In order to watch certain digital channels a conditional access module CAM can be necessary This module must be inserted in the CI slot of your TV Obtain the Conditional Access Module CAM and the viewing card by subscribing to a pay channel company then insert those to the TV usin...

Страница 55: ... Settings menu will function as described below Language Settings In the configuration menu highlight the Language Settings item by pressing or buttons Press OK and Language Settings submenu will be displayed on the screen Use or buttons to highlight the menu item that will be adjusted and then press or button to set Notes System Language determines the on screen menu language Audio Language is us...

Страница 56: ...t safe Timers To view Timers menu press MENU button and select Channel List icon by using or button Press OK button to view Channel List menu Use or button to highlight Timers and press OK to continue Setting Sleep Timer This setting is used for setting the TV to turn off after a certain time Highlight Sleep Timer by using or button Use or button to set The timer can be programmed between Off and ...

Страница 57: ...ect Time Zone Use or buttons to change the Time Zone between GMT 12 or GMT 12 Date Time on the top of the menu list will then change according to the selected Time Zone Changes are automatically stored Press MENU to exit Configuring Source Settings You can enables or disable selected source options The TV will not switch to the disabled source options when SOURCE button is pressed Select Sources i...

Страница 58: ... sometimes during dialogue if deemed necessary You can use this feature only if the broadcaster supports that additional narration track Auto TV Off You can set the timeout value of auto off feature After the timeout value is reached and the Tv is not operated for selected time the TV will go off Broadcast Type optional When you set the desired broadcast type by using or button the TV will display...

Страница 59: ...e Please note that ghosting may occur while displaying a persistent image LCD TVs image persistence may disappear after a short time Try turning off the TV for a while To avoid this do not leave the screen in still picture for extended periods No Power If your TV system has no power please check the main power cable and connection to the mains socket outlet Poor Picture Have you selected the corre...

Страница 60: ...and HDMI Signal Compatibility Input Signal Types Source Supported Signals Available EXT 1 SCART 1 PAL 50 60 O NTSC 60 O RGB 50 O RGB 60 O EXT 2 SCART 2 PAL 50 60 O NTSC 60 O RGB 50 X RGB 60 X SIDE AV PAL 50 60 O NTSC 60 O YPbPr 480I 60Hz O 480P 60Hz O 576I 50Hz O 576P 50Hz O 720P 50Hz O 720P 60Hz O 1080I 50Hz O 1080I 60Hz O 1080P 50Hz O 1080P 60Hz O HDMI1 HDMI2 480I 60Hz O 480P 60Hz O 576I 50Hz O ...

Страница 61: ... þ 576p þ 720p þ þ 1080i þ þ 1080p þ þ þ þ þ Appendix D Supported File Formats for USB Mode Supported Players Player Stream Video Decoder MSVD Audio Decoder MSAD Audio MP3 None MP3 Audio WAV AIFF None LPCM Windows Media optional WMA ASF VC1 WMA MPEG1 Program Stream MPEG 1 MPEG1 MP3 AC 3 and PCM MPEG2 Program Stream MPEG 2 MPEG2 MP3 AC 3 and PCM MPEG4 MPEG 4 H264 in MP4 container H264 and MPEG4 AAC...

Страница 62: ...continue with the reboot operation 2 3 AM search and upgrade mode If Automatic scanning in Upgrade Options menu is enabled TV wakes up at 03 00 and searches broadcast channels for new software upgrade If new software is found and downloaded successfully with next power up TV opens with new software version Note on reboot operation Reboot is the last step in software upgrade operation if download o...

Страница 63: ...11 6 Digital Reception DVB T Transmission Standards DVB T MPEG2 DVB T MPEG4 HD i DEMODULATION Symbol rate COFDM with 2K 8K FFT mode Modulation 16 QAM 64 QAM FEC for all DVB modes automatically found MHEG 5 ENGINE compliant with ISO IEC 13522 5 UK engine Profile UK only Object carousel support compliant with ISO IEC 135818 6 and UK DTT profile UK only Frequency range 474 850 MHz for UK models ii VI...

Страница 64: ...www vestel france fr ...

Страница 65: ...50180192 ...

Отзывы: