background image

14

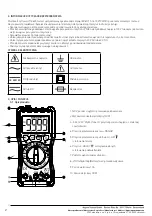
 Adres producenta/ Adresse des Herstellers/ Manufacturer’s Address/ Адрес производителя 

GTV Poland Sp. z o.o. Sp. k., ul. Przejazdowa 21, 05-800 Pruszków
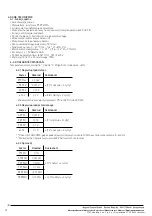
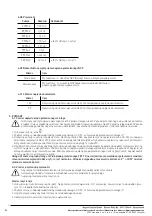
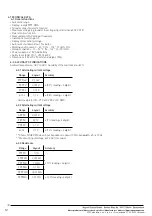
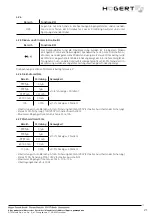
    

4.2.8  Capacitance

Range

Layout

Accuracy

9,999nF

0,001 nF

± (4.0% r 30 digits)

99,99nF

0,01 nF

± (4.0% r 3 digits)

999,9nF

0,1 nF

9,999µF

0,001 µF

99,99µF

0,01µF

999,9µF

0,1µF

9,999mF

0,001 mF

99,99mF

0,01 mF

± (5.0% r 30 digits)


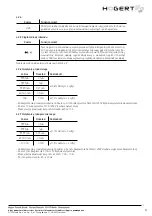
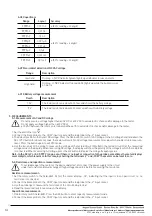
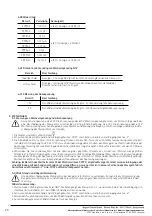
4.2.9 Non-contact detection of NCV AC voltage

 Range

Description

Low field

Display - L, NCV indicator (green) lights up and buzzer issues an alarm

High field

Display - H, NCV indicator (two red LEDs) lights up while the buzzer issues 

an alarm


4.2.10 Battery voltage measurement

Reach

Description

1.5 V

The load resistance is about 30 ohms and shows the battery voltage

9 V

The load resistance is about 300 ohms and shows the battery voltage
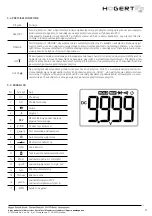
5. MEASUREMENTS

   5-1. Measurement of AC and DC voltage


Do not measure a voltage higher than 600 V DC or 600 V AC to avoid electric shock and/or damage to the meter.

Do not apply a voltage higher than 600 V DC or 

600 V AC between the common terminal and the earth to avoid electric shock and/or damage to the meter.

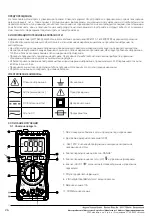
   1. Set the dial to the icon   . 

   2. Connect the black probe to the „COM” input socket and the red probe to the „V” input socket.

   3.  The default position in the field is DC voltage. Press the SEL button to switch to AC voltage. In the AC voltage field, hold down the 

SEL / VFC button for about 2 seconds, the meter will switch to AC voltage measurement mode, which enables stable measure-

ment. Press the button again to exit VFC mode.

   4.  Use the two ends of the probe to measure the voltage of the tested circuit. (Parallel to the tested circuit). Get the measured 

voltage value on the display. When measuring DC voltage, the display will show the polarity of the voltage to which the red probe 

is connected. When measuring AC voltage, press the HZ button to display the voltage frequency value

    Note: In the DC mV or AC 9.999 V range, even if there is no input or connection to the probes, sometimes the meter displays 

several digits, which is normal. In this case, by shorting the terminals „V” and „COM” the meter can be reset to zero.

   5-2. Resistance and capacitance measurement


To avoid damage to the meter or the device under test, disconnect the power supply to the circuit 

under test and completely discharge all high voltage capacitors before measuring the resistance.

   Resistance measurement:

   1.  Set the rotary switch to the field „ ”. At first the meter displays „OL”, indicating that the input is in an open circuit, i.e. no 

resistance is connected.

   2.  Connect the black probe to the „COM” input socket and the red probe to the „V” input socket.

   3.  Use the probe tips to measure the resistance of the circuit being tested.

   4.  Read the measured resistance value on the display

   Capacitance  measurement:

   1. Rotate rotary switch field „ ”. Press the SEL button to enter capacity measurement mode.

   2. Connect the black probe to the „COM” input socket and the red probe to the „V” input socket.

Содержание HT1E600

Страница 1: ...kowania nie s zamierzone i mog prowadzi do uszkodzenia mienia lub nawet obra e cia a Urz dzenie nale y u ywa wy cznie zgodnie z niniejsz instrukcj obs ugi Producent nie ponosi adnej odpowiedzialno ci...

Страница 2: ...onecznym lub ekstremalnie wysokich temperaturach o ile to mo liwe Unikaj ryzyka pora enia pr dem podczas pomiaru napi przekraczaj cych 30 V AC lub 60 C DC Przed pomiarem pr du nale y wy czy zasilacz...

Страница 3: ...aby wy wietli zmierzone napi cie lub cz stotliwo pr du Naci nij ponownie aby wyj z wy wietlania cz stotliwo ci Przytrzymaj ten przycisk przez oko o 2 sekundy aby w czy latark kt ra wy cza si automatyc...

Страница 4: ...Poziom bezpiecze stwa IEC61010 1 CAT III 600 V Wymiary 150 x 70 x 50 mm i waga 195G 4 2 DOK ADNO WSKAZA Temperatura otoczenia od 18 C do 28 C Wilgotno rodowiska 80 4 2 1 Napi cie pr du sta ego Zakres...

Страница 5: ...omiaru diody wy wietla przybli one napi cie przewodz ce diody Napi cie w obwodzie otwartym wynosi oko o 3 3 V 4 2 6 Nat enie pr du sta ego Zakres Rozk ad Dok adno 999 9 A 0 1 A 0 8 Odczyt 3 cyfry 9999...

Страница 6: ...t napi cie sta e Naci nij przycisk SEL aby prze czy na napi cie zmienne AC W polu napi cia ACprzytrzymajprzyciskSEL VFCprzezoko o2sekundy miernikprzejdziewtrybpomiarunapi ciaozmiennejcz stotliwo ci kt...

Страница 7: ...badanego obwodu Roz aduj wszystkie kondensatory wysokiego napi cia Wyjmij sondy miernika i przywr obw d do pierwotnego stanu Uwaga Podczaspomiarudu egopr du5 10Aczasw czenianiepowinienprzekracza 10se...

Страница 8: ...mierzonym typem akumulatora u yj czerwonej sondy aby dotkn bieguna mierzonego akumulatora a czarnej sondy aby dotkn bieguna a nast pnie odczytaj zmierzone napi cie akumulatora z ekranu LCD 6 KONSERWAC...

Страница 9: ...on contact NCV detection diode and circuit continuity Any other use is not intended and may lead to property damage or even personal injury Use the device only in accordance with this manual The manuf...

Страница 10: ...ht or extremely high temperatures if possible Avoid the risk of electric shock when measuring voltages exceeding 30 V AC or 60 C DC Switch off the power supply and disconnect it from the circuit befor...

Страница 11: ...ed current voltage or frequency press again to exit the frequency display Hold this button down for about 2 seconds to turn on the flashlight which turns off automatically after 15 seconds you can tur...

Страница 12: ...evel IEC61010 1 CAT III 600 V Dimensions 150 x 70 x 50 mm and weight 195G 4 2 ACCURACY OF INDICATIONS Ambient temperature 18 C to 28 C Humidity of the environment 80 4 2 1 Alternating current voltage...

Страница 13: ...en lights up during the measurement the diodes display approximate conductive voltage of the diodes The voltage in an open circuit is about 3 3 V 4 2 6 DC amperage Range Layout Accuracy 999 9 A 0 1 A...

Страница 14: ...ton for about 2 seconds the meter will switch to AC voltage measurement mode which enables stable measure ment Press the button again to exit VFC mode 4 Use the two ends of the probe to measure the vo...

Страница 15: ...ts should be 3 5 minutes 5 4 Continuity and diode test To avoid damage to the meter or the equipment under test it is necessary to disconnect the power supply to the circuit under test and discharge a...

Страница 16: ...E 6 1 Battery replacement If the symbol appears on the LCD display when the meter is used replace the battery to prevent incorrect readings 1 Disconnect the test lines Turn off the power 2 Use a screw...

Страница 17: ...ng Akku Spannung kontaktlose Erkennung von Wechselspannung NCV Kontinuit t von Dioden und Stromkreisen JeglichedavonabweichendeNutzungistnichtzweckm igundkannzuSachsch denodersogarK rperverletzungf hr...

Страница 18: ...ng zugef hrt werden berpr fen Sie den richtigen Sondenanschluss Vermeiden Sie die Verwendung des Messger ts in direktem Sonnenlicht oder bei extrem hohen Temperaturen sofern m glich Vermeiden Sie das...

Страница 19: ...gemessene Spannung oder Stromfrequenz anzuzeigen Erneut dr cken um die Anzeige der Frequenz zu verlassen Diese Taste etwa 2 Sekunden lang gedr ckt halten um die Taschenlampe einzuschalten die automati...

Страница 20: ...eau IEC61010 1 CAT III 600 V Abmessungen 150 x 70 x 50 mm und Gewicht 195G 4 2 GENAUIGKEIT DER ANZEIGEN Umgebungstemperatur zwischen 18 C und 28 C Umgebungsfeuchte 80 4 2 1 Gleichstromspannung Bereich...

Страница 21: ...e Kontinuit tsanzeige gr n leuchtet W hrend der Dio denmessung werden die ungef hre Leitungsspannung der Diode angezeigt Die Spannung im offenen Stromkreis betr gt etwa 3 3 V 4 2 6 Gleichstromst rke B...

Страница 22: ...hselspannung umzuschalten Im Feld der AC Spannung Taste SEL VFC etwa 2 Sekunden lang gedr ckt halten das Messger t wechselt in den Modus der Spannungsmessung mit variabler Frequenz der eine stabile Me...

Страница 23: ...n Stromkreises an das getrennt wurde und die rote Sonde an das Ende mit dem hohen Potential des Stromkreises an der getrennt wurde Die Umkehrung der Sonden ergibt einen negativen Wert der Anzeige besc...

Страница 24: ...der Summer emittiert einen Dauer Alarmton 3 WenndieinduzierteSpannunghochist zeigtdasDisplay H an ZweiroteLED DiodenaufderlinkenSeitederNCV Anzeige leuchten auf und der Summer emittiert einen Dauer Al...

Страница 25: ...oducenta Adresse des Herstellers Manufacturer s Address GTV Poland Sp z o o Sp k ul Przejazdowa 21 05 800 Pruszk w RU HT1E600 1 2 3 3 1 3 2 3 3 LCD 4 4 1 4 2 5 5 1 5 2 5 3 5 4 5 5 5 6 6 6 1 6 2 6 3 1...

Страница 26: ...tellers Manufacturer s Address GTV Poland Sp z o o Sp k ul Przejazdowa 21 05 800 Pruszk w 8 2 HT1E600 IEC61010 1 600 CATIII 2 100 30 60 AC DC AC DC 3 3 1 1 NCV 2 LCD 3 SEL VFC 4 RANGE 5 HZ 6 HOLD 7 8...

Страница 27: ...s GTV Poland Sp z o o Sp k ul Przejazdowa 21 05 800 Pruszk w 3 2 SEL V F C SEL 2 VFC OFF SEL RANGE RANGE 2 HZ 2 15 HOLD HOLD HOLD 2 15 3 3 LCD Nr 1 DC 2 AC 3 4 5 NCV 6 V F C 7 8 9 10 HOLD 11 12 MK K M...

Страница 28: ...70 RH 2 x 1 5V Bateria AAA IEC61010 1 CAT III 600 150 x 70 x 50 195 4 2 od 18 C do 28 C 80 4 2 1 999 9 mV 0 1 mV 0 7 3 9 999 V 0 001 V 99 99 V 0 01 V 600 V 0 1 V 0 8 2 PTC 600 DC lub AC RMS 4 2 2 0 99...

Страница 29: ...01 mA 600 0 0 mA 0 1 mA 10 A 0 01 A 1 2 3 A mA F600mA 250 10 A F10A 250 V mA 600 10A 4 2 7 999 9 A 0 1 A 1 0 3 9999 A 1 A 99 99mA 0 01 mA 600 0 0 mA 0 1mA 10 00A 0 01A 1 5 3 A mA F600mA 250V 10A F10A...

Страница 30: ...TV Poland Sp z o o Sp k ul Przejazdowa 21 05 800 Pruszk w 4 2 10 L NCV H NCV LED 4 2 10 1 5 30 9 300 5 5 1 Pomiar napi cia pr du przemiennego i sta ego 600 600 600 600 1 2 COM V 3 SEL AC AC SEL VFC 2...

Страница 31: ...rstellers Manufacturer s Address GTV Poland Sp z o o Sp k ul Przejazdowa 21 05 800 Pruszk w 5 3 250 1 2 SEL 3 COM 4 5 OL 6 5 10 10 3 5 5 4 1 2 COM V 3 30 4 OL 0 5 0 8 5 5 1 Live 2 V 3 L LIVE 5 6 NCV L...

Страница 32: ...32 Adres producenta Adresse des Herstellers Manufacturer s Address GTV Poland Sp z o o Sp k ul Przejazdowa 21 05 800 Pruszk w 5 7 9 1 5 6 6 1 1 2 3 6 2 1 2 3 6 3...

Отзывы: