monty 3650
Betriebsanleitung Operator’s Manual Notice d’ utilisation
Modéle:
monty 3650
_DE-EN-FR_ Release December 2018
HOFMANN behält sich das Recht zu Änderungen ohne Vorankündigung vor _ HOFMANN reserves the right of modification without notice _ Document non contractuel
33
5.0
MOUNTING
AND
DEMOUNTING-GENERAL
PRECAUTIONS
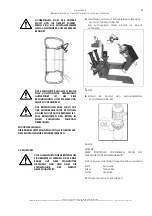
BEFORE MOUNTING A TIRE ON A RIM, PAY
ATTENTION TO THE FOLLOWING:
A.
THE RIM AND ALL ITS PARTS MUST BE CLEAN AND
IN GOOD CONDITION: IF NECESSARY CLEAN
AND PAINT IT AFTER REMOVING ALL WHEEL-
WEIGHTS INCLUDING TAPE WEIGHTS INSIDE THE
RIM.
B.
THE TIRE MUST BE CLEAN AND DRY, WITHOUT ANY
DAMAGE TO THE BEAD AND THE CARCASS.
C.
REPLACE THE RUBBER VALVE STEM WITH A NEW
ONE OR REPLACE THE ‘O’ RING IF THE VALVE
STEM IS MADE OF METAL.
D.
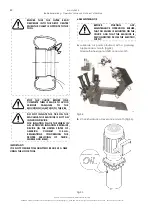
LUBRICATION IS NECESSARY TO MOUNT THE TIRE
CORRECTLY AND GET A PROPER CENTERING. BE
SURE YOU ARE USING APPROVED LUBRICANT
ONLY.
E.
MAKE SURE THE TIRE IS THE CORRECT SIZE FOR THE
RIM.
5.1 LOCKING RIMS WITH A CENTER HOLE OF 220MM
AND 280MM
A.
Move the footboard all the way to the outside.
Roll the wheel onto the footboard.
B.
Move the chuck approximately to the center of
the rim. Move the footboard towards the chuck
and center the rim on the flange of the
corresponding diameter (220mm or 280mm).
C.
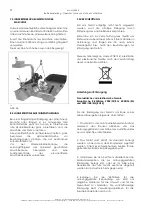
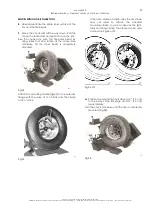
Lock the rim with the wing nut (#2 Fig.17) and the
star flange (#1 Fig.17) sothat the drive pin is
engaged into a bolt hole of the rim.
276
Fig.17
REMARK:
INSTALL THE DRIVE PIN ON THE STAR FLANGE INTO
THE INNER DIAMETER HOLE FOR RIMS WITH A
CENTER HOLE OF 220MM.
INSTALL THE DRIVE PIN INTO THE OUTER DIAMETER
HOLE FOR RIMS WITH A CENTER HOLE OF 280MM.
THE DRIVE PIN CAN BE INSTALLED/REMOVED
WITH HAND PRESSURE.
Содержание monty 3650
Страница 62: ...62 ...


