background image


10. Accessories: 


Scale Main 
Frame······························································ 1unit  
 
Scale 
Pan··································································1unit 
 
User’s 
Manual······························································1unit 
 
AC 
Adapter·····························································1unit 


Rechargeable 
Battery······························································1unit


11. Trouble shooting methods 

1. Unable to turn on the balance . 

1. Check the power adapter properly plugged in.  
2. To replace with new adapter if it is damaged.  
3. Insert the overlay connection wire or replace with new one if 
the overlay disconnected or damaged.  
4. Main board damaged  

 
2. All characters on display after turning on and unable to 
return to normal weighing status 

1. The balance crashed due to AD chip affected. To turn off 
the balance and turn on it again after 30 minutes.(fit for all 
models)   
2. The switch of overlay is damaged, to replace with new 
one.(fit for K, N, G, A, B, C models). 

Содержание Futura

Страница 1: ...Futura Bedienungsanleiltung Operating Manual ...

Страница 2: ......

Страница 3: ... strömung und Störungen durch elektromagnetische Wellen zu vermeiden 2 Inbetriebnahme a Schließen Sie ein Ende des Netzadapters an der Waage an ein anderes Ende an die Stromversorgung N K C CH B A G Serie X L Serie Verbindungsskizze Verbindungsskizze b Schalten Sie die Waage ein N K C CH B A G Serie Schalter X L Serie Schalter ...

Страница 4: ...Bei einer Waage mit beispielsweise 300 g Kapazität wird nach dem Einschalten Folgendes angezeigt ...

Страница 5: ... CAL angezeigt danach 200 00g Wenn das angezeigt Gewicht nicht genau ist wiederholen Sie die oben genannten Kali brierungsschritte 2 Lineare Kalibrierung Halten Sie calibration für 3 Sekunden gedrückt Sie gelangen nun in den Kalibrierungs modus Danach drücken Sie erneut die Taste bis im Display CAL L erscheint somit gelangen Sie zur linearen Kalibrierung Legen Sie nun das geforderte Startgewicht a...

Страница 6: ...e erreicht ist Damit ist die Kalibrierung abgeschlossen Bemerkung Wenn das Gewicht nicht innerhalb von 10 Sekunden nach Starten des Kalibrierungsstatus aufgelegt wird wird no CAL angezeigt Das bedeutet dass keine Kalibrierung durchgeführt wurde ...

Страница 7: ...n bis der schwarze Punkt auf der unteren linken Seite verschwindet das Gewicht des Objekts kann nun abgelesen werden 5 Tara Drücken Sie nachdem Sie das Taragefäss auf der Wägeplattform platziert haben Die Anzeige geht auf 0 und das Gewicht des Gefässes ist nun intern gespeichert ...

Страница 8: ... Zero Tracking Auto Tara Mit der Auto Zero Funktion werden kleine Gewichtsschwan kungen automatisch tariert Werden kleine Mengen vom Wägegut entnommen oder zugeführt so können durch die in der Waage vorhandene Stabilitätskompensation falsche Wägeergebnisse angezeigt werden Beispiel Langsames Herausfließen von Flüssig keiten aus einem auf der Waage befindlichen Behälter Bei Dosierungen mit kleinen ...

Страница 9: ...o d angezeigt Jetzt drücken Sie erneut ClassⅠ Variation von 0 20 classⅡ Variation von 0 5 Zero0d bedeuted keine Nullpunktverfolgung b Drücken Sie es blinkt die Anzeige tArE Drücken Sie nun und tArE d erscheint im Display Drücken Sie erneut classⅠ Variation von 0 30 class Ⅱ Variation von 0 9 tArE0d bedeutet kein Auto Tara c Um die Einstellung zu beenden drücken Sie Die Waage startet neu uns wieder ...

Страница 10: ...ellen Halten Sie für 3 Sekunden gedrückt bis die Anzeige Unit blinkt Drücken Sie nun Unit erscheint im Display Über die Taste können Sie die gewünschte Einheit auswählen und durch Drücken von bestätigen Beispiel Einheit g umstelleln auf oz ...

Страница 11: ... den Gebrauch a Waage vor dem Gebrauch aufwärmen lassen b Die Gesamtmasse von Tara und Wiegesubstanz darf die maximale Kapazität nicht überschreiten c Wenn das gewogene Gewicht nicht korrekt ist muss die Waage neu kalibriert werden 10 Zubehör Waage 1Stück Wäreplattform 1Stück Bedienungsanleitung 1Stück AC Adapter 1Stück Wiederaufladbarer Akku 1Stück ...

Страница 12: ...rund des betroffenen AD Chips abgestürzt Schalten Sie die Waage aus und nach 30 Minuten wieder ein 2 Der Schalter des Overlay ist beschädigt und muss ersetzt werden 3 S CAL oder UER2 0 wird nach dem Einschalten angezeigt 1 Die Waage ist aufgrund des betroffenen AD Chips abge stürzt Schalten Sie die Waage aus und nach 30 Minuten wieder ein 2 AD chip muss ersetzt werden 3 Wägezellendraht getrennt Üb...

Страница 13: ...rgrundbeleuchtung Pin 12 oder Pin 13 der Programmscheiben D78F0511A auf der Hauptplatine sind fehlerhaft verbunden mit Pin 6 oder Pin 7 des Bildschirmtreiberchips BL55066 8 Die max Kapazität wird nach Einschalten der Waage nicht angezeigt Stattdessen nur unterschiedliche Zahlen oder ein weisses Display Hauptplatinen Speicherchip BL24C02 ist beschädigt und muss ersetzt werden 9 Nullpunkt nicht stab...

Страница 14: ...locker oder der Berührungspunkt Oxidiert Befestigen Sie diesen Wenn es immer noch nicht funktioniert sollte der Stecker auf der Anzeige 9 Core Serial Port Buchse ersetzt werden 4 Die Leistungsspannung ist instabil Laden Sie die Batterie wieder auf oder schliessen Sie die Waage an die Hauptstrom versorgung an 5 Indikator innerer AD Chip CS5530 oder Wägezellenstromkreis GM6155 beschädigt Ersetzen Si...

Страница 15: ...electromagnetic wave interference 2 Starting up a Plug in one end of the power adapter or power line to the balance input another end Connecting the AC power supply N K C CH B A G series connection sketch X L series connection sketch b Turn on the power N K C CH B A G series turning on sketch X L models turning on sketch ...

Страница 16: ...Taking 300g 10mg for example after turning on the balance it will display in order ...

Страница 17: ... it means entering the weighing status If the weighing is not accuracy then repeat the above said calibration steps 2 Linear calibration Press calibration for 0 1mg accuracy balance press for 3 seconds it enters the calibration status then press till it appears CAL L it enters the linear calibration put on the weight in accordance with the data on display one point for calibration has been done an...

Страница 18: ...Note If not put on the weight within 10 seconds after entering the calibration status no CAL will be appeared It means no calibration has been done to quit the calibration ...

Страница 19: ... till a black point on the bottom left side disappears the value of the subject can be read out 5 Tare Press the tare weight of the pan can be taken out 6 Backlit The backlit is on when turning on the balance Press to turn off the backlit The service time of the balance can be ...

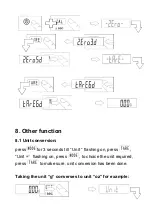
Страница 20: ...thin 3 seconds till Zero flashing press Zero d on display press repeatedly ClassⅠ variation from 0 20 classⅡ variation from 0 5 Zero0d means no Zero point tracing b Press again tArE flashing press tArE d on display press again classⅠ variation from 0 30 class Ⅱ variation from 0 9 tArE0d means no auto tare c Setting end press it restarts and is back to normal weighing mode ...

Страница 21: ...8 1 Unit conversion press for 3 seconds till Unit flashing on press Unit flashing on press to choice the unit required press to make sure unit conversion has been done Taking the unit g converses to unit oz for example ...

Страница 22: ...n for use a To preheating it as per the rule before use it b The total mass of tare and weighing substance should not exceed the limitation of Max capacity c If the weighing is inaccurate please calibrate the balance by weight d In case of taking out the round pan please first turn it around clockwise and take out Do not put out upward hardly so as to avoid the damage of the load cell ...

Страница 23: ...dapter if it is damaged 3 Insert the overlay connection wire or replace with new one if the overlay disconnected or damaged 4 Main board damaged 2 All characters on display after turning on and unable to return to normal weighing status 1 The balance crashed due to AD chip affected To turn off the balance and turn on it again after 30 minutes fit for all models 2 The switch of overlay is damaged t...

Страница 24: ... the load cell damaged 5 on display after turning on the balance and unable to come to zero after press 1 Load cell wire disconnected Check the wire connector 2 To replace with new one if the load cell damaged 6 Zero on flashing after turning on the balance Calibration button damaged To replace with new one fit for X B A models or replace with new overlay fit for N K G C models The calibration fun...

Страница 25: ...en keep waiting till CAL d flashing on the screen put on the weight corresponding to the data on display 10 Reading data unstable during weighing process 1 There are airflow or vibration around the working area To change the working place 2 Maybe the pan or load cell are touched by some other things To make the surroundings of the pan and load cell clean enough 3 The plug between load cell and ind...

Страница 26: ...ing the weighing process and kept unchanged even by adding the substance weight The balance crashed due to static electricity interference To shut down and restart it If it is happened frequently please contact our company for the solution ...

Страница 27: ......
Страница 28: ...Walter Hofmann AG Waagentechnik Industriestrasse 30 4912 Aarwangen Telefon 062 923 13 13 Telefax 062 922 21 22 info hofmann ag ch www hofmann ag ch Walter Hofmann AG Alle Rechte vorbehalten ...

Отзывы: