


HOBO Pendant MX Temp (MX2201) and Temp/Light (MX2202) Logger Manual
1-800-LOGGERS 5
field and type a specific reading. In the example, an alarm is
configured to trip when the temperature falls below 32°F.
6.
Under Raise Alarm After, select the duration before an
alarm is tripped and tap Done in the Alarm Duration screen.
7.
Select either Cumulative or Consecutive Samples. If you
select Cumulative Samples, then the alarm will trip when
the time the sensor is out of range over the course of the
deployment is equal to the selected duration. If you select
Consecutive Samples, then the alarm will trip when the
time the sensor is continuously out of range is equal to the
selected duration. For example, the high alarm for
temperature is set to 85°F and the duration is set to 30
minutes. If Cumulative is selected, then an alarm will trip
once a sensor reading has been at or above 85°F for a total
of 30 minutes since the logger was configured; specifically,
this could be 15 minutes above 85°F in the morning and
then 15 minutes above 85°F again in the afternoon. If
Consecutive is selected, then an alarm will trip only if all
sensor readings are 85°F or above for a continuous 30-
minute period.
8.
Tap Done and repeat steps 3–8 for the other sensor in the
Pendant MX Temp/Light (MX2202) logger if desired. Note
that when both alarms are configured, an alarm is raised
when either sensor is in an alarm condition.
9.
Back in the Configure screen, select one of the following
options to determine how the alarm indications are cleared:
•
Logger Reconfigured.
The alarm indication will display
until the next time the logger is reconfigured.
•
Sensor in Limits.
The alarm icon indication will display
until the sensor reading returns to the normal range
between any configured high and low alarm limits.
10.
Tap Start in the Configure screen to load the alarm settings
onto the logger if you are ready to start.
When an alarm trips, the logger alarm LED blinks every 4
seconds (unless Show LED is disabled), an alarm icon appears in
the app, and an Alarm Tripped event is logged. The alarm state
will clear when the readings return to normal if you selected
Sensor in Limits in step 9. Otherwise, the alarm state will
remain in place until the logger is reconfigured.
Notes:
•
Alarm limits are checked at every logging interval. For
example, if the logging interval is set to 5 minutes, then
the logger will check the sensor readings against your
configured high and low alarm setting every 5 minutes.
•
The actual values for the high and low alarm limits are set
to the closest value supported by the logger. For
example, the closest value to 85°F that the logger can
record is 84.990°F. In addition, alarms can trip or clear
when the sensor reading is within the specified
resolution. This means the value that triggers the alarm
may differ slightly than the value entered. For example, if
the High Alarm is set to 75.999°F, the alarm can trip
when the sensor reading is 75.994°F, which is within the
range of the resolution specifications.
•
When you read out the logger, alarm events can be
displayed on the plot or in the data file. See
Logger
Events
.
Burst Logging
Burst logging is a logging mode that allows you to set up more
frequent logging when a specified condition is met. For
example, a logger is recording data at a 5-minute logging
interval and burst logging is configured to log every 30 seconds
when the temperature rises above 85°F (the high limit) or falls
below 32°F (the low limit). This means the logger will record
data every 5 minutes as long as the temperature remains
between 85°F and 32°F. Once the temperature rises above
85°F, the logger will switch to the faster logging rate and record
data every 30 seconds until the temperature falls back to 85°F.
At that time, logging then resumes every 5 minutes at the
normal logging interval. Similarly, if the temperature falls below
32°F, then the logger would switch to burst logging mode again
and record data every 30 seconds. Once the temperature rises
back to 32°F, the logger will then return to normal mode,
logging every 5 minutes.
Note:
Sensor alarms, statistics, and the
Stop Logging option “Wrap When Full” are not available in
burst logging mode.
To set up burst logging:
1.
Tap the HOBOs icon and tap the logger to connect to it. If
the logger was configured with Bluetooth Always Off
enabled, press the circle on the logger to wake it up.
2.
Once connected, tap Configure.
3.
Tap Logging Mode and then tap Burst Logging.
4.
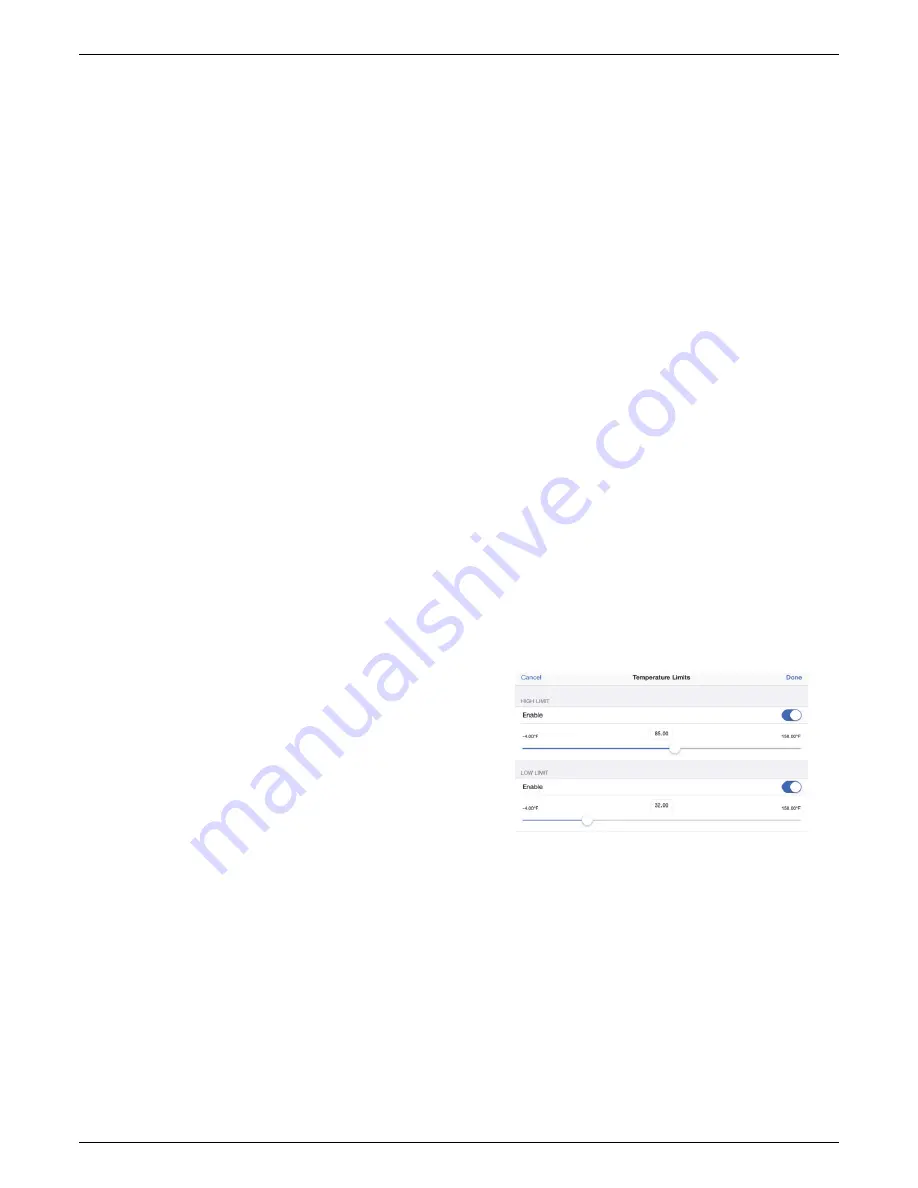
Tap a sensor under Burst Sensor Limits.
5.
Enable High Limit if you want burst logging to occur when
the sensor reading rises above a specific reading. Drag the
slider to the reading that will trigger burst logging or tap the
value field and type a specific reading. In the example, the
logger will switch to burst logging when the temperature
rises above 85°F.
6.
Enable Low Limit if you want burst logging to occur when
the sensor reading falls below a specific reading. Drag the
slider to the reading that will trigger burst logging or tap the
value field and type a specific reading. In the example, the
logger will switch to burst logging when the temperature
falls below 32°F.
7.
Tap Done and repeat steps 4–7 for the other sensor in the
Pendant MX Temp/Light (MX2202) logger if desired.
8.
Tap Burst Logging Interval and select an interval faster than
the logging interval. Keep in mind that the faster the burst
logging rate, the greater the impact on battery life and the
shorter the logging duration. Because measurements are
being taken at the burst logging interval throughout the
deployment, the battery usage is similar to what it would be
if you had selected this rate for the normal logging interval.
Tap Done.
www.
GlobalTestSupply
.com
Find Quality Products Online at:


