background image

5

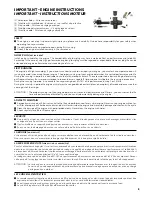
(1)  Carburator Body - 

Corps du carburateur

(2)  Throttle with throttle boot - 

Boisseau et son soufflet de protection

(3)  Main needle - 

Pointeau de réglage principal

(4)  Throttle stop adjustement screw - 

Vis de réglage de ralenti

(5)  Throttle needle - 

Pointeau de réglage de reprise

safety

  The engine is not a toy. Its power mights injure you, please use it carefully. Owners have responsibility for your safety when 

operating to use your motor

  It is advisable to ask a competent person during first running

  Check if the engine installed correctly in the remote car.

glow Plug 

(

not


included

)

Install a plug suitable for the engine. The compatibility of glow plug may have a marked effect on performance and reliability. 
Particulary in the case of very high performance engines, glow plug must be regarded as expendable. However, plug life can be 
extended and engine performance maintained by careful use.

first running

This engine is of high technology, if you are not sure how to maintain or repair your engine, you must ask a competent person. A 
running in period is necessary for your engine. The proper running in of your engine determines its eventual performance and life. 
During the running in period, it is advisable to use fuel with more oil content. The carburator had a basic setting before turning 
out from our factory. But we recommended to loosen the main needle (3) (around one turn) before the running in procedure.
During the running in period, it is advisable to use your engine at 50-75% of its performance, during 1 or 1,5 litre.
During the running-in period the engine must always have a good and constant idle and have plenty of smoke and excessive fuel 
coming out of the stinger.

ATTENTION !    The proper running in of your engine determines its eventual performance and life time, you can shorten the life 

time and performance dramatically, and you can also permanently damage the engine.

advise to maintain

  A properly maintained air filter is essential to the life and performance of every nitro engine. Never run your engine without an 

air filter or properly air filter because dust and dirt will enter inside the engine and irreversibly damage and shorten its life cycle. 

  Clean the outside of the engine with petrol product only. Never clean the engine with water. 

  Check regulary for different leaks engine

sécurité

  Ce produit n’est pas un jouet, mais un moteur thermique. Il peut être dangereux et causer des dommages irréversibles si les 

consignes de cette notice ne sont pas suivies

  Il est conseillé de se rapprocher de personnes averties lors des premières utilisations du moteur

  en aucun cas, le démarrage du moteur ne se fera alors qu’il n’est pas fixé sur un châssis 

lA bougie 

(

non


incluse

)

Votre moteur doit être équipé d’une bougie correspondant au taux de nitrométhane du carburant et de la cylindrée du moteur.
Nous vous préconisons de remplacer la bougie régulièrement car c’est une pièce sujette à usure.

lA 1ère Mise en route 

(

voir


dessin


du


carburateur

)

Pour les utilisateurs néophytes, il vous est recommandé de vous rapprocher de personnes averties lors des premières utilisations 
du moteur. Votre moteur nécessite une période de rodage. La qualité du rodage déterminera ses performances et sa fiabilité. Il 
est important d’utiliser du carburant contenant un pourcentage d’huile plus élevé. Le carburateur est préréglé en usine mais il est 
conseillé d’ouvrir le pointeau principal (3) de 1 tour avant le rodage. 
Le rodage correspond à une utilsation à 50-75% des performances du moteur sur une période de 1 à 1,5 litre de carburant. Durant 
cette période, les réglages doivent rester constants et le moteur doit toujours émettre de la fumée par le pot d’échappement. 

ATTeNTION !   Le sérieux dans le suivi de la procédure de rodage déterminera les performances et la longévité de votre moteur. 

La casse d’un quelconque élément de votre moteur due à un mauvais rodage ne sera en aucun cas prise en charge 
par la garantie du moteur.

les conseils d’entretien

  Le remplacement systématique de la mousse de filtre à air ou un nettoyage de celui-ci avant que des impuretés puissent être 

aspirées par le moteur. Ces impuretés provoquent dans tous les cas des détériorations irrémédiables.

 Le nettoyage extérieur du moteur grâce à un nettoyant à base de pétrole. Ne jamais nettoyer le moteur à l’eau.

 Le contrôle régulier de l’efficacité des différentes étanchéités 

IMPORTANT - ENGINE INSTRuCTIONS

imPortant - instructions moteur

(2)

(1)

(5)

(4)

(3)

Содержание Spirit

Страница 1: ...supervision Ceci n est pas un jouet Ne convient pas aux enfants de moins de 14 ans sans la surveillance d un adulte Kein Spielzeug Nichte geeignet für Kinder unter 14 Jahren ohne Aufsicht Erwachsener No es un juguete No recomendado para niños menores de 14 años instruction manual ...

Страница 2: ...e filtre 60ml 4xAA Alkaline batteries 4 piles Alkaline R6 Aluminium Glow starter and charger Kit chauffe bougie en aluminium chargeur HT 210250 tools required not Included in the kit outillage requis non inclus dans le kit EX 421939 Wheel nuts wrench 17mm Clé à roue 17mm EX 421984 Aluminium Multi tool for Shocks Outil multifonction pour amortisseur Multifonction pliers complety set Gamme multifonc...

Страница 3: ...e GLOW FUEL for radio control models the model shop sells Please use a popular name brand of the GLOW FUEL Please use the nitro methane between 10 30 Avoid fire direct sunlight high temperature near battery and store the fuel in a cool dry and dark place out of childrens reach Do not leave the fuel in the fuel pump and the fuel tank There is danger that fuel leaks Remove the fuel cap and throw the...

Страница 4: ...téristiques suivantes Utiliser UNIQUEMENT du carburant pour modèles radio commandés disponible chez les revendeurs Favoriser un carburant de bonne qualité Utiliser un carburant ayant un taux de nitrométhane compris entre 10 et 30 Eviter toute source d étincelles provenant notamment de batteries ou de sources de forte température à proximité du bidon de carburant Stocker le carburant dans un lieu t...

Страница 5: ... and irreversibly damage and shorten its life cycle Clean the outside of the engine with petrol product only Never clean the engine with water Check regulary for different leaks engine Sécurité Ce produit n est pas un jouet mais un moteur thermique Il peut être dangereux et causer des dommages irréversibles si les consignes de cette notice ne sont pas suivies Il est conseillé de se rapprocher de p...

Страница 6: ... 3x8mm F H 3x8mm Set 3x3mm Cap 2 5x14mm R H 3x10mm F H 3x10mm Set 3x5mm Cap 2 5x18mm R H 3x12mm F H 3x12mm Set 3x12mm Cap 3x14mm R H 3x16mm F H 3x16mm Set 4x4mm Cap 3x23mm R H 3x18mm F H 3x40mm Set 4x8mm Cap 3x28mm R H 3x23mm F H 4x8mm Set 5x5mm Use Thread Lock Frein filet Transmission Grease Graisse de transmission Silicon Oil Huile de silicone Air Filter Oil Huile filtre à air R H 3x28mm R H 3x2...

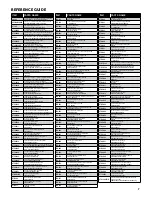
Страница 7: ...EPX2 Sprit EP RallyCross Front Plate STREP 305 Colonnette de platine radio avant en plastique Front plate holder STRX 007 Barre de direction Spirit Steering Plate STRX 008 Protections latérales Spirit Side Guard STRX 010 Réservoir Spirit Fuel tank STRX 011 Molette d antenne Antena pipe screw STRX 012 Renforts de châssis Spirit Chassis Brace Set STRX 014 Vis fermeture de boite radio Radio box locke...

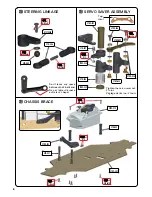
Страница 8: ... set 3x12 x4 4x8x2 5mm x4 F H 3x10 x2 F H 4x8 1 1 Tighten the servo saver nut 3 turns Réglage de l écrou 3 tours Top Haut HT 510006 x1 R H 3x8 x1 M 3 STRX 023 STRX 026 STR 086 STR 088 STRX 010 STR 009 STRX 201 STRX 012 STR 021 x1 R H 3x12 x2 M 3 Don t leave any space between the 2 balls end Ne pas laisser d espace entre les 2 chapes ...

Страница 9: ...9 front plate steering steering system assembly x1 M 3 1 x2 R H 3x8 x1 R H 3x12 x4 6x10x3 STREP 304 ...

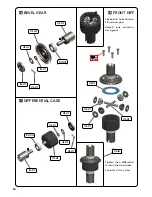
Страница 10: ...R 070 STR 070 STR 069 HT 530165 STR 071 STR 078 STR 079 STR 073 STR 082 STR 076 STR 077 STR 074 STR 075 STR 071 HT 530165 STR 075 Silicone oil huile silicone Fill just over gear Remplir juste au dessus des pignons Tighten the 4 differential screw in the cross order Serrer les 4 vis en croix ...

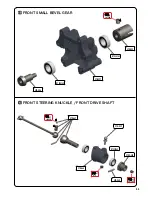
Страница 11: ...front small bevel gear front steering knuckle front drive shaft x1 M 3 x1 set 5x4 x2 set 5x5 x1 set 4x4 1 1 2 STR 084 STR 097 HT 530165 HT 530165 STR 085 STR 029 STRX 249 STR 048 STR 046 HT 530165 STR 047 ...

Страница 12: ...12 front lower arm front drive assembly x2 set 4x8 STR 033 STR 045 STR 072 STR 041 STR 097 STRX 234 STR 042 STR 035 x1 R H 3x10 x2 F H 3x40 x2 F H 3x16 ...

Страница 13: ...t shock tower x2 R H 3x8 x2 set 3x5 x2 set 3x3 x2 set 3x12 x2 R H 3x16 1 1 STRX 130 STR 097 STR 032 STRX 205 HT 595015 STR 088 STR 059 STR 053 x4 R H 3x12 x2 cap 3x28 x1 R H 3x12 Don t leave any space between the 2 balls end ...

Страница 14: ...14 front drive assembly completed front assembly x2 R H 3x10 x2 cap 3x23 x2 M 3 x2 M 3 STR 031 STR 037 STR 043 STR 044 STR 029 STR 038 STR 040 STR 039 STR 052 x4 F H 4x16 11 mm ...

Страница 15: ...15 steering rod assembly steering rod STREP 303 STR 028 34 mm STR 029 ...

Страница 16: ...9 HT 530165 STR 071 STR 078 STR 079 STR 073 STR 076 STR 077 STR 074 STR 075 STR 071 HT 530165 STR 075 x4 F H 3x10 2 2 3 Silicone oil huile silicone Fill just over gear Remplir juste au dessus des pignons Tighten the 4 differential screw in the cross order Serrer les 4 vis en croix STR 083 ...

Страница 17: ...17 BRAKE PAD ASSEMBLY BRAKE SYSTEM CENTER DIFF ASSEMBLY STR 020 STRX 203 STR 017 x4 R H 3x16 x4 R H 3x28 x4 F H 3x8 x2 F H 3x8 x2 set 3x3 1 1 STR 016 HT 530130 STR 019 STR 018 ...

Страница 18: ...18 throttle control linkage throttle control linkage assembly HT 510006 x1 R H 2 5x18 x4 set 3x3 x2 M 2 5 1 1 1 1 1 1 THROTTLE LINKAGE KIT HT 510018 x1 cap 2 5x14 ...

Страница 19: ...19 center diff mounting completed center assembly STR 068 x4 F H 4x10 1 ...

Страница 20: ... 530165 STR 071 STR 078 STR 079 STR 073 STR 076 STR 077 STR 074 STR 075 STR 071 HT 530165 STR 075 x4 F H 3x10 2 2 3 Silicone oil huile silicone Fill just over gear Remplir juste au dessus des pignons Tighten the 4 differential screw in the cross order Serrer les 4 vis en croix STR 082 ...

Страница 21: ...21 rear drive assembly STR 058 STR 033 STR 042 STR 035 STR 097 x1 R H 3x10 x2 F H 3x40 x2 F H 3x12 x1 set 4x8 x1 set 5x4 1 STR 084 STR 097 HT 530165 HT 530165 STR 085 rear small bevel gear ...

Страница 22: ...22 rear c hub rear drive shaft rear c hub rear brace STRX 249 HT 530165 STRX 012 STR 055 STR 064 STR 098 STR 048 HT 530165 STR 066 x2 R H 3x10 x1 R H 3x23 x2 set 5x5 x1 M 3 ...

Страница 23: ...23 rear sway bar wing stay STRX 135 STR 097 STR 056 x2 R H 3x16 x2 R H 3x8 x4 R H 3x10 x2 set 3x3 STR 053 STR 088 STR 059 x2 set 3x12 x2 set 3x5 1 Don t leave any space between the 2 balls end ...

Страница 24: ...24 rear sway bar rear center drive shaft STRX 206 HT 595015 STR 032 STR 062 STR 067 STR 061 x1 R H 3x10 x2 R H 3x18 x2 R H 3x16 x2 R H 3x16 x2 R H 3x12 x2 cap 3x23 x2 cap 3x23 x6 M 3 x2 M 3 1 17 mm ...

Страница 25: ...25 rear drive assembly rear completed assembly STR 068 x4 F H 4x16 x2 F H 3x10 ...

Страница 26: ... REAR HT 598104 REAR HT 585006 HT 585008 HT 595010 HT 585011 HT 598106 HT 598114 HT 598105 HT 595009 FRONT REAR COMPLETY SET HT 592000 x4 M 2 5 x4 15x1mm x4 2 5 washer 3 3 3 3 Fill up silicone oil Wait for air bubbles to escape Close shock cap Remplir avec huile silicone Attendre que les bulles s échappent et refermer ...

Страница 27: ...27 front shocks rear shocks completed shocks assembly x2 R H 3x16 x2 R H 3x16 x2 M 3 x2 M 3 x2 3mm x2 3mm ...

Страница 28: ...28 side guard side guard assembly STRX 008 x6 F H 3x8 ...

Страница 29: ...29 radio plate assembly receiver switch STRX 202 STRX 014 STRX 209 STRX 015 STRX 015 HT 501154 XT 130543 STRX 089 STREP 305 STRX 094 x3 R H 3x8 x9 R H 3x8 x1 F H 3x8 x4 M 3 ...

Страница 30: ...tle steering servo receiver battery STR 094 HT 520001 HT 501370 STRX 011 XT 6 1400PY B STRX 015 Receiver x8 R H 3x12 1 1 1 1 Use thread lock on these screws only Utiliser du frein filet seulement sur ces 4 vis ...

Страница 31: ...radio tray servo horn completed radio tray assembly x2 Servo screw x2 M 3 x7 F H 3x10 Check the servos position before attaching the servo horn Vérifier la position des servos avant de fixer les palonniers ...

Страница 32: ...32 clutch system clutch bell HT 495050 HT 495026 HT 560223 HT 495023 HT 495024 KIT HT 495027 HT 530110 x1 3x10 x1 3 washer 1 1 ...

Страница 33: ...ir filter STRX 290 HT 501227 or HT 501229 HT 230660 HT 501235 x4 cap 3x10 4 4 4 Put correctly air filter oil on the air filter foam before running Appliquer correctement l huile de filtre à air avant l utilisation x4 M 3 x1 F H 3x8 ...

Страница 34: ...34 air filter installation exhaust pipe holder HT 501015 1 1 x1 set 4x4 x1 F H 4x10 ...

Страница 35: ...35 engine installation fuel tube STR 091 HT 108 HT 220302 x1 set 5x5 ...

Страница 36: ...36 wheels assembly wheels tyres HT 443 STRX 050 ...

Страница 37: ...37 completed car assembly wing HT 501600 x2 R H 3x12 ...

Страница 38: ...38 ...

Страница 39: ...39 notes ...

Страница 40: ...subject to change without notice Photograph shows model after assembly and painting info hobbytech rc com General information Les spécificités peuvent changer sans information préalable Les photos sont non contractuelles ...

Отзывы: