background image

14 


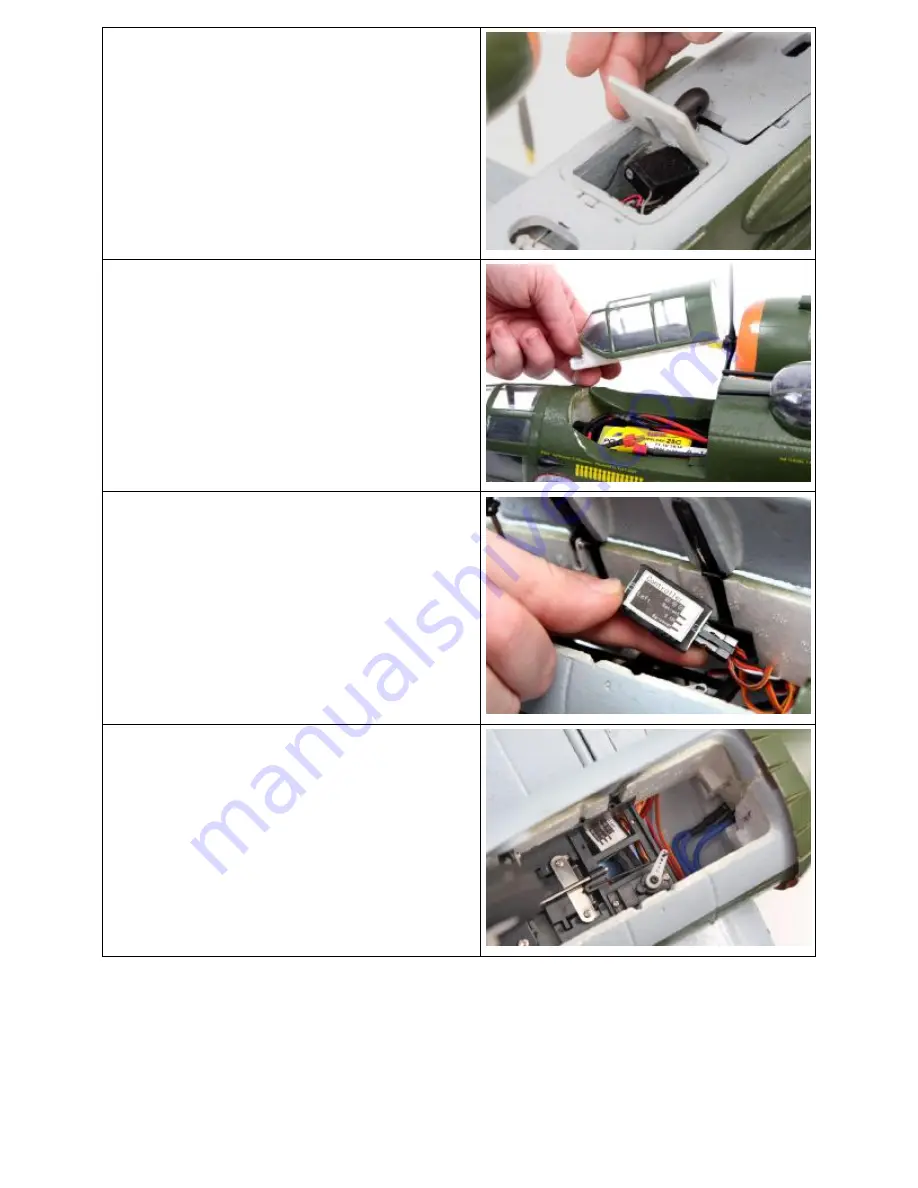
42. Install the power Y-conn to each ESC 

making sure that you plug the red-to-red 
and black-to-black. Feed the Deans plug 
into the cockpit area of the fuselage. 


43. The flight battery is located under the 

cockpit. Lift from the rear to remove. A    
3-cell Lipo battery of approx. 2500mAh is 
about right for size and weight.  


44.  Each landing gear sequencer controls 

one gear door and one gear leg. The three 
plugs connect with the signal wire to the 
rear of the sequencer (away from label).  


45.  Make sure that the sequencer and motor 

wires are neatly tucked away so that they 
do not interfere with the landing gear 
wheel when the gear is retracted.  


Содержание Apache Princess

Страница 1: ...1...

Страница 2: ...tion lights A great deal of the assembly is pre done for you This is a receiver ready airplane that only requires some simple assembly and the installation of your radio equipment and batteries to be...

Страница 3: ...pre installed 3 Landing Gear Door Sequencers pre installed 2 pair of 3 bladed propellers 2 left 2 right 2 Brushless Outrunner Motors 2 20A Speed Controls pre installed Wings with Navigation lights pr...

Страница 4: ...wires into the three ESC wires Do not worry about the plug in order we will check motor rotation in a later step 2 Feed the ESC and motor wires back into the engine nacelle and slide the motor onto i...

Страница 5: ...s for the lights 6 Photo shows the root end of a wing panel and identifies the various connectors 7 Locate the triple connector and plug in one leg to the connector labeled 5 Please make sure to corre...

Страница 6: ...elage at front of the wing opening and insert the wing into the fuselage Make sure that the wing is fully seated into the opening When the wing is in the correct position it will look like the photo t...

Страница 7: ...n the photo 14 Locate the foam rectangle that creates the wire cover for the bottom of the wing Apply a bead of glue around the edge 15 Install the wire cover as shown in the photo 16 Locate the horiz...

Страница 8: ...position on the fuselage and screw into position with the long screws as shown Note it is not necessary to glue the stab in position 19 Snug each screw in position Do not over tighten 20 Attach the el...

Страница 9: ...abilizer A small amount of glue can be used if desired 22 Screw fin into position as shown 23 Install the short rudder pushrods to the outer bell cranks as shown in the photo 24 Lightly glue the rear...

Страница 10: ...or is not turning in the correct direction swap any two of the three motor wires to reverse its direction 26 After removing the props install the engine cowls Three small black screws are provided for...

Страница 11: ...e injection molded detail parts Glue the cockpit air intakes in place with a small amount of glue 32 The fin aerial is installed on the top of the fuselage behind the ball turret 33 The teardrop anten...

Страница 12: ...ips screwdriver or length of music wire Install gun barrels as shown 35 Make pilot hole for side gun blister barrel and install as shown 36 Install two gun barrels in tail position 37 Using a body rea...

Страница 13: ...h model on its back mark a point that is 2 1 2 back from the leading edge of the wing next to the fuselage This is the CG for this model All initial flights should be flown with the CG no further aft...

Страница 14: ...from the rear to remove A 3 cell Lipo battery of approx 2500mAh is about right for size and weight 44 Each landing gear sequencer controls one gear door and one gear leg The three plugs connect with...

Страница 15: ...48 With the model upside down and your transmitter turned ON with the throttle in the OFF position plug a 3 cell Lipo battery to the Deans plug to power up the system Check that each control surface i...

Страница 16: ...ts at a scale like speed 51 Once the gear is completely retracted the gear doors are commanded to close 52 Each gear door closes at a scale like speed 53 Once completely closed they are ready to rever...

Страница 17: ...lished flyer make the first flight and trim the aircraft A buddy box training system is also very helpful Flying The B 25 has very good ground handling character due to its wide stance tricycle landin...

Страница 18: ...r within eight 8 hours of having consumed alcohol 10 I will not operate my model aircraft while using any drug which could adversely affect my ability to safely control my model aircraft 11 Children u...

Страница 19: ...ea Choose an area clear of obstacles and large enough to safely accommodate your flying activity Make certain this area is clear of friends and spectators prior to launching your aircraft Be aware of...

Отзывы: