background image

- 87 -

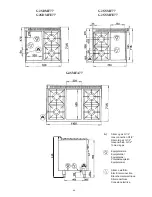
G4SF77
G4SFE77
G4SFEV77
G4SFA77
G4SFEV77P

G6SFEA77

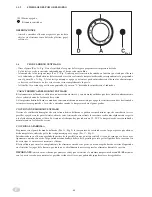
A)

Attacco gas G1/2”
Gas connection G1/2”
Raccord gaz G 1/2"
Gasanschluß G 1/2"
Toma de gas

Equipotenziale
Equipotential
Equipotentiel
Potentialausgleich
Equipotencial

Attacco elettrico
Electrical connection
Branchement electrique
Stromanschluss
Conexión eléctrica

SCHEMI DI INSTALLAZIONE - INSTALLATION DIAGRAM

SCHEMAS D’INSTALLATION - INSTALLATIONSPLÄNE

ESQUEMAS DE INSTALACIÓN

925

735

735

Содержание G2SDM77

Страница 1: ...03 Teil 1 und 2 Kategorie II für Erdgas und Flüssiggas COCINA A GAS SERIE DOMINA 700 SEGÚN EN 437 y EN 203 parte 1 y 2 Categoría II Metano y G P L 0 6 9 4 G4SF77 G4SFA77 G4SF77P G4SFE77 G4SFE77P G6SFA77 G6SFEA77 G4SFEV77 G4SFEV77P G6SFEVA77 G2SDMF77 G2SSMF77 G2SDMFE77 G2SSMFE77 G4SMFA77 G4SM77 G4SMA77 G2SSMA77 G2SDMA77 G2SSM77 G2SDM77 I GB F D E ISTRUZIONI PER L INSTALLAZIONE L USO E LA MANUTENZIO...

Страница 2: ...00 8 2 6 Collegamento all impianto del gas 8 2 6 1 Scarico dei prodotti di combustione sotto una cappa di aspirazione 8 2 6 2 Come ottenere la portata termica nominale 8 2 7 Controllo della pressione 9 2 7 1 Controllo della portata termica generale 9 2 7 2 Regolazione della portata termica minima 9 2 7 3 Controllo per il funzionamento a gas liquido 9 2 7 4 Controllo del funzionamento 9 2 8 Introdu...

Страница 3: ...elettrica è quindi necessario verificare questo fondamentale requisi to e in caso di dubbio richiedere il controllo accurato da parte di personale professionalmente qualificato Il costruttore non può essere considerato responsabile per eventuali danni causati dalla mancanza di messa a terra dell impianto L apparecchiatura deve essere inclusa in un sistema equipotenziale la cui efficienza deve esse...

Страница 4: ...85 G1 2 320 585 1 560 620 310 1 1 1 1x5 3 kW 15 0 1183 1165 1 587 1 846 1 Compreso la portata termica del pilota ca 200 W Tensione 1N AC 220 240 V 50 Hz per forno ventilato Dimensioni esterne Larghezza Profondità Altezza Altezza massima Attacco gas Dimensioni piastra cottura Larghezza Profondità Dimensioni forno GN2 1 N forni Larghezza Profondità Altezza N Bruciatori e portata termica Piccolo 1 Me...

Страница 5: ...cciaio inox maniglie in acciao satinato montate su supporti in materiale atermico e guarnizione di tenuta alla porta Cerniere a molla bilanciate 1 4 RISCALDAMENTOAGAS Con bruciatore in acciaio inox a fiamma autostabilizzata Regolazione termostatica della temperatura 150 290 C con valvola di sicurezza con termocoppia per l interruzione automatica del gas in caso di spegnimento accidentale del pilot...

Страница 6: ...E E DIRETTIVE TECNICHE Per l installazione sono da osservare le seguenti norme Prescrizioni vigenti antinfortunistiche e antincendio La regolamentazione dell ente erogatore del gas dal quale bisogna farsi rilasciare il nullaosta prima dell installazione Norme Installazione impianti a gas Norme Installazione impianti elettrici La regolamentazione dell ente erogatore energia elettrica Norme igienich...

Страница 7: ...as 15 C l h g h 19 7 28 7 36 9 2 4 4 8 5 7 6 0 6 0 2 15 2 1 634 186 243 473 466 1 Compreso portata termica pilota circa 200W K Ugello corto 15 mm F fisso R d A Regolazione dell aria primaria 110 75 115 75 PEL COPRECI Nazione e Categoria Cat UGELLO Tipo di GAS PRESSIONE GAS A MONTE mbar Nom Min Max BRUCIATORE PICCOLO Ømm Tipo MARCATO R d A Xmm ITALIAII2H3 ITALIAII2H3 2H 3 G20 metano G30 butano G31 ...

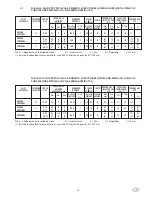
Страница 8: ... che corrisponde con il gas disponibile in rete Indicazione riportata sull imballo e o targhetta sull apparecchio TABELLA II DATI TECNICI GAS PRESSIONE UGELLI BRUCIATORE FORNO GN2 1 PILOTA E VITE DEL MINIMO CUCINE SERIE DOMINA 700 TABELLA II DATI TECNICI GAS PRESSIONE UGELLI BRUCIATORE PIASTRA DI LENTA COTTURA PILOTA EVITE DEL MINIMO CUCINE SERIE DOMINA 700 1 Compreso portata termica pilota circa ...

Страница 9: ...controllare la tenuta gas con bolle di sapone CONTROLLO DELLA PRESSIONE ALL UGELLO Pi Fig 2 La presa di pressione si trova sopra il porta ugello Fig 2 La gomma al silicone è adatta per alte temperature ma va protetta con carta stagnola 2 7 1 CONTROLLO DELLA PORTATA TERMICA GENERALE Una eventuale trasformazione per il funzionamento ad altro tipo di gas vedere Cap 4 deve essere eseguita da un instal...

Страница 10: ...i sulla morsettiera arrivo linea ad una efficace terra realizzata conformemente alle norme in vigore AVVERTENZE SPECIFICHE La sicurezza elettrica di questa appartecchiatura è assicurata soltanto quando la stessa è correttamente collegata ad un efficace impianto di messa a terra come previsto dalle vigenti norme di sicurezza elettrica il costruttore declina ogni responsabilità qualora queste norme ...

Страница 11: ...rno sta richiedendo calore quando all interno della camera di cottura viene raggiunta la temperatura desiderata corrispondente a quella impostata nella manopola Pos A Fig 2 la spia arancio si spegne e si possono quindi introdurre nel forno gli alimenti da cuocere Durante questa fase è necessario chiudere completamente la porta A fine cottura spegnere il forno ruotando la manopola sullo 0 in corris...

Страница 12: ...3 ripiani di cui è munita la griglia laterale inoltre con il sistema ad aria calda la cottura avviene più rapidamente rispetto a quella effettuata con un forno statico Tenere perciò presente di ridurre di 15 20 C la temperatura di cottura riportata normalmente nei libri di cucina COTTURAALLAGRIGLIA Impostare nella manopola comando forno Pos A Fig 3 la temperatura di cottura desiderata quindi aspet...

Страница 13: ...chiave del 12 con quello corrispondente al tipo di gas prescelto attenendosi alle Tabelle II Iniettori Cap 2 5 SOSTITUZIONE UGELLO BRUCIATORE PILOTA DI PLACCA Smontare le due piastrine di bloccaggio Fig 3 pos 3 con una chiave a brugola di 4 mm Sollevare la testa del bruciatore pilota Fig 3 pos 5 Sostituire l ugello Fig 3 pos 4 del bruciatore pilota usando la chiave del 5 con quello corrispondente ...

Страница 14: ...rrispondente al tipo di gas prescelto e indicato nella Tabella II Iniettori Cap 2 5 SOSTITUZIONE UGELLO BRUCIATORE PIASTRA Sostituire l ugello del bruciatore Fig 6 pos 1 con quello corrispondente al tipo di gas prescelto e indicato nella Tabella II Iniettori Cap 2 5 Accendere il bruciatore pilota Fig 6 pos 5 portando la manopola Fig 8 nella posizione accendere il bruciatore Fig 6 pos 4 portando la...

Страница 15: ...zione premere a fondo e procedere all accensione del pilota schiacciando contemporaneamente il pulsan te dell accensione piezoelettrica il pulsante si trova sul cruscotto Il bruciatore pilota è visibile attraverso l oblò sul cruscotto Mantenere premuta la manopola per circa 20 secondi al suo rilascio la fiammella del pilota deve rimanere accesa Se ciò non avvenisse ripetere l operazione di accensi...

Страница 16: ... del gas verso i bruciatori 13 e 15 smontare il bulbo che si trova all interno del forno e viene fissato con squadrette porta bulbo smontare l entrata del gas 12 con una chiave del 19 montare il nuovo termostato seguendo l ordine inverso di smontaggio cambiare la vite del minimo By pass 11 montare il bulbo nel forno usando le sue squadrette N B Controllare che non vi siano fughe di gas usando boll...

Страница 17: ...rde C Termostato limite forno Il termostato limite può essere sostituito solo da un Centro di Assistenza Autorizzato Pulire giornalmente la parti in acciaio inox con acqua tiepida saponata quindi risciacquare abbondantemente ed asciugare con cura Evitare nel modo più assoluto di pulire l acciaio inox con paglietta spazzola o raschietti di acciaio comune in quanto possono depositare particelle ferr...

Страница 18: ...6 Gas system connection 25 2 6 1 Discharge of exhaust flue products under a draft hood 25 2 6 2 How to achieve the nominal thermal capacity 25 2 7 Pressure check 25 2 7 1 Checking the general thermal capacity 26 2 7 2 Adjusting the minimum thermal capacity 26 2 7 3 Liquid gas operation control 26 2 7 4 Operation control 26 2 8 Introduction to users 26 3 Electrical connection 27 3 1 Earthing 27 3 2...

Страница 19: ...oubt request an accurate check up by professionally qualified personnel the Manufacturer cannot be deemed responsible for any damages caused by the lack of earthing in the system the unit must be included in an equipotential system whose efficiency should be tested in compliance with the law in force all units are supplied with a 200cm long cable having a sufficient cross section for the maximum l...

Страница 20: ... 1 1 1 1x5 3 kW 15 0 1183 1165 1 587 1 846 G4SF77 G4SFE77 G4SFA77 G6SFEA77 G2SDMF77 G2SSMF77 G2SDMFE77 G2SSMFE77 G4SMFA77 G4SF77P G4SFEA77P G2SDMA77 G2SSMA77 G4SFEV77 A 1100 735 850 958 G1 2 1 520 620 310 2 2 1x2 6 kW 19 1498 1476 2 011 2 338 2 6 G2SSM77 G2SDM77 A 700 735 250 330 G1 2 1 1 1 15 1183 1165 1 587 1 846 A 1100 735 850 985 A 1200 735 250 330 G4SMA77 G4SM77 A 700 735 850 958 G1 2 1 520 6...

Страница 21: ...nd insulating glass wool interspace door headers of stainless steel handles in satin steel mounted on athermal supports and door seal Balanced spring hinges 1 4 GAS HEATING Stainless steel burner with self stabilising flame Thermostat adjustable temperature 150 290 C with safety valve and thermocouple for automatic gas interruption in case of accidental pilot extinguishment Piezoelectric ignition ...

Страница 22: ...O BE COMPLIED WITH The following indications should be observed during installation Accident and fire regulations in force Prescriptions by the Gas Supply Company which should issue an authorisation before installation Instructions for the Installation of gas equipment Instructions for the Installation of electrical equipment Prescriptions by the Electrical Supply Company Hygienic regulations 2 3 ...

Страница 23: ...50 K 95K 95 K F F F F 85 85 55 55 35 35 21 21 Gas pressure at nozzle with 21S Max mbar Min mbar Nominal Thermal kW 1 100 T C Min Gas consumption 15 C l h g h 19 8 24 6 28 9 28 9 36 9 2 2 3 0 3 3 3 3 4 3 3 5 3 5 3 5 3 5 1 35 1 25 1 25 1 25 371 431 108 125 108 142 276 239 276 272 R o A Regulation of primary air 1 Including the pilot thermal capacity approx 400W Nozzle marking Ø 1 100 Pressure regula...

Страница 24: ... category Cat Nozzle Type of gas 2H 2L 3B P 3 G20 G25 G30 G31 G30 G31 Gas pressure upstream mbar Nom Min Max 20 25 29 29 37 17 20 25 20 25 25 30 35 35 45 OVEN BURNER Ø mm Type MARKED R d A X mm BY PASS 22 S Ø mm MARKED PILOT targhet MARKED 185K 190 250K 125K 125K 15 15 15 15 95 95 65 65 36 36 19 19 Gas pressure at nozzle with 25ST Max mbar Min mbar Nominal Thermal kW 1 100 T C Min Gas consumption ...

Страница 25: ...G Attention If the incoming gas dynamic pressure to the unit is lower than the minimum pressure on Table II connection is prohibited furthermore the fitter should notify the gas Company that the supply pressure is too low N B Should the pressure vary more to than 10 of the nominal pressure e g for G20 22mbar it is advisable to mount a pressure regulator ahead of the unit in order to guarantee the ...

Страница 26: ...ith Table II Injectors Ch 2 5 The oven should be heated up for at least 20 minutes by bringing the thermostat in the maximum position then turn the knob to the minimum 2 7 3 LIQUID GAS OPERATION CONTROL Check whether the fitted nozzles comply with the indications on Table II Ch 2 5 Check whether the incoming pressure complies with the indications on Table II Make sure that the L P G gas system has...

Страница 27: ...e safety regulations It is necessary to verify this fundamental safety requisite and in case of doubt ask for an accurate testing of the system by professionally qualified personnel The Manufacturer cannot be deemed responsible for any damages caused by the lack of unit earthing ATTENTION NEVER INTERRUPTTHE EARTH WIRE Yellow Green 3 2 POWER SUPPLY CABLE The unit is supplied fitted for the followin...

Страница 28: ...per element on 1500W Upper and lower elements 3800W with thermostat control 100 290 C N B Before turning on the oven make sure that no plastic bags and no paper of cardboard are inside the oven 3 5 8 USING THEVENTILATED ELECTRIC OVEN Turn the knob clockwise onto the desired position Pos A Fig 2 The green flash light will light up to show that the oven is on If the orange flash light lights up Pos ...

Страница 29: ... on again when the temperature decreases by a few degrees COOKING WITH THEVENTILATED ELECTRIC OVEN Thanks to the proper distribution of hot air inside the oven various types of food may be cooked on the three shelves of the side grill Moreover this system enables to cook food faster as compared to the static electric oven Therefore it is advisable to reduce the temperature indicated on most cookbo...

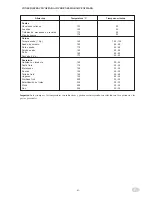
Страница 30: ...g flan Meat Roasted veal Roasted lamb Roasted pork Roasted pheasant Chicken Fish 1 kg Pastry Yeast biscuits Short pastry Meringues Sponge cakes Fruit pies Flat bread Sterilised fruit Sterilised vegetables Pizza Bread Type of food Temperature C Cooking time in minutes 130 150 175 175 160 160 170 160 160 170 160 175 100 150 150 150 200 200 220 250 20 50 45 25 120 150 60 90 50 60 60 90 60 90 30 40 20...

Страница 31: ...thout a yellow tip L P G gas REPLACING THE IDLE SCREW BYPASS Replace the minimum thermal capacity screw bypass Fig 2 position 1 with one corresponding to the gas type chosen and complying with Table II Injectors Ch 2 5 The thermal capacity in the minimum position should be approx 30 of the nominal thermal capacity When you turn the fast knob from the maximum position to the minimum position the bu...

Страница 32: ...the idle screw Fig 5 position 11 located on the thermostat with one corresponding to the gas type selected and following Table II Injectors Ch 2 5 Screw the idle bypass screw fully down After replacing the nozzles apply on the existing label the one supplied with the machine indicating the new type of gas NOTE it is advisable to use the reduction grill on the burner SUGGESTEDCONTAINERS Type of bur...

Страница 33: ...Turn the knob to the right and set it on the symbol The upper resistance of 1500 W power is turned on by setting it on 290 C the upper and lower resistances are turned on IGNITING THE COOK BURNERS To ignite the cooking plate pilot press the knob Fig 8 and rotate it to the left to reach the symbol having reached it press the knob deeply down at the same time pressing the piezoelectric ignition butt...

Страница 34: ...r gas oven units only The thermostat is located on the supply backguard disassemble the thermocouple 16 with a size 19 spanner first remove the gas outlet towards the burners 13 and 15 remove the bulb inside the oven which is fixed by bulb holder brackets remove the gas inlet 12 with a size 9 spanner install a new thermostat following the reverse assembling order change the idle bypass screw 11 in...

Страница 35: ...LECTRICOVENCOMPONENTS Electric oven units only To be performed exclusively by an Authorised Service Centre In order to replace these components it is important to first do the following switch off live voltage from the unit with the omnipolar breaker remove the electric thermostat knob disassemble the front panel remove the oven bottom if necessary remove the oven door if necessary Now you can rep...

Страница 36: ...Evacuation des produits de combustion par une hotte d aspiration Appareil de type A 43 2 6 2 Comment obtenir un debit thermique nominal 43 2 7 Controle de la pression 43 2 7 1 Controle du debit thermique general 43 2 7 2 Reglage du debit thermique minimum 43 2 7 3 Controle pour le fonctionnement au gaz liquide 44 2 7 4 Controle du fonctionnement 44 2 8 Informations de l usager 44 3 Branchement ele...

Страница 37: ...n vigueur en matière de sécurité électrique En cas de doute faites contrôler votre installation par un électricien qualifié Le Fabricant décline toute responsabilité en cas de dégâts causés à des personnes ou à des biens provoqués par l absence de mise à la terre de l appareil L appareil doit être inclus dans un système équipotentiel dont l efficacité devra être vérifié conformément à la législati...

Страница 38: ...7 A 1100 735 850 985 G1 2 1 520 620 310 3 3 1x5 3 kW 28 5 2248 2214 3 016 3 508 5 3 A 700 735 850 985 G1 2 320 585 1 560 620 310 1 1 1 1 21 0 1656 1631 2 222 2 585 A 1100 735 850 985 G1 2 320 585 1 560 620 310 2 2 1 1 30 5 2405 2369 3 228 3 754 A 1100 735 850 958 G1 2 1 520 620 310 4 1 30 2405 2369 3 175 3 693 A 1100 735 850 958 G1 2 1 520 620 310 4 1x5 3 kW 24 1893 1864 2 540 2 954 5 3 G1 2 2 2 1...

Страница 39: ...orts en matériau athermique L étanchéité du four est assuré par un joint fixé tout autour de la porte La porte est montée sur des charnières à ressorts 1 4 FONCTIONNEMENTAUGAZ Le fonctionnement est au gaz avec un brûleur à flamme autostabilisante Le réglage de la température de 150 à 290 C s effectue par un thermostat avec soupape de sécurité et thermocouple pour l interruption automatique de l ar...

Страница 40: ...ssion en amont Pi pression au gicleur 2 2 LEGISLATIONA RESPECTER La législation suivante est à respecter Lois sur la prévention des accidents de travail et des risques d incendie Réglementation de la compagnie distributrice de gaz qui devra délivrer une autorisation d installation Normes sur les Installations au gaz Normes sur les Installations électriques Réglementation de la compagnie distributr...

Страница 41: ... 9 2 2 2 2 3 1 3 3 4 3 371 371 394 108 142 3 5 3 5 3 5 1 35 1 35 1 25 276 272 PEL COPRECI 90 90 55 R d A Réglage de l air primaire 1 Y compris le débit thermique de la veilleuse 200 W environ Marquage gicleur Ø 1 100 mm Régulateur de pression exclu K Gicleur court l 15 mm F Fixe R Réglable PAYS CATEGO RIE GICLEUR TYPE DE GAZ PRESSION GAZ EN AMONT mbar BRULEUR MOYEN BY PASS VEILLEUSE PRESSION GAZ A...

Страница 42: ...rquage gicleur Ø 1 100 mm Régulateur de pression exclu K Gicleur court l 15 mm F Fixe R Réglable PAYS CATEGO RIE GICLEUR TYPE DE GAZ PRESSION GAZ EN AMONT mbar BRULEUR PLAQUE DE CUISSON BY PASS 22 S VEILLEUSE PRESSIONGAZ AUGIGLEURAVEC 25 ST DEBIT THERMIQUE NOM kW 1 CONSOMMATION GAZ 15 C Nom Min Max Ømm Type MARQUE R d A Xmm Ømm MARQUE TARGHET MARQUE Max mbar Min mbar 100 P T Min ca 23 l h g h PORT...

Страница 43: ...seau dépasse la pression maximum du tableau II par exemple pour G20 25 mbar prévenez la compagnie du gaz Contrôlez si la pression en entrée et au gicleur correspond aux valeurs reportées dans le tableau II 2 7 CONTROLE DE LA PRESSION CONTROLE DE LA PRESSION EN AMONT Pe Fig 1 La pression est mesurée avec un manomètre de 0 à 80 mbar précision 0 1 mbar au moins Le raccord de pression Fig 1 se trouve ...

Страница 44: ...ans cette notice et sur la base du four IMPORTANT Prévoyez en amont de chaque appareil un dispositif d interruption omnipolaire du réseau qui ait une distance entre les contacts de 3 mm au moins par exemple interrupteur manuel de puissance adaptée équipé de fusibles disjoncteur 3 1 MISEA LA TERRE Il est indispensable de relier l appareil à une installation de mise à la terre Dans ce but il faut re...

Страница 45: ...0 W Elément supérieur et inférieur 3800 W avec contrôle thermostatique de 100 à 290 C ATTENTION Avant d allumer le four contrôlez qu il n y ait pas de sachets en plastique papier ou carton à l intérieur 3 5 8 UTILISATION DU FOUR ELECTRIQUEA CHALEURTOURNANTE Tournez la manette Réf A Fig 2 dans le sens des aiguilles d une montre et placez la sur la température désirée Le voyant vert s allume pour si...

Страница 46: ...sur plusieurs niveaux sans mélange d odeurs C est l idéal pour cuire simultanément des plats de natures différentes De plus cette technique permet aussi de diminuer le temps de cuisson par conséquent réduire la température de cuisson de 15 à 20 C par rapport à celle reportées dans les livres de recettes CUISSONAUGRILL Tournez la manette Réf A Fig 3 sur la température désirée Lorsque le voyant oran...

Страница 47: ...UISSON Démontez les deux plaquettes de blocage Fig 3 poste 4 avec une clé à six pans de 4 mm Soulevez la tête de la veilleuse Fig 3 poste 5 A l aide d une clé de 5 dévissez le gicleur de la veilleuse Fig 3 poste 4 et remplacez le par un autre correspondant au type de gaz choisi et reporté dans le tableau II paragraphes 2 5 Avant de monter la tête Fig 3 poste 5 réglez l air en tournant son régulate...

Страница 48: ...rrespondant au type de gaz choisi et reporté dans le tableau II paragraphe 2 5 CHANGEMENT DU GICLEUR DU BRULEUR Changez le gicleur du brûleur Fig 6 poste 1 et remplacez le par un autre correspondant au type de gaz choisi et reporté dans le tableau II paragraphe 2 5 Allumez la veilleuse Fig 6 poste 5 en tournant la manette Fig 8 en face de la position allumez le brûleur Fig 6 poste 4 en positionnan...

Страница 49: ...érieure Four éteint Elément supérieur allumé 1500 W Elément supérieur et inférieur 5 3 kW avec contrôle thermostatique de 100 à 290 C Pour éteindre le brûleur ramenez la manette sur le symbole pour l extinction complète ramenez la manette sur le symbole ALLUMAGE DES BRULEURS DE LA PLAQUE DE CUISSON Pour allumer la veilleuse de la plaque de cuisson appuyez sur la manette Fig 8 et tournez la à gauch...

Страница 50: ...az le thermostat se trouve sur la rampe d alimentation avec une clé de 19 démontez le thermocouple 16 démontez d abord la sortie du gaz vers les brûleurs 13 et 15 démontez le réservoir dans le four qui est fixé à un porte réservoir avec une clé de 22 démontez l arrivée du gaz 12 montez le nouveau thermocouple et remontez le tout en sens inverse changez la vis de minimum By pass 11 remontez le rése...

Страница 51: ... se basant sur le schéma électrique et en procédant inversement Attention les résistances doivent être reliées à la terre fils jaune vert C Thermostat de sécurité Le thermostat de sécurité se déclenche ça signifie qu il est défectueux Il arrive rarement que le thermostat de sécurité doive aussi être changé Nettoyez tous les jours les éléments en acier Inox avec de l eau tiède et savonneuse Rincez ...

Страница 52: ...uss an die gasanlage 59 2 6 1 Abgasung in Eine Rauchhaube Gerättyp A 59 2 6 2 Erreichen der Nennwärmeleistung 59 2 7 Kontrolle des Druckes 60 2 7 1 Einstellung der Allgemeinen Wärmeleistung 60 2 7 2 Einstellung der Mindestwärmeleistung 60 2 7 3 Kontrolle für den betrieb mit Flüssiggas 60 2 7 4 Betriebskontrolle 60 2 8 Vorbereitung des Verwenders 60 3 Stromanschluss 61 3 1 Erdanschluss 61 3 2 Verso...

Страница 53: ...gsanlage vorhanden ist diese grundwichtige Anforderung muß daher überprüft werden und im Zweifelsfall ist eine sorgfältige Kontrolle durch qualifizierte Fachkräfte in Anspruch zu nehmen Der Hersteller kann nicht für eventuelle Schäden haftbar gemacht werden die auf eine fehlende Anlagenerdung zurückzuführen sind Das Gerät muß in einem Äquipotentialsystem eingeschlossen sein dessen Leistungsfähigke...

Страница 54: ...50 985 G1 2 1 520 620 310 3 3 1x5 3 kW 28 5 2248 2214 3 016 3 508 5 3 A 700 735 850 985 G1 2 320 585 1 560 620 310 1 1 1 1 21 0 1656 1631 2 222 2 585 A 1100 735 850 985 G1 2 320 585 1 560 620 310 2 2 1 1 30 5 2405 2369 3 228 3 754 A 1100 735 850 958 G1 2 1 520 620 310 4 1 30 2405 2369 3 175 3 693 A 1100 735 850 958 G1 2 1 520 620 310 4 1x5 3 kW 24 1893 1864 2 540 2 954 5 3 G1 2 2 2 1 24 5 1932 190...

Страница 55: ...aus Edelstahl Griffe aus satiniertem Stahl auf Halterungen aus athermischem Material montierte Griffe und Türdichtung Ausgewuchtete Federscharniere 1 4 GASHEIZUNG Mit Brenner aus Inox Stahl mit selbsthaltender Flamme Thermostatische Einstellung der Temperatur zwischen 150 290 C mit Sicherheitsventil und Thermoelement zur automatischen Gasabstellung im Falle eines unabsichtlichen Erlöschens der Lei...

Страница 56: ...25 m3 h m3 h G30 G31 Kg h Kg h mbar KW mbar II2H3B P 20 50 50 II2L3B P 25 30 30 NL AT CH II2H3B P 20 30 30 II2H3 PL IS MT CY FR BE DE LU IT GR GB ES IE PT II2H3 20 29 37 II2E 3 20 25 29 37 II2ELL3B P 20 20 50 50 I3B P 30 30 II2E3P 20 37 I2E I3 20 29 37 20 50 67 NO SE EE LT DK LV CZ SK SI FI TR HR BG RO 2 2 EINZUHALTENDE GESETZE NORMEN UND TECHNISCHE RICHTLINIEN Bei der Installation müssen folgende...

Страница 57: ...71 394 108 125 108 142 3 5 3 5 3 5 3 5 3 5 1 35 1 35 1 35 1 35 1 25 276 239 276 272 PEL COPRECI 90 90 90 50 55 TABELLE II TECHNISCHE DATEN ÜBER GAS DRUCK DÜSEN DES MITTLEREN BRENNERS LEITFLAMME UND KLEINSTSTUFEN EINSTELLSCHRAUBE GASHERDE SERIE DOMINA 700 P L E Primärlufteinstellung 1 Einschließlich der Wärmeleistung der Leitflamme ca 200 W Düsenmarkierung Ø 1 100 mm Ausgeschlossen Druckregler K ku...

Страница 58: ... 186 245 6 0 6 0 6 0 6 0 6 0 1 55 1 55 1 55 1 55 1 55 473 408 473 466 95 105 95 55 65 PEL SAABAF 95 105 95 55 65 P L E Primärlufteinstellung 1 Einschließlich der Wärmeleistung der Leitflamme ca 200 W Düsenmarkierung Ø 1 100 mm Ausgeschlossen Druckregler K kurze Düse F Fix TABELLEII TECHNISCHEDATENÜBER GAS DRUCK GLÜHPLATTEN BRENNERDÜSEN LEITFLAMME UNDKLEINSTSTUFEN EINSTELLSCHRAUBE GILTFÜRALLEGASHER...

Страница 59: ...Verpackung und oder auf dem Geräteschild Wenn das Gerät für eine andere Gas und Druckart voreingestellt ist muß vorher eine Umrüstung für den Betrieb mit einer anderen Gasart stattfinden Siehe hierzu Tabelle II für die Düse die Kleinststufen Einstellschraube By Pass die Primärlufteinstellung Xmm die Leitflammendüse und den Druck an der Düse des Hauptbrenners MERKE Die Namen der Düsen 2H und 3 sind...

Страница 60: ...ISTUNG Die Wärmeleistung der richtigen Kleinststufe erzielt man mittels der kalibrierten Kleinststufen Einstellschraube By Pass die laut Tabelle II Einspritzdüsen Kap 2 5 ganz eingeschraubt werden muß Der Backofen muß mindestens 20 Minuten lang mit dem Drehknopf auf Stellung Höchststufe vorgewärmt werden und danach ist der Knopf auf die Kleinststufe Den Druck an der Düse und die Mindestwärmeleistu...

Страница 61: ...tandpunktausnurdannsicher wennesinÜbereinstimmungmitdengeltendenVorschriften zur Stromsicherheit ordnungsgemäß an eine leistungsfähige Erdanlage angeschlossen ist Der Hersteller übernimmt bei Nichteinhaltung dieser Unfallschutznorm keineVerantwortung Diese grundlegend wichtige Sicherheitsanforderung muß überprüft werden und im Zweifelsfall für eine sorgfältige Anlagenkontrolle durch sachverständig...

Страница 62: ...res Heizelement eingeschaltet 1500W Oberes und unteres Heizelement 3800W mit Thermostatkontrolle 100 290 C HINWEIS Vor Einschaltung des Backofens sicherstellen daß sich keine Plastik Papier oder Kartontüten oder dergleichen im Garraum befinden 3 5 8 GEBRAUCH DES UMLUFT ELEKTROBACKOFENS Den Drehschalter Pos A Abb 2 im Uhrzeigersinn auf die gewünschte Temperatur drehen Die grüne Kontrollampe leuchte...

Страница 63: ...Heizwiderstand abstellt wenn die eingestellte Temperatur erreicht ist und ihn wieder einschaltet wenn die Temperatur um einige Grade gesunken ist BACKEN IM BACKOFEN MIT HEISSLUFTBETRIEB Dank der homogenen Heißluftbelüftung können auf den 3 Stufen der Seitengitters verschiedene Speisearten im Ofen ge kocht werden Außerdem erfolgt der Kochvorgang mit dem Heißluftsystem schneller als im statischen Ba...

Страница 64: ...teig Meringen Biskuit Obstkuchen Fladen Obst Sterilisierung Gemüse Sterilisierung Pizza Brot Speisen C Temperatur Minutenzeit 130 150 175 175 160 160 170 160 160 170 160 175 100 150 150 150 200 200 220 250 20 50 45 25 120 150 60 90 50 60 60 90 60 90 30 40 20 25 20 25 30 35 20 25 50 60 40 50 20 30 20 30 20 30 20 30 Wichtig Die angegeben Zeiten und Temperaturen gelten nur richtweise und können nach ...

Страница 65: ...eeigneten Schraube ersetzen unter Einhaltung der Tabelle II Einspritzdüsen Kap 2 5 In der Kleinststellung muß die Wärmeleistung etwa 30 der Nennwärmeleistung betragen Beim schnellen Drehen des Knopfes von der Höchststellung auf die Kleinststellung darf der Brenner nicht erlöschen oder rückschlagen 4 2 BACKOFEN AUSTAUSCHENDERBACKOFEN BRENNERDÜSE Nach Entfernen der Backofenbodenplatte das Schutzgehä...

Страница 66: ...mmenbrenner Abb 6 Pos 5 durch das Drehen des Drehknopfes Abb 8 auf die Stufe anzünden den Brenner Abb 6 Pos 4 durch das Drehen des Drehknopfes auf die Stufe 8 anzünden die Schraube Abb 6 Pos 2 lockern die Flamme durch das Einwirken auf die Einstellbuchse Abb 3 Pos 3 einregulieren und für jede Gasart die Primärluft P L E mit Xmm einstellen siehe Tabelle II Einspritzdüsen Kap 2 5 AUSTAUSCHEN DER KLE...

Страница 67: ...Heizelemente oben und unten ein Zur Brennerlöschung den Knopf wieder auf die Stellung drehen und um das Gerät ganz auszuschalten den Knopf auf drehen ANZÜNDEN DER KOCHPLATTENBRENNER Zum Anzünden der Kochplattenleitflamme den Drehknopf Abb 8 drücken und bis auf das Symbol nach links drehen auf dieser Stellung stark auf den Knopf drücken und durch das gleichzeitige Drücken des Piezozündknopfes die L...

Страница 68: ...Schlüssel abmontieren zuerst den Gasauslaß zu den Brennern 13 und 15 abmontieren den mit einem Haltewinkel befestigten Wulst im Backofeninnern abmontieren den Gaseinlaß 12 mit einem 9er Schlüssel abmontieren den neuen Thermostat in der umgekehrten Reihenfolge der Abmontage wieder einbauen die Kleinststellungs Einstellschraube By Pass 11 auswechseln den Wulst unter Verwendung seines Befestigungswin...

Страница 69: ...der Übertemperaturschalter während des Betriebes angesprochen wird ist er defekt er ist daher kaum möglich daß er ausgetauscht werden muß Die Teile aus Inox Stahl täglich mit lauwarmem Seifenwasser säubern reichlich nachspülen und sorgfältig abtrocknen Die Inox Stahlteile dürfen absolut nicht mit herkömmlichen Metallwollen Bürsten oder Stahlschabern geputzt werden weil sich dadurch Eisenteilchen a...

Страница 70: ...ajo una campana de aspiración Aparato de tipo A 76 2 6 2 Cómo obtener la capacidad térmica nominal 76 2 7 Control de la presión 77 2 7 1 Control de la capacidad térmica general 77 2 7 2 Regulación de la capacidad térmica mínima 77 2 7 3 Control para el funcionamiento a gas líquido 78 2 7 4 Control del funcionamiento 78 2 8 Introducción del usuario 78 3 Conexión eléctrica 78 3 1 Protección de tierr...

Страница 71: ...d eléctrica por tanto es necesario verificar este requisito fundamental y en caso de duda pedir el control cuidadoso por parte de personal profesionalmente experto El fabricante no puede ser considerado responsable por eventuales daños causados por la falta de la línea de tierra de la instalación El aparato debe estar incluido en un sistema equipotencial de comprobada eficiencia según las normas e...

Страница 72: ...0 310 3 3 1x5 3 kW 28 5 2248 2214 3 016 3 508 5 3 A 700 735 850 985 G1 2 320 585 1 560 620 310 1 1 1 1 21 0 1656 1631 2 222 2 585 A 1100 735 850 985 G1 2 320 585 1 560 620 310 2 2 1 1 30 5 2405 2369 3 228 3 754 A 1100 735 850 958 G1 2 1 520 620 310 4 1 30 2405 2369 3 175 3 693 A 1100 735 850 958 G1 2 1 520 620 310 4 1x5 3 kW 24 1893 1864 2 540 2 954 5 3 G1 2 2 2 1 24 5 1932 1903 2 593 3 151 A 700 ...

Страница 73: ...n aislamiento de lana de vidrio contra puertas de acero inoxidable manillas de acero satinado montadas sobre soportes de material atérmico y junta de retención en la puerta Bisagras con muelle balanceadas 1 4 CALENTAMIENTOA GAS Con quemador de acero inoxidable y llama autoestabilizada Regulación termostática 150 290 C con válvula de seguridad con termopar para la interrupción automática del paso d...

Страница 74: ...ector 2 2 LEY NORMASY DIRECTIVASTÉCNICASA RESPETAR Para la instalación hay que respetar las siguientes normas Medidas vigentes contra accidentes e incendios Los reglamentos de la compañía de suministro del gas el cual tiene que dar su aprobación antes de la instalación de la cocina Normas Instalación de equipos a gas Normas Instalación equipos eléctricos La reglamentación de la compañía de suminis...

Страница 75: ... Ømm Tipo MARCADO R d A Xmm Ømm Tipo MARCADO TARGHET MARCADO Máx mbar Mín mbar 100 C T Mín l h g h ESPANA PORTUGAL ESPANA PORTUGAL PORTUGAL 2H 3 3 G 20 G 30 G 31 G 30 G 31 20 29 37 50 67 17 20 25 42 5 50 15 35 45 57 5 80 140 K 95 K 78 K F F F 85 55 50 35 21 21 19 8 28 9 36 9 49 9 66 8 2 3 3 3 4 3 7 5 8 5 3 5 3 5 3 5 1 35 1 35 1 35 371 108 142 108 142 276 272 276 272 PEL COPRECI 90 55 50 PAÍSY CATE...

Страница 76: ...espondientes al gas de la red de suministro Esta indicación se encuentra en el embalaje y o etiqueta del aparato Si el aparato está predispuesto para otro tipo de gas y presión primero hay que hacer una transformación para el funcionamiento con otro tipo de gas R d A Regulación de la entrada del aire K Inyector corto F Fijo R Regulable L 15 mm 1 Incluida la capacidad térmica del piloto unos 200 W ...

Страница 77: ... se encuentra en la conexión del gas G 1 detrás del tablero desatornillar el tornillo A de la toma de presión B conectar la manguera de siliconas en el manómetro encender el quemador y medir la presión dinámica anterior al aparato Colocar el tornillo A con arandela de estanqueidad del gas C controlar que no haya pérdidas de gas con burbujas de jabón Controlar si la presión que entra y en el inyect...

Страница 78: ...verde 3 2 CABLE DEALIMENTACIÓN El aparato se entrega preparado para las siguientes tensiones 3N AC 380 415 V 3 AC 220 240 V IN AC 220 240 V 50 Hz El cable flexible para la conexión con la línea eléctrica debe tener características no inferiores al tipo de aislamiento de goma H07RN F El cable debe ser introducido a través de un sujeta cable y luego fijado muy bien Además la tensión de alimentación ...

Страница 79: ...de que no haya objetos en el interior como bolsas de plástico papel cartón etc 3 5 8 USO DEL HORNO ELÉCTRICOVENTILADO Girar el pomo Pos A Fig 2 en el sentido de las agujas del reloj programando la temperatura deseada La luz testigo verde se enciende indicando que el horno se ha encendido Al encenderse la luz testigo naranja Pos C Fig 2 indica que el termostato ha entrado en función y por tanto que...

Страница 80: ...en las tres parrillas apoyadas en las guías laterales además con el sistema de aire caliente la cocción se realiza más rápidamente respecto a la efectuada con un horno estático Por tanto no olvidar que hay que reducir un 15 20 C la temperatura de cocción indicada normalmente en los libros de cocina COCCIÓNALAPARRILLA Programar con el pomo de mando del horno Pos A Fig 3 la temperatura de cocción de...

Страница 81: ...an de huevos Carnes Ternera asada 1 Kg Asado de cordero Cerdo asado Faisán asado Pollo Pescado 1 Kg Pastelería Galletas con levadura Pasta frola Merengues Roscas Torta de fruta Hogazas Sterilised fruit Esterilización de frutas Pizza Pan Alimentos Temperatura C Tiempo en minutos 130 150 175 175 160 160 170 160 160 170 160 175 100 150 150 150 200 200 220 250 20 50 45 25 120 150 60 90 50 60 60 90 60 ...

Страница 82: ...rmica mínima by pass Fig 2 pos 1 con el correspondiente para el tipo de gas escogido ateniéndose a la Tabla II Inyectores Cap 3 4 0 2 y 3 4 0 3 La capacidad térmica en la posición de mínimo tiene que ser un 30 aproximadamente de la capacidad térmica nominal Cuando se gira la manivela veloz desde la posición máxima a la posición mínima el quemador no tiene que apagarse 4 2 HORNO SUSTITUCIÓN DEL INY...

Страница 83: ... Inyectores Cap 2 5 Girar hasta el final el tornillo de mínimo o by pass Una vez completada la sustitución de las boquillas aplíquese sobre la etiqueta existente la que acompaña a la máquina en la que se indica el nuevo tipo de gas 5 INTRUCCIONES PARA EL USUARIO ENCENDIDOQUEMADORDEPLACA COCINA Para encender el piloto de la cocina apretar la manivela Fig 7 girándola hacia la izquierda hasta el símb...

Страница 84: ...n los 300 ºC se encienden las dos resistencias superior e inferior Horno apagado Elemento superior encendido 1500 W Elemento superior e inferior 5 3 kW con control termostático 100 290 C Para apagar el quemador girar la manivela en sentido contrario poniéndola en el símbolo para apagar también el piloto girar la manivela hasta cero ENCENDIDOQUEMADORDEPLACA COCINA Para encender el piloto de la coci...

Страница 85: ... el bulbo que se encuentra dentro del horno y fijado con escuadras porta bulbo desmontar la entrada del gas 12 con una llave del 9 montar el nuevo termostato siguiendo el orden inverso al del desmontaje cambiar el tornillo del mínimo By pass 11 montar el bulbo en el horno usando sus escuadras Nota controlar que no haya pérdidas de gas usando burbujas de jabón la estanqueidad tiene que ser perfecta...

Страница 86: ...ne haciéndo esta operación periódicamente con POLISH líquido un producto que se encuentra en todas partes desconectar la manivela del termostato eléctrico desmontar la parte delantera si fuera necesario quitar el fondo del horno si fuera necesario quitar la puerta del horno Entonces se pueden sustituir los componentes más importantes A Interruptor y termostato del horno Tomar la parte frontal con ...

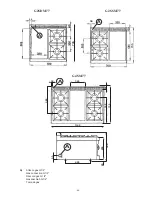
Страница 87: ...chluß G 1 2 Toma de gas Equipotenziale Equipotential Equipotentiel Potentialausgleich Equipotencial Attacco elettrico Electrical connection Branchement electrique Stromanschluss Conexión eléctrica SCHEMI DI INSTALLAZIONE INSTALLATION DIAGRAM SCHEMAS D INSTALLATION INSTALLATIONSPLÄNE ESQUEMAS DE INSTALACIÓN 925 735 735 ...

Страница 88: ...as G1 2 Gas connection G1 2 Raccord gaz G 1 2 Gasanschluß G 1 2 Toma de gas Equipotenziale Equipotential Equipotentiel Potentialausgleich Equipotencial Attacco elettrico Electrical connection Branchement electrique Stromanschluss Conexión eléctrica 925 735 735 735 ...

Страница 89: ... 89 G2SDM77 G2SSM77 G4SM77 A 465 55 330 250 20 585 1100 A 50 320 330 735 60 50 A 735 50 A 735 A Attacco gas G1 2 Gas connection G1 2 Raccord gaz G 1 2 Gasanschluß G 1 2 Toma de gas ...

Страница 90: ...00 KITCHEN BASEBOARD DIAGRAM SCHEMA DE MONTAGE DU SOCLE DE LA CUISINIERE DOMINA 700 SOCKELMONTAGEPLAN FÜR HERDE DOMINA 700 ESQUEMA DE ZÓCALO PARA COCINAS DOMINA 700 630 MIN Misura consigliata Misura variabile in base all impianto 120 MAX X 100 100 A A 70 ...

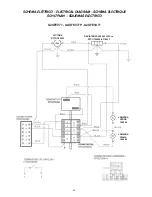
Страница 91: ...U 600067 167516 N CODICE M B M M B M CODE n Nr CODEX M B M N CODE M B M SHORTNAME CAVO T LV M CO KURZZEICHEN ABBREVIAZIONE ABREVIATION TERMOSTATO LAMP VERDE CAVO D ALIM MORSETTIERA COMMUTATORE ITALIANO ORANGE LAMPE LOWER HEATING ELEMENT UPPER HEATING ELEMENT UNTERER ROHRHEIZKOERPER OBERER ROHRHEIZKOERPER ORANGE LAMP ANSCHLUSSKABEL KLEMMENLEISTE HAUPTSCHALTER THERMOSTAT GRUENE LAMPE THERMOSTAT GREE...

Страница 92: ...A ELETTRICO ELECTRICAL DIAGRAM SCHEMA ELECTRIQUE SCHLTPLAN SQUEMAS ELECTRICO G4SFEV77 GASFEV77P G4SFEVA77 MOTORE RTFOC00623 RESISTENZA 2600 W 230Vca RTCU700650 6318627 LAMPADA VERDE 166465 LAMPADA GIALLA 166466 ...

Страница 93: ...KOERPER CABLE D ALIMENTACION REGLETA CONMUTADOR TERMOSTATO BOMBILLA VERDE BOMBILLA ANARANJADO RESITENCIA ITALIANO FRANCAIS ENGLISH DEUTSCH ESPANOL ABBREVIAZIONE SHORTNAME ABREVIATION KURZZEICHEN ABREVIACION N CODICE CODEn N CODE Nr CODEX N CODICO C A M C O T LV LG R1 RTBF 900045 RTCU 700454 RTCU 700455 166465 166466 RTCU 700650 CAVO D ALIMENTAZIONE MORSETTIERA COMMUTATORE TERMOSTATO LAMPADA VERDE ...

Страница 94: ... 94 fig 1 fig 2 fig 3 fig 5 fig 4 X 4 8 4 8 7 ...

Страница 95: ...ando fuegos encendidos placa a fuego lento Piastra a fuoco lento Simmering plate Plaque de cuisson a feu lent Placa a fuego lento Langsamkochplatte 1 2 3 4 5 6 7 8 Forno gas statico Static gas oven Four a gaz a convection naturelle Gasbeheizter backofen statisch Horno a gas estático ...

Страница 96: ...eclientsouhaitantsedéfairedecetappareil devradonccontacterlefabricantetsuivrelaprocédurequecedernieraadoptéeafindepermettrelacollecteséparéedel appareilarrivéenfindevie La collecte différentiée adéquate permettant le recyclage successif de l appareil et un traitement compatible avec l environnement contri bue à prévenir les impacts négatifs sur l environnement et la santé des personnes ainsi qu à ...

Страница 97: ......

Отзывы: