HMS SW8923 Скачать руководство пользователя страница 15


15 


MANUAL  INSTRUCTION 
 
IMPORTANT  SAFETY  INFORMATION 


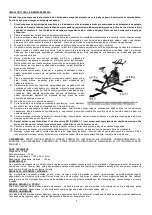
This product has been designed for hom e use only and built for optim um  safety. Please note the follow ing safety precautions: 
 

1. 

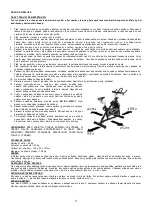
Before starting any exercise program you should consult your doctor to determ ine if you have any physical  or health 
conditions that could create a risk to your healt h and safety, or prevent you from  using the equipm ent properly. Your 
doctor's advice is essential if you are taking m edication that affects your heart rate, blood pressure or cholesterol level. 
This is especially im portant for persons over the age of 35, p regnant w om en, or those w ith pre-existing health problems 
or balance im pairm ents.  

2. 

Before using this equipment  to exercise, alw ays do stretching  exercises to properly w arm up.   

3. 

Be aw are of your body's signals.  Incorrect or excessive exercise can damage  your health.  Stop exercising  if you experience  any 
of the  follow ing symptoms:  pain,  tightness  in  your chest, irregular  heartbeat,  extreme  shortness of breath,  feeling  light  hea ded, 
dizzy or nauseous.  If you do experience  any of these conditions  you should  consult your doctor before continuing  w ith exercise 
program.  Injuries  to health  may result from incorrect or excessive training.   

4. 

During  exercises and after keep children  and pets aw ay from the equipment. 

5. 

Use the equipment  on a stable and levelled  surface w ith a protective cover for your floor or carpet. Move   all sharp  objects. 

6. 

Free area shall be not less than 0,6 m greater than the training  area 
in  the directions  from  w hich the equipment  is accessed. Free  area 
must  also  include  the  area  for  emergency  dismount.  Where 
equipment  is positioned  adjacent  to each other the value of the free 
area may be shared.   

7. 

Before  each  use, visually  inspect  the  unit  including  hardw are and 
resistance bends. 

8. 

Before using the equipment,  check if the nuts, bolts and other bends  
are securely tightened. 

9. 

Alw ays use the  equipment  as  indicated.  If  you  find  any  defective 
components  w hilst assembling  or checking  the equipment,  or if you 
hear  any  unusual  noise  coming  from  the  equipment  w hile  using, 
stop. Do  not use the equipment  until  the problem  has been rectified.  

10.  Do  not insert any object into  any openings. 
11.  Be aw are of all regulation  and constructions parts w hich may disturb 

during  exercises. 

12.  The  safety level  of the  equipment  can  only  be  maintained  if it  is 

regularly  examined  for damage  and/or  w ear and tear.  

13.  Wear  suitable  clothing  w hilst using  the  equipment.  Avoid  w earing 

loose  clothing  w hich may  get caught  in  the equipment  or that may  
restrict or prevent movement. 

14.  The equipm ent has been tested and certified according to  EN 

ISO  20957-1 under class H. It is not suitable for therapeutic use. 

15.  Care must be taken w hen lifting or moving  the equipment  so as not to injure your back. Alw ays use proper lifting  techniques a nd/or  

use assistance. 

16.  The  equipment  is designed  for adult use only. Keep  unsupervised children  aw ay from the equipment.   
17.  Assemble  this unit as described  in this manual.  Use only parts from the set. Check  all parts w ith the part list.  

 
WARNING:

   READ  ALL INSTRUCTIONS  BEFORE  USING  ANY FITNESS  EQUIPMENT.  WE  ASSUME  NO  RESPONSIBILITY  FOR 

PERSONAL  INJURY  OR  PROPERTY  DAMAGE  CAUSED

  BY OR  THROUGH  THE  USE OF THIS  PRODUCT 


SPECIFICATIONS   

Weight 

– 55 kg  

Flyw heel 

– 22 kg  

Dimensions 

– 122 x 50 x 101cm   

Maximum  w eight of user 

– 120  kg  


MAINTENANC E    

Your unit  has been carefully designed  to require  minimum  maintenance.  To  ensure this, w e recommend  that you do the follow ing:   

• 

Keep  your unit clean  by w iping sw eat, dust or other residue off w ith a soft, clean cloth after each use  

• 

Alw ays make  sure that the bands are secure and show  no signs of w ear  

• 

Regularly  check the tightness of nuts and  bolts   


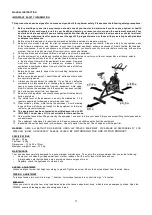
SADDLE  ADJUSTMENT   

Loosen seat post screw . Set height  according to grow th. Tighten  up screw . Do not take  out seat post from the main  frame.    

 
TENSION  ADJUSTMENT   

To reduce tension  turn control into sign ”-” direction,  to increase tension  turn control into sign “+” direction. 

 
BREAKING


When  you w ant to stop the item,  stop to pedal  and press the tension  adjustment  knob,  w hich is also an emergency  break. Spin  b ike 
SW8923  acquires breaking  system and emergency  break.   


Содержание SW8923

Страница 1: ...1 INSTRUKCJA U YTKOWANIA MANUAL INSTRUCTION N VOD K OBSLUZE...

Страница 2: ...ystaj ce urz dzenia regulacyjne i inne elementy konstrukcyjne kt re mog yby przeszkadza w trakcie w icze 12 Sprz t w ykorzystuj jedynie zgodnie z przeznaczeniem Je li kt ra z cz ci ulegnie uszkodzeniu...

Страница 3: ...ik 1 61 Ko o zamachow e 22 460 38 36 40 1 1 21 S up siode ka 1 62 Dystans d5 10 1 2 22 Podp rka siode ka 1 63 O ka bezw adno ciow a 12 150 M12 1 29 38 40Cr 1 23 Siode ko 6801 1 64 Ma e ko o a cucha 1...

Страница 4: ...r caj c rub 28 i usuwaj c podk adk 6 2 Os ony 28 i 29 s u do ochrony urz dzenia podczas transportu wi c zachowaj wymontowane cz ci na przysz o KROK 2 Przymocuj przedni stabilizator 9 i tylny stabiliza...

Страница 5: ...2 Przymocuj peda y 18 L R Lewy Prawy do korby 11 L R Lewej Prawej korzystaj c z klucza KROK 4 1 Wyci gnij ga k 17 wsu s up siode ka 21 do ramyg wnej 25 i wyreguluj wysoko siode ka 2 Korzystaj c z kluc...

Страница 6: ...j 25 Dostosuj do po danej pozycji i zablokuj ga k 2 Przymocuj kierownic 12 do s upa kierownicy 15 korzystaj c ze rub 13 i podk adek 14 3 Po cz komputerek 81 i wspornik komputera 81a z uchwytem na kier...

Страница 7: ...u szy okres czasu powiniene skonsultowa si z lekarzem przez rozpocz ciem wicze 4 Organizacja treningu Rozgrzewka Przed ka dym treningiem powiniene si rozgrzewa przez 5 10 minut Mo na wykona kilka wicz...

Страница 8: ...inimum 2 Po czenie Bluetooth BT niebieska dioda LED zapali si gdy urz dzenie po czy si poprzez Bluetooth Procedura uruchamiania 1 Pod cz konsol z rowerem 2 W cz zasilanie konsoli 3 W cz aplikacj iBiki...

Страница 9: ...om Bluetooth a nast pnie w cz skanowanie w poszukiwaniu urz dzenia np iBiking XXX Po wy wietleniu listy urz dze wybierz w a ciwe i sparuj je ze swoim telefonem tabletem Domy le has o 0000 4 zera 1 2 A...

Страница 10: ...zpocznij trening Po zako czeniu treningu mo esz udost pni swoje wyniki na Facebooku lub Twitterze 2 3 2 Szybki start Quick Start Rozpocznij natychmiast trening Po zako czeniu treningu mo esz udost pni...

Страница 11: ...ystaj ce z po czenia Bluetooth a nast pnie w cz Bluetooth w konsoli SI0004 Zrestartuj sw j telefon tablet 2 Nie mog ustanowi po czenia Bluetooth w aplikacji iBiking Wy cz wszystkie urz dzenia korzysta...

Страница 12: ...droid 2 2 lub nowszym Obs ugiwane Rozdzielczo ci 1920 x 1080 1280 x 800 1280 x 760 800 x 480 4 Sformu owania Made for iPod Made for iPhone oraz Made for iPad oznaczaj e akcesoria zosta y zaprojektowan...

Страница 13: ...13 Dzia obs ugi klienta ABISAL Sp z o o ul w El biety 6 41 905 Bytom abisal abisal pl www abisal pl www hms fitness pl...

Страница 14: ...a i konserwacja uszkodzenia i zu ycie takich element w jak linki paski elementy gumowe peda y uchwyty z g bki k ka o yska tapicerka itp 6 Gwarancja traci wa no w przypadku Up ywu terminu wa no ci samo...

Страница 15: ...mbling or checking the equipment or if you hear any unusual noise coming from the equipment w hile using stop Do not use the equipment until the problem has been rectified 10 Do not insert any object...

Страница 16: ...d6 12 1 2 3 19 Knob 1 50 Spring plate t2 0 15 8 153 1 20 Sensor 1 51 Nut M5 H4 S8 1 21 Saddle tube post 1 52 Bolt M5 12 10 1 22 Saddle post 1 53 Nut M5 H9 S8 1 23 Saddle 6801 1 54 Nut M12 1 H19 5 S19...

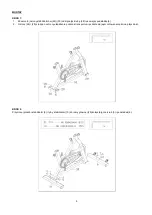
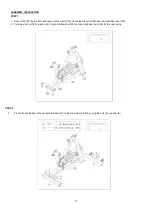
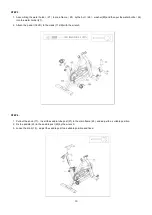
Страница 17: ...washer 6 front stabilizer post 29 and rear stabilizer post 30 2 Put away the bolt 28 washer 6 front stabilizer post 29 and rear stabilizer post 30 for the next using STEP 2 1 Fix the front stabilizer...

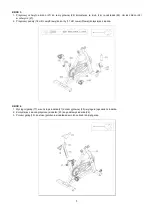
Страница 18: ...he water holder 27 2 Attach the pedal 18L R to the crank 11L R with the wrench STEP 4 1 Pull out the knob 17 insertthe saddle tube post 21 to the main frame 25 and adjustto a suitable position 2 Fix t...

Страница 19: ...n frame 25 adjustto a suitable position and fixed 2 Fasten the handlebar post 12 to the front post 15 by the bolt 13 washer 14 3 Attach the computer 81 to the computer bracket 81a of the handlebar pos...

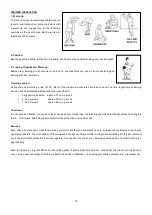
Страница 20: ...x per week approx 30 min per unit 1 2 x per week approx 60 min per unit Cool down To introduce an effective cool down of the muscles and the metabolism the intensityshould be drasticallydecreased duri...

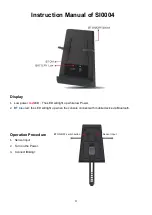
Страница 21: ...red LED The LED will light up while low Power 2 BT blue led the LED will light up when the console connect with mobile device via Bluetooth Operation Procedure 1 Sensor input 2 Turn on the Power 3 Co...

Страница 22: ...In SETTING mode turn on Bluetooth and scan for ID i e iBiking XXX Note you will see the device no On transmitter and pair the device Initial password is 0000 4 zeros 1 2 Android system Enter iBiking...

Страница 23: ...u can post your workout information to Facebook or Twitter 2 3 2 Quick Start Start workout directly After exercise you can post your workout information to Facebook or Twitter 2 3 3 Heart Rate This fu...

Страница 24: ...T Setting Turn off all the BT device near you and Turn on the transmitter again Restart your mobile 2 Couldn t connect BT transmitter while entering iBiking Turn off all the BT device near you and Tur...

Страница 25: ...1280 x 800 1280 x 760 800 x 480 4 Made for iPod Made for iPhone and Made for iPad mean that an electronic accessory has been designed to connect specifically to iPod iPhone or iPad respectively and ha...

Страница 26: ...26 Consumer service department ABISAL Sp z o o ul w El biety 6 41 905 Bytom abisal abisal pl www abisal pl www hms fitness pl...

Страница 27: ...vkl dejte dn p edm ty 11 D vejte pozor na ouhaj c regula n sti a jin konstruk n sti kter by p i tr ninku mohly p ek et 12 Za zen vyu vejte pouze v souladu s jeho ur en m Jestli e bude n kter st po koz...

Страница 28: ...1 2RZ NBK 2 20 idlo 1 61 Kotou ov setrva n k 22 460 38 36 40 1 1 21 Sloupek sedadla 1 62 Distan n podlo ka d5 10 1 2 22 Podp ra sedadla 1 63 Osa setrva n ku 12 150 M12 1 29 38 40Cr 1 23 Sedadlo 6801 1...

Страница 29: ...28 6 29 a 30 slou k ochran za zen v p pad transportu proto jsou p i prvotn m otev en kartonu namontov ny na za zen P ed slo en m za zen je ale demontujte a pro p pad budouc ho transportu uschovejte K...

Страница 30: ...ipevn te ped ly 18L R Lev Prav k rameni 11 L R Lev mu Prav mu pomoc kl e KROK 4 1 Vyt hn te hlavi ku 17 vsa te ty sed tka 21 do hlavn ho r mu 25 a nastavte po adovanou v ku sed tka 2 Pomoc kl e p ipev...

Страница 31: ...d tek 15 do hlavn ho r mu 25 Nastavte je na po adovanou pozici a zablokujte hlavi kou 2 P ipevn te d tka 12 k ty i d tek 15 pomoc roub 13 a podlo ek 14 3 P ipevn te po ta 81 a 81a k d tk m 12 4 Spojt...

Страница 32: ...dits l ka em 4 Pl n tr ninku Rozcvi ka P ed ka d m tr ninkem je pot eba vykonat rozcvi ku trvaj c 5 10 min Je mo n prov st n kolik protahovac ch cvik nebo p r minut lapatna cyklotrena ru p i mal z t i...

Страница 33: ...ne na minimum 2 Spojen Bluetooth BT modr LED dioda se rozsv t jakmile se za zen p ipoj p es Bluetooth Proce spu t n 1 P ipojte po ta k rotopedu 2 Zapn te nap jen po ta e 3 Spus te aplikaci iBiking v t...

Страница 34: ...n te Bluetooth a d le zapn te skenov n za elem vyhled n za zen nap iBiking XXX Po zobrazen seznamu za zen vyberte odpov daj c a sp rujte je se sv m telefonem tabletem V choz heslo je 0000 4 nuly 1 2 A...

Страница 35: ...te sp lit a pot zapo n te tr nink Po ukon en tr ninku m ete zve ejnit svoje v sledky na Facebook u nebo Twitter u 2 3 2 Rychl start Quick Start Ihned zapo nete tr nink Po ukon en tr ninku m ete zve ej...

Страница 36: ...v echna za zen vyu vaj c p ipojen Bluetooth a pot zapn te funkci Bluetooth v po ta i SI0004 Restartujte telefon tablet 2 Nemohu nav zat Bluetooth spojen s aplikac iBiking Vypn te v echna za zen vyu va...

Страница 37: ...Phone 4 Za zen se syst mem Android 2 2 nebo nov j m Podporovan rozli en 1920 x 1080 1280 x 800 1280 x 760 800 x 480 4 Formulace Made for iPod Made for iPhone a Made for iPad znamenaj e dopl ky byly na...

Страница 38: ...38 Odd len p e o klienta ABISAL Sp z o o ul w El biety 6 41 905 Bytom abisal abisal pl www abisal pl www hms fitness pl...

Страница 39: ...39...

Страница 40: ...40...

Отзывы: