background image

Confidential 

77 

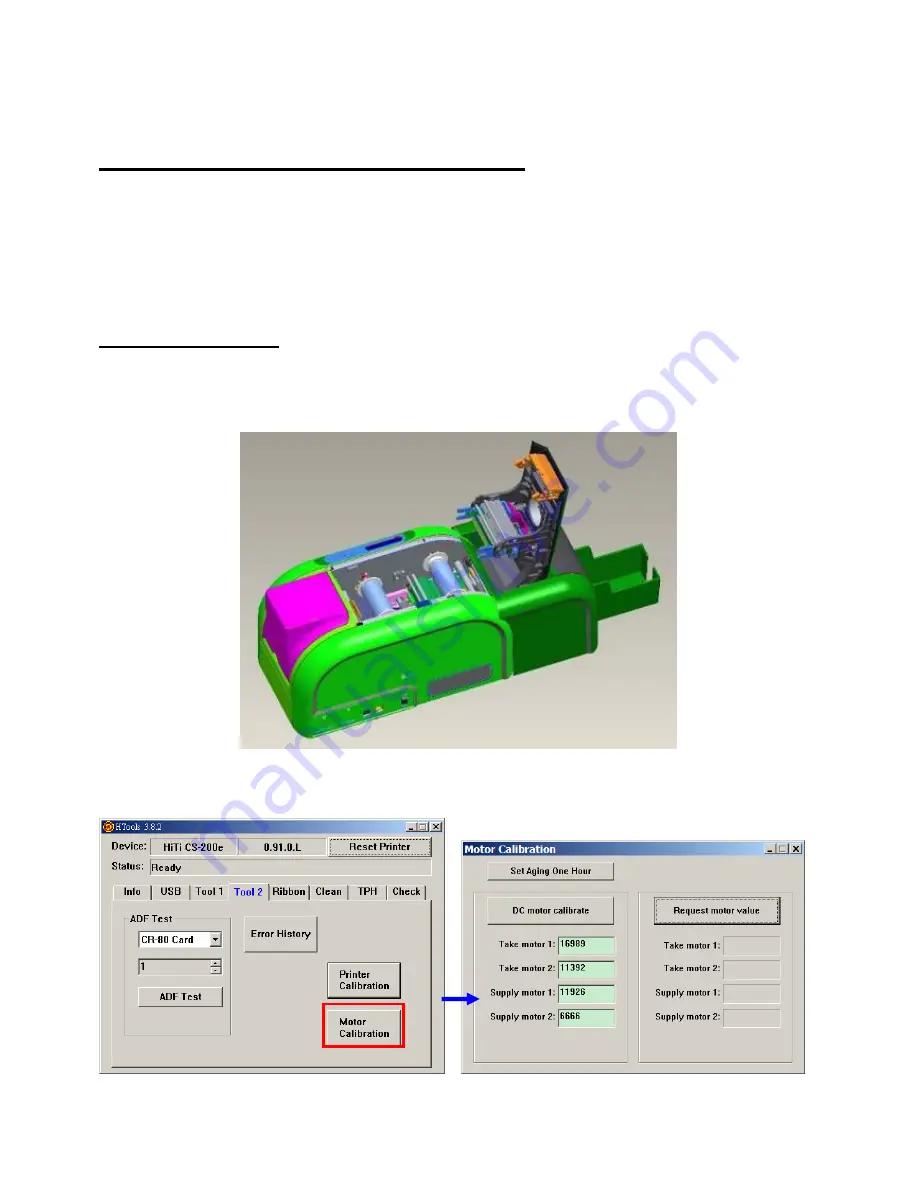
5-7 Ribbon Motor Calibration 


- When Should You Calibrate Ribbon Motors? 

1.  After you change a Ribbon Motor 
2.  After you change a Ribbon Belt 
3.  After you change the Main Board 
4.  When H-banding, Ribbon Jam, Ribbon Peeling off NG (ribbon attaches on the card) or 

Ribbon Broken occurs due to wrong ribbon motor duty cycle 


- How to Calibrate? 

1.  Remove the Ribbon 
2.  Power on the printer   take ribbon spools out   install 2 dummy ribbon spools   close the 

ribbon door 


3.  Connect the CS-200e to a PC then run HTools.exe 
4.  In Tool 2 page, click “Motor Calibration” to enter the calibration page 


Содержание CS-200e

Страница 1: ...Confidential 1 Version 1 3 The Service Guide was written mainly for engineers Please Do Not reproduce and duplicate...

Страница 2: ...Confidential 2 0 11 2 3 2 4 3 5 6 7 3...

Страница 3: ...s 25 C Do not disassemble These Parts 26 4 Disassembly 27 4 1 Case of card printer chassis 27 4 2 Main Board 34 4 3 Flipper Module 36 4 4 Motors 38 4 4 1 Platen Motor 39 4 4 2 Ribbon Supply and Take M...

Страница 4: ...ition 64 5 3 Tools for Adjustments Calibration 65 5 4 TPH Module Replacement Instruction 66 5 5 TPH Replacement Instruction 67 5 6 TPH Voltage Adjustment 75 5 7 Ribbon Motor Calibration 77 5 8 Ribbon...

Страница 5: ...P Windows 7 Windows 8 Pentium class 1 2GHz CPU or equivalent with 512 MB of RAM or higher Minimum 300MB of free hard disk space Ribbon Options YMCKO 400 prints Resin K 1 000 prints YMCKO with half pan...

Страница 6: ...continuous tone printing High Speed printing Single side printing YMCKO can be done within 21 seconds Convenience The bundle Application Card Desiree CS enables you to edit your double side cards easi...

Страница 7: ...h ease No screwdrivers needed Simple TPH voltage adjustment via software makes the calibration procedure much easier than ever 2 2 Different TPH printing method Compare to a photo printer CS 200e same...

Страница 8: ...different card thickness such as 1 0mm 0 8mm 0 5mm and 0 3mm 2 4 Double side printing mechanism only when a flipper module is attached An external Flipper Module makes the flip function available easi...

Страница 9: ...evice offers a different height of gap to feed 0 3mm 0 5mm 0 8mm or 1 0mm PVC cards The Card Weight device ensures the function of card feeding even one card loaded inside only Single card insertion d...

Страница 10: ...rable material that could remove dust particles from printouts and the cleaning pipe is an easy to remove design allows the user to change this pipe easily and frequently Cleaning Pipe Cleaning Roller...

Страница 11: ...tained in order to reduce an original magnetic field Means Low coercivity means the requested out force is less than the High Coercivity material on purpose of eliminate the magnetization In other wor...

Страница 12: ...uses a thermal printing head TPH to sequentially heat 5 ribbon panels that are coated with yellow magenta cyan black and over coating layer The heat process turns the dye into gas that diffuses into a...

Страница 13: ...d Mother board The ASIC is an IC Integrated Chip located on the Main Board The ASIC drives the USB controller controls the embedded SDRAM MCU I F USB I F memory I F and GIO interface TPH thermal contr...

Страница 14: ...C DC external adaptor has been applied in CS 200e It is a universal input 100 240ACV adaptor with 24 5 DCV output ADF Motor DC type It controls the ADF roller locating in the bottom of card input hopp...

Страница 15: ...Cam Motor DC type Controls the position of Cam TPH and then move TPH to start the dye diffusion thermal transfer during printing Ribbon Motors Take Supply DC type Search wind the ribbon to accurate pr...

Страница 16: ...tor stepping type Moves the card via platen roller while printing is in progress against the TPH Flip Motor Stepping type It moves the rollers in the flipper to control card flip and movement a swing...

Страница 17: ...menu Description RIBBON Indicates the ribbon type installed MODEL Indicates the model name FW Indicates the firmware version IC R W With without an IC card R W module Yes No MAG R W With without a mag...

Страница 18: ...eam to penetrate through the ribbon onto the sensors with different intensity of light like the table below signals can be recognized by the ASIC Y M C K O G Hi Lo Lo Lo Hi B Lo Lo Hi Lo Hi In CS 200e...

Страница 19: ...Confidential 19 The anatomy of ribbon searching Blue Green Ribbon LEDs Ribbon sensors Ribbon Supply Ribbon Take R Ribbon LED Ribbon SNR...

Страница 20: ...ribbon cassette and shows how many prints are remained in your ribbon Cover Sensor The cover sensor could identify the cover is open or not next to the ribbon sensors A slice of rib locating next to t...

Страница 21: ...be OFF when it detects the card and will be ON when they do not detect any card All of them are interrupt type sensor It detects the card when the card blocks the signal light from the other LED side...

Страница 22: ...ment of the TPH and Pinch Roller between hese positions and Cam sensor detects sends information back to firmware The difference of printing positions is as shown below Ribbon Encode Sensor There are...

Страница 23: ...de RBN Supply Cover SNR RBN Chip SNR Exit SNR LE SNR JAM SNR RBN SNR CAM SNR Encode RBN Take Fan The Fan reduces the temperature of the TPH Thermal Print Head It only starts to work when the TPH reach...

Страница 24: ...e blocked or covered Placing the printer on a bed sofa rug or other similar not firm surfaces may block the openings The printer should never be placed near or over a radiator or heat register proper...

Страница 25: ...Confidential 25 B Tools Tweezers Wire Cutter Screwdriver minus Screwdriver plus...

Страница 26: ...d to be calibrated by a specific calibration device and cannot be repaired on site Fixing screws DO NOT disassemble Located on the both sides of the TPH module Fixing screws of Platen Motor Must disas...

Страница 27: ...7 4 Disassembly 4 1 Case of card printer chassis Maintenance Parts Replacement Procedures Parts Name The case of card printer chassis Parts No Tools Screwdriver Procedure No 1 Appearance view of CS 20...

Страница 28: ...Confidential 28 Unscrew 4 screws that hold the upper cover marked in red circles in the figure below PS_ID_LINKAGE_F_C2 56 C0843 001 Slide down the upper cover to take it off...

Страница 29: ...ential 29 Unscrew the corresponding screws which have been marked in circles of different colors for the part that you are going to take off Front case front ADF cover Pink Back Brown Left Green Right...

Страница 30: ...Confidential 30...

Страница 31: ...Confidential 31 The rest of 2 screws for removing the ADF cover top To remove the Left Cover you have to disconnect to cables LCD Button ID_ADF_Cover_Top 56 C0850 001...

Страница 32: ...Confidential 32 Separate the chassis from the ID base Loose three screws on the right side ID_Linkage_B 56 C0844 001 ID_Linkage_F 56 C0843 001 ID_ADF_Cover_Front 56 C0851 001 ID_Exit 56 C0845 001...

Страница 33: ...Confidential 33 Loose 2 screws on the left side Lift up the chassis to separate it from the ID base...

Страница 34: ...CS200e ROHS Parts No 45 C08R1 072 Tools Screwdriver Procedure No 2 Remove The case of card printer chassis according to Procedure No 1 Unplug all the connectors and loose these 4 screws to disassembl...

Страница 35: ...Confidential 35 Now the Main Board is unattached from the chassis...

Страница 36: ...lacement Procedures Parts Name The case of flipper module chassis Parts No 86 CFP01 101 Tools Screwdriver Procedure No 3 Appearance view of CS 200e flipper module Loose 6 screws from the button of the...

Страница 37: ...Confidential 37 Loose 4 screws from the button and 1 screw for grounding wire to separate the flipper chassis button plate...

Страница 38: ...tepping Motor 47 C0815 001 ASM_SHINANO_HYBRID_MOTOR_C2 Platen Motor 2 3 DC Motor 2 47 C0816 001 ASM RIBBON MOTOR 001 CS200e ROHS 4 DC Motor 47 C0817 001 ASM ADF MOTOR 001 CS200e ROHS 5 DC Motor 47 C08...

Страница 39: ...Parts Name ASM_SHINANO_HYBRID_MOTOR_C2 Platen Motor Parts No 47 C0815 001 Tools Screwdriver Procedure No 4 Remove The case of card printer chassis and Main Board according to Procedure No 1 and 2 Loo...

Страница 40: ...rts Name ASM RIBBON MOTOR 001 CS200e ROHS Parts No 47 C0816 001 Tools Screwdriver Procedure No 5 Remove The case of card printer chassis Main Board according to Procedure No 1 and 2 Ribbon supply moto...

Страница 41: ...Confidential 41 Ribbon supply motor Loose 2 screws the ribbon belt and unplug the connector to take out the Ribbon Motor Take c...

Страница 42: ...dures Parts Name ASM ADF MOTOR 001 CS 200e ROHS Parts No 47 C0817 001 Tools Screwdriver Procedure No 6 Remove The case of card printer chassis Main Board according to Procedure No 1 and 2 Unscrew 2 sc...

Страница 43: ...Confidential 43 4 5 LED and Sensor LE LE Jam RBN_ S_En RBN_ T_En RBN Chip Cam Door RBN SNR RBN LED Exit Exit Smart Card...

Страница 44: ...arts Replacement Procedures Parts Name SNR BD SG 205 A11 CS 200e ROHS Parts No 45 C08RE A11 Tools Screwdriver Procedure No 7 Remove The case of card printer chassis and according to Procedure No 1 Loo...

Страница 45: ...Confidential 45 Loose one screw unplug the connector to remove the Ribbon Encoding Take...

Страница 46: ...D BD RIBBON A11 CS 200e ROHS Parts No 45 C08RF 011 Tools Screwdriver Procedure No 8 Remove The case of card printer according to Procedure No 1 till the upper cover Remove the TPH module from the link...

Страница 47: ...Confidential 47 You can also remove 2 screws on the green cover as shown below to remove the ribbon LED...

Страница 48: ...ROHS Parts No 45 C08RG A11 45 C08RE A11 Tools Screwdriver Wire Cutter Procedure No 9 Remove The case of card printer according to Procedure No 1 Use a long screw to fix the Frame Pinch Back for removi...

Страница 49: ...Confidential 49 Loose 2 screws unplug the connector to remove the Ribbon SNR Loose 2 screws unplug the connector to remove the Door SNR...

Страница 50: ...ROHS Parts No 45 C08RE A11 Tools Screwdriver Procedure No 10 Remove The case of card printer according to Procedure No 1 Remove Ribbon Encoding SNR E ring of Encoding Disk Encoding Disk Set GE_24T_H3...

Страница 51: ...NR BD SG 205 A11 CS 200e ROHS Parts No 45 C08RE A11 Tools Screwdriver Procedure No 11 Remove The case of card printer according to Procedure No 1 Remove Ribbon Encoding SNR C ring of Encoding Disk Enc...

Страница 52: ...s Name SNR BD CAM A11 CS 200e ROHS Parts No 45 C08RD A11 Tools Screwdriver Procedure No 12 Remove The case of card printer and chassis according to Procedure No 1 Remove Platen Belt C ring of Pulley P...

Страница 53: ...CHIP 011 CS 200e ROHS Parts No 45 C08RB 011 Tools Screwdriver Pliers Procedure No 13 Remove The case of card printer and chassis according to Procedure No 1 Put some alcohol on both nuts to soften and...

Страница 54: ...Parts No 45 C08RC 011 Tools Screwdriver Procedure No 14 Remove The case of card printer and chassis according to Procedure No 1 Follow the Procedure No 7 to take off the Ribbon Encoding Sensor Take R...

Страница 55: ...c ring and 3 screws on the left side Cut off 4 wire binders accordingly following the wire to trace another 2 binders locate on the bottom side Remove the 2 shafts shown as the right figure When asse...

Страница 56: ...Confidential 56 Use pliers to hold the nuts and then loose the screws and then unplug the connector to take out the Smart Card Contact Board...

Страница 57: ...Confidential 57 4 6 Flipper Sensors Motor Board Flipper LE Flipper Front Flipper Back Flipper Door Flipper Board...

Страница 58: ...1 Flipper Board Maintenance Parts Replacement Procedures Parts Name FILPPER BD M11 CS 200e ROHS Parts No 45 C08R3 M11 Tools Screwdriver Procedure No 14 Loose 3 screws unplug the 4 connectors to remov...

Страница 59: ...lacement Procedures Parts Name SNR BD SG 205 A11 CS 200e ROHS Parts No 45 C08RE A11 Tools Screwdriver Procedure No 11 Loose the designated screw unplug the corresponding connector to remove the pointe...

Страница 60: ...Motor Maintenance Parts Replacement Procedures Parts Name MTR PM 7 5 2 8OHM M42SP 12NK BIP CS 200e ROHS Parts No 17 MFC08 BM1 Tools Screwdriver Procedure No 11 Unplug 1 connector and then loose 2 scre...

Страница 61: ...dures Parts Name BUTTON BD M11 CS 200e ROHS Parts No 45 C08RA M11 Tools Screwdriver Procedure No 18 Loose 4 screws from the left cover and then take out the module Loose 1 screw to release the Button...

Страница 62: ...inch back to cover back 2 71 75A53 8P0 MACH CAP M3 0 5X8L NYLOK Case chassis to plate chassis 3 M3 Main Board ADF case 4 M2 6 ADF Motor 5 M3 Case Platen motor 6 M3 Ribbon motors 7 M3 Fan Shaft of chas...

Страница 63: ...l 63 No P N Spec For 11 LCM to case 4 12 Ribbon Chip Contact Board to chassis 2 sets Smart Card Contact Board to cover front 2 sets 13 M3 The screw behind the platen pulley 1 14 M2 Cam motor to the me...

Страница 64: ...from the chassis to the cams You have to use two pins to plug through to ensure the correct cam alignments following the procedure as shown below Video of how to do the alignment of CS200e is availabl...

Страница 65: ...Confidential 65 5 3 Tools for Adjustments Calibration 2 pieces of Dummy Ribbon Spools empty HTools V3 8 2 or above...

Страница 66: ...Fail An ADC Error caused by TPH NG Warning Preparation Ensure the printer is off and the power cord is unplugged Ensure the TPH is cooled How To Replace Step 1 Push both forks of TPH module equally to...

Страница 67: ...End Users The Instruction of Print Head Disassembly It is available in the CS 200e driver Users can get this instruction in Control Panel Printers and Faxes Printing Preferences right click on CS 200...

Страница 68: ...tial 68 Before a new TPH module installed Step 1 Power on the CS 200e Step 2 Go to Control Panel Printers and Faxes HiTi CS 200e Printing Preferences Step 3 Go to Tools Maintenance Info Print Head Rep...

Страница 69: ...Confidential 69 Step 4 Click Print Test Chart to print a reference test chart After printing test chart power off printer and then change the TPH...

Страница 70: ...PH module is correctly installed Step 2 Refer to step 2 3 as procedure above to enter TPH replacement procedure Click Next to continue the process Step 3 Input the serial number and resistance value o...

Страница 71: ...Chart again check and adjust the position or density if necessary Click Next to continue the process Step 5 Click HiTi CS 200e S2Exxxx tph to save the TPH information send it to HiTI for warranty appl...

Страница 72: ...Confidential 72 Htools Settings for Htools v3 11 2 and above Advance Adjustment Procedure for Distributors 1 Select Tool2 Printer Calibration 2 Then choose Card Depth as 0 8mm and Print Chart A...

Страница 73: ...After print the chart A shown below please check the lines on each letter and add or minus the figure according to the printed chart Unit 1pixel 4 Following is the B Chart and following the same proc...

Страница 74: ...e TPH press the save to printer button NOTE Please note that because the 0 3mm card thickness has 4 unit difference from the rest of the card dept so the Htools will automatically 4 when you save the...

Страница 75: ...e this card will be used in comparing with the one printed by the new TPH 2 Check out the resistance R of new TPH installed the label type or location could change 3 Run HTools input R click Calibrate...

Страница 76: ...9 9 7 8 8 7 8 8 7 9 9 9 8 8 7 9 8 7 8 9 8 8 9 9 7 9 7 8 9 9 8 9 9 9 7 9 9 8 79 9 7 7 9 8 79 8 7 9 9 8 8 8 79 8 9 7 8 77 9 9 7 9 7 77 8 9 8 9 8 7 9 77 8 8 9 7 7 9 7 9 7 8 7 9 9 8 7 9 99 9 7 8 9 9 99 8...

Страница 77: ...en H banding Ribbon Jam Ribbon Peeling off NG ribbon attaches on the card or Ribbon Broken occurs due to wrong ribbon motor duty cycle How to Calibrate 1 Remove the Ribbon 2 Power on the printer take...

Страница 78: ...minutes NOTE The standard range of each calibration comparing to the original values after a main board replacement Motor Tolerance Take motor 1 2 0 Take motor 2 2 0 Supply motor 1 2 5 Supply motor 2...

Страница 79: ...files printed on the card and because of the environment and static differences around the globe some printers will have more visible interference that makes the ribbon wrinkled those marks are actua...

Страница 80: ...How to Calibrate 1 Remove the ribbon from the CS 200e 2 Clean the Ribbon LED s and Ribbon Sensors 3 Close the ribbon door and then power on the printer 4 Connect the CS 200e to a PC then run HTools e...

Страница 81: ...T_C2 R3 65 C0104 011 CH_GE_TQL_DRIVER_NEW_C1 R4 R8 65 C0115 002 SC_GE_24T_H3_C1 R5 56 C0862 001 YH_PULLEY_S2M_100T_C2 R7 56 P0106 G21 GROOVE IDLE L15 R9 R10 56 C0864 001 YH_PULLEY_32_G18T_C2 L12 No Pa...

Страница 82: ...0 65 C0128 001 SC_GE_D18T_C1 L11 56 D0113 G22 P_K_IDLE_GEAR3_FEEDROLLER L12 56 C0864 001 YH_PULLEY_32_G18T_C2 R9 R10 L13 65 C0805 001 YH_GE_H40T_2T_D_C2 No Part Number Belt Name Same As B4 59 C0812 00...

Страница 83: ...1 YH_PS_CAM_TPH_C2 L17 No Part Number Gear Name Same As L14 65 C0127 002 SC_GE_D16T_C1 L15 56 P0106 G21 GROOVE IDLE R7 L16 L18 65 C0801 001 YH_GE_D40T_C2 L1 L2 L3 R1 R6 L17 56 C0803 001 YH_PS_CAM_TPH_...

Страница 84: ...rial Park 215006 China PRC TEL 86 512 67601688 FAX 86 512 67601186 United States North America 727 Brea Canyon Rd Suite 2 Walnut CA 91789 U S A TEL 909 974 0099 FAX 909 974 0011 Netherlands Europe Ekk...

Отзывы: