background image

Advanced Techniques 

- 34 - 

Note:

 The date search function is released when you press the STOP button during date search mode. 

Note:

 If the recorded time is less than 30 seconds, the date search function may not operate normally. 

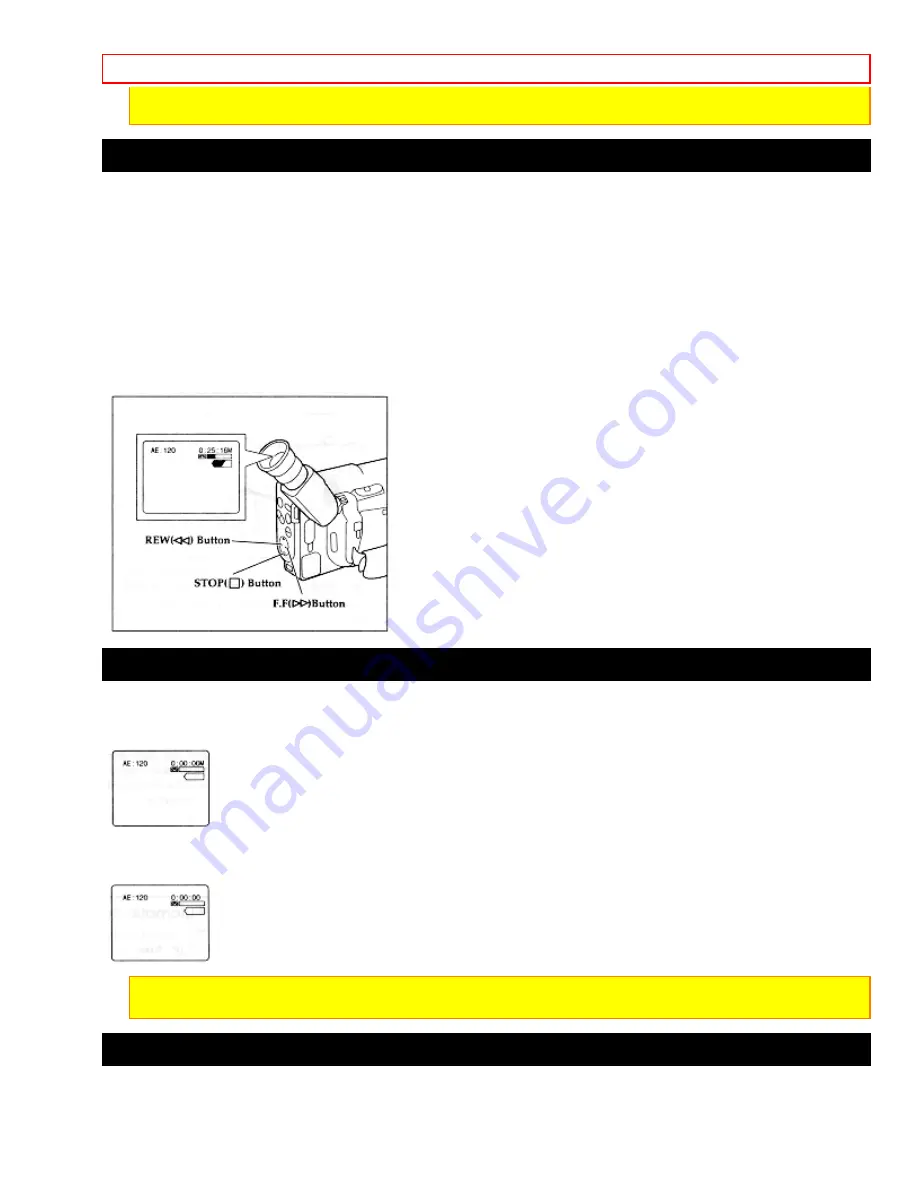
Using Memory 

The linear time counter memory stops a rewinding tape at approximately 0;00;00M. This feature helps in locating 
a specific point in the tape to which you wish to return. An example might be that you have recorded some tape 
that you have already watched, you continue recording but do not care to watch the tape you recorded earlier. 
The memory feature returns you to the beginning of the most recent recording. 

1. Press the DISPLAY button on the remote control so the linear time counter with memory is displayed as shown 
in the figure. 
2. Start recording or playback of a cassette. Press the COUNTER RESET button on the remote control at the 
point to which you wish to return. The linear time counter clears to 0:00:00M. 
3. Press the STOP button to stop playback, or press the start/stop recording and set the CAM/OFF/VIDEO switch 
to VIDEO. 
4. Press the REW button and the tape stops at approximately where you reset the linear time counter. This 
feature works in F.F as well. 


Using the Display Button 

Pressing the DISPLAY button on the remote control allows you to switch the displays in the viewfinder. When the 
camcorder is turned on, the linear time counter appears. 

• Pressing the DISPLAY button once displays the linear time counter with the memory feature. 


• When a recorded tape is in the camcorder during the VIDEO mode, "SEARCH" appears in the viewfinder. (Refer 
to "Date Search" on page 40). 
• Pressing the DISPLAY button a second time returns to the linear time counter. 


Note:

 The linear time counter with the memory feature in the viewfinder can also be displayed on the 

connected television. 

Using the Wireless Remote Control 

Use the wireless remote control to operate the camcorder from a distance. The PLAY, F.FWD, REW, STOP, 
PAUSE (START/STOP) and ZOOM buttons on the wireless remote control operate the functions of the 
corresponding buttons on the camcorder. Aim the wireless remote control at the infrared receiver of the 

Содержание VM-E521A

Страница 1: ...Trans Canada Highway Pointe Claire Tel 770 279 5600 Quebec H9R 1B1 CANADA Tel 514 697 9150 HITACHI SALES CORPORATION OF HAWAII INC 3219 Koapaka Street Honolulu Hawaii 96819 Tel 808 836 3621 Thank you for buying a Hitachi product Please take time to become familiar with the manual and how it is set up Keep it handy for feature reference QR14542 Hitachi Ltd 1995 Printed in Japan KG T ...

Страница 2: ...e 19 Getting Started Identifying Controls 20 Basic Techniques 22 Making a Basic Recording 23 Playing Back Your Recording 23 Advanced Techniques 26 Date Recording 26 Using the Power Zoom 28 Using the Digital Zoom 28 Using the INST ZOOM Instant Zoom Button 28 Using Auto Focus 29 Using Manual Focus 30 Using the Electronic Image Stabilizer 30 Using Fade 31 Using 16x9 32 Using Instant Review 32 Using Q...

Страница 3: ...tage within the unit may have sufficient magnitude to cause electrical shock Therefore it is dangerous to make any kind of contact with any inside part of this unit This symbol alerts the user that important literature concerning the operation and maintenance of this unit has been included Therefore it should be read carefully to avoid any problems CAUTION TO REDUCE THE RISK OF ELECTRIC SHOCK DO N...

Страница 4: ... proper grounding and in particular specifies that the cable ground shall be connected to the grounding system of the building as close to the point of cable entry as practical Notes This unit uses 8mm video format cassettes It records and plays back in the SP mode 14 3 mm sec It cannot record and play back in the LP mode 7 2 mm sec This camcorder uses a Hi Fi stereo sound system When a tape recor...

Страница 5: ...r deteriorated insulation 7 Power Cord Protection Power supply cords should be routed so that they are not likely to be walked on or pinched by items placed upon or against them paying particular attention to cords at plugs convenience receptacles and the point where they exit from the appliance 8 Ventilation Slots and openings in the cabinet are provided for ventilation to ensure reliable operati...

Страница 6: ... be hazardous and should be left to a professional antenna installer USE 14 Cleaning Unplug this video product from the wall outlet before cleaning Do not use liquid cleaners or aerosol cleaners Use a damp cloth for cleaning 15 Object and Liquid Entry Never push objects of any kind into this video product through openings as they may touch dangerous voltage points or short out parts that could res...

Страница 7: ...herwise subjected to damage or stress 9 Do not operate charger with damaged cord or plug replace them immediately 10 An extension cord should not be used unless absolutely necessary Use of improper extension cord could result in a risk of fire and electric shock If extension cord must be used make sure A The pins on plug of extension cord are the same number size and shape as those of plug on char...

Страница 8: ... camcorder is functioning properly but the solid state pickup device C C D usually causes this as an inherent characteristic Try to avoid shooting an excessive bright object directly Be sure not to leave the camcorder in a place where the temperature exceeds 140 F 60 C or the pickup device may be damaged Dangerous includes Inside a car with the windows closed and in direct sunshine Near heating ap...

Страница 9: ...mail by sending either money order or your credit card information to the following address HiTRON Inc 675 Old Peachtree RD Suwanee GA 30174 Tel 1 800 995 4500 For more information concerning the purchase of camcorder accessories please see the optional accessory listing on page 65 Attaching the Shoulder Strap Thread the ends of the provided shoulder strap through the slots at the back of the camc...

Страница 10: ...give an operating time of approximately 55 minutes but this is reduced to a half to one third depending on how often you use zoom and start stop functions Charge the battery at a temperature range of 50 F 10 C 86 F 30 C to prevent damage to the battery 1 Plug the AC adapter charger power cord into an AC outlet Make sure that the wide blade fits into the wide slot If it doesn t fit try reversing it...

Страница 11: ...ting time When operation time becomes too short to be useful replace the battery If the POWER light begins to flash during charging remove the battery and then reattach it to the AC charger adapter If the POWER light continues to flash after several attempts to attach it the battery is unable to take a charge and must be replaced Do not attach a hot battery to the AC adapter charger Allow it to co...

Страница 12: ...on before storing the camcorder in its case or carrying the camera recorder around to avoid damaging the viewfinder or camcorder Eyepiece Adjustment To use the electronic viewfinder turn this control for your optimum focus adjustment Adjustment the Hand Strap Adjust the hand strap to best fit your hand After adjustment hook the hand strap s pad securely Loading Batteries Install the batteries to p...

Страница 13: ...r with battery in the remote control making sure that it is fully inserted WARNING KEEP THE BATTERIES AWAY FROM CHILDREN AND PETS IF SWALLOWED CONSULT A PHYSICIAN IMMEDIATELY FOR EMERGENCY TREATMENT Note Replace the batteries with 3V micro lithium cells such as Maxell CR2025 or its equivalent Note Dispose of battery safely in accordance with local laws Do not dispose of in fire Note Do not short c...

Страница 14: ... 4 While pushing down the battery slide it to the right until it clicks into place 5 After installing the battery close the cover Hold the OPEN lever and align the tabs on both sides of the cover with the end of the attachment section Note If the OPEN lever is flat the cover will not close Note Always remove the battery from the camcorder after use Note We cannot guarantee against malfunctions of ...

Страница 15: ...ed battery This symbol indicates a partially charged battery This flashing symbol indicates a battery nearly out of power Use an alternate power source or charge the battery before continuing to use the camcorder Using Alkaline Dry Cell Batteries The camcorder can be powered by six alkaline dry cell batteries inserted into the power supply attachment holder The continuous operation time of the cam...

Страница 16: ...mended that you use alkaline batteries within the recommended period of use or within two years of the date of manufacture Note Be careful of the following to prevent the leakage of liquid or an explosion Check that the orientation polarity of the batteries is correct Remove the batteries when not using the camcorder Remove the used batteries from the camcorder Do not use batteries made by differe...

Страница 17: ...itch off and replace the batteries If the power switch is left turned on in this state the power may turn on temporarily and turn off again repeatedly Note Be sure not to short disassemble heat or throw batteries into fire This is very dangerous Using Alternative Power Sources Using the AC Adapter Charger Please ensure that the CAM OFF VIDEO switch is in the OFF position whenever attaching or deta...

Страница 18: ...n or off Inserting a Cassette 1 Slide the EJECT switch in the direction of the arrow The cassette door opens automatically 2 Place the cassette in the cassette holder so that the transparent window faces away from the body of the camcorder and the sprockets toward the body of the camcorder 3 Push the cassette holder which is embossed PUSH LOCK on the left hand side until it clicks into place The c...

Страница 19: ...ut of tape Turn the camcorder on to display the linear time counter The linear time counter keeps track from when you load a cassette into the camcorder and clears to 0 00 00 when the cassette is ejected Remaining Tape The tape remaining display shows the remaining tape that can be used for recording and playback using seven dashes This feature is handy when recording since it lets you know how lo...

Страница 20: ...ing 3 Pressing the F F button gives you higher numbers while the REW button gives you lower numbers Select the right month and press STOP button Use the F F REW and STOP buttons to select the proper day year hour minute and AM or PM 4 After setting the AM PM press the DATE TITLE button The display changes and the internal clock starts Note After the date and time are set AUTO appears and the camco...

Страница 21: ...ting the date and time or creating a title 12 Ring of Tape Transport F F Button Use this button to fast forward tapes or for visual search During visual search the camcorder fast forwards at approximately 9 times normal playback speed Also use this button to set date and time STOP Button Use this button to stop playback fast forward or reverse Also use this button to set date and time Right side B...

Страница 22: ...readed socket to mount the camcorder to a tripod Remote Control Illustration 29 TV Control Buttons Used for controlling the TV POWER Turns the TV on and off AVX Used for recording picture and sound from an auxiliary input VOLUME Increase or decrease the volume CHANNEL Top button switches to the next higher channel bottom button switches to the next lower channel For these to operate you must have ...

Страница 23: ...M OFF VIDEO switch as you slide it to CAM appears and the camcorder is now ready to record 4 Use the diopter control to match the viewfinder s focus with your eyesight 5 When you are ready to record press the Start Stop button REC appears in the viewfinder and the camcorder records the picture you see in the viewfinder Note TAPE flashes in the viewfinder when the tab on the side of the cassette is...

Страница 24: ... it has only one AUDIO IN jack Note Some televisions have an S VIDEO IN jack Connect the black S VIDEO plug to the television instead of the yellow VIDEO plug Note If you use a generally available audio video cable in place of the AV stereo output cable provided with the connection shown above unplug the AV stereo output cable from the AV IN OUT jack of the camcorder 2 Connect the free square plug...

Страница 25: ...nd Removing Cassettes p 18 2 Hold down the red button on the CAM OFF VIDEO switch while sliding the switch to VIDEO 3 Press the PLAY button and enjoy your video 4 Press the STOP button when finished Using Still To view a still picture during playback press the Start Stop Press the Start Stop button again to resume playback If you leave the camcorder in play pause mode for more than 5 minutes the c...

Страница 26: ...back is activated both the picture and sound are played back at twice the normal speed This will cause noise lines to appear on the picture and the sound to become warbled With some tapes the width of the noise band may vary or noise may flow Note With some TVs the synchronization may unlock and the picture may fluctuate or the picture may become black and white Advanced Techniques The Hitachi VM ...

Страница 27: ... make a recording TITLE and Date Automatic Title and Date Recording This option records the date and created title see Creating and Recording a Title on page 43 automatically once a day at the beginning of recording for 10 seconds Note When TITLE is displayed in the viewfinder the title cannot be turned on or off using the remote control Date Date Recording The camcorder records the date with the ...

Страница 28: ... in the viewfinder for about 5 seconds and then disappears The zoom position is displayed in 10 steps Using the Digital Zoom The digital zoom increases the magnification of the power zoom by 2 times You must place the subject you wish to magnify at the center of the viewfinder Note This digital zoom has certain limitation and may degradate at extreme magnification and amplify camcorder s movement ...

Страница 29: ...uses the subject in the center of the viewfinder automatically unless the manual focus is engaged If FOCUS appears in the viewfinder manual focus is engaged Press the FOCUS control buttons simultaneously to return to auto focus The auto focus will not work under the following conditions and you must focus manually Objects outside the center of the viewfinder Objects at different distances in the c...

Страница 30: ...ly to your subject If you don t use the T control to zoom to the picture you want the picture may fall out of focus when actual recording starts 3 Press the Focus control F far or N near button until the subject is in focus 4 Use the power zoom W control to zoom back to the picture you desire Note To return to auto focus press the FOCUS control buttons and the FOCUS disappears from the viewfinder ...

Страница 31: ...use the EIS function when using a tripod The sensor would detect vibrations from the tripod in which case the picture would be blurred Using Fade Use the fade feature to add a professional touch to your recordings Use the FADE button to select one of the three fade options White fade Fades in from a white screen or fades out to a white screen appears in the upper left corner of the viewfinder Wipe...

Страница 32: ...n during recording or recording pause fades the top and bottom of the picture in the viewfinder to black 16x9 is displayed in the viewfinder When the 16x9 button is pressed again 16x9 disappears and the normal picture is restored Using Instant Review Use this feature to view the last few seconds of the tape you shot 1 Set the camcorder to record pause mode and tap the REW button The last few secon...

Страница 33: ... in the camcorder Note Be sure that the date and time are set 1 Attach a power source and slide the CAM OFF VIDEO switch to VIDEO 2 Press the DATE TITLE button the DISPLAY button on the remote control to display SEARCH in the viewfinder 3 Press the REW button to search for the start position from which you last made a recording or the F F button the F FWD button on the remote control to recording ...

Страница 34: ...tton to stop playback or press the start stop recording and set the CAM OFF VIDEO switch to VIDEO 4 Press the REW button and the tape stops at approximately where you reset the linear time counter This feature works in F F as well Using the Display Button Pressing the DISPLAY button on the remote control allows you to switch the displays in the viewfinder When the camcorder is turned on the linear...

Страница 35: ...any time A title contains two lines of up to 16 characters per line The camcorder contains 47 different characters for creating a title When creating and recording a title use the TITLE ON OFF button on the remote control When creating a title in the CAM mode the DATE TITLE button of the camcorder can be used instead of the TITLE ON OFF button on the remote control TITLE should be displayed in the...

Страница 36: ...s method avoids erasing previously recorded material which will happen when you record a title on a previously recorded tape Note Title recording is disabled when you connect the optional AV input cable to the AV IN OUT jack to record video and audio from the television or VCR Recording a Created Title while Transferring a Tape 1 Connect the camcorder to the VCR p 27 2 Turn on the VCR and set it t...

Страница 37: ...he recording VCR starts recording automatically 7 Press the F FWD REW STOP and Start Stop buttons to pause the VCR You can then search forward or back through the tape without affecting the tape in the VCR Use the F FWD and REW buttons to search the tape Press the PLAY button to resume normal playback To resume recording on the tape in the VCR press the Start Stop button and then the S EDIT button...

Страница 38: ...ton and hold it If the remote control code has been set the VCR channel is counted up automatically Note Your VCR should have an infrared remote control Note If the channel on the VCR does not change with the above operation you need to switch the remote control code of your VCR Refer to the VCR s instruction manual If the channel still does not change after you have changed the VCR s remote contr...

Страница 39: ...camcorder to VIDEO Turn the recording VCR on and select line input 4 Press the PROGRAM button of the remote control The program display appears in the viewfinder Note If your VCR is connected to a TV the program display will also appear on the TV screen 5 Press the button and use the or button to search for the starting point of the segment you want to copy Press and then to set the camcorder to t...

Страница 40: ...le with many televisions but will not work with every one made If your TV does not respond the way it should when you program it as explained below this remote may be incapable of operating it Once you have programmed the remote you won t have to do it again until you change the batteries This remote control can be used with your TV as well as the camcorder as long as your TV comes with a remote c...

Страница 41: ...e programmed the camcorder s remote control is ready to control the TV Press the button of the TV function that you want Be aware that not all of your TV s functions may work even though the remote control is correctly programmed Note It may not be possible to control all TVs listed in the Table Note The AVX Button can t be used with Gold Star 2 and Sharp TVs Using Audio Video Dubbing Use audio vi...

Страница 42: ...more than 5 minutes the camcorder stops automatically to protect the tape Note Automatic date recording is disabled during audio video dubbing Note When the audio video dubbed portion is played back noise may appear at the end of the dubbed portion Recording Television Programs If your television or VCR has AUDIO OUT and VIDEO OUT jacks you can record television programs with your camcorder Record...

Страница 43: ...Press the operate button on the DC camera light to turn it on and off Notes when using the DC camera light Keep the DC camera light away from splashing or dripping water Never cover the DC camera light with paper plastic or other object as the cooling vents may become blocked possibly causing the camera light to overheat Never use the DC camera light in the vicinity of explosive or highly flammabl...

Страница 44: ... by placing the bulb in the hole of the reflective plate lining up the smaller mark on the front of the cover with the mark on the DC camera light and turning the front of the cover clockwise till the larger mark on the front of the cover aligns with the mark on the DC camera light Check that the front of the camera light is attached properly before turning the light on Note Only replace the camer...

Страница 45: ...r adheres to it 1 Rotate and remove eye cup 2 Clean the picture tube face and lens To prevent scratching use a soft non abrasive cloth swab or lens cleaning paper 3 Fit the projection of the eye cup into the groove in the viewfinder and rotate the eye cup in the direction of the arrow Periodic Maintenance A precision electromechanical device the Hitachi VM E520 E521A requires maintenance after a p...

Страница 46: ...ck Point Correction Picture does not appear in the viewfinder Remove the lens cap Slide the CAM OFF VIDEO switch to CAM Disconnect the AV input cable from the camcorder The camcorder cannot go into the recording mode even when the start stop button is pressed Check the record protect tab on the cassette See page 19 for details Push the cassette holder embossed PUSH LOCK to close it Slide the CAM O...

Страница 47: ...r When you see the playback picture on your TV RF adjust fine tuning knob on television set to obtain best picture Picture bends at the top of the TV screen TV receiver is of older type It needs to be modified to work properly with camcorder Tape is damaged Try another cassette Color of your TV screen is too bright too faint or change TV set has VIR circuit Turn it off during playback Date search ...

Страница 48: ...m Check Point Correction TAPE appears in the viewfinder Have you moved the camcorder or cassette from a cold place to a warm place so that its temperature changed abruptly If the temperature has changed remove the cassette and set the CAM OFF VIDEO switch to OFF then wait for about one hour Remove the cassette and then try to reinsert remove it several times If the indication is still shown in the...

Страница 49: ... Each facility will provide you with convenient and expedient assistance Our service Hotline operator will direct you to the Hitachi Authorized Service Facility nearest you Just present proof of purchase and or delivery receipts to the Hitachi Authorized Service Facility and service will be rendered in accordance with the terms of the limited warranty as stated on your warranty card or operating g...

Страница 50: ...the toll free number 8 00AM 6 00PM East Coast Time workdays 1 800 995 4500 By Mail Complete the order form on page 67 Detach it and send it to the following address with your credit card information money order or check in U S currency and payable to HiTRON Inc HiTRON is a subsidiary of Hitachi Home Electronics America Inc HiTRON Inc 675 Old Peachtree RD Suwanee GA 30174 Please allow two to three ...

Отзывы: