background image

17

Getting Started

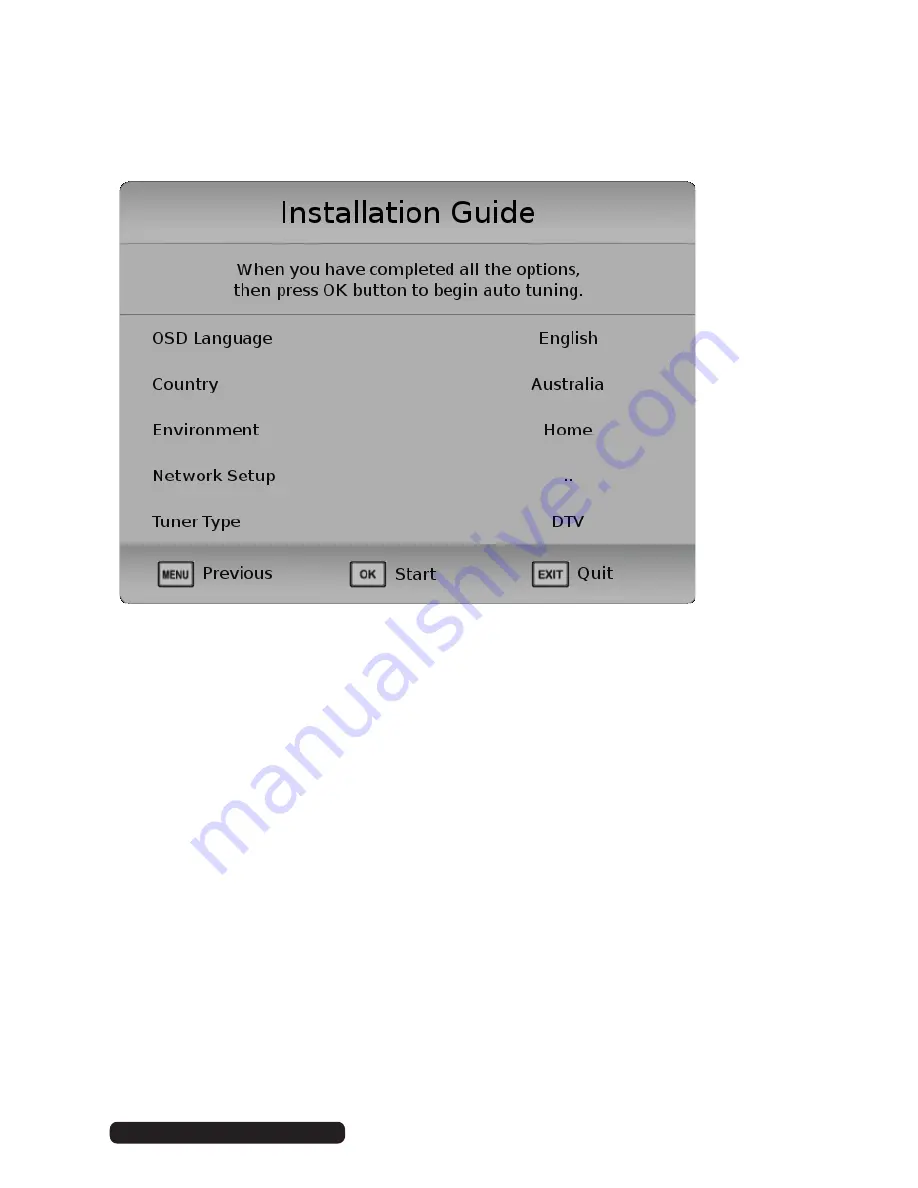
Settings confirmation page will be displayed on the screen, as illustrated below.
Press menu button to go back previous step. 

Press OK button to begin scanning for TV stations. To exit channel tuning, press the 
EXIT button. When auto searching is complete, your TV will show the first channel 
found.

After Sales Support

Telephone: 


Email: 

1300 886 649

 [email protected]

Содержание VC406000

Страница 1: ...For Model VC406000 LED LCD HDTV OWNER S GUIDE ...

Страница 2: ... menu Press the UP DOWN RIGHT LEFT buttons to navigate the on screen menus and adjust the system settings to your preference Press OK to confirm your selection SOURCE Switch the input source VOL Turn the volume up down NUMBER BUTTONS 0 9 Press to select a TV channel directly when watching TV The channel changes after 2 seconds P MODE Cycle through the different picture modes S MODE Cycle through t...

Страница 3: ...y the DVD title menu DVD Play the previous file Play next file Move fast backward Move fast forward TV RADIO Switch the unit between TV and radio l h POWE R MUTE FAV SUBTITLE D SETU P INDEX ZOOM TV RADIO RETURN VOL CH U 79 0 1 23 5 4 6 P MODE INFO S MODE SOURCE EPG CLE 1018C CH LIST D MENU TITLE MENU SMART HUB EXIT 1 SMART HUB INDEX RETURN CH LIST Access the smart hub page Access the list of recor...

Страница 4: ...ey should normally last for about one year If the remote control fails to work even when it is operated near the TV replace the batteries Precautions when using batteries Do not use old and new batteries together Do not use different types of battery for example Manganese and Alkaline batteries together Note that there are chargeable and non chargeable batteries Do not attempt to charge non charge...

Страница 5: ...mote control This may damage the parts or lead to malfunction The operating distance may vary according to the brightness of the room Do not point bright light at the remote control sensor Do not place objects between the remote control and the remote control sensor Do not use this remote control while simultaneously operating a remote control of other devices Remote Control S Sensor l h POWE R MU...

Страница 6: ...ctured to the highest standards of performance and safety and as part of our philosophy of customer service and satisfaction are backed by our comprehensive 2 Year Warranty We hope you will enjoy using your purchase for many years to come After Sales Support Telephone Email 1300 886 649 info tempoaustralia com au ...

Страница 7: ...ion 5 Controls and Connections 7 Getting Started 17 Basic Operations 18 Electronic Program Guide EPG 20 Recording 21 Media Mode 27 Menus 30 DVD Mode 52 FAQs 59 Specifications 61 Warranty 62 Contents After Sales Support Telephone Email 1300 886 649 info tempoaustralia com au ...

Страница 8: ...of controls adjustments or procedures other than those specified herein may result in hazardous laser light beam exposure This TV set with DVD player should not be adjusted or repaired by anyone except qualified service personnel The laser mechanism in the set corresponds to the stylus needle of a record player Although this product uses a laser pick up lens it is completely safe when operated acc...

Страница 9: ...line contact with the antenna could result in fire electric shock or serious injury Ventilation Install the unit at an adequate distance from the wall to ensure sufficient ventilation If the temperature inside the unit rises it may result in fire General Safety Instructions Cont Installation Follow instructions Only install this TV set in accordance with the instructions in this manual If a televi...

Страница 10: ...sulting in fire or electric shock Disconnect Always grasp the plug when disconnecting the power cord Pulling the cord can damage the internal wire and may cause a fire Lightning storms Unplug this TV during lightning storms or when unused for long periods of time Not doing so may result in fire or electric shock Usage conditions and restrictions Adjustments Follow the instructions in this manual w...

Страница 11: ...the risk of fire and electric shock always unplug the TV before cleaning Cleaning Only use a soft dry cloth for cleaning the TV do not use a damp cloth Never clean with industrial strength polish wax benzene paint thinner air freshener lubricant detergent or other chemicals Wipe off any moisture dirt or dust on the power plug pins with a clean dry cloth Repair If the unit requires repair contact t...

Страница 12: ...f the TV Step 3 Tighten the screws supplied with a screwdriver to affix the stand to the panel as illustrated on the right 3 NOTE Do not apply excessive force as this may damage the screw holes IMPORTANT Make sure the TV set is unplugged from the power supply before installing or removing the stand The TV panel may be awkward to install on your own We recommend you ask someone to help with install...

Страница 13: ...pply before wall mounting it and removing the stand We recommend you contact a professional for assistance when wall mounting the TV We assume no liability for any eventual damage to the product or injury to yourself if you mount the TV on your own Back of the TV NOTE The screws in the package are for securing the TV stand only If you are wall mounting the TV please consult a qualified installer f...

Страница 14: ...ase the volume level or move left right 7 CHANNEL select the next channel or move up down 8 CHANNEL select the previous channel or move up down 9 MENU enter the settings menu 10 TV AV select the input source 11 POWER turn the TV on off NOTE See page 8 for a detailed description of all sockets on the back panel 1 2 3 5 6 7 8 9 10 11 4 Keypad may change model to model 7 After Sales Support Telephone...

Страница 15: ...8 Controls and Connections Cont Main unit back view controls and sockets After Sales Support Telephone Email 1300 886 649 info tempoaustralia com au ...

Страница 16: ...o an AC power source Read through the instructions before connecting the TV to other equipment To power outlet Main unit For best picture quality we recommend connecting the TV set to an external antenna 75Ω antenna plug Indoor antenna amplifier Outdoor antenna amplifier Power plug of antenna amplifier Antenna After Sales Support Telephone Email 1300 886 649 info tempoaustralia com au ...

Страница 17: ...connect the unit with other devices AV cable not included HDMI connection Use HDMI cable to connect the unit with other devices to receive high definition multimedia signal HDMI cable not included Y Pb Pr YPbPr IN L AV IN VIDEO YPbPr AV IN R AUDIO HDMI3 HDMI2 HDMI HDMI1 ARC After Sales Support Telephone Email 1300 886 649 info tempoaustralia com au ...

Страница 18: ...monitor Coaxial S PDIF connection VGA cable not included Audio cable not included Use a coaxial cable to connect the unit with an amplifier or other audio decoding device for coaxial audio signal output Coaxial cable is not included PC VGA PC AUDIO IN PC IN COAX OUT USB After Sales Support Telephone Email 1300 886 649 info tempoaustralia com au ...

Страница 19: ...ns Cont Audio cable not included YPbPr cable not included Y Pb Pr YPbPr IN RL AV IN VIDEO YPbPr AV IN AUDIO RJ45 connection Use a ethernet cable not included to connect this port After Sales Support Telephone Email 1300 886 649 info tempoaustralia com au ...

Страница 20: ...ewind live TV and playback of video music photo multimedia files Controls and Connections Cont Earphone connection EARPHONE cable Not included USB device not included COAX OUT USB HDMI3 HDMI2 HDMI HDMI1 ARC After Sales Support Telephone Email 1300 886 649 info tempoaustralia com au ...

Страница 21: ...e lower side of the back panel or on the remote control making sure to aim it at the sensor at the front of the TV the indicator will glow blue Press it again to power off standby mode the indicator will glow red Installation Guide When you switch on the TV for the first time the First Time Setup menu will be displayed on the screen as illustrated below Step one OSD language Use the buttons to sel...

Страница 22: ...utton to go to the next step Press MENU button to go to previous step Step three Country Use the buttons to select the environment you are living in and then use the OK button to go to the next step Press MENU button to go to previous step After Sales Support Telephone Email 1300 886 649 info tempoaustralia com au ...

Страница 23: ...U button to go to previous step You can configure the network settings later via the TV s menu See page 35 for detailed network setup instructions Step five Tuner Use the buttons to select the type of scan ATV DTV DTV ATV and then use the OK button to go to the next step Press MENU button to go to previous step After Sales Support Telephone Email 1300 886 649 info tempoaustralia com au ...

Страница 24: ... below Press menu button to go back previous step Press OK button to begin scanning for TV stations To exit channel tuning press the EXIT button When auto searching is complete your TV will show the first channel found After Sales Support Telephone Email 1300 886 649 info tempoaustralia com au ...

Страница 25: ...ress the CH button to select the next previous channel Alternatively press the number buttons to select a channel directly Press the VOL button to adjust the volume level Press the MUTE button to mute the sound press it again to restore sound Picture and sound mode Press the P MODE button on the remote control repeatedly to select the picture mode directly available options Standard Movie User Eco...

Страница 26: ...key again to remove a favourite channel from the list Quick select While viewing a channel press the CH LIST button to enter the Channels List directly Press the buttons to select the channel and press OK to watch it TV Radio for DTV mode only Press the TV RADIO button on the remote control to switch the unit between TV and radio mode Subtitles Press the SUBTITLE button on the remote control to en...

Страница 27: ...e every channel for which you want to view program information To do this use the buttons to select a channel in the left column then press OK to confirm Press the buttons to switch between columns Press the buttons to select a different channel program in the list and press OK to activate the channel Press the button to display the TV guide of the previous day Press the button to display the TV g...

Страница 28: ...o stop recording select No to dismiss the dialogue box To watch a recorded program Press the INDEX button on the remote control to display the PVR Settings page Alternatively go to the Menu PVR Recorded List Use the buttons to select a recorded file and press OK to start playback in full screen mode Scheduled Recording in DTV mode only See instructions under EPG on the previous page IMPORTANT Befo...

Страница 29: ...ume playback Use the keys then press OK to select a function such as Fast Forward from the on screen toolbar To stop time shift press the STOP button on the remote control to display a dialogue box then select Yes to exit time shift mode and return to live TV signal or select No to dismiss the dialogue box NOTE The USB storage device will not retain recorded data after exiting the time shift funct...

Страница 30: ...ed recording at different times without removing the USB recording device You will need to remove the USB device as it is required to reset after each recording to protect the device from damage If you see the message DISK NOT READY displayed remove the device reconnect and proceed with your recording Some USB storage devices may not be compatible for smooth operation with this TV For large file s...

Страница 31: ... LEFT RIGHT UP DOWN to select these functions Applications Input source options Quick Links Smart TV applications AccuWeather Web Browser YouTube Facebook Twitter Picasa TerraTV Input Source Options DTV ATV AV YPbPr PC HDMI 1 2 3 USB MEDIA Miracast Hyperlink After Sales Support Telephone Email 1300 886 649 info tempoaustralia com au ...

Страница 32: ...tphone or tablet on the TV screen by connecting your mobile device directly to the TV wirelessly In order to use this feature your device must support Wi Fi Display technology To start using Miracast feature go to SMART HUB and press OK on MIRACAST Turn on Wireless Display a k a Wi Fi Display Wi Fi Direct Cast Screen function on your smart phone or tablet Please refer to your device s user manual ...

Страница 33: ...ature start the DLNA UPnP media server on your device Start HYPERLINK application on TV from the SMART HUB page TV will automatically connect to shared media device To choose a different device press the RED button A list of available devices will be displayed Select your preferred media device from the list and click OK Then select from either Movie Music or Photo and press OK to enter it You wil...

Страница 34: ... Previous Next Rotate Enlarge from the on screen toolbar Press STOP or EXIT buttons to exit playback go back to file list page Photo Press the buttons to select Photo in the main menu then press OK to enter it Photos files can only be played in this menu category Use the buttons to select the desired folder or file then press OK to selecet files and press button to play files fullscreen When playi...

Страница 35: ...u category Use the buttons to navigate to the desired folder or file then press OK to select and press PLAY button for playback When playing music files Use the buttons then press OK to select a function such as NEXT FAST FORWARD and STOP from the on screen toolbar After Sales Support Telephone Email 1300 886 649 info tempoaustralia com au ...

Страница 36: ...ar Press the buttons to select the preferred function then press OK to confirm Remote operations when playing multimedia files Press the button to play or pause playing Press the button to stop playing Press the button to move fast backward Press the button to move fast forward Press the button to play the previous file Press the button to play the next file NOTE To play your multimedia files make...

Страница 37: ...ystem under the same conditions Menu navigation Press the MENU button on the back panel or on the remote control to display the main menu Press the buttons to select different submenus Press OK or to enter the submenu page Press the buttons to select the preferred option Press the buttons to adjust the value Press the MENU button to return to the previous menu page Press the EXIT button to exit th...

Страница 38: ...31 Menus Time After Sales Support Telephone Email 1300 886 649 info tempoaustralia com au ...

Страница 39: ...32 Menus Lock After Sales Support Telephone Email 1300 886 649 info tempoaustralia com au ...

Страница 40: ...33 Option Menus After Sales Support Telephone Email 1300 886 649 info tempoaustralia com au ...

Страница 41: ...enus If not connect on PC prompt information above will appear after connecting on PC functions as follows will appear PC Setting After Sales Support Telephone Email 1300 886 649 info tempoaustralia com au ...

Страница 42: ...tup process Press keys and select wired network type The press to highlight wired press ok and bellow screen will appear For a stable internet connection it is recomnended to use a wired connection or place the wireless router close to the TV Network Setting Wired After Sales Support Telephone Email 1300 886 649 info tempoaustralia com au ...

Страница 43: ...connected message will appear Press Exit button to exit the menu If the connection is unsuccessful the Wired network is not connected message will appear Check the accuracy of information you have entered and try again After Sales Support Telephone Email 1300 886 649 info tempoaustralia com au ...

Страница 44: ...ake sure to place your Wi Fi Router close to the TV Press key and select Wi Fi network type Then press to highlight Wi Fi press OK and below screen will appear Wi Fi After Sales Support Telephone Email 1300 886 649 info tempoaustralia com au ...

Страница 45: ...er closer to the TV and press GREEN button to search again After selecting the WAP press OK If the WAP has a security password enter the password using on screen keypad and the press CONNECT Select the WAP you wish to use by pressing button to view detailed information press YELLOW button After Sales Support Telephone Email 1300 886 649 info tempoaustralia com au ...

Страница 46: ...d Successfully message will appears Click OK to exit If the connection is unsuccessful Click the security password of your WAP and its security protocal settings and try again Menus After Sales Support Telephone Email 1300 886 649 info tempoaustralia com au ...

Страница 47: ...enus Press OK to save the settings Enter the WAP password correctly using the on screen keypad and press connect click OK to exit After Sales Support Telephone Email 1300 886 649 info tempoaustralia com au ...

Страница 48: ...ecorded List Shows the list of recorded programs you can also use the INDEX key on the remote to access this page Record schedule a program to be recorded After Sales Support Telephone Email 1300 886 649 info tempoaustralia com au ...

Страница 49: ... program Schedule List Shows the list of programs scheduled to be recorded PVR File System Select Disk If you have multiple partitions on your disk select the partition you wish to use After Sales Support Telephone Email 1300 886 649 info tempoaustralia com au ...

Страница 50: ...ge the size of the time shift buffer Press OK and confirm to format your USB drive Press OK to check the speed of the USB drive Time Shift size Format start Speed Check After Sales Support Telephone Email 1300 886 649 info tempoaustralia com au ...

Страница 51: ...hen select your country tuner type Logical Channel Number LCN default is on and press OK to start scanning To access Channel menu navigate to SMART HUB Channel The default password is 0000 After Sales Support Telephone Email 1300 886 649 info tempoaustralia com au ...

Страница 52: ...45 Menus Press OK to enter Press left right to select the channel Press OK to start scanning DTV Channel Tuning After Sales Support Telephone Email 1300 886 649 info tempoaustralia com au ...

Страница 53: ...nel from the channel list and EPG Press BLUE button to skip a channel when using CH buttons Press FAV to add a channel to Favourites List press the button again to remove from the Favourites List After Sales Support Telephone Email 1300 886 649 info tempoaustralia com au ...

Страница 54: ...te USB This item is used to display signal details such as Channel Number Frequency Quality and Strength This item is used to update software through USB memory device After Sales Support Telephone Email 1300 886 649 info tempoaustralia com au ...

Страница 55: ...cklight intensity Adjust the picture size Auto 4 3 16 9 Zoom 1 Wide Zoom Panorama Off Low Middle High 0 100 Noise Reduction Back light Picture mode selection When user setting is selected contrast Brightness Colour Sharpness settings can be adjusted After Sales Support Telephone Email 1300 886 649 info tempoaustralia com au ...

Страница 56: ...49 Menus Sound To access the sound menu navigate to SMART HUB SOUND Displays audio codec information for current program After Sales Support Telephone Email 1300 886 649 info tempoaustralia com au ...

Страница 57: ... unit press the buttons or the number buttons to select the chapter track number then press OK to confirm To stop playing and return to the menu screen press the TITLE or D MENU button on the remote control Stopping play Press the STOP button to stop playback NOTE When the player is stopped it records the point on the DVD where STOP was pressed RESUME function Press the PLAY button again to resume...

Страница 58: ...dly to select the item you want to set and enter a time number chapter number track number etc then press OK Accordingly the disc will be played from the selected point Display Press the DISPLAY button to display the playing status of your disc Change subtitle language Some DVDs have multiple subtitle languages recorded To change the subtitle language to a different language from the one selected ...

Страница 59: ...ay This function allows you to zoom into the picture to enlarge it or zoom out Press the ZOOM button when playing the screen shows Use the navigation buttons to scroll across the enlarged picture Changing the audio soundtrack language on DVD VCD discs It is possible to change the audio soundtrack language to a different language from the one selected at the initial settings This function works onl...

Страница 60: ...hen press the or OK button to start playback On the file selection page press the or buttons to turn to the previous or next page Press the REPEAT button on the remote control to change the play mode SINGLE play one file only REPEAT ONE repeat one file REPEAT FOLDER all the files in the folder will be played repeatedly FOLDER all the files in the folder will be played NOTE The available repeat mod...

Страница 61: ...he or OK button to start playback During normal playback press the or button to play the previous or next file Press the REPEAT button on the remote control to change the play mode SINGLE play one file only REPEAT ONE repeat one file REPEAT FOLDER all the files in the folder will be played repeatedly FOLDER all the files in the folder will be played NOTE The available repeat modes may vary for dif...

Страница 62: ...GLE play one file only REPEAT ONE repeat one file REPEAT FOLDER all the files in the folder will be played repeatedly FOLDER all the files in the folder will be played NOTE The available repeat modes may vary for different discs Skip to the next previous picture Press button to skip to the next picture or button to skip to the previous picture If no key is pressed for three seconds it will skip to...

Страница 63: ...iquids Be careful not to drop or bend the disc Do not insert more than one disc in the disc compartment Do not try to close the disc cover when the disc is not inserted properly Be sure to store the disc in its exclusive case when not in use DO NOT store discs in humid or dusty areas or where they are exposed to direct sunlight or sources of heat such as a heating appliance Cleaning dirty discs If...

Страница 64: ...ain to close the setup menu Use the buttons to switch to another main setup item Then press the or OK button to enter the submenu page Press the button to return to the previous menu page General setup page TV Display This setting is for selecting the TV output mode Available options Normal PS Pan scan mode Normal LB Letter box mode Wide 16 9 wide screen mode OSD Language This is for choosing your...

Страница 65: ...enu contains multiple menu languages Program Control Use this item to select the desired program rating Password Use this item to change the password Input the password using the number buttons on the remote control The default password is 0000 NOTE If you forget the password please use the master password 4711 Default Use this item to reset to factory settings Audio setup page Downmix Use this it...

Страница 66: ...trol unit Check the batteries are correctly installed The batteries may be exhausted replace them Make sure to point the remote control at the remote control sensor and try it again Make sure to use the remote control at a distance of no more than 6m from the sensor Remove any obstacles between the remote control and remote control sensor No key operation by the main unit and or the remote control...

Страница 67: ...With some DVDs an alternative language cannot be selected with the LANG or SUBTITLE button Try selecting it from the DVD menu if an alternative language is available Angle cannot be changed This function is dependent on software availability Even if a disc has a number of angles recorded they may be recorded for specific scenes only No menu play with video CDs This function works only for video CD...

Страница 68: ...ote the built in DVD player is set to Region 4 coding by the factory which cannot be changed This is in compliance with DVD patentrequirements The region number for the built in DVD player is 4 148 25 H x RGB x 444 75 V After Sales Support Telephone Email 1300 886 649 info tempoaustralia com au ...

Страница 69: ...on for any other reasonably foreseeable loss or damage You are also entitled to have the goods repaired or replaced if the goods fail to be of acceptable quality and the failure does not amount to a major failure If you require further information on the Australian Consumer Law please visit the Australian Consumer Law website at http www consumerlaw gov au Goods presented for repair may be replace...

Страница 70: ... not extend to accessories not supplied with the product or by Tempo This warranty does not cover manuals and packaging This warranty does not cover batteries or any other consumable item Normal W ear and Tear This warranty does not cover normal wear and tear of the products or parts Exclusions This warranty does not cover Any defect caused by an accident misuse abuse improper installation or oper...

Страница 71: ......

Отзывы: