- 17 -
CHAPTER 3
Touch screen
84”(213cm) touch screen with the feature of multi-
spot touch (10 spot at the same time) and infrared
technology.
Using the Touch Screen with External
Source
Touch screen is integrated with with optional
embedded computer module. IF you want to use the
touch screen when an external source is connected
via HDMI or VGA, please connect the external source
to “INTERACTIVE BOARD” via a USB a to USB
cable. Connect that cable to the USB B input. Touch
screen will be active in a short time. “To use the touch
screen by an external source may require a driver. In
this case, the chosen required touch screen driver
should be loaded to external source device from the
CD given with that device.”
Touch screen controls the currently displayed image
on the screen. If “Embedded Computer” is being used
as source, touch screen controls the “Embedded
Computer”. If an external source is connected via
HDMI or VGA and chosen as the source then that
source is automatically selected.
WARNING:
To activate the touch screen feature of
the Interactive Board, the processing system should
be started.
WARNING:
If any drivers are missing or you require
technical support - please contact pj.support@
hitachi-eu.com.
Touch Screen Installation
3.1.1. About installation
1.
Before starting installation, ensure that all drivers
are installed correctly and USB are installed correctly.
The usage of standard drivers given by manufacturers
is recommended.
2.
The multi-spot touch screen should be connected
before installation.
3.
Close the antivirus programme and Trojan
preventing programme before installation (as 360
antivirus and 260 safeguard).
4.
If the used driver has been installed in the computer
before, please unload the installation completely and,
if needed, delete the old installation files.
5.
Standard USB extension cord should be used as
USB connector cable.
6.
If you use Windows XP processing system, you
should first install Microsoft.net Framework 2.0.
7.
After the VGA and HDMI connections of the screen
and server connections are unplugged and plugged
again, the USB connection of touch screen should
also be unplugged and plugged again. Otherwise,
touch system will not function properly.
8.
After the USB connection is ready, the driver will
be loaded automatically and the touch screen will be
ready to use.
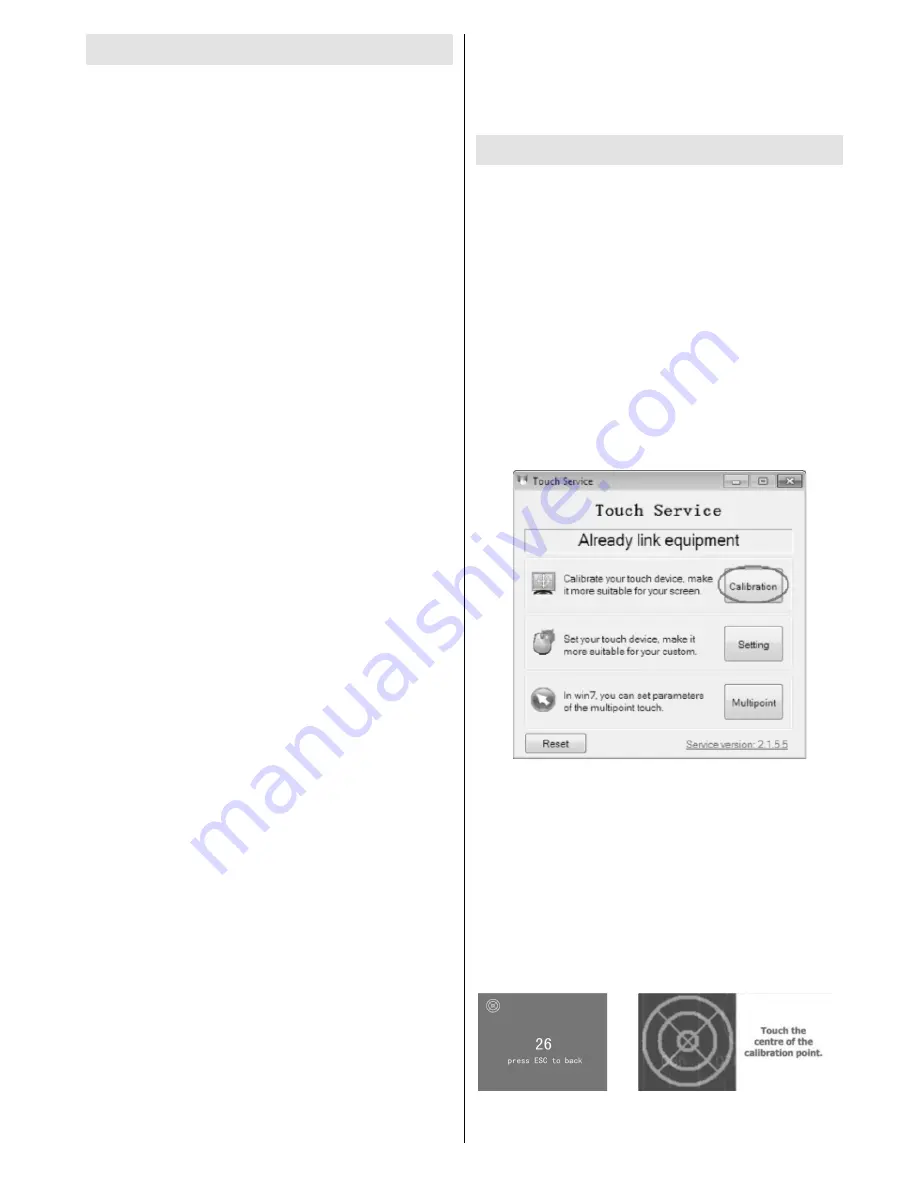
CALIBRATING THE TOUCH SCREEN
Function Description
1.
The coordinates of the touch panel and display
screen should be accurately matched by calibration.
2.
When will calibration be needed?
a)
The first time you have installed touch panel
bundled software.
b)
Inconsistency occurred between the mouse and
your finger action.
c)
After changing the touch panel or monitor.
d)
Having moved the touch panel or there is a change
in monitor resolution.
Operating steps
1.
Click “Calibration” on Touch Service main interface
2.
Touch the center of the calibration points shown
on the screen one by one with your finger in order
below (Figure 4-6). In total, there are four calibration
points. (Upper left corner→ upper right corner
→ lower right corner → lower left corner).
a)
The number in the center is the countdown. When
it comes to zero, you will automatically
exit the calibration without saving the result.
b)
Also, you can press ESC to exit the calibration
process without saving the result.


