Hitachi M 12SC Скачать руководство пользователя страница 3

2

PRECAUTIONS ON USING ROUTER
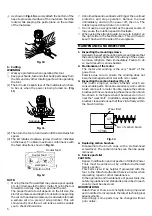
1.

Single-hand operation is unstable and dangerous.
Ensure that both handles are gripped firmly during
operation.

2.

The bit is very hot immediately after operation.
Avoid bare hand contact with the bit for any
reason.

SPECIFICATIONS

Voltage

230 V 

Power Input

900 W

Collet Chuck Capacity

12 mm / 8 mm

No-load speed

25000 / min

Weight (without cord and
standard accessories)

3.3 kg

(3) Dust collector set
Optional accessories are subject to change without notice.

APPLICATIONS

Woodworking jobs centered on grooving and
beveling.
For example, grooving beveling, cutting, copying,
engraving, shape cutting, combinations and others.

PRIOR TO OPERATION

1. Power source

Ensure that the power source to be utilized conforms
to the power requirements specified on the product
nameplate.

2. Power switch

Ensure that the power switch is in the OFF position.
If the plug is connected to a receptacle while the power
switch is in the ON position, the power tool will start
operating immediately, which could cause a serious
accident.

3. Extension cord

When the work area is removed from the power
source, use an extension cord of sufficient thickness
and rated capacity. The extension cord should be kept
as short as practicable.

STANDARD ACCESSORIES

(1) 8 mm Collet chuck ..................................................... 1
(2) Template guide .......................................................... 1
(3) Straight guide set ................................................ 1 set

1

Bar holder ........................................................... 1

2

Feed screw .......................................................... 1

3

Wing bolt ............................................................ 3

4

Guide bar ............................................................ 2

5

Straight guide ..................................................... 1

(4) 16 mm Wrench .......................................................... 1
(5) 23 mm Wrench .......................................................... 1
(6) Hex. bar wrench ........................................................ 1
(7) Hex. socket hd. bolt ................................................... 2
Standard accessories are subject to change without
notice.

OPTIONAL ACCESSORIES ... Sold separately

(1) Template Guide

(2) Chuck Sleeve

Bottom of Sub base

A

B

C

16.5 mm

18 mm

18.5 mm

20 mm

4.5 mm

25.5 mm

27 mm

28.5 mm

30 mm

d

D

20 mm

D

d

Shape of chuck sleeve

12 mm

6 mm

No groove

3 / 8”

1 groove

Содержание M 12SC

Страница 1: ...e Before using this Electric Power Tool carefully read through these HANDLING INSTRUCTIONS to ensure efficient safe operation It is recommended that these INSTRUCTIONS be kept readily available as an important reference when using this power tool ...

Страница 2: ...idents d Remove any adjusting key or wrench before turning the power tool on A wrench or a key left attached to a rotating part of the power tool may result in personal injury e Do not overreach Keep proper footing and balance at all times This enables better control of the power tool in unexpected situations f Dress properly Do not wear loose clothing or jewellery Keep your hair clothing and glov...

Страница 3: ...oduct nameplate 2 Power switch Ensure that the power switch is in the OFF position If the plug is connected to a receptacle while the power switch is in the ON position the power tool will start operating immediately which could cause a serious accident 3 Extension cord When the work area is removed from the power source use an extension cord of sufficient thickness and rated capacity The extensio...

Страница 4: ...reverse order INSTALLING THE MOTOR HOUSING WARNING Be sure to switch power OFF and disconnect the plug from the receptacle to avoid serious trouble 1 Installing the motor housing 1 Open the lever 2 While holding the base insert the motor housing into the base aligning the pin with the groove in the base 3 Confirm that the pin and the groove are aligning Rotate the motor housing clockwise into the ...

Страница 5: ... to the matters cescribed blow and illustrated in Fig 7 When using the router along the interior plane of the template the dimensions of the finished product will be less than the dimensions of the template by an amount equal to dimension A the difference between the radius of the template guide and the radius of the bit The reverse is frue when using the router along the exterior of the template ...

Страница 6: ...ht side in the feed direction This will help to keep it flush with the side of the workpiece MAINTENANCE AND INSPECTION 1 Inspecting the mounting screws Regularly inspect all mounting screws and ensure that they are properly tightened Should any of the screws be loose retighten them immediately Failure to do so could result in serious hazard 2 Maintenance of the motor The motor unit winding is the...

Страница 7: ...6 NOTE Due to HITACHI s continuing program of research and development the specifications herein are subject to change without prior notice ...

Страница 8: ...E 1 508 GUIDE BAR 2 509 WING BOLT M6 15 3 510 BAR HOLDER 1 511 FEED SCREW 1 512 STRAIGHT GUIDE SET INCLUD 507 511 1 ITEM NO PART NAME Q TY 1 MACHINE SCREW W WASHERS M4 55 3 2 MACHINE SCREW W WASHERS M4 8 1 3 HEAD COVER B 1 4A HEAD COVER A 1 5 MACHINE SCREW W WASHERS M4 16 2 6 CORD CLIP 1 7 MACHINE SCREW W SP WASHER M4 6 1 8 CORD ARMOR 1 9 CORD 1 10 CONNECTOR 50092 1 13 MACHINE SCREW W WASHERS M4 1...

Страница 9: ...8 ...

Страница 10: ...9 ...

Страница 11: ...10 ...

Страница 12: ...701 Code No C99133011 Printed in China Hitachi Koki Co Ltd ...

Отзывы: