background image

28

800.HITACHI 

(800.448.2244)

Monday ~ Friday

9:00 am - 6:00 pm EST

www.hitachi.us/tv

HITACHI AMERICA, LTD., DIGITAL MEDIA DIVISION

HITACHI has made every effort to assure you enjoy trouble free operation from your Hitachi

product.  Should you require service assistance with 

OPERATIONAL, HOOK UP, TECHNICAL 

ASSISTANCE OR WARRANTY SERVICE SUPPORT,

please contact 

800.HITACHI (800.448.2244).

Please be prepared to submit proof of purchase and/or delivery receipts to your 800.HITACHI 

Customer Service Representative.  Warranty coverage will be provided in accordance with the

provisions of your Limited Warranty (see the Limited Warranty page in this operating guide). 

Pour de plus amples renseignements sur le service durant la periode couverte par la garantie,

sur le fonctionnement ou pour de l'assistance techniquie communiquez avec:

Au Canada: 800.HITACHI (800.448.2244)

Lundi ~ Vendredi                 9:00 am - 6:00 pm HNE

Hitachi America, Ltd., Digital Media Division

Customer Service Support

P.O. Box 99652

Troy, MI 48099

[email protected]

Содержание LULLABABY BCM241T08

Страница 1: ...e call Toll Free 800 HITACHI 800 448 2244 or or visit our website at www hitachi us tv Keep this owner s guide for future reference Record the serial number of your Baby Monitor for future reference This information is located on the bottom of the camera unit Revision 11042014 Wireless Video Monitor with 2 4 Touch Panel Display Owner s Guide 2 36 Diagonal ENGLISH ESPA OL ...

Страница 2: ...ce WARNING TO PREVENT FIRE OR SHOCK HAZARD DO NOT EXPOSE THIS APPLIANCE TO RAIN OR MOISTURE TO PREVENT THE SPREAD OF FIRE KEEP CANDLES OR OPEN FLAMES AWAY FROM THIS PRODUCT AT ALL TIMES CAUTION TO PREVENT ELECTRIC SHOCK DO NOT USE THE AC PLUG WITH AN EXTENSION CORD RECEPTACLE OR OTHER OUTLET UNLESS THE BLADES CAN BE FULLY INSERTED TO PREVENT BLADE EXPOSURE E WASTE RECYCLE NOTICE This product may c...

Страница 3: ...iver Connect the equipment to an outlet on a circuit different from that to which the receiver is connected Consult the dealer or an experienced radio TV technician for help To comply with FCC RF exposure compliance requirements a separation distance of at least 8 inches must be maintained be tween the Camera unit of this device and all persons This product s transmitter must not be co located or ...

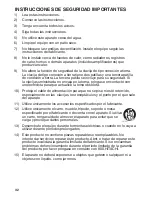
Страница 4: ...power cord from being walked on or pinched particularly at plugs convenience receptacles and the point where they exit from the product 11 Only use attachments accessories specified by the manufacturer 12 Use only with cart stand tripod bracket or table specified by the manufacturer or sold with the product if any When a cart is used use caution when moving the cart product combination to avoid in...

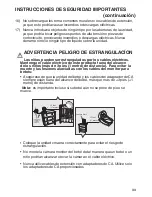
Страница 5: ...t of reach of children more than 3 feet 1 meter away at all times To prevent deaths and injuries associated with baby monitor cords Make sure the camera unit and AC adapter cords are always out of the reach of children more than 3 feet 1 meter away from reach at all times Note This is important even if your baby is not yet standing or mobile Position the wireless baby monitor camera properly to av...

Страница 6: ...ay also form during the summer if the product is exposed to the breeze from an air conditioner In such cases change the location of the product Declaration of Conformity This device complies with part 15 of the FCC Rules Operation is subject to the following two conditions 1 This device may not cause harmful interference and 2 This device must accept any interference received including interferenc...

Страница 7: ...x2 Owner s Guide Cable Clip x2 Wall Mount Template 9 10 11 1 2 3 4 7 6 8 5 Product Layout Camera Unit Fig 1 1 Antenna 2 Power Indicator LED 3 Lens 4 Microphone 5 Power Adapter Plug 6 Light Sensor 7 Night Light 8 Power Pairing button 9 Infrared LEDs 10 Speaker 11 Temperature sensor Fig 1 ...

Страница 8: ...icator LED 4 Microphone 5 VOX indicator LED 6 Sound level LEDs 7 Speaker 8 Antenna 9 LCD Screen Touch Panel 10 Menu button 11 Power Adapter Plug 12 Holder Stand 13 Built in rechargeable battery 3 7V 1100mAh Li ion 14 Internal shut down button 9 10 11 12 1 3 2 4 5 6 7 8 13 14 Fig 2 ...

Страница 9: ...button to turn on the camera The LED on the camera will light up RED Note Press and hold the POWER button for approximately 3 seconds to turn off the camera 1 2 Location Placement Place the camera in a convenient location making sure the unit and all cables are more that 3 feet beyond the baby s farthest reach Aim the lens at the intended observation area baby crib or playpen etc Fig 3 Fig 4 ...

Страница 10: ...dapter 2 Press the POWER button to turn on the display unit See Fig 5 Note The Display Unit battery pack is not user replaceable Using AC Power See Fig 6 1 Plug one end of the provided power adapter into a wall outlet 2 Connect the power adapter to the power adapter jack located on the left side of the display Note 1 When the display is powered on the Power LED will light up green Note 2 Press and...

Страница 11: ...ay unit Note When the display is turned ON and it is charging the battery status will show When charging is completed battery is fully charged the battery status will show When the display unit is powered off and it is charging the Power LED will be red When charging is completed battery is fully charged the Power LED will turn green ...

Страница 12: ...ature of the room it is in The temperature will then be shown on the screen of the Display Unit 2 3 Pairing The system comes with a camera unit that has already been paired with the display unit The pairing function gives each camera unit a separate channel on the display unit This is necessary for configuring additional camera units To configure pair additional cameras refer to page 20 3 11 Add c...

Страница 13: ...70 1 F 70 1 2 3 4 1 F Fig 8 2 5 Status Information The status bar will be displayed on the top of the screen See Fig 8 1 Camera number 2 Signal strength 3 Temperature Camera side 4 Battery status Charging ...

Страница 14: ...menu on the screen touch panel See Fig 10 1 Brightness Setting 2 Volume Setting Display unit 3 Camera Selection 4 Temperature Setting 5 Voice Activation VOX Function 6 Next Page 7 Volume Setting Camera 8 Music Function 9 Night Light Setting 10 Previous Page 11 Light Source Setting 12 Delete Camera 13 Add Camera 14 Flip Function 15 Restore Default ...

Страница 15: ... 1 Brightness Setting In this submenu you can adjust the brightness of the screen See Fig 11 3 2 Volume Setting Display unit In this submenu you can adjust the volume level on the display unit See Fig 12 Fig 11 Fi ...

Страница 16: ... of the temperature alert When the temperature exceeds the set range and the temperature alert feature is enabled the temperature indicator on the display unit will blink If you enable the temperature alert feature the alert icon will light up and a warning sound will be emitted when the tempera ture exceeds the set range See Fig 15 Note The lowest range left side is between 32 F to 77 F 0 C to 25...

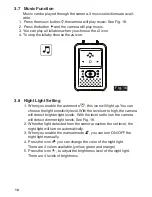
Страница 17: ...e to high volume sounds See Fig 16 2 When you enable the VOX on the display unit the icon LED will light up Press the menu button to finalize the settings and return to the display screen The VOX LED will be blue indicating that the VOX feature is ON 3 The screen will turn off within 10 seconds and enter the power saving mode 4 When the sound from the camera reaches the set level the screen will t...

Страница 18: ...oose the light sensitivity level With the level set to high the camera will detect brighter light levels With the level set to low the camera will detect dimmer light levels See Fig 19 2 When the light detected from the camera reaches the set level the night light will turn on automatically 3 When you enable the manual mode you can turn ON OFF the night light manually 4 Press the icon you can chan...

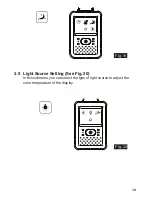
Страница 19: ...19 Fig 19 3 9 Light Source Setting See Fig 20 In this submenu you can select the type of light source to adjust the color temperature of the display Fig 20 ...

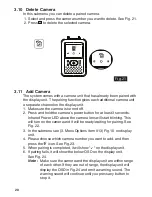
Страница 20: ...red Power LED above the camera lens will start blinking This will turn on the camera and it will be ready waiting for pairing See Fig 22 3 In the submenu see 3 Menu Options item 13 Fig 10 on display unit 4 Please choose which camera number you want to add and then press the icon See Fig 23 5 When pairing is completed it will show on the display unit 6 If pairing fails it will show the below OSD on...

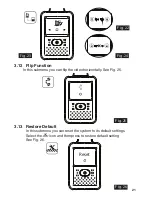
Страница 21: ...ou can flip the video horizontally See Fig 25 3 13 Restore Default In this submenu you can reset the system to its default settings Select the icon and then press to restore default setting See Fig 26 Fig 25 Fig 23 Fig 22 Fig 24 Reset Fig 26 ...

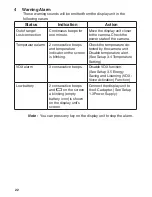
Страница 22: ...indicator on the screen is blinking Check the temperature de tected by the camera unit Disable temperature alert See Setup 3 4 Temperature Setting VOX alarm 3 consecutive beeps Disable VOX function See Setup 3 5 Energy Saving and Listening VOX Voice Activation Function Low battery 2 consecutive beeps and on the screen a blinking empty battery icon is shown on the display unit s screen Connect the ...

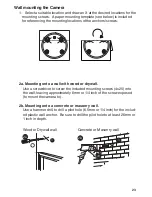
Страница 23: ... wall with wood or drywall Use a screwdriver to screw the included mounting screws 4x25 into the wall leaving approximately 6mm or 1 4 inch of the screw exposed to mount the camera to 2b Mounting onto a concrete or masonry wall Use a hammer drill to drill a pilot hole 6 5mm or 1 4 inch for the includ ed plastic wall anchor Be sure to drill the pilot hole to at least 26mm or 1 inch in depth 1 2b 1 ...

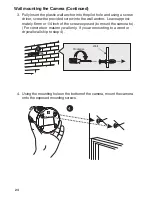
Страница 24: ...provided screw into the wall anchor Leave approxi mately 6mm or 1 4 inch of the screw exposed to mount the camera to For concrete or masonry wall only If you are mounting to a wood or drywall wall skip to step 4 4 Using the mounting hole on the bottom of the camera mount the camera onto the exposed mounting screws Wall Clockwise 3 4 ...

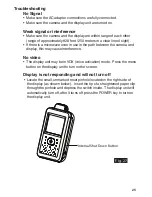
Страница 25: ...n the camera and display this may cause interference No video The display unit may be in VOX voice activation mode Press the menu button on the display unit to turn on the screen Display is not responding and will not turn off Locate the small unmarked reset pinhole located on the right side of the display as shown below Insert the tip of a straightened paper clip through the pinhole and depress t...

Страница 26: ... or store in dusty or dirty areas Do not store in hot areas High temperatures can shorten the life of electronic devices and warp or melt certain plastics Do not store in very cold areas Moisture can form inside the case which may damage electronic circuit boards Do not attempt to open the case Non expert handling of the de vice may damage the system Avoid dropping or strong shocks Operate this pr...

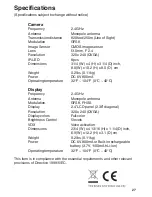
Страница 27: ...00mA Operating temperature 32 F 104 F 0 C 40 C Display Frequency 2 4 GHz Antenna Monopole antenna Modulation GFSK FHSS Display 2 4 LCD panel 2 36 diagonal Resolution 320 x 240 QVGA Display colors Full color Brightness Control 5 levels VOX Voice activation Dimensions 2 3 4 W x 4 13 16 H x 1 1 4 D inch 6 9 W x 12 2 H x 3 1 D cm Weight 0 2 lbs 0 11kg Power DC 6V 800mA or Built in rechargeable battery...

Страница 28: ...of of purchase and or delivery receipts to your 800 HITACHI Customer Service Representative Warranty coverage will be provided in accordance with the provisions of your Limited Warranty see the Limited Warranty page in this operating guide Pour de plus amples renseignements sur le service durant la periode couverte par la garantie sur le fonctionnement ou pour de l assistance techniquie communique...

Страница 29: ...ct or damage caused by exposure to hostile or unstable operating environments such as areas containing dust and or smoke or in any manner other than those identified as acceptable in the Product s Owner s Guide e damage caused by power surges accidents natural disasters occurrences or any other events or circumstances outside Hitachi s control f any Product used in any manner inconsistent with the...

Страница 30: ...ÁCULO U OTRA TOMA DE CORRIENTE A MENOS QUE LOS CONDUCTORES SE PUEDAN INSERTAR COMPLETAMENTE PARA EVITAR LA EXPOSICIÓN DE LOS CONTACTOS E WASTE RECICLA AVISO Este producto puede contener plomo y debe ser eliminado o reciclado de acuerdo con los desechos electrónicos locales e waste leyes Para obtener información sobre reciclado y desecho del producto póngase en contacto con su agencia gubernamental...

Страница 31: ...N RAZONABLE CONTRA INTERFER ENCIAS PERJUDICIALES EN UNA INSTALACIÓN RESIDENCIAL ESTE EQUIPO GENERA O EMPLEA ENERGÍA DE RADIOFRECUENCIA Y SI NO ES INSTALADO Y EMPLEADO DE ACUERDO CON ESTAS INSTRUCCIONES PUEDE CAUSAR INTERFERENCIAS PERJUDICIALES A LAS RADIOCOMUNICACIONES SIN EMBARGO NO GARANTIZAMOS QUE NO OCURRIRÁN INTERFERENCIAS EN UNA INSTALACIÓN EN PARTICULAR SI ESTE EQUIPO CAUSA INTERFER ENCIAS ...

Страница 32: ...ión para que no se pise ni esté retorcido especialmente en las clavijas los receptáculos y el punto por el que sale del aparato 11 Utilice únicamente los accesorios especificados por el fabricante 12 Utilice únicamente el carro mueble trípode soporte o mesa especificado por el fabricante o de venta con el aparato Si utiliza un carro tenga cuidado al mover el aparato para evitar que se caiga y prov...

Страница 33: ...able eléctrico de este producto fuera del alcance de los niños más de 3 pies 1 metro de distancia Para evitar la muerte y las lesiones asociadas con los cables del monitor para bebés Asegúrese de que la unidad del bebé y los cables del adaptador de CA siempre están fuera del alcance del bebé más que más de 3 pies 1 metro de distancia Nota es importante incluso si su bebé aún no se pone de pie o se...

Страница 34: ...to a una corriente de aire del acondicionador de aire En estos casos cambie el lugar donde está instalada la unidad Declaración de Conformidad Este dispositivo cumple con el Apartado 15 de las normas de la FCC El funcionamiento está sujeto a las dos condiciones siguientes 1 Este dispositivo no deberá causar interferencias perjudiciales y 2 Este dispositivo deberá aceptar cualquier interferencia qu...

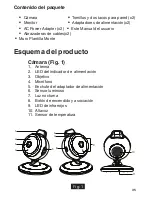
Страница 35: ...ario Abrazaderas de cables x2 Muro Plantilla Monte 9 10 11 1 2 3 4 7 6 8 5 Esquema del producto Cámara Fig 1 1 Antenna 2 LED del indicador de alimentación 3 Objetivo 4 Micrófono 5 Enchufe del adaptador de alimentación 6 Sensor luminoso 7 Luz nocturna 8 Botón de encendido y asociación 9 LED de infrarrojos 10 Altavoz 11 Sensor de temperatura Fig 1 ...

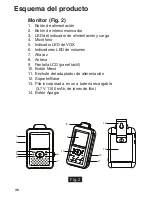
Страница 36: ...n y carga 4 Micrófono 5 Indicador LED de VOX 6 Indicadores LED de volumen 7 Altavoz 8 Antena 9 Pantalla LCD panel táctil 10 Botón Menú 11 Enchufe del adaptador de alimentación 12 Soporte Base 13 Pila incorporada en una batería recargable 3 7 V 1100 mAh de iones de litio 14 Botón Apagar 9 10 11 12 1 3 2 4 5 6 7 8 13 14 Fig 2 ...

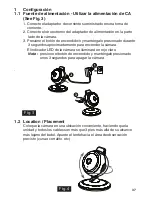
Страница 37: ...galo presionado durante 3 segundos aproximadamente para encender la cámara El indicador LED de la cámara se iluminará en rojo claro Nota presione el botón de encendido y manténgalo presionado unos 3 segundos para apagar la cámara 1 2 Location Placement Coloque la cámara en una ubicación conveniente haciendo que la unidad y todos los cables son más que 3 pies más allá de su alcance más lejano del b...

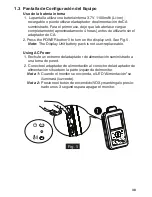
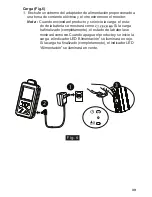
Страница 38: ...2 Press the POWER button to turn on the display unit See Fig 5 Note The Display Unit battery pack is not user replaceable Using AC Power 1 Enchufe un extremo del adaptador de alimentación suministrado a una toma de pared 2 Conecte el adaptador de alimentación al conector del adaptador de alimentación situado en la parte izquierda del monitor Nota 1 Cuando el monitor se encienda el LED Alimentación...

Страница 39: ...a Cuando encienda el producto y se inicie la carga el esta do de la batería se mostrará como Si la carga ha finalizado completamente el estado de la batería se mostrará como Cuando apague el producto y se inicie la carga el indicador LED Alimentación se iluminará en rojo Si la carga ha finalizado completamente el indicador LED Alimentación se iluminará en verde ...

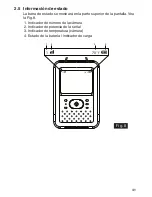
Страница 40: ... indicador de temperatura ambiente se mostrará en la pantalla de la unidad del monitor 2 3 Asociación El sistema incluye una unidad de cámara que ya se ha asociado con la unidad del monitor La función de asociación proporciona a cada uni dad de cámara un canal independiente en la unidad del monitor Esto es necesario para configurar las unidades de cámaras adicionales Para configurar cámaras adicio...

Страница 41: ...ación de estado La barra de estado se mostrará en la parte superior de la pantalla Vea la Fig 8 1 Indicador de número de la cámara 2 Indicador de potencia de la señal 3 Indicador de temperatura cámara 4 Estado de la batería Indicador de carga ...

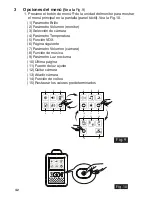
Страница 42: ...en la pantalla panel táctil Vea la Fig 10 1 Parámetro Brillo 2 Parámetro Volumen monitor 3 Selección de cámara 4 Parámetro Temperatura 5 Función VOX 6 Página siguiente 7 Parámetro Volumen cámara 8 Función de música 9 Parámetro Luz nocturna 10 Última página 11 Fuente de luz ajuste 12 Quitar cámara 13 Añadir cámara 14 Función de volteo 15 Restaurar los valores predeterminados ...

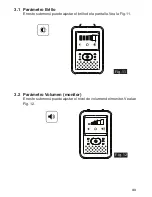
Страница 43: ...12 3 1 Parámetro Brillo En este submenú puede ajustar el brillo de la pantalla Vea la Fig 11 3 2 Parámetro Volumen monitor En este submenú puede ajustar el nivel de volumen del monitor Vea lae Fig 12 Fig 11 Fi ...

Страница 44: ... temperatura de la alerta CCuando la temperatura supera el rango establecido y la función de alerta de temperatura está activada el indicador de la temperatura en la unidad de pantalla parpadeará Si activa la función de alerta de temperatura en el icono de alerta se encenderá y un sonido de advertencia se emite cuando la temperatura excede el rango estab lecido Vea la Fig 15 Nota El intervalo más ...

Страница 45: ...n de menú para volver a la pantalla de visualización para completar la configuración El LED VOX perman ecerá encendido azul claro 3 Esto desactiva la pantalla en un plazo de 10 segundos y se activa el modo de ahorro de energía 4 Cuando el sonido de la cámara alcance el nivel establecido la pan talla se activará automáticamente y la unidad del monitor emitirá un sonido de advertencia 3 6 Parámetro ...

Страница 46: ...l icono se iluminará Puede elegir el nivel de sensibilidad Con el nivel establecido en alto se de tectará la luz más intensa Vea la Fig 19 2 Cuando la luz procedente de la cámara alcance el nivel establecido la luz nocturna se activará según la configuración 3 Cuando habilite el modo manual podrá activar o desactivar la luz nocturna según la configuración 4 Presione el icono para cambiar el color ...

Страница 47: ...el tipo de fuente de luz para ajustar la temperatura de color de la pantalla 3 10 Quitar cámara En este submenú puede eliminar una cámara asociada 1 Presione el número de cámaras que desea eliminar Vea la Fig 21 2 Presione para llevar a cabo la eliminación Fig 19 Fig 21 Fig 20 ...

Страница 48: ...l monitor El LED de alimentación se iluminará verde 3 En el submenú vea la 3 Opciones del menú del artículo 13 Fig10 del monitor 4 Elija el número de cámaras que desea agregar y a continuación presione el icono Vea la Fig 23 4 La asociación se ha completado Se mostrará en el monitor 5 La asociación ha fallado Se mostrará la imagen en el monitor Vea la Fig 24 Nota Asegúrese de que la cámara y el mo...

Страница 49: ...ar el vídeo horizontalmente cuando in stale la cámara en el techo Vea la Fig 25 3 13 Restaurar los valores predeterminados En este submenú puede restablecer los valores predeterminados del sistema Presione para asegurarse Vea la Fig 26 Fig 25 Reset Fig 26 ...

Страница 50: ...cutivos e indicador de tem peratura intermitente en la pantalla Compruebe la temperatura de la cámara Deshabilite la alerta de temperatura con sulte la sección de configura ción 3 4 Alarma de VOX 3 pitidos consecutivos Deshabilite la función VOX consulte la sección de configuración 3 5 Batería con poca carga 2 pitidos consecutivos y intermitente en la pantalla Conecte el monitor al adaptador de CA...

Страница 51: ... anclaje tornillo 2a Montaje en una pared de madera o paneles de yeso Utilice un destornillador para atornillar el tornillo de montaje incluido M3x10 en la pared dejando approximatelty 6mm o 1 4 de pulgada del tornillo expuesto para montar la cámara 2b Montaje en una pared de concreto Utilice un taladro de martillo para perforar un orificio guía 6 5 mm o de 1 4 pulgadas para el anclaje de pared de...

Страница 52: ...illo suministrado en el anclaje de pared Deje aproximadamente 6 mm o 1 4 de pulgada del tornillo expuesto para montar la cámara Para uso en pared de concreto o block solamente si va a montar en una pared de madera o paneles de yeso vaya directamente al paso 4 4 Usando el orificio de montaje en la parte inferior de la cámara mon tar la cámara en el tornillo de montaje ...

Страница 53: ...cance uno del otro alcance de aproximadamente 250 metros 820 pies en na línea clara de visión No hay vídeo El monitor puede estar en VOX activado de voz modo Pulse el botón VOX en el vigilar para encender la pantalla El monitor no responde y no se apaga Localice el orificio pequeño de reinicio en la parte posterior de la pan talla como se muestra más abajo Inserte un clip a través del agujero y pr...

Страница 54: ...spositivos en áreas donde la temperatura sea elevada Las altas temperaturas pueden reducir la vida útil de los dispositivos electrónicos y deformar o derretir ciertos plásticos No almacene los dispositivos en zonas donde la temperatura sea baja Cuando el sistema se calienta hasta su temperatura nor mal se puede formar humedad dentro de la cubierta que puede dañar placas del circuito No intente abr...

Страница 55: ...mperatura de operación 32 F 104 F 0 C 40 C Monitor Frecuencia 2 4 GHz Antena Monopole antenna Modulación GFSK FHSS Tipo de pantalla 2 4 LCD panel 2 36 diagonol Resolución 320 x 240 QVGA Colores de pantalla Full color Control de brillo 5 levels VOX Voice activation Dimensiones 6 9 W x 12 2 H x 3 1 D cm 2 3 4 W x 4 13 16 H x 1 1 4 D inch Peso 0 11kg 0 2 lbs Fuente de alimentación DC 6V 800mA or pila...

Страница 56: ...minos establecidos en la garantía limitada consulte la página Garantía limitada de este manual de usuario Pour de plus amples renseignements sur le service durant la période couverte par la garantie sur le fonctionnement ou pour de l assistance technique communiquez avec Au Canada 800 HITACHI 800 448 2244 Lundi Vendredi 9 00 am 6 00 pm HNE Hitachi America Ltd Digital Media Division Customer Servic...

Страница 57: ...57 Memo ...

Страница 58: ...58 Memo ...

Страница 59: ...59 Memo ...

Отзывы: