background image


Displaying DAB Station Information 

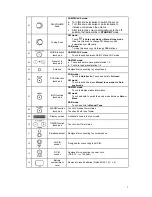
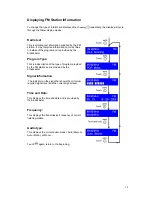
It is possible to change the type of information that is displayed on the second line of the 
display when listening to a DAB station. There are five types of information available as listed 
below with examples on the right.  

To change the information displayed touch 


 repeatedly, the display will cycle through 

the follow display modes. 


Dynamic Label Segment:  

This is scrolling text information supplied by the DAB 
station. It may comprise information on music titles or 
details of the programme and is provided by the 
broadcaster. 

Program Type: 

This is a description of the type of programme 
provided by the DAB station and is provided by the 
broadcaster. 

Multiplex Name: 

This will show the multiplex name that is broadcasting 
the programme name you are listening to. 

Signal Information: 

 The indicator on the signal bar shows the minimum 
required signal level and the current signal level. 

Time and Date: 

This displays the time and date and is provided by the 
broadcaster. 
 

Touch 


 again, return to first browse. 


Secondary Services 
 

You may see a ">" symbol after the name of the station, this indicates that there are secondary 
services available to that station. These secondary services contain extra services that are 
related to the primary station. E.g. A sports station may want to add extra commentaries. The 
secondary services are inserted directly after the primary station in the station list. To select the 
secondary station, turn the Tuning Knob when the ">" appears in the LCD before the station 
name. When the secondary service ends, the radio will automatically switch back to the primary 
station. 

11 

Содержание KH 322

Страница 1: ...Instruction Manual KH 322 Design DAB FM RDS Tabletop Radio ...

Страница 2: ...in moderate climates Operate turning controls and switches as instructed in the manual Before turning on the power for the first time make sure the power cord is properly installed For safety reasons do not remove any covers or attempt to gain access to the inside of the product Refer any servicing to qualified personnel Do not attempt to remove any screws or open the casing of the unit there are ...

Страница 3: ...e placed on the equipment DON T place hot objects or naked flame sources such as lighted candles or nightlights on or close to equipment High temperatures can melt plastic and lead to fires DON T use equipment such as personal stereos or radios so that you are distracted from the requirements of traffic safety DON T listen to headphones at high volume as such use can permanently damage your hearin...

Страница 4: ...Show the Signal Strength in DAB mode 10 Displaying DAB Station Information 11 DAB Menu Controls 12 Setting DAB FM Station Presets 13 Selecting a Preset DAB FM station 13 How to Reset Radio and show Software version 13 FM mode 14 How to tune in FM Radio Stations 14 How to search FM Radio Stations Manually 14 How to search FM Radio Stations Automatically 14 Displaying FM Station Information 15 FM Me...

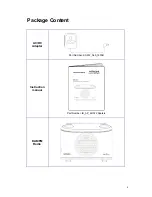
Страница 5: ...Package Content AC DC Adapter Part Number KSS12_065_1800B Instruction manual Part Number IB_AP_KH322 Sparkle DAB FM Radio 5 ...

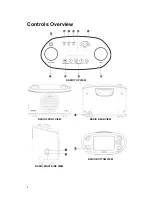
Страница 6: ...Controls Overview RADIO TOP VIEW RADIO FRONT VIEW RADIO REAR VIEW RADIO RIGHT SIDE VIEW RADIO BOTTOM VIEW 6 ...

Страница 7: ...station 1 4 05 Antenna Designed for connecting to your antenna 06 SCAN function touch pad DAB mode Touch to Quick scan Touch and hold to Full scan FM mode Touch to switch between Manual tune mode and Auto seek mode 07 INFO function touch pad DAB FM mode Touch to display station information FM mode Touch and hold to switch the audio mode between Auto or Mono DAB mode Touch and hold to Manual Tune 0...

Страница 8: ...ove the battery compartment cover at the bottom of the radio 3 Insert 4 new D size batteries referring to the polarity markings inside the battery compartment Note Before installing batteries ensure that the radio is disconnected from the mains supply If you are not going to use the radio for an extended period please remove the batteries to avoid damage Never mix old and new batteries DAB Mode 1 ...

Страница 9: ...in memory A slide bar is displayed on the LCD indicating the progress of the scan Once the scanning is completed the DAB station name list will be displayed in alphanumeric order The first station in the list will be selected Turn the Tuning Knob to cycle through available stations when your desired station appears stop turning your radio will tune to the selected station Note If no DAB signal is ...

Страница 10: ...een the channels when the desired channel appears stop turning Note If there is a multiplex corresponding to this channel number and frequency the display will show the multiplex name and a tuning meter showing the signal strength 3 Touch again to exit To Show the Signal Strength in DAB mode Repeat touching until the LCD screen display shows a signal bar with the strength of the current station No...

Страница 11: ...l show the multiplex name that is broadcasting the programme name you are listening to Signal Information The indicator on the signal bar shows the minimum required signal level and the current signal level Time and Date This displays the time and date and is provided by the broadcaster Touch again return to first browse Secondary Services You may see a symbol after the name of the station this in...

Страница 12: ...DAB Menu Controls ...

Страница 13: ...tation 1 To select a stored DAB FM station first enter corresponding mode by touching 2 Then touch the corresponding preset touch pad Æ that you have stored your radio will tune to that station immediately 3 If the preset has not been allocated a station Preset empty will be displayed on the LCD How to Reset Radio and show Software version 1 Touch and hold will show software version 2 Touch again ...

Страница 14: ...op turning your radio will tune to that station immediately 4 To search the next active station please keep turning the Tuning Knob How to search FM Radio Stations Automatically 1 Touch twice and Auto seek mode appears 2 Turn the Tuning Knob clockwise or anti clockwise your radio will scan upward downward from the current frequency automatically Note During this step touch any button will pause th...

Страница 15: ...aster Program Type This is a description of the type of program provided by the FM station and is provided by the broadcaster Signal Information The indicator on the signal bar shows the minimum required signal level and the current signal level Time and Date This displays the time and date and is provided by the broadcaster Frequency This displays the transmission Frequency of current istening st...

Страница 16: ...FM Menu Controls 16 ...

Страница 17: ...1 Touch until AUX mode is appeared 2 Connect one end of the audio lead not provided to the headphone or auxiliary out socket of your source device the other end connect to AUX IN socket on the right side of radio 3 To gain optimal volume level adjust the output volume level on both the source device and the radio 17 ...

Страница 18: ...onfirm your radio will automatically exit Alarm setting mode 5 Touch to check its status 6 Turn the ON VOLUME Knob anti clockwise to enter STANDBY mode alarm icon will appear Note In STANDBY mode when alarm is coming radio screen will be twinkling but the sound level is low 7 When Alarm is coming touch any button to deactivate it The radio will start to count down from the snooze period set Note a...

Страница 19: ... minutes 1 Touch once to increase by 1 minute touch and hold to increase faster 2 Touch once to decrease by 1 minute touch and hold to decrease faster Alarm will be activated once the preset time passes Touch any button to deactivate it 3 To clear the timer a Touch both together b Alternatively repeat touching to decrease Timer to 0 19 ...

Страница 20: ...d at National Rate If you require a replacement for any of the items listed below please quote their corresponding part numbers Replacement Part Part Number AC DC Adapter KSS12_065_1800B IB_AP_KH322 Sparkle Instruction Manual The mark is in compliance with the Waste Electrical and Electronic Equipment Directive 2002 96 EC WEEE The mark indicates the requirement NOT to dispose the equipment includi...

Отзывы: