background image

6

English

2. Power switch

Ensure that the power switch is in the OFF position.
If the plug is connected to a receptacle while the
power switch is in the ON position, the power tool
will start operating immediately, which could cause
a serious accident.

3. Extension cord

When the work area is removed from the power
source, use an extension cord of sufficient thickness
and rated capacity. The extension cord should be
kept as short as practicable.

4. Installing Tools
CAUTION

Be sure to switch power OFF and disconnect the
plug from the receptacle to avoid serious trouble.

NOTE

When using tools such as bull points, cutters, etc.,
make sure to use the genuine parts designated by
our company.

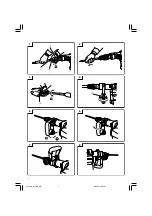
(1) Clean the shank portion of the tool.
(2) As shown in 

Fig. 1

, pull grip (A) in the direction of

A

  , and insert the tool into a hole of the front cap.

(3) Adjust the groove position while turning the tool, and

furthermore insert it until it hits the end of the hole.

(4) Return grip (A) to its original position, pull the tool

and make sure it is locked completely (

Fig. 2

).

5. Deciding Working Position of Tool

The tool can be turned every 30 degrees and can
be fixed at the position of 12 steps.

(1) As shown in 

Fig. 3

, if the grip (A) is turned in the

direction of 

B

  in a state where the grip (B) is

pushed in the direction of 

A

, the blade angle can

be changed freely to any desired position.

(2) Release grip (B) and turn the tool, and make sure

that it is locked completely.

6. Removing Tool

As shown in 

Fig. 1

, pull grip (A), and pull out the

tool.

CAUTION

Be sure to grip the handle and side handle during
work. Do not hold by the grip (A) during work. If
you pull it by mistake, the bull point could jump out.

7. Move the side handle

  For bar type handle

Fixing the side handle (Fig. 4)

(1) Rotate the side handle in a clockwise direction to

secure it.

(2) Set the side handle to a position that is suited to

the operation and then securely tighten the side
handle.

  For D type handle

The side handle can be fixed at any desired position;
360 degrees, and can also be fixed at any position
in the back-and-forth direction.

(1) Loosen the handle by turning the grip in the direction

of 

A

  as shown in 

Fig. 5

.

(2) Adjust it to a position where vertical (up-and-down)

operation can be facilitated as illustrated in 

Fig. 6

,

Fig. 7

, and 

Fig. 8

.

(3) Turn the grip in the direction of 

B

  and fix the

handle.

HOW TO USE THE DEMOLITION HAMMER
(Fig. 9)

1. After placing the tip of the tool on concrete surface,

switch ON.
The switch can be turned ON if the trigger is pulled
and OFF when it is released.
If the stopper is pressed while the trigger for the
switch is pulled, even if your finger is released from
the trigger, the switch remains ON - convenient for
continuous operation.
To turn the switch OFF, pull the trigger again, and
then the stopper comes off.

2. By utilizing the empty weight of the machine and

by firmly holding the demolition hammer with both
hands, one can effectively control the subsequent
recoil motion.
Proceed at a moderate work-rate, the use of too
much force will impair efficiency.

CAUTION

After long time of use, the cylinder case becomes
hot. Therefore, be careful not to burn your hands.

GREASE REPLACEMENT

This machine is of full air-tight construction to protect
against dust and to prevent lubricant leakage. This
machine can be used without grease supplement for an
extended period of time.  However, perform the grease
replacement to maintain the service life. Replace the
grease as described below.

1. Grease Replacement Period

You should look at the grease when you change
the carbon brush (See item 4 in the section
MAINTENANCE AND INSPECTION).
Ask for grease replacement at the nearest Hitachi
Authorized Service Center.
In the case that you are forced to change the grease
by yourself, please follow the following points.

2. How to replace grease
CAUTION

Before replacing the grease, turn the power off and
pull out the plug from the receptacle.

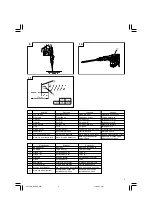
(1) Remove the crank cover and wipe off the old grease

inside. (

Fig. 10

)

(2) Supply 76 g (the standard volume to cover the

connecting rod) of Hitachi Electric Hammer Grease
A to the crank case.

(3) After replacing the grease, install the crank cover

securely. At this time, do not damage or lose the
oil seal.

NOTE

The Hitachi Electric Hammer Grease A is of the low
viscosity type. When the grease is consumed,
purchase from the Hitachi Authorized Service
Center.

MAINTENANCE AND INSPECTION

CAUTION

Be sure to switch power OFF and disconnect the
plug from the receptacle to avoid serious trouble.

1. Inspecting the tool

Since use of a dull tool will degrade efficiency and
cause possible motor malfunction, sharpen or
replace the tool as soon as abrasion is noted.

 01Eng_H60MC_WE

11/26/10, 9:32

6

Содержание H 60MC

Страница 1: ...erstand these instructions before use Diese Anleitung vor Benutzung des Werkzeugs sorgfältig durchlesen und verstehen Lire soigneusement et bien assimiler ces instructions avant usage Prima dell uso leggere attentamente e comprendere queste istruzioni Deze gebruiksaanwijzing s v p voor gebruik zorgvuldig doorlezen Leer cuidadosamente y comprender estas instrucciones antes del uso Antes de usar lei...

Страница 2: ...1 1 2 3 6 7 8 4 5 A B 6 5 3 4 A B 3 2 1 A 00Table_H60MC_WE 2 29 12 3 48 PM 1 ...

Страница 3: ... carbone Auto stop carbon brush Auto Stop Kohlebürest Balai en carbone à arrêt Spazzola di carbone ad automatique arresto automatico Nederlands Español Português Boorschacht Barrena Haste da ferramenta Voorkap Tapa frontal Tampa frontal Greep A Empuñadura A Cabo A Greep B Empuñadura B Cabo B Zijgreep Mango lateral Empunhadura lateral Greep Empuñadura Cabo Bedekking Cubierta del motor Proteção da m...

Страница 4: ...96 EC on waste electrical and electronic equipment and its implementation in accordance with national law electric tools that have reached the end of their life must be collected separately and returned to an environmentally compatible recycling facility Nur für EU Länder Werfen Sie Elektrowerkzeuge nicht in den Hausmüll Gemäss Europäischer Richtlinie 2002 96 EG über Elektro und Elektronik Altgerä...

Страница 5: ...king up or carrying the tool Carrying power tools with your finger on the switch or energising power tools that have the switch on invites accidents d Remove any adjusting key or wrench before turning the power tool on A wrench or a key left attached to a rotating part of the power tool may result in personal injury e Do not overreach Keep proper footing and balance at all times This enables bette...

Страница 6: ...de handle 10 2 kg Be sure to check the nameplate on product as it is subject to change by areas 1 Bushing Tool 2 Shank 1 Bull Point Overall Length 280 400 mm 1 Scoop 1 Cutter 1 Rammer 2 Shank 1 Cold chisel Overall length 280 400 mm DEMOLITION HAMMER SAFETY WARNINGS 1 Wear ear protectors Exposure to noise can cause hearing loss 2 Use auxiliary handle s if supplied with the tool Loss of control can ...

Страница 7: ... illustrated in Fig 6 Fig 7 and Fig 8 3 Turn the grip in the direction of B and fix the handle HOW TO USE THE DEMOLITION HAMMER Fig 9 1 After placing the tip of the tool on concrete surface switch ON The switch can be turned ON if the trigger is pulled and OFF when it is released If the stopper is pressed while the trigger for the switch is pulled even if your finger is released from the trigger t...

Страница 8: ...ulation This guarantee does not cover defects or damage due to misuse abuse or normal wear and tear In case of complaint please send the Power Tool undismantled with the GUARANTEE CERTIFICATE found at the end of this Handling instruction to a Hitachi Authorized Service Center NOTE Due to HITACHI s continuing program of research and development the specifications herein are subject to change withou...

Страница 9: ...e Elektrowerkzeuge wenn Sie müde sind oder unter Einfluss von Drogen Alkohol oder Medikamenten stehen Bei der Arbeit mit Elektrowerkzeugen können bereits kurze Phasen der Unaufmerksamkeit zu schweren Verletzungen führen b Benutzen Sie eine persönliche Schutzausrüstung Tragen Sie immer einen Augenschutz Schutzausrüstung wie Staubmaske rutschsichere Sicherheitsschuhe Schutzhelm und Gehörschutz senke...

Страница 10: ...chen Kabel oder Kabelrohre darunter liegen 6 Tragen Sie eine Schutzmaske wenn Sin nach oben hin arbeiten 7 Stellen Sie den Bohrerhalter korrekt ein 8 Vergewissern Sie sich vor der Arbeit daß die Schrauben richting festgezogen sind 9 Geben Sie acht auf untenstehende Leute und Gegenstände wenn Sie an einem weit erhöhten Platz arbeiten 10 Tragen Sie Sicherheitsschuhe um Verletzungen der Füße zu verme...

Страница 11: ...nen fixiert werden 1 Wie in Abb 3 gezeigt kann der Scneidenwinkel frei zu jeder beliebigen Position geändert werden wenn der Griff A in Richtung B gedrückt wird während der Griff B in Richtung A gedrückt wird 2 Geben Sie den Griff B frei und drehen Sie das Werkzeug um sicherzustellen daß es sicher verriegelt ist 6 Entfernen des Werkzeugs Ziehen Sie wie in Abb 1 gezeigt am Griff A und ziehen Sie da...

Страница 12: ...ren führen 3 Wartung des Motors Die Motorwicklung ist das HERZ des Elektrowerkzeugs Daher ist besonders sorgfältig darauf zu achten daß die Wicklung nicht beschädigt wird und oder mit Öl oder Wasser in Berührung kommt 4 Inspektion der Kohlebürsten Abb 11 Im Motor sind Kohlebürsten verwendet die Verbauchsteile sind Wenn sie abgenützt sind kann es zu Motorschäden führen Wenn der Motor mit einer Auto...

Страница 13: ...ng der Aussetzung benutzt werden WARNUNG 䡬 Der Vibrationsemissionswert während der tatsächlichen Benutzung des Elektrowerkzeugs kann von dem deklarierten Gesamtwert abweichen abhängig davon wie das Werkzeug verwendet wird 䡬 Legen Sie Sicherheitsmaßnahmen zum Schutz des Bedieners fest die auf einer Expositionseinschätzung unter den tatsächlichen Benutzungsbedingungen beruhen unter Berücksichtigung ...

Страница 14: ...blessures graves b Utiliser un équipement de protection individuelle Toujours porter des verres de protection L utilisation d équipements de protection tels que les masques anti poussière les chaussures de sécurité anti dérapantes les casques ou les protections auditives dans des conditions appropriées réduisent les risques de blessures c Empêcher les démarrages intempestifs Veiller à ce que l int...

Страница 15: ...dans les pièces métalliques exposées de l outil et communiquer une décharge électrique à l opérateur 4 Ne pas toucher le foret pendant ou immédiatement après le fonctionnement Il devient très chaud et peut causer des brûlures 5 Avant de briser découper ou percer un mur le plancher ou le plafond s assurer qu aucun câble électrique ou conduit n y soit noyé 6 Porter un masque lorsqu on lève la tête 7...

Страница 16: ...ier qu il est bloqué à fond 6 Retrait de l outil Comme indiqué sur la Fig 1 tirer sur la poignée A et sortir l outil ATTENTION Veillez à bien prendre en main la poignée et la poignée latérale pendant les travaux Ne tenez pas par la poignée A pendant les travaux Si vous tirez dessus par erreur la pointe de broyage pourrait être projetée 7 Déplacer la poignée latérale Pour la poignée du type à barre...

Страница 17: ... de fixation et enlever le couvercle arrière de balai Enlever le chapeau de balai et le balai de charbon Après avoir remplacé le balai de charbon ne pas manquer de serrer fermement le chapeau de balai et d installer le couvercle arrière 6 Liste des pièces de rechange ATTENTION Les réparations modifications et inspections des outils électriques Hitachi doivent être confiées à un centre de service a...

Страница 18: ...e protezioni oculari L attrezzatura protettiva quali maschera facciale calzature antiscivolo caschi o protezioni oculari ridurrà il rischio di lesioni personali c Impedite le accensioni involontarie Prima del collegamento a una sorgente di alimentazione e o pacco batteria e prima di raccogliere o trasportare l utensile verificate che l interruttore sia posizionato su OFF Il trasporto degli elettro...

Страница 19: ...niziare a penetrare frantumare o perforare um muro pavimento o soffitto accertarsi con sicurezza che oggetti come cavi e condotte non siano murati in essi 6 Indossare una maschera nel caso si debba lavorare con il viso rivolto verso l alto 7 Posizionare correttamente il supporto della punta 8 Prima di iniziare i lavori controllare la tenuta delle viti 9 Durante lavori svolti in posizioni elevate f...

Страница 20: ...o stato in cui l impugnatura B è spinta nella direzione di A l angolazione della lama può essere cambiata liberamente su qualsiasi posizione desiderata 2 Rilasciare l impugnatura B e girare l utensile assicurandosi che sia bloccato completamente 6 Rimozione dell utensile Come mostrato nella Fig 1 tirare l impugnatura A e tirare fuori l utensile CAUTELA Assicurarsi di afferrare la leva e la leva la...

Страница 21: ...tore L avvolgimento del motore il vero e proprio cuore degli attezzi elettrici Fare attenzione a non danneggiare l avvolgimento e o non bagnarlo con olio o acqua 4 Controllo delle spazzole di carbone Fig 11 Il motore impiega spazzole di carbone materiali soggeti a consumo Quando una spazzola è cosumata o vicina al limite d usara il motore potrebbe subire dei danni Usando spazzole di carbone con ar...

Страница 22: ...ltre utilizzato per la stima preliminare dell esposizione AVVERTENZA 䡬 Il valore di emissione vibrazioni durante l uso effettivo dell utensile può essere diverso dal valore totale dichiarato in base alle modalità di utilizzo dell utensile stesso 䡬 Identificare le misure di sicurezza per la protezione dell operatore basate su stima dell esposizione nelle effettive condizioni di utilizzo prendendo i...

Страница 23: ... lichamelijk letsel resulteren b Gebruik persoonlijke beschermingsmiddelen Draag altijd oogbescherming Beschermingsmiddelen zoals stofmaskers niet glijdende veiligheidsschoenen een helm of oorbescherming vermindert het risico op lichamelijk letsel c Voorkom dat het gereedschap per ongeluk kan starten Controleer of de schakelaar in de uit stand staat voordat u de voeding en of de accu aansluit het ...

Страница 24: ...authentieke onderdelen gebruikt Hierdoor kunt u erop aan dat de veiligheid van het elektrisch gereedschap behouden blijft VOORZORGMAATREGELEN Houd kinderen en kwetsbare personen op een afstand Het gereedschap moet na gebruik buiten het bereik van kinderen en andere kwetsbare personen worden opgeborgen VEILIGHEIDSWAARSCHUWING VOOR DE HAKHAMER 1 Draag oorbeschermers Blootstelling aan lawaai kan tot ...

Страница 25: ...als afgebeeld in Afb 3 de greep A in de richting van B wordt gedraaid met greep B in de richting van A geduwd 2 Laat greep B los en draai het hulpstuk om te controleren of het goed in het gereedschap is vergrendeld 6 Verwijderen van het hulpstuk Zie Afb 1 en trek aan greep A en verwijder het hulpstuk uit het gereedschap LET OP Zorg dat u tijdens gebruik altijd het hoofd en zijhandvat vast heeft Ho...

Страница 26: ... worden dat de wikkeling niet beschadigd en of met olie of water bevochtigd wordt 4 Inspectie van de koolborstels Afb 11 Bij de motor zijn koolborstels gebruikt die onderhevig zijn aan slijtage De motor kan beschadigd worden wanneer de koolborstels versleten zijn De motor stop automatisch wanneer deze voorzien is van auto stop koolborstels In dit geval dienen beide koolborstels vervangen te worden...

Страница 27: ...otstelling gebruiken WAARSCHUWING 䡬 De trillingsemissiewaarde tijdens het feitelijke gebruik van het elektrisch gereedschap kan afwijken van de opgegeven totale waarde afhankelijk van de manieren waarop het gereedschap wordt gebruikt 䡬 Neem kennis van de veiligheidsmaatregelen voor de bescherming van de gebruiker die gebaseerd zijn op een schatting van blootstelling onder feitelijke gebruiksomstan...

Страница 28: ...o utiliza herramientas eléctricas puede dar lugar a importantes daños personales b Utilice un equipo de protección Utilice siempre una protección ocular El equipo de protección como máscara para el polvo zapatos de seguridad antideslizantes casco o protección para oídos utilizado para condiciones adecuadas reducirá los daños personales c Evite un inicio involuntario Asegúrese de que el interruptor...

Страница 29: ...antenimiento de la seguridad de la herramienta eléctrica PRECAUCIÓN Mantenga a los niños y a las personas enfermas alejadas Cuando no se utilicen las herramientas deben almacenarse fuera del alcance de los niños y de las personas enfermas ADVERTENCIA DE SEGURIDAD AL UTILIZAR EL MARTILLO DEMOLEDOR 1 Utilice protectores de oídos La exposición al ruido puede causar daños auditivos 2 Utilice los mango...

Страница 30: ...oduzca la herramienta en el orificio de la tapa delantera 3 Ajuste la posición de la ranura girando la herramienta y después inserte más hasta que ésta toque el extremo del orificio 4 Devuelva la empuñadura A a su posición original tire de la herramienta para asegurarse de que haya quedado completamente bloqueada Fig 2 5 Decisión de la posición de trabajo de la herramienta La herramienta podrá gir...

Страница 31: ...far la clavija del tomacorriente 1 Inspección d la herramienta Ya que la utilización de una herramienta de corte embotada disminuirá la eficiencia de trabajo y podría causar desperfectos en el motor afilar o cambiar las herramientas de corte tan pronto como se note abrasión en éstas 2 Inspeccionar los tornillos de montaje Regularmente inspeccionar todos los tornillos de montaje y asegurarse de que...

Страница 32: ... acuerdo con EN60745 Cincelado Valor de emisión de la vibración ah Cheq 20 0 m s2 Incertidumbre K 4 3 m s2 El valor total de vibración declarado ha sido medido de acuerdo con un método de prueba estándar y permite comparar unas herramientas con otras También resulta útil para llevar a cabo evaluaciones preliminares de exposición ADVERTENCIA 䡬 La emisión de vibración durante la utilización de la he...

Страница 33: ...e sempre protecção para os olhos O equipamento de protecção tal como uma máscara de pó sapatos de segurança anti derrapantes chapéu rígido ou protecção auricular utilizados para condições adequadas reduzirá os ferimentos pessoais c Evite ligar por acidente Certifique se de que o interruptor está na posição de desligado antes de ligar a fonte de alimentação e ou bateria levantar ou transportar a fe...

Страница 34: ...tificadora constante do produto pois ela está sujeita a mudanças conforme a área ESPECIFICAÇÕES ACESSÓRIOS PADRÃO 1 Estojo 1 2 Ponta macho haste SDS max 1 3 Empunhadura lateral Tipo I lateral tipo barra 1 Tipo II lateral tipo D 1 Está instalado o empunhadura lateral de tipo I ou tipo II Os acessórios padrão estão sujeitos a mudanças sem aviso prévio ACESSÓRIOS OPCIONAIS vendidos separadamente 䡬 De...

Страница 35: ...o da lâmina pode ser modificado livremente para qualquer posição desejada 2 Solte o cabo B e gire a ferramenta certificando se de que ele está completamente travado 6 Retirada da ferramenta Como mostra a Fig 1 puxe o cabo A e tire para fora a ferramenta CUIDADO Agarre o cabo e a pega lateral durante o trabalho Não segure no cabo A durante o trabalho Se o puxar por engano a ponta poderia saltar 7 M...

Страница 36: ...livremente nos suportes de escova 5 Troca das escovas de carvão Desaperte o parafuso de ajuste e retire a proteção do cabo Retire os protetores da escova e as escovas de carvão Depois de trocar as escovas de carvão não esqueça de apertar bem os protetores da escova e instalar a proteção do cabo 6 Lista de peças para conserto CUIDADO Consertos modificações e inspeção de Ferramentas Elétricas da Hit...

Страница 37: ...36 08Back_H60MC_WE 11 26 10 9 35 36 ...

Страница 38: ...37 08Back_H60MC_WE 3 1 12 7 17 AM 37 ...

Страница 39: ...H HOLDER 2 56 HEX SOCKET SET SCREW M5 8 2 57 BEARING HOLDER 1 58 TAPPING SCREW W FLANGE D4 16 2 59 DUST SEAL 1 60 TAIL COVER 1 61 TAPPING SCREW W FLANGE D5 20 2 62 NEEDLE BEARING A BK1512 1 63 SEAL LOCK HEX SOCKET HD BOLT M6 25 4 64 VINYL TUBE I D 9 5 T0 56 85 2 65 TERMINAL M4 0 1 66 SIDE HANDLE 1 67 MOUNT 1 68 HANDLE BOLT 1 69 BAND 1 70 SEAL LOCK HEX SOCKET HD BOLT M5 16 6 71 CRANK COVER 1 72 O R...

Страница 40: ...39 08Back_H60MC_WE 11 26 10 9 35 39 ...

Страница 41: ... DE GARANTIA 1 Número de modelo 2 Número de serie 3 Fecha de adquisición 4 Nombre y dirección del cliente 5 Nombre y dirección del distribudor Se ruega poner el sellú del distribudor con su nombre y dirección CERTIFICAT DE GARANTIE 1 No de modèle 2 No de série 3 Date d achat 4 Nom et adresse du client 5 Nom et adresse du revendeur Cachet portant le nom et l adresse du revendeur CERTIFICADO DE GARA...

Страница 42: ...41 1 2 3 4 5 08Back_H60MC_WE 11 26 10 9 35 41 ...

Страница 43: ...C E 1541 91015 EVRY CEDEX France Tel 33 1 69474949 Fax 33 1 60861416 URL http www hitachi powertools fr Hitachi Power Tools Belgium N V S A Koningin Astridlaan 51 1780 Wemmel Belgium Tel 32 2 460 1720 Fax 32 2 460 2542 URL http www hitachi powertools be Hitachi Fercad Power Tools Italia S p A Via Retrone 49 36077 Altavilla Vicentina VI Italy Tel 39 0444 548111 Fax 39 0444 548110 URL http www hitac...

Страница 44: ... sonora misurato 100 dB Livello di potenza sonora garantito 102 dB La documentazione tecnica è conservata da parte del nostro responsabile del reparto di progettazione Questa dichiarazione è applicabile ai prodotti cui sono applicati i marchi CE EC VERKLARING VAN CONFORMITEIT Wij verklaren onder eigen verantwoordelijkheid dat dit product conform de richtlijnen of gestandardiseerde documenten EN607...

Отзывы: