background image

(3)


As


shown


in


Fig.


3

,


push


in


the


lock


pin


to


prevent


rotation


of


the


spindle.


Then,


secure


the


sanding


disc


by


tightening


the


wheel


nut


with


the


wrench.

2.


Mounting


the


Diamond


Wheel

CAUTION


When


utilizing


the


diamond


wheel,


pay


particular


attention


to


the


following


points.

(1)


Utilize


the


correct


size


diamond


wheel.


(external


dia.


105


mm,


internal


dia.


20


mm)

(2)


Do


not


apply


cooling


water


or


grinding

 fl 

uid


while


utilizing


the


diamond


wheel.

(3)


Hold


the


tool

 fi 

rmly


to


control


the


tendency


of


the


tool


to


be


repelled


by


the


material


during


cutting


operation.

(4)


Ensure


that


the


cutting


depth


is


kept


within


2–5


mm


to


prevent


over-heating


damage


to


the


motor.


Use


with


moderate


cutting


speed,


and


do


not


apply


excessive


pressure


on


the


workpiece.


Mounting


the


Guide


Base


Assembly.


(Fig.


4)

(1)


Loosen


the


two


small


screws


on


the


wheel


guard.

(2)


Insert


the


guide


piece


between


the


wheel


guard


and


set


plate


(A),


and


tighten


one


of


the


small


screws.


Ensure


that


the


guide


will


not


move.

(3)


Set


the


angle


of


the


wheel


guard


to


a


suitable


position


for


operation,


and


securely


tighten


the


remaining


small


screw


to

 fi 

x


the


wheel


guard


in


position.


Mounting


the


Diamond


Wheel.


(Fig.


5)

NOTE


Mounting


of


the


diamond


wheel


on


the


spindle


is


illustrated


in


Fig.


5

.


Note


that


the


wheel


washer


is


reversed


from


ordinary


usage


with


depressed


center


wheel.

(1)


Mount


the


wheel


washer


and


diamond


wheel


onto


the


spindle.

(2)


Mount


the


concave


side


of


the


wheel


nut


onto


the


diamond


wheel,


and


screw


the


wheel


nut


onto


the


spindle.

(3)


As


shown


in


Fig.


5


push


in


the


lock


pin


to


prevent


rotation


of


the


spindle.


Then,


secure


the


diamond


wheel


by


tightening


the


wheel


nut


with


the


wrench.

MAINTENANCE


AND


INSPECTION

1.


Inspecting


the


depressed


center


wheel


Ensure


that


the


depressed


center


wheel


is


free


of


cracks


and


surface


defects.


Replace


the


depressed


center


wheel


when


it


has


been


worn


out


to


about


60


mm


in


external


diameter.

2.


Inspecting


the


mounting


screws


Regularly


inspect


all


mounting


screws


and


ensure


that


they


are


properly


tightened.


Should


any


of


the


screws


be


loose,


retighten


them


immediately.


Failure


to


do


so


could


result


in


serious


hazard.


3.


Maintenance


of


the


motor


The


motor


unit


winding


is


the


very


“heart”


of


the


power


tool.


Exercise


due


care


to


ensure


the


winding


does


not


become


damaged


and/or


wet


with


oil


or


water.

4.


Inspecting


the


carbon


brushes


(Fig.


8)


The


motor


employs


carbon


brushes


that


are


consumable


parts.


Since


an


excessively


worn


carbon


brush


can


result


in


motor


trouble,


replace


the


carbon


brush


with


a


new


one


having


the


same


carbon


brush


No.


shown


in


the


fi 

gure


when


it


becomes


worn


to


or


near


the


“wear


limit”.


In


addition,


always


keep


carbon


brushes


clean


and


ensure


that


they


slide


freely


within


the


brush


holders.

5.


Replacing


carbon


brushes


Disassemble


the


brush


caps


with


a


slotted-head


screwdriver.


The


carbon


brushes


can


then


be


easily


removed.

6.


Service


parts


list

CAUTION


Repair,


modi

fi 

cation


and


inspection


of


Hitachi


Power


Tools


must


be


carried


out


by


a


Hitachi


Authorized


Service


Center.


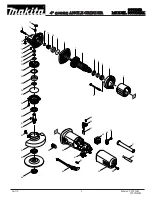
This


Parts


List


will


be


helpful


if


presented


with


the


tool


to


the


Hitachi


Authorized


Service


Center


when


requesting


repair


or


other


maintenance.


In


the


operation


and


maintenance


of


power


tools,


the


safety


regulations


and


standards


prescribed


in


each


country


must


be


observed.

MODIFICATION


Hitachi


Power


Tools


are


constantly


being


improved


and


modi

fi 

ed


to


incorporate


the


latest


technological


advancements.


Accordingly,


some


parts


may


be


changed


without


prior


notice.

NOTE

Due


to


HITACHI’s


continuing


program


of


research


and


development,


the


speci

fi 

cations


herein


are


subject


to


change


without


prior


notice.

English

6

000Book̲PDA-100D̲Tha.indb   6

000Book̲PDA-100D̲Tha.indb   6

2009/04/10   9:23:33

2009/04/10   9:23:33

Содержание G 10SB1

Страница 1: ...ugh carefully and understand these instructions before use 使用前務請詳加閱讀 โปรดอ านโดยละเอียดและทำความเข าใจก อนใช งาน Disc Grinder 手提圓盤電磨機 เครื องเจียร ไฟฟ า PDA 100D G 10SB1 000Book PDA 100D Tha indb A 000Book PDA 100D Tha indb A 2009 04 10 9 23 32 2009 04 10 9 23 32 ...

Страница 2: ...1 12mm 5mm 21 r e 1 2 2 3 4 5 6 7 7 8 9 0 8 8 9 1 5 0 0 1 4 5 w q A B 15 30 1 3 5 7 2 4 6 8 000Book PDA 100D Tha indb 1 000Book PDA 100D Tha indb 1 2009 04 10 9 23 32 2009 04 10 9 23 32 ...

Страница 3: ...nding disc 砂盤 จานขัด Rubber pad 橡膠墊圈 แผ นยาง Washer 襯墊 แหวน Guide base 導軌基座 แท นราง Guide piece 導軌片 ไกด พีส Set plate A 支架板 A แผ นยึด A Screwdriver 螺絲刀 ไขควง Screw 螺絲釘 สกรู Diamond wheel 金剛石輪 จานตัดกากเพชร q Wing bolt 蝶形螺栓 โบลต ปีกผีเสื อ w Adjust the cutting depth by losening the wing bolt 利用放鬆蝶形螺栓來調節切削深度 ปรับตั งความลึกที ตัดโดยคลายโบลต ปีกผีเสื อ e Wear limit 磨損極限 ขอบเขตการสึกหรอ r No of carbon...

Страница 4: ...rning the power tool on A wrench or a key left attached to a rotating part of the power tool may result in personal injury e Do not overreach Keep proper footing and balance at all times This enables better control of the power tool in unexpected situations f Dress properly Do not wear loose clothing or jewellery Keep your hair clothing and gloves away from moving parts Loose clothes jewellery or ...

Страница 5: ... fin and finishing of various types of steel bronze and aluminum materials and castings Grinding of welded sections or sections cut by means of a cutting torch Grinding of brick marble etc Cutting and scribing of concrete stone tile use the diamond wheel PRIOR TO OPERATION 1 Power source Ensure that the power source to be utilized conforms to the power requirements specified on the product namepla...

Страница 6: ...nce the depressed center wheel angle has been adequately abraded both forward and backward operations are permissible 4 The provided depressed center wheel resinoid wheel is rated as Class A grain and 36 grain size Accordingly its range of applications cover a wide variety proving to be most suitable for heavy grinding of general steel materials Since the wheel grain size is rather coarse creating...

Страница 7: ...ee of cracks and surface defects Replace the depressed center wheel when it has been worn out to about 60 mm in external diameter 2 Inspecting the mounting screws Regularly inspect all mounting screws and ensure that they are properly tightened Should any of the screws be loose retighten them immediately Failure to do so could result in serious hazard 3 Maintenance of the motor The motor unit wind...

Страница 8: ...可減少人員傷害 c 避免意外地啟動 在插電前確認開關是在 off 的位置 以手指放在開關握持電動工具 或在電動工具 的開關於 on 的狀況下插上插頭 都會導致 意外發生 d 在將電動工具啟動前 先卸下任何調整用鑰匙 或扳手 扳手或鑰匙遺留在電動工具的轉動部位時 可 能導致人員傷害 e 身體勿過度伸張 任何時間要保持站穩及平衡 以便在不預期的狀態下 能對電動工具有較好 的控制 f 衣著要合宜 別穿太鬆的衣服或戴首飾 保持 你的頭髮 衣服及手套遠離轉動部位 寬鬆的衣服 手飾及長髮會被捲入轉動部位 g 如果裝置要用於粉塵抽取及集塵設施 要確保 其連接及正當使用 使用此類裝置能減少與粉塵有關之危害 4 電動工具之使用及注意事項 a 勿強力使用電動工具 使用正確之電動工具為 你所需 正確使用電動工具會依其設計條件使工作做得 更好更安全 b 如果開關不能轉至開及關的位置 勿使用電動 工具 任何電動工具...

Страница 9: ...驟 11 防止過載操作 12 當主軸轉動時不要撳下鎖定銷 13 操作時當心周圍的人 規 格 形式 PDA 100D G10SB1 電壓 按地區 1 100 V 115 V 120 V 127 V 220 V 230 V 240 V 輸入功率 1 620 W 530 W 額定輸出功率 370 W 270 W 無負荷速度 12000轉 分 砂輪尺寸 最高周速 4300 m min 外徑 100 mm 厚度 6 mm 穴徑 16 mm 重量 2 1 9 kg 1 8 kg 1 當須改變地區時應檢查產品上的銘牌 2 僅限於本體 標 準 附 件 1 砂輪 人造的樹脂黏結的砂輪 1 外徑 100 mm 厚度 4 mm 穴徑 16 mm 2 扳手 1 標準附件可能不預先通告而徑予更改 選購附件 分開銷售 注意 一定要在有砂輪防護件時操作圓盤電磨機 1 裝 100 mm 的砂盤 墊片螺帽 砂盤 橡膠墊圈 ...

Страница 10: ...體免受碎輪片的損傷 7 檢查鎖定銷 在打開電源開關之前掀兩 三下鎖定銷 檢查鎖 定銷是否被釋放 8 砂輪的檢查和安裝 仔細檢查所安裝的砂輪確無破損和裂縫 確認所 安裝的砂輪在規定的條件下牢固地被夾持 細節請參考 砂輪的組裝和拆卸 這一項目 9 試行運轉 不檢查砂輪上是否存在著破損和裂縫就開始研 磨 將非常危險 所以在開始正式研磨之前使該 圓盤電磨機在無人的情況下試行運轉 如果沒有 問題 就表明此圓盤電磨機沒有異常 試運轉的持續時間如下 當更換砂輪時 3 分鐘以上 當開始日常工作前 1 分鐘以上 實用手提圓盤電磨機的應用 1 因為只用圓盤電磨機本身的重量研磨是切實可行 的 千萬不要把圓盤電磨機強壓在被研磨的表面 上 輕輕地握住圓盤電磨機以使它輕輕地和磨削 面接觸 重的壓力將降低旋轉速度並會磨損拋光表面 所 引起的過負荷現象將導致馬達燒毀 2 研磨時不要利用圓盤電磨機的整個表面 如圖 1 所示...

Страница 11: ... mm 內徑 20 mm 2 使用金剛石輪時不要加涼水或且磨削液 3 在切削操作中要牢固地握住工具來控制被材料抵 制的工具的傾斜度 4 可使切削深度保持在 2 5 mm 以防過熱損壞馬 達 使用適中的切削速度以及不要在工具上施加 過多的壓力 安裝導軌基座組件 圖 4 1 在砂輪導軌上鬆開兩個小的螺絲釘 2 在輪導軌和支架板 A 之間插入導軌片 並且上 緊兩個螺絲釘中的一個 保証導軌將不會運動 3 以一角度把砂輪導軌放到適合於操作的位置 並 安全地擰緊另一個留下的小螺絲釘把砂輪保護固 定在所定的位置 安裝金剛石輪 圖 5 註 如圖 5 所示在主軸上安裝金剛石輪 要注意輪墊 圈和砂輪螺帽 它與砂輪的普通用法相反 1 把輪墊圈和金剛石砂輪安裝到主軸 2 把輪螺帽的凸面安裝到金剛石輪上 並把輪螺帽 旋進主軸 3 如圖 5 所示 撳下鎖定銷防止主軸轉動 用扳手 擰緊砂輪螺帽卡緊金剛石輪 維 護 和 ...

Страница 12: ...所 認可的維修中心進行 當尋求修理或其他維護時 將本部件目錄與工具 一起提交給日立所認可的維修中心會對您有所幫 助 在操作和維護電動工具中 必須遵守各國的安全 規則和標准規定 改進 日立電動工具隨時都在進行改進以適應最新的技術進 步 因此 有些部件可能未預先通知而進行改進 註 為求改進 本手冊所載規格可能不預先通知而徑 予更改 11 中國語 000Book PDA 100D Tha indb 11 000Book PDA 100D Tha indb 11 2009 04 10 9 23 33 2009 04 10 9 23 33 ...

Страница 13: ...ที ตัวสวิทซ หรือเมื อเสียบปลั ก ขณะเปิดสวิทซ ไว อาจทำให เกิดอุบัติเหตุ d เอาสลักปรับแต งหรือประแจออกก อนเปิดสวิทซ ไฟฟ า สลักหรือประแจที ติดกับส วนหมุนของเครื องมือไฟฟ าอาจทำให คุณบาดเจ บได e อย าเอื อมตัว ยืนให มั นและสมดุลตลอดเวลา ทำให ควบคุมเครื องมือไฟฟ าได ดีขึ นเมื อมีเหตุที ไม คาด น f แต งตัวให รัดกุม อย าสวมเสื อผ าหลวมหรือใช เครื องประดับ ให ผม เสื อผ าและถุงมืออยู ห างจากชิ นส วนที เคลื อ...

Страница 14: ...ี แสดงความหยาบ 2 ชุดจานตัดกากเพชร ใช ตัดและตกแต งคอนกรีด หิน กระเบื อง เป นต น ชุดแท นราง จานตัดกากเพชร แบบเซกเมนต อาจเปลี ยนแปลงอุปกรณ ประกอบได โดยไม แจ งล วงหน า การใช งาน กำจัดตะกรันหล อและตกแต งผิวของวัสดุเหล ก ทองเหลืองและ อะลูมิเนียม และชิ นงานหล อ เจียระไนชิ นส วนเชื อมหรือหน าตัดที ตัดด วยหัวตัดแก ส การขัดอิฐ หินอ อน เป นต น การขัดและตกแต งคอนกรีต หิน กระเบื อง ใช จานตัดกากเพชร คำแนะนำก อน...

Страница 15: ...ทั งหมดของหินเจียร แตะกับชิ นงาน ใช เฉพาะผิวรอบวง โดยเอียงหินเจียร เป นมุม 15 ถึง 30 ตามรูปที 1 3 เมื อใช เครื องเจียร ไฟฟ ามีหินเจียร ศูนย จมตัวใหม ที กดไปด านหน า ทิศทาง A ขอบหินเจียร อาจตัดเนื อชิ นงานก ได ในกรณีนี ให ดึง ถอยหลัง ทิศทาง B อย างไรก ตาม เมื อหินเจียร ศูนย จมสึกมากพอ อาจเจียร แบบเดินหน า หรือถอยหลังก ได 4 หินเจียร ศูนย จมที มีมาให หินเจียร พลาสติก มีความหยาบชั น A และขนาดเบอร 36 ด...

Страница 16: ...วและรอยบิ นที ผิว เปลี ยนหินเจียร ศูนย จมเมื อเส นผ านศูนย กลางภายนอกสึกจนมีขนาด ประมาณ 60 มม 2 การตรวจสอบสกรูยึด ให ตรวจสอบสกรูยึดเสมอ และให ขันไว อย างถูกต อง ถ าสกรูหลวม ให ขันเสียใหม โดยทันที มิฉะนั นอาจเกิดอันตรายมาก 3 การบำรุงรักษามอเตอร การขดลวดของมอเตอร เป นหัวใจสำคัญของเครื องมือไฟฟ า ให ใช ความระมัดระวังเพื อไม ให ขดลวดของมอเตอร ชำรุดและ หรือ เปียกน ำหรือน ำมัน 4 การตรวจสอบแปรงถ าน รูปที...

Страница 17: ...LAND 1 24 SPRING WASHER M4 7 25 MACHINE SCREW M4 12 5 26 WOODRUFF KEY 1 27A SPINDLE M10 P1 5 1 28 FRINGER 1 29 MACHINE SCREW W SP WASHER M5 16 2 30 SET PLATE 1 31 WHEEL GUARD ASS Y 29 30 1 32C WHEEL WASHER 1 33A D C WHEELS 100MM 4T A36Q 1 34B WHEEL NUT C 1 35 GEAR AND PINION ASS Y 6 18 1 36 HOUSING 1 Item No Part Name Q ty 37 NAME PLATE 1 38 BRUSH CAP 2 39 CARBON BRUSH 2 40 RUBBER PACKING 2 41 WIR...

Страница 18: ...NG WASHER M4 7 25 MACHINE SCREW M4 12 5 26 WOODRUFF KEY 1 27A SPINDLE M10 P1 5 1 28 FRINGER 1 29 MACHINE SCREW W SP WASHER M5 16 2 30 SET PLATE 1 31 WHEEL GUARD ASS Y 29 30 1 32B WHEEL WASHER 1 33A D C WHEELS 100MM 4T A36Q 1 34B WHEEL NUT C 1 35 GEAR AND PINION ASS Y 6 18 1 36 HOUSING 1 Item No Part Name Q ty 37 NAME PLATE 1 38 BRUSH CAP 2 39 CARBON BRUSH 2 40 RUBBER PACKING 2 41 WIRING BLOCK ASS ...

Страница 19: ...18 000Book PDA 100D Tha indb 18 000Book PDA 100D Tha indb 18 2009 04 10 9 23 34 2009 04 10 9 23 34 ...

Страница 20: ...Hitachi Koki Co Ltd 905 Code No C99036733 M Printed in Malaysia 000Book PDA 100D Tha indb 19 000Book PDA 100D Tha indb 19 2009 04 10 9 23 34 2009 04 10 9 23 34 ...

Отзывы: