background image

EN-27

AUDIO MODE

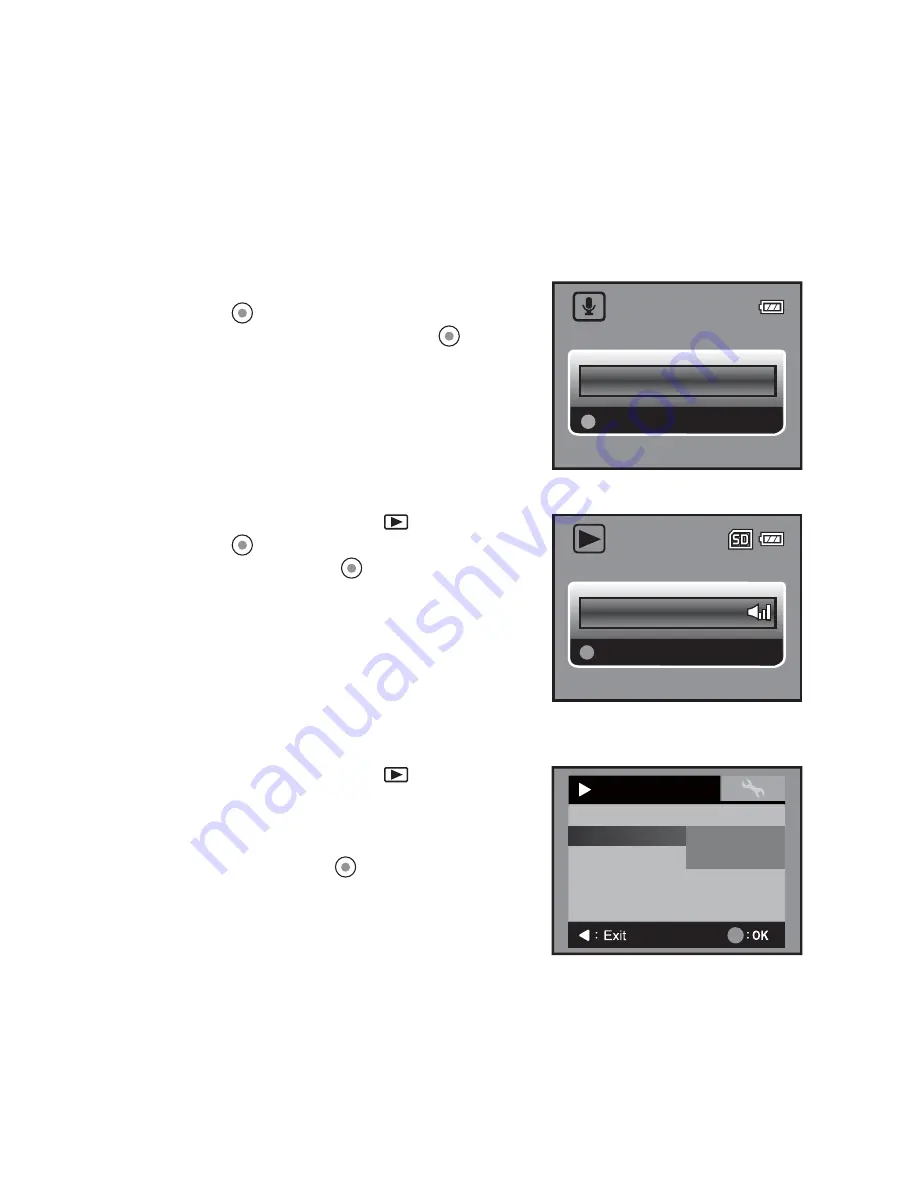
Recording Audio Files

The digital video camera enables you to record and playback audio files anytime and 
anywhere.

1. Press the 

MODE

 button to enter Audio Mode.

2. Press the 

 button to start audio recording.

„

To pause recording, press the 

 button

again.

„

To stop recording, press the 

T

 button.

Playing Back Audio Files

1. Press the 

MODE

 button until 

is displayed.

2. Press the 

 button to begin playback.

„

To pause, press the 

 button again.

„

To stop playback, press the 

T

 button.

Deleting Audio Files

1. Press the 

MODE

 button until 

is displayed.

2. Press the 

MENU

 button to enter the audio

playback menu.

3. Select [Delete File] or [Delete All] with the 

c

 / 

d

buttons and press  the 

 button.

„

[Delete File]: Delete the current audio file.

„

[Delete All]: Delete all audio files.

00:03:06

00:00:00

00:00:00

Stop

00:00:00

Play

100-001

00:03:02

00:03:02

00:03:02

Delete All

On

Protect
Sound

Delete File

Slide Show

Play

Single

Yes

No

5sec.

Delete All

5

Protect
Sound

Delete File

Slide Show

Play

Single

Yes

No

5sec.

Содержание DZ-SV560E

Страница 1: ......

Страница 2: ...llation If this equipment does cause harmful interference to radio or television reception which can be determined by turning the equipment off and on the user is encouraged to try to correct the interference by one or more of the following measures Reorient or relocate the receiving antenna Increase the separation between the equipment and receiver Connect the equipment into an outlet on a circui...

Страница 3: ...tal video camera may be different from those described in this manual This is due to the fact that different retailers often specify slightly different product inclusions and accessories to suit their market requirements customer demographics and geographical preferences Products very often vary between retailers especially with accessories such as batteries chargers AC adapters memory cards cable...

Страница 4: ...ed power supply voltage Use with any other power supply voltage might cause fire or electric shock Do not use the Digital video camera in areas near water This might cause fire or electric shock Take special care during rain snow on the beach or near the shore Do not place the Digital video camera on inclined or unstable surfaces This might cause the Digital video camera to fall or tilt over causi...

Страница 5: ...ke it or use excessive force when handling the Digital video camera This might cause damage to the Digital video camera Do not use the Digital video camera in humid steamy smoky or dusty places This might cause fire or electric shock Do not remove the batteries immediately after long period of continuous use The batteries become hot during use Touching a hot battery might cause burns Do not wrap t...

Страница 6: ...s may feel warm after a long period of continuous use of the Digital video camera or the flash This is normal and not a malfunction The Digital video camera may feel warm after a long period of continuous use This is normal and not a malfunction If the batteries are not to be used for a long period of time remove them from the Digital video camera to prevent leakage or corrosion and store them aft...

Страница 7: ...ction 20 Setting the Focus 21 Setting the Self Timer 22 PLAYBACK MODE 22 Playing Back Video Clips 23 Playing Back Still Images 24 Thumbnail Display 24 Slide Show Display 25 Protecting Images 26 Deleting Still Images Video Clips 27 AUDIO MODE 27 Recording Audio Files 27 Playing Back Audio Files 27 Deleting Audio Files 28 MENU OPTIONS 28 Video Menu 30 Capture Menu 32 Playback Menu 33 Setup Menu 35 E...

Страница 8: ...eo camera is capable of capturing images and video clips Package Contents Carefully unpack your digital video camera and ensure that you have the following items Common Product Components Digital video camera Software CD ROM USB cable A V cable Earphone Camera strap Camera pouch 2 x AA size batteries Common Optional Accessories SD SDHC memory card Tripod Accessories and components may vary by reta...

Страница 9: ...EN 8 GETTING TO KNOW YOUR DIGITAL VIDEO CAMERA Front View 1 Speaker 2 Focus switch Normal mode Macro mode 3 Lens 4 LED lights 5 Microphone 6 Battery cover 7 Tripod socket 7 1 2 5 3 6 4 ...

Страница 10: ... Zoom out wide angle button Thumbnail button Zoom in telephoto button 5 S Up button MODE Mode button 6 X Right button Camera mode quick key 7 OK Shutter button 8 T Down button MENU Menu button 9 Status LED indicator 10 USB port 11 SD SDHC memory card slot 12 A V OUT terminal 13 Earphones connector 14 Strap holder ...

Страница 11: ...attery power Medium battery power Low battery power No battery power 5 Zoom status available only when movie size is set to 320 x 240 6 Exposure compensation 7 White Balance Auto Daylight Cloudy Fluoresc Tungsten 8 Image quality Fine Standard Economy 9 Video size 640 x 480 320 x 240 10 Focus setting Blank Normal Macro 00 02 05 00 02 05 00 02 05 6 5 3 2 1 4 7 8 9 10 1 2X 1 2X 1 2X ...

Страница 12: ...st AEB 7 ISO Auto 100 200 8 Exposure compensation 9 White Balance 10 Image quality 11 Image size 11m 3840 x 2880 FW interpolation 8m 3264 x 2448 FW interpolation 5m 2560 x 1920 3m 2048 x 1536 1m 1280 x 960 0 3m 640 x 480 12 Focus setting 13 Self timer 10s 10 sec 2s 2 sec 99999 99999 99999 8 6 3 2 1 4 9 10 11 7 5 12 10s 10s 10s 1 2X 1 2X 1 2X 13 5m 5m ...

Страница 13: ...udio mode icon 2 Available recording time 3 Storage media 4 Battery condition 5 Elapsed time 6 Recording indicator Recording Recording indicator REC 00 00 00 1 4 6 5 00 00 00 00 00 00 00 00 00 2 3 00 00 00 1 Stop 00 00 00 00 00 00 00 00 00 ...

Страница 14: ...e icon 2 Storage media 3 Battery condition 4 Folder and file number Audio Playback Mode 1 Playback mode icon 2 Storage media 3 Battery condition 4 Volume indicator 5 Folder and file number 6 Playback indicator 7 Elapsed time 00 00 00 00 00 00 00 00 00 3 2 1 4 5 6 7 Play Play 101 0001 101 0001 Play 101 0001 101 0001 101 0001 4 2 1 3 101 0001 Play 2 1 4 7 6 5 3 100 001 00 03 02 00 03 02 00 03 02 ...

Страница 15: ... cover and make sure it is locked securely To prevent valuable data from being accidentally deleted from an SD SDHC memory card you can slide the write protect tab on the side of the SD SDHC memory card to LOCK To save edit or delete data on an SD SDHC memory card you must unlock the card To prevent damaging of SD SDHC memory card be sure to turn off the power when inserting or removing the SD SDH...

Страница 16: ...ed for a defined period of time To resume operation turn the power on again Refer to section in this manual titled Power Off in the Setup Menu for further details LED Indicators Indicators State Description Activity LED indicator Solid green The digital video camera is powering up LED indicator Solid green The digital video camera is ready to record images or videos LED indicator Blinking green US...

Страница 17: ...CD panel carefully with the correct direction Over rotation or rotating to the wrong direction may damage the hinge that connects the LCD monitor to the digital video camera Avoid touching the LCD monitor when moving the LCD panel Cautions Do not hold the digital video camera by only holding the LCD panel Be careful not to block the lens microphone or LED lights with your fingers when shooting Clo...

Страница 18: ... in 24 hour format After confirming all settings are correct press the button 5 To exit from the Setup menu press the f button Choosing the Language Specify in which language menus and messages are to be displayed on the LCD monitor 1 Press the MENU button 2 Select Setup menu with the f button 3 Select Language with the c d buttons and press the button The Language setting screen will be displayed...

Страница 19: ...ta 1 Press the MENU button 2 Select Setup menu with the f button 3 Select Format with the c d buttons and press the button 4 Select Yes with the c d buttons and press the button To cancel formatting select No and press the button Language English Setup Format LCD Bright Light Freq Next Menu 0 50Hz Date Time Power Off Next Menu Off Exit Format Card OK Format No Yes ...

Страница 20: ...The recording time depends on the storage media size and the subject to be recorded Capturing Still Images 1 Press the button until the digital video camera turns on 2 Press the MODE button or button camera mode quick key to enter Capture Mode 3 Compose the image on the LCD monitor 4 Press the button to capture the image If the access speed of your SD SDHC memory card is not fast enough for record...

Страница 21: ... magnification is displayed on the zoom status 2 Press the button to capture the image video clip The digital magnification ranges from 1 0x to 4 0x The zoom function can be activated in video mode of 320x240 But it should be adjusted before recording Setting the Focus Images Video clips may be captured by sliding the focus switch to set the focus modes macro or normal mode 1 Slide the focus switc...

Страница 22: ...ion is activated and begins to count down 3 The image video clip is captured after the preset time has elapsed After one image video clip is taken the self timer mode is turned off If you wish to take another shot using the self timer repeat the above steps Self timer mode Description 2s The image is captured about 2 seconds after the shutter is pressed This mode is useful for preventing camera sh...

Страница 23: ... start of the video clip Video clips cannot be displayed rotated or enlarged To play the video clip back on your computer you may use either Windows Media Player or Apple Quick Time Player Quick Time basic player is available free of charge compatible with Mac and Windows computers and can be downloaded from the Apple web site at www apple com For helps on using Quick Time Player please refer to t...

Страница 24: ...mage with the e f buttons 3 The images can be displayed in reverse or forward sequence with the e f buttons 4 Press the button to adjust the zoom ratio The magnification factor is displayed on the LCD monitor 5 To view different portion of the images press the c d e f button to adjust the display area The magnification factors range from 1 0x to 4 0x 2X 2X 2X ...

Страница 25: ...ack your still images automatically in sequential order as a slideshow This is a very useful and entertaining feature for reviewing captured images and for presentations 1 Press the MODE button until is displayed 2 Press the MENU button 3 Select Slide Show with the c d buttons and press the button 4 Select the desired interval time with the c d buttons and press the button The slide show starts To...

Страница 26: ... to protect in thumbnail mode Press the button to mark the selected images video clips All Protects all images video clips 6 Press the button Protection is applied to the selected images and the video camera returns to the previous menu mode The protect icon is displayed with protected images 7 To cancel protection repeat steps 2 to 6 from above The removal of image protection is executed and the ...

Страница 27: ...buttons 3 Press the MENU button 4 Select Delete File or Delete All with the c d buttons and press the button Delete File Deletes the current image video clip Delete All Deletes all images video clips 5 Select Yes to delete Select No to cancel 6 Press the button to confirm Delete All 5 Protect Sound Delete File Slide Show Play Single Yes No 5sec ...

Страница 28: ...o begin playback To pause press the button again To stop playback press the T button Deleting Audio Files 1 Press the MODE button until is displayed 2 Press the MENU button to enter the audio playback menu 3 Select Delete File or Delete All with the c d buttons and press the button Delete File Delete the current audio file Delete All Delete all audio files 00 03 06 00 00 00 00 00 00 Stop 00 00 00 ...

Страница 29: ...Size This sets the size of the video clips that will be captured 640 x 480 320 x 240 Quality This sets the quality compression at which the video clip is captured Fine Standard Economy EV Your digital video camera adjusts the exposure of each shot automatically However if the subject is very dark or very bright you may override the digital video camera s automatic exposure determination to make th...

Страница 30: ... the human eye Auto Daylight Cloudy Fluoresc Tungsten LED This sets whether the video camera s LED lights are activated during usage Auto The LED lights will automatically turn on when recording video clips and turns off when the recording ends On The LED lights are turned on all the time during usage Off The LED lights are turned off all the time during usage ...

Страница 31: ...ize of the images that will be captured 11m 3840 x 2880 FW interpolation 8m 3264 x 2448 FW interpolation 5m 2560 x 1920 3m 2048 x 1536 1 m 1280 x 960 0 3m 640 x 480 Quality Refer to the section in this manual titled Quality in Video Menu for further details EV Refer to the section in this manual titled EV in Video Menu for further details W Balance Refer to the section in this manual titled W Bala...

Страница 32: ...is sets the shooting mode for capturing still images Blank Single Captures a single image Burst Captures 3 images continuously AEB Auto exposure bracketing capture mode Date Print The date of recording can be printed directly on the still images This function must be activated before the image is captured The date appears on the right bottom of the captured image When images are captured with date...

Страница 33: ...press the e button Slide Show Refer to section in this manual titled Slideshow Display for further details Delete File Refer to section in this manual titled Deleting Still Images Video Clips for further details Delete All Refer to section in this manual titled Deleting Still Images Video Clips for further details Protect Refer to section in this manual titled Protecting Images for further details...

Страница 34: ...er details LCD Bright This sets the brightness of the LCD monitor screen The adjustment range is from 5 to 5 Light Freq The function allows to change the light frequency of environment to 60Hz or 50Hz 60Hz the light frequency of environment is 60Hz 50Hz the light frequency of environment is 50Hz Date Time Refer to section in this manual titled Setting the Date and Time for further details Power Of...

Страница 35: ...st one file is inserted into the video camera Yes No Beep This sets whether or not to mute the startup sound and the video camera sound each time you press a button On Off Video Out Sets video compatibility with the equipment you are going to connect to the digital video camera NTSC NTSC system PAL PAL system Sys Reset Returns all basic settings to the digital video camera s default settings Yes N...

Страница 36: ...tion To install software 1 Insert the CD ROM that came with the digital video camera into your CD ROM drive The welcome screen appears 2 Click the respective software name Follow the on screen instructions to complete the installation For more information about the operation of the software refer to its respective help documentation For Windows 2000 XP Vista users please make sure to install and u...

Страница 37: ...le click on the DCIM folder to open it to find more folders Your recorded images video clips and audio files will be inside these folders 9 Copy and paste or drag and drop files to a folder on your computer 10 To delete files simply select the unwanted files and delete Mac users Double click the untitled or unlabeled disk drive icon on your desktop iPhoto may automatically launch Formatting the in...

Страница 38: ...igital video camera 4 Connect the other end of the USB cable to an available USB port on your computer 5 Select PC Cam with the c d buttons and press the button 6 Position the digital video camera steadily on a flat surface or use a tripod 7 Launch the videoconferencing application software Simply follow the instructions in the application software to start your digital video camera This function ...

Страница 39: ...s SD SDHC memory card up to 4GB optional File format Image format JPEG video format Motion JPEG AVI Lens Aperture 3 1 Focus Length 7 5mm Focus range Macro 60 100 cm Normal 100cm infinity Shutter speed 1 4 S 1 1000 S LCD monitor 2 36 TFT LCD 115K pixels Self timer 10 sec delay 2 sec delay Exposure compensation 1 8EV 1 8EV in 0 3EV increments White balance Auto Daylight Cloudy Fluorescent Tungsten I...

Страница 40: ...free capacity Insert a new SD SDHC memory card or delete unwanted files The video camera is not in shooting mode Set the video camera to shoot ing mode The SD SDHC memory card is write protected Remove the write protection The video camera cannot focus The lens is dirty Wipe clean with a soft dry cloth or lens paper The distance to the subject is smaller than the effective range Place your subject...

Страница 41: ...SB port on the printer 4 Select Pictbridge with the c d buttons and press the button Printing images When the digital video camera is properly connected to a PictBridge compliant printer and set to Pictbridge the PictBridge menu is displayed on the monitor 1 Select the item you wish to configure with the c d buttons and press the button Images Sets whether you wish to print a specific image or all...

Страница 42: ...d buttons After selecting the desired image and printing number press the button to confirm 4 Select Print with the c d buttons and press the button to start printing 5 The printing starts and the figure shown on the right hand side appears COMPLETE will be displayed temporarily reminding you that the printing procedure is finished If a printing error is detected PRINT ERROR will be displayed The ...

Страница 43: ...oductos Italian Il simbolo è in accordo con la Direttiva 2002 96 EC sui Rifiuti Apparecchiature Elettriche ed Elettroniche RAEE Il simbolo indica l obbligo della raccolta separata delle apparecchiature elettriche ed elettroniche pertanto si raccomanda d utilizzare i sistemi di raccolta e o restituzione disponibili nella vostra zona per queste tipologie d apparecchiature Swedish Märket anger överen...

Страница 44: ......

Страница 45: ......

Отзывы: