


-9-
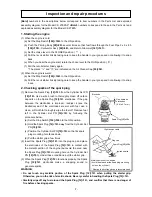
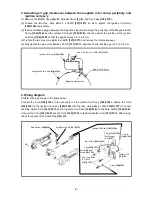
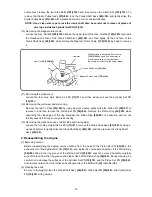
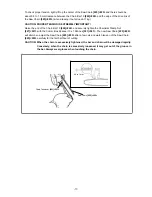
Be careful of the installation angle and the press-connecting direction of the Earth Cord
[130]<130>
.
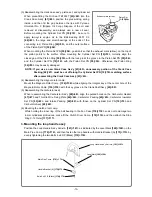
5. Checking the pump filter body comp.
Use a piece of wire to remove the Pump Filter Body Comp.
[146]<146>
from the fuel inlet of the Tank
[143]<143>
. If the Pump Filter Body Comp.
[146]<146>
is stained, clean it with gasoline. Remove the
Pump Filter Body Comp.
[146]<146>
from the Shield Tube 3 x 5 x180
[137]<137>
. Check the Pump Filter
Body Comp.
[146]<146>
for clogging by blowing air into it. Replace the Pump Filter Body Comp.
[146]<146>
as necessary.
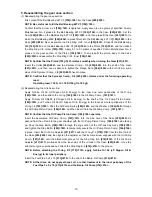
6. Cleaning the muffler (B)/muffler and cylinder
Remove the Muffler Cover
[4]<4>
. Loosen the two Hex. Hole Bolts 6 x 65
[6]
or Hex. Hole Bolts M6 x 55
<6>
, and then remove the Muffler (B)
[8]
or Muffler
<8>
together with the Heat Protection Panel
[10]<10>
.
Use a flat-blade (precision) screwdriver to scrape off carbon accumulated at the exhaust port of Muffler (B)
[8]
or Muffler
<8>
. Close the exhaust port of the Cylinder Set PN
[19]<19>
with the Piston Set PN
[55]<54>
, and then scrape off carbon accumulated at the exhaust port of the Cylinder Set PN
[19]<19>
.
NOTE: Do not scratch the Piston Set PN [55]<54>.
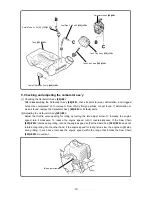
7. Cleaning the cleaner element
Open the Air Cleaner Cap
[53]<52>
of the Air Filter Ass'y
[54]<53>
. Remove the Cleaner Element
[52]<51>
and clean it with compressed air. If the Cleaner Element
[52]<51>
is heavily stained, clean it
with gasoline and dry it well before reassembly.
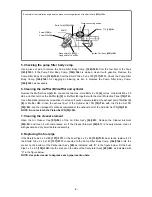
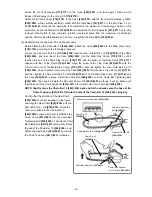
8. Replacing the fuel pipe
If the Shield Tube 3 x 5 x180
[137]<137>
or the Fuel Pipe 3 x 5 x 85
[138]<138>
has cracks, replace it. Fit
the Shield Tube 3 x 5 x180
[137]<137>
connected to the Pump Filter Body Comp.
[146]<146>
into the
socket on the bottom of the Carburetor Ass'y
[48]
as indicated with “B” in the figure below. Fit the Fuel
Pipe 3 x 5 x 85
[138]<138>
into the socket on the side of the Carburetor Ass'y
[48]<48>
as indicated with
“C” in the figure below.
NOTE: Use parts cleaner to degrease each pipe insertion hole.
Screw
[129]
or
Screw M4
<129>
Flange Nut M4
[132]
or
Flange Nut M14
<132>
Earth Cord
[130]<130>
Ignition Coil Ass'y
[128]<128>
Press-connecting portion
Washer T1.6
[16]<16>
45º±10º


