background image

  Picture
  Audio
  Timer
  Function
  Setup
  Language
     Select
    OK  Set

Function
  Screen Saver 

  Off

  Screen Wipe 

On  60Min.

  Black Side Panel 

  Off

  Video Power Save 

  Off

  Freeze Mode 

  Split

  Default Zoom 

  Panoramic  

  Reset 


   Reset

     Select            Set                Return

OK

    MENU

FUNCTION MENU

Function
  Panel Life   

  Normal

  Mode Display 

  Off

  ID Number  

  1

  Inverse 


On  60Min.

  Standby White 

  Off

  Gamma 


  2.2  

  Reset 


   Reset

     Select            Set                Return

Selected characters

Setup hint

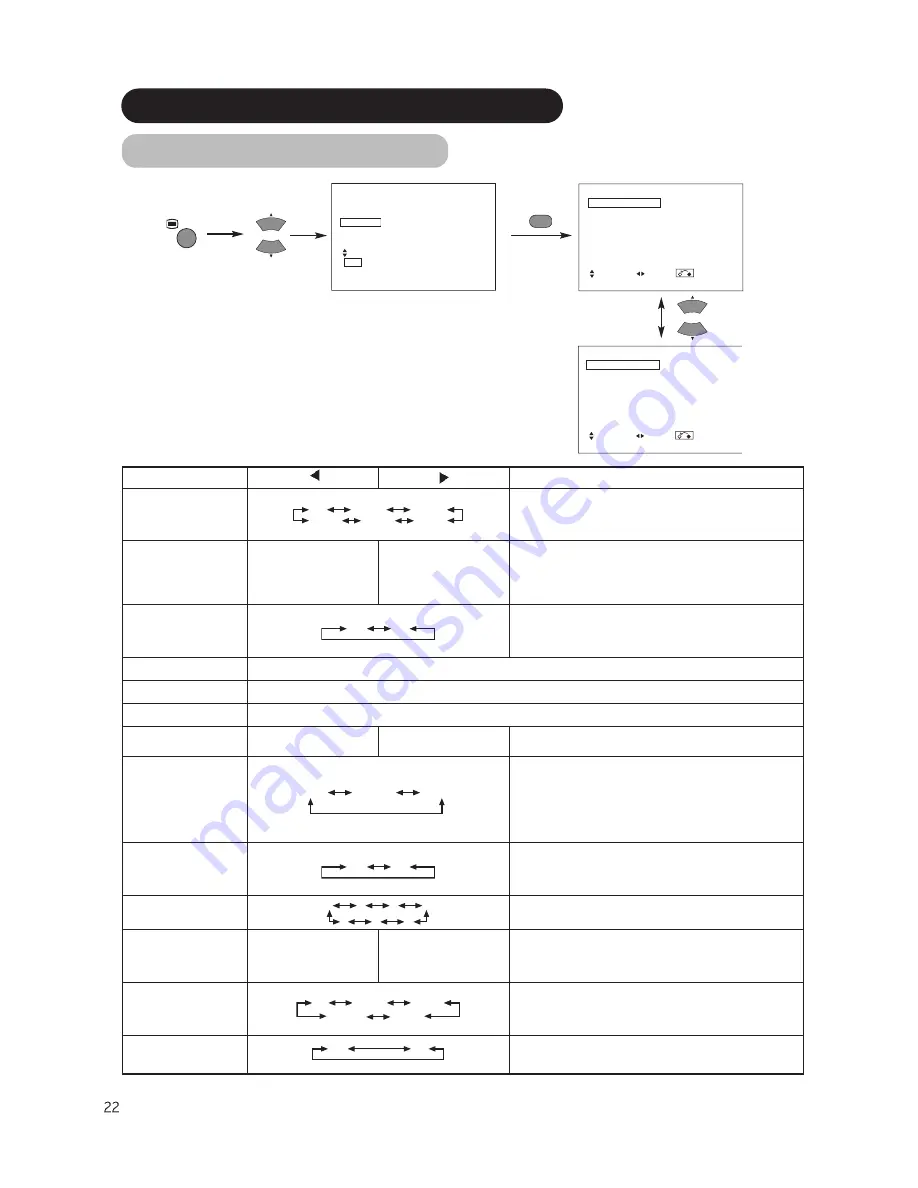
Screen Saver

Off           5Min.           10Min.

60Min.       40Min.       20Min.

This moves the picture around the screen in small amounts, at set
intervals, to reduce the panel image retention. This is where
stationary objects, such as screen logos, leave a slight image visible
after they should have disappeared.

Screen Wipe

On

60Min.

This is used to reduce the panel image retention that can occur with
stationary pictures by the white field signal. Select On (continuous
operation) or 60 Min. (time limit operation) and press the OK button.
Press the MENU or RETURN button on the remote control to return to
normal viewing.

Black Side Panel

Off          On

This turns the gray sidebars On/Off when watching normal mode
screen size area. It is always set to Off when the monitor powered
On. It is recommended to set to Off to reduce the panel image
retention.

Video Power Save

Optional (grayed out)

Freeze Mode

Optional (grayed out)

Default Zoom

Optional (grayed out)

Reset

(off the function)

(waiting to reset)

The original factory settings for the items of this Menu page can be
restored by pressing the OK button.

Panel Life

Normal         Extend 1         Extend 2

This function is to suppress the contrast of the screen regardless of
the Contrast setting in the Picture Menu. By this control, power
consumption can be reduced or degradation of a panel can be
mitigated. The order of power consumption is Extend 2 < Extend 1 <
Normal.
If the Contrast setting is changed when this item is set to Extend 1 or
2, it will be changed to Normal automatically.

Mode Display

Off          On

This can display the Input Signal Screen Display every time the input
mode and signal mode are changed.
Set to OFF if the Input Signal Screen Display is not needed when
switching signals.

ID Number

1         2         3         4

7         6         5

Assigns ID nos. to the monitors so that they can be controlled
individually (up to 7 monitors can be controlled).

Inverse

On

60Min.

This function can change each level of RGB signal invert to reduce
the panel image retention. When this function is required to use,
select On (continuous operation) or 60Min. (time limit operation) and
press the OK button. And press the Menu or Return button to exit.

Standby White

Off         15Min.         30Min.
     120Min.         60Min.

This function is also provided against the image retention. If time is
set for this item, the screen changes into the white pattern when the
monitor enters power save mode, and it will continue for the period of
setting time.

Gamma

2.2                       2.8

Normally set to 2.2.  This function will change the overall brightness 
(and Color Saturation) of an image as it is displayed on a monitor.

OPERATING INSTRUCTIONS (continued)

Содержание CMP420V1A

Страница 1: ...PLASMA DISPLAY MONITOR Operating Guide for CMP420V1A CMP420V2A ...

Страница 2: ...s of their respective holders REMARQUE Les particularités de lʼécran couleur à plasma sont les suivantes Les informations contenues dans ce manuel peuvent être modifiées sans préavis Le constructeur nʼaccepte aucune responsabilité pour les erreurs qui peuvent éventuellement apparaître dans ce manuel MARQUES DÉPOSÉES VGA et XGA sont des marques déposées dʼInternational Business Machines Corporation...

Страница 3: ...the future Notes on lnstallation Work This product is marketed assuming that it is installed by qualifed personnel with enough skill and competence Always have an installation specialist or your dealer install and set up the product HITACHI cannot assume liabilities for damage caused by mistake in installation or mounting misuse modification or a natural disaster Note for Dealers After installatio...

Страница 4: ...ns in the literature accompanying the appliance WARNING TO PREVENT FIRE OR SHOCK HAZARD DO NOT EXPOSE THIS MONITOR TO RAIN OR MOISTURE THE MONITOR SHOULD NOT BE EXPOSED TO DRIPPING OR SPLASHING AND NO OBJECTS FILLED WITH LIQUIDS SUCH AS VASES SHOULD BE PLACED ON THE MONITOR NOTE There are no user serviceable parts inside the monitor Model and serial numbers are indicated on back side of the monito...

Страница 5: ...ting as recommended by the manufacturer 17 An outdoor antenna should not be located in the vicinity of overhead power lines or other electrical circuits 18 If an outside antenna is connected to the receiver be sure the antenna system is grounded so as to provide some protection against voltage surges and built up static charges Section 810 of the National Electric Code ANSI NFPA No 70 1984 provide...

Страница 6: ...r wax glass cleaner etc especially because they would cause discoloration scratches or cracks Large screen high definition plasma display panel The 42 inch color plasma display panel with a resolution of 852 H x 480 V pixels creates a high definition large screen aspect ratio 16 9 and low profile flat display Free from electromagnetic interferences from geomagnetic sources and ambient power lines ...

Страница 7: ...o change without notice While meticulous care has been taken in the preparation of this manual you are requested to notify your dealer or us should you have any comments views or questions about our product Fully understand the prerequisites to using the product such as hardware and software specifications and constraints in using the product We are not held liable for damages caused by improper h...

Страница 8: ...jects could result in fire or electrical shock Use special caution in households where children are present If liquids or foreign objects should enter the Plasma monitor immediately turn off the power switch disconnect the power plug from the power outlet and contact your dealer Do not place the monitor in a bathroom Do not expose the monitor to rain or moisture Do not place flower vases pots cups...

Страница 9: ...not place a spread cover etc over them because this could result in the inadvertent placing of heavy objects on the concealed power cord or cables Do not pull the power cord and cables When connecting and disconnecting the power cord or cables do it with your hand holding the plug or connector Do not place the cord near the heater Do not touch the power plug just after disconnecting it from the po...

Страница 10: ...knock or rub the surface with sharp or hard objects Clean the screen with a soft cloth moistened with warm water and dry with a soft cloth If it is not enough then use a cloth with mild detergent Do not use harsh or abrasive cleaners How to clean the cabinet of the monitor Use a soft cloth to clean the cabinet and control panel of the monitor When excessively soiled dilute a neutral detergent in w...

Страница 11: ...ace heavy objects on the remote control Avoid strong rays Any strong rays such as direct sun rays or room lighting onto the remote control sensors could invalidate the remote control Avoid radio interference Any interfering radiation could cause distorted images or noises Avoid radio generator such as a mobile telephone transceiver etc around the monitor Set the sound volume at a suitable level It...

Страница 12: ... regulations provided that following conditions are met Video inputs The input signal amplitude must not exceed the specified level CAUTION Changes or modifications not expressly approved by the party responsible for compliance could void the user s authority to operate the equipment Declaration of Conformity According to 47CFR Part 2 and 15 for Class B Personal Computers and Peripherals and or CP...

Страница 13: ...CT button INPUT SELECT button OK button RECALL button SELECT button Adjustment buttons are located on the bottom The back cover is provided with indications to distinguish the adjustment buttons SUB POWER button Control panel VOLUME UP DOWN buttons ADJUST buttons Main power switch The main power switch is located at the back on the lower surface Indicating lamp External device connection terminals...

Страница 14: ...batteries could explode or leak resulting in fires physical injury or stains Danger of explosion if battery is incorrectly replaced Replace with the same or equivalent type When loading batteries observe their correct polarities as marked on the product If loaded in the wrong direction the batteries could explode or leak resulting in fires physical injury or stains CAUTION ATTENTION Do not drop or...

Страница 15: ...elf Ask your dealer to provide the name of a qualified installer In order to prevent an internal temperature increase maintain a space of 10cm 4 inches For a desktop set up or more between the sides and other objects such as walls etc so that the ventilation holes are not blocked CAUTION Have this unit mounted in a stable place Take measures to prevent it from tumbling down to avoid possible physi...

Страница 16: ...l computer is turned off 3 Connect the signal input terminal RGB 1 or RGB 2 on the rear panel of this device to the display signal output terminal of the personal computer Use a cable that fits the input terminal of this device and the output terminal of the personal computer Depending on the type of personal computer being connected the use of an optional conversion adapter or the adapter provide...

Страница 17: ...r cord after completing all other connections INSTALLATION INSTRUCTIONS continued Power Cord Connection Use only the power cord provided Do not use a power supply voltage other than that indicated AC100 240V 50 60Hz as this may cause fire or electric shock CAUTION Mounting the Speaker Unit option Refer to the instruction manual concerning mounting of the optional speaker unit ...

Страница 18: ...e control or the SUB POWER button on the underside of the front of the frame is ON Lights orange Off Power Save When the main power switch is ON and the ON button on the remote control or the SUB POWER button on the underside of the front of the frame is ON However the state in POWER SAVE mode When the indicating lamp lights in orange or the message No Sync Signal Power Save or Invalid Scan Freq a...

Страница 19: ...nput can be switched by pressing the RGB1 RGB2 buttons of the remote control Input can be switched in the sequence of RGB1 RGB2 by pressing the INPUT SELECT button of the monitor When a button is pressed the volume adjustment status guide will be displayed The volume will increase when the VOL or button is pressed while the guide is being displayed The volume will decrease when the VOL or button i...

Страница 20: ...ontal frequency Input vertical frequency The input signal status can be displayed on the screen by pressing the RECALL button of the remote control or the monitor The display will go out in approximately 6 seconds Off timer On timer RGB OPERATING INSTRUCTIONS continued RECALL button Display area selection diagram RGB input Resolution Full display Circular display Display Full Normal Real Zoom1 Zoo...

Страница 21: ...ol allows separate control of up to a maximum of seven monitors Remote control ID No 2 initially ID no 1 can be set by pressing the ID SET button for 2 sec or more while holding down the ID button The number will be incremented 2 6 7 1 2 when this button pressed continuously The ID remote control is operated by pressing the various buttons while holding down the ID button Operation is possible onl...

Страница 22: ...g is adjusted Brightness Black is subdued for increased overall darkness Black is set off for increased overall brightness Adjust to taste Color Darkens colors Lightens colors Adjust to taste Tint Enhances red and weakens green Enhances green and weakens red This is not available to adjust when receiving PAL SECAM signal In this case the character will be grayed out Adjust for most realistic skin ...

Страница 23: ...tadium Perfect Volume Off On This will automatically adjust volume so each channel and input has the same average volume level Reset off the function waiting to reset The original factory settings for the items of this Menu page can be restored by pressing the OK button Picture Audio Timer Function Setup Language Select OK Set Audio Audio Mode Movie Treble 10 Bass 10 Balance 0 L R SRS TruBass Midd...

Страница 24: ...ory settings for the items of this Menu page can be restored by pressing the OK button Panel Life Normal Extend 1 Extend 2 This function is to suppress the contrast of the screen regardless of the Contrast setting in the Picture Menu By this control power consumption can be reduced or degradation of a panel can be mitigated The order of power consumption is Extend 2 Extend 1 Normal If the Contrast...

Страница 25: ...S continued Depending on the type of signal displayed displays may not be optimized through automatic adjustment Available with the use of video unit option CMPAVW1VKA Adjust manually to optimize them Horizontal Position 0 Next Prev Adjust Return OK Setup Auto Adjust Adjust Horizontal Position 0 Vertical Position 31 Horizontal Clock 20 Clock Phase 10 Reset Reset Select Return Exit Clock Phase 10 N...

Страница 26: ...nd press the OK button OTHER FEATURES Automatic Store Approximately 1 sec after adjustment is completed the adjustments will be recorded as shown in the table below The previously recorded items will be lost The signal mode can be identified by the horizontal vertical sync frequency and the sync signal polarity Different signals that have the same or similar elements will be handled as the same si...

Страница 27: ...req Recheck the input signal specifications No Sync Signal Changes in the signal status are displayed on the screen as they arise OTHER FEATURES continued RGB2 RGB H 48 4kHz V 60 1 Hz Min OFF RGB Invalid Scan Freq Power Save Mode When the RGB1 RGB2 input is selected When this unit is connected to a VESA DPMS computer the Power Save Off mode can be set to be activated automatically when the compute...

Страница 28: ...ime The tendency of the phosphor is to degrade more the brighter the characters and figures are displayed When images of figures with different levels of brightness as shown in Fig B are continuously displayed for a long period of time it becomes easier for image marks at locations when the brighter figures are displayed to be noticeable The image retention images in this document are exaggerated ...

Страница 29: ...lid Scan Freq is displayed Invalid Scan Freq An input signal is not received normally Check to see if the input signal matches the monitor specifications Check the way the signal cable is connected The power indicating lamp is normally lit but no picture Check the contrast and brightness settings adjust them for higher contrast and brightness Check the way the signal cable is connected The display...

Страница 30: ...TROUBLESHOOTING continued Symptoms That Seemingly Appear to be Failures continued ...

Страница 31: ...tal Clock adjustment 6 Press the or ADJUST buttons and search for clear characters over the entire screen 7 Perform adjustment for symptom 2 below when the characters are blurred on the entire screen The display image may be momentarily disturbed during clock adjustment but this is not a failure Symptom 2 Text displayed across the screen appears blurred in its entirety figure 2 A fine pattern flic...

Страница 32: ...H x 91 D mm Net weight excluding Speakers Stand 33 2kg Ambient conditions Temperature Operating 5 C to 35 C Storage 15 C to 60 C Relative humidity Operating 20 to 80 Storage 20 to 90 non condensing Power supply AC100 240V 50 60Hz Power consumption at standby 310W 3W Audio output 12W 12W 6Ω RGB input Input signals Input terminals RGB1 DVI input terminal DVI D RGB1 audio input terminal 3 5mm Stereo ...

Страница 33: ... D S Data4 17 T M D S Data0 5 T M D S Data4 18 T M D S Data0 6 DDC Clock 19 T M D S Data0 5 Shield 7 DDC Data 20 T M D S Data5 8 No Connect 21 T M D S Data5 9 T M D S Data1 22 T M D S Clock Shield 10 T M D S Data1 23 T M D S Clock 11 T M D S Data1 3 Shield 24 T M D S Clock 12 T M D S Data3 Frame GND 13 T M D S Data3 With Digital RGB signal input RGB1 input Recommended Signal List Make sure that th...

Страница 34: ...to it The monitor differentiates the signal modes according to the horizontal and vertical frequencies and the horizontal and vertical sync signal polarities Note that different signals having all these elements alike may be handled as the same signal Displaying images with more than 480 lines of vertical resolution at Full diplay compressed display can result in the interpolation of stripes PRODU...

Страница 35: ...H S I L G N E SUPPLEMENT For Display Monitor with video unit option CMPAVW1VKA ...

Страница 36: ...at the time With DVI STB and RGB component setup To component video equipments Please use the connection cable suitable for the terminal form of video equipment Applicable video signals for each input terminal See PRODUCT SPECIFICATIONS for details Terminal RCA SCART DVI D sub Remarks Signal CVBS S video Component RGB PC STB RGB Component AV1 AV2 Refer to Setup Menu AV3 AV4 Refer to Setup Menu RGB...

Страница 37: ...0 or 720p 60 4 3 Panoramic Zoom Full Cinema Display size selection diagram When you want to Set the display size Input signal Display screen Remarks Play a 4 3 image in a 16 9 screen faithfully 4 3 Blanking occurs on both sides Play a 4 3 image in a 16 9 screen with the height and width of the middle of the screen enlarged on equal scales and with both sides appearing somewhat enlarged Panoramic P...

Страница 38: ... a normal 4 3 image is displayed over the entire screen in the Panoramic mode parts of the periphery of the image may disappear and or appear distorted in some cases Use the 4 3 mode to view images which were created in 4 3 mode This mode allows 4 3 content to be viewed without picture distortion Press Vertical picture position can be adjusted for Panoramic Zoom and Cinema mode as follows 1 Press ...

Страница 39: ... pressing the and SELECT buttons the audio of the video will be output from the side on which the speaker icon is located The same video input mode cannot be selected for both screens at the same time Pressing the PinP button again or the RETURN button will cancel the 2 pictures display When the Video input is set to RGB Video this Split mode is not possible Refer to the table for 2 pictures Split...

Страница 40: ...ding Select Set Return OK Picture Day Color Temp Adjust Color Management Color Decoding Select Set Return OK Picture Color Management On Magenta 60 Red 30 Yellow 0 Green 60 Cyan 30 Blue 0 Reset Reset Select On Off Return OK OK Picture Color Decoding RGB R G B Red 0 Green 60 Color 0 Tint 31 Reset Reset Select Return Exit OPERATING INSTRUCTIONS continued PICTURE MENU Picture Mode Day Next Prev Selec...

Страница 41: ...he function waiting to reset The original factory settings for the items of this Menu page can be restored by pressing the OK button YNR Off Low High Performs picture signal noise reduction Turn up to reduce noise CNR Performs color signal noise reduction Turn up to reduce noise And it will be fixed as Off only when selecting DVI STB mode Film Mode Off On On Automatically detects the movie film ma...

Страница 42: ...ss the OK button every time the setting is changed Red Darkens red only Lightens red only This adjusts R G B level or tint to make the color appear natural for the user s preference These settings are independently stored in each of the 4 Color Temperature modes Green Darkens green only Lightens green only Color Darkens colors Lightens colors Tint Enhances red and weakens green Enhances green and ...

Страница 43: ...and the operation is found erratic set this to match the input signal When the component signal is received this would be not available PAL signals are not available in North America grayed out AV2 Same to AV1 AV3 AV4 Video Input AV1 Auto HDTV SDTV DVD This should correspond to the signal mode of the signal from the equipment that is connected to AV1 video input terminal Normally set this to Auto ...

Страница 44: ...t signal Approximately 1 sec after adjustment is completed the adjustments will be recorded as shown in the table below OTHER FEATURES Automatic Store Menu Display Registration condition Picture Picture Mode 1 setting is registered Contrast For every input function and every Picture Mode 1 setting is registered Brightness Color Sharpness Tint Color Temperature Contrast Mode YNR CNR Film Mode PAL C...

Страница 45: ...ge 20 to 90 non condensing Power supply AC100 240V 50 60Hz Power consumption at standby 310W 3W Audio output 12W 12W 6Ω RGB input Input signals Input terminals RGB1 DVI input terminal DVI D RGB1 audio input terminal 3 5mm Stereo Mini Jack RGB2 analog RGB input terminal D sub 15 pin RGB2 audio input terminal 3 5mm Stereo Mini Jack Video signals 0 7 V 1 0 Vp p analog RGB Recommended Signal 480i 576i...

Страница 46: ...nnector When different kinds of input signals are simultaneously input to the monitor via a graphics board or the like the monitor will automatically select the signals in the following priority order Even in the case of the recommended signals shown on the following page there may be instances when correct display is not possible In this case use H V separate sync H V composite sync Sync signal t...

Страница 47: ...ontal frequency kHz Dot clock frequency MHz Remarks Signal Name Resolution Vertical frequency Hz 1 576i 576 50 00 15 63 2 480i 480 59 94 15 73 3 576p 576 50 00 31 26 4 480p 480 59 94 31 47 5 1080i 50 1080 50 00 28 13 6 1080i 60 1080 60 00 33 75 7 720p 60 720 59 94 44 96 With component input AV1 AV2 and RGB2 component input The monitor differentiates the signal modes according to the horizontal and...

Страница 48: ...ent and expedient assistance Our service hotline operator will direct you to the Hitachi Authorized Service Facility nearest you Just present proof of purchase and or delivery receipts to the Hitachi Authorized Service Facility and service will be rendered in accordance with the terms of the limited warranty as stated on your warranty card or operating guide Should you have any questions regarding...

Страница 49: ...n présumant qu il sera installé par une personne qualifiée possédant les connaissances et les compétences indispensables Ce produit doit dans tous les cas être installé et réglé avant emploi par un installateur spécialisé ou votre revendeur HITACHI ne peut assumer aucune responsabilité pour des dégâts ou des endommagements causés au produit à cause d une erreur commise lors de l installation ou du...

Страница 50: ...ne l appareil AVERTISSEMENT AFIN DE PRÉVENIR LES RISQUES D INCENDIE ET D ÉLECTROCUTION NE PAS EXPOSER LE MONITEUR À LA PLUIE OU À L HUMIDITÉ LE MONITEUR NE DOIT PAS ÊTRE EXPOSÉ À L ÉCLABOUSSEMENT OU AU RUISSELLEMENT DE GOUTTELETTES D EAU ET AUCUN OBJET CONTENANT UN LIQUIDE COMME UN VASE ETC NE DOIT ÊTRE PLACÉ SUR LE MONITEUR REMARQUES ll n y a aucune pièce destinée à l utilisateur à l intérieur du...

Страница 51: ...le faire basculer et entraîner des blessures corporelles ou le bris de l appareil 16 Lors de l installation d un support ou de tablettes murales suivez toutes les directives du fabricant 17 L antenne extérieure ne doit pas être installée à proximité de lignes aériennes de transport d énergie ni dispositifs d éclairage ni autres circuits d énergie électrique 18 Si une antenne extérieure est reliée ...

Страница 52: ...doux sec Grand écran d affichage à plasma et à haute définition L écran d affichage couleur à plasma de 42 pouces avec une résolution de 852 H x 480 V pixels permet de créer un grand écran affichage à haute définition format d image 16 9 plat L écran d affichage n étant pas affecté par les interférences électromagnétiques provenant de sources géomagnétiques et des lignes à haute tension situées da...

Страница 53: ...a préparation de ce Manuel nous vous prions de contacter votre revendeur ou notre société si vous avez des commentaires des avis ou des questions concernant notre produit Il convient de comprendre parfaitement les conditions préalables requises à l utilisation de ce produit telles que les caractéristiques et les spécifications techniques concernant le matériel et le logiciel et les contraintes lor...

Страница 54: ...cendie ou des commotions électriques Soyez particulièrement prudent dans une maison ou un local où des enfants sont présents Si des liquides ou des objets étrangers pénètrent dans l écran à plasma mettre immédiatement l appareil hors tension en coupant l alimentation puis retirer la prise mâle de la prise femelle murale d alimentation et contacter votre revendeur Ne pas placer l écran à plasma dan...

Страница 55: ... quelconque couverture nappe etc car on risquerait ainsi de les dissimuler et de placer par inadvertance des objets lourds sur le câble d alimentation ou sur les autres câbles Ne pas tirer sur le câble d alimentation ou sur les autres câbles Lorsque l on branche ou débranche le câble d alimentation ou les autres câbles vous devez tenir en main la prise ou le connecteur Ne pas placer le câble d ali...

Страница 56: ...e provoquer un incendie ou des commotions électriques Ne pas placer l appareil près de la cuisine d un humidificateur ou à un autre endroit où il y a de l huile de la fumée ou de l humidité Eviter un environnement où la température est élevée La chaleur peut avoir un effet négatif sur l écran et les autres composants et peut provoquer la transformation la fusion ou un incendie Ne pas placer l écra...

Страница 57: ...d éclairage du phosphore est limitée Lorsque l écran a été sous tension et éclairé pendant une période de temps prolongé la luminosité du phosphore se dégradera au point que les images fixes brûleront la partie de l écran où elles se trouvent et laisseront une trace résiduelle grise Suggestions pour prévenir une telle rétention ou persistance d image Ne pas afficher durant une période de temps pro...

Страница 58: ...lider les signaux transmis par la télécommande et empêcher leur bonne réception Eviter les interférences radio Toutes interférences produites par des radiations peut troubler l image ou provoquer des bruits Eviter les générateurs d interférences radio comme les téléphones portables les émetteurs récepteurs à proximité de l écran Régler le volume sonore a un niveau adéquat Durant la nuit il est sou...

Страница 59: ...ISIR 16 Les boutons destinés aux réglages sont situés à la partie inférieure Des indications sont portées sur le couvercle arrière afin de distinguer les différent boutons de réglage Bouton ALIMENTATION 14 19 Panneau de commande Boutons VOLUME HAUT BAS Boutons AJUSTER 16 Terminaux de branchement des dispositifs externes Vue de la face arrière Terminaux d entrée RGB 14 Terminal haut parleur externe...

Страница 60: ...t exploser ou provoquer une fuite provoquant Danger d explosion si la batterie est inexactement substituée Substituez avec la même chose ou le type équivalent un incendie des blessures ou des taches Lorsque vous mettez en place les piles dans leur logement veuillez respecter la polarité correcte comme indiqué sur le produit Si les piles sont placées dans le mauvais sens les piles pourraient explos...

Страница 61: ...evendeur de vous indiquer les coordonnées d un installateur qualifié Afin de prévenir l augmentation de la température à l intérieur de l appareil maintenir un espace de 10 cm soit 4 pouces pour une installation sur bureau au minimum entre les côtés de l appareil et les autres objets comme les murs etc afin de ne pas bloquer les orifices de ventilation ATTENTION Installer l appareil dans un endroi...

Страница 62: ...de l ordinateur est bien en position OFF 3 Connecter le terminal d entrée des signaux RGB 1 ou RGB 2 situé sur le panneau arrière de l appareil au terminal de sortie des signaux d affichage de l ordinateur Utiliser un câble qui s adapte au terminal d entrée de cet appareil et au terminal de sortie de l ordinateur En fonction du type d ordinateur personnel auquel l écran sera connecté l utilisation...

Страница 63: ... branchements et connexions INSTRUCTIONS CONCERNANT L INSTALLATION suite Branchement du Câble D alimentation Utiliser uniquement le câble d alimentation fourni avec l écran Ne pas utiliser un voltage d alimentation autre que celui indiqué C A 100 240V 50 60 Hz car ceci pourrait provoquer un incendie ou des commotions électriques ATTENTION Se référer au Manuel Utilisateur concernant le montage de l...

Страница 64: ...uton ON sur la télécommande ou que le bouton d alimentation secondaire situé à la partie inférieure frontale l écran est positionné sur ON S allume en orange OFF Economiseur d energie Lorsque l interrupteur principal d alimentation est positionné sur ON que le bouton ON sur la télécommande ou que le bouton d alimentation secondaire situé à la partie inférieure frontale l écran est positionné sur O...

Страница 65: ... entrée L entrée peut être changée en appuyant sur les boutons RGB1 ou RGB2 de la télécommande L entrée peut être changée selon la séquence RGB1 RGB2 en appuyant sur le bouton CHOISIR ENTREE de l écran Lorsque l on appuie sur un bouton le guide de l état de réglage du volume sonore est affiché à l écran Le volume sonore augmentera lorsque l on presse le bouton VOL ou pendant que le guide est affic...

Страница 66: ...ntrée Fréquence verticale d entrée L état des signaux d entrée peut être affiché à l écran en appuyant sur le bouton RAPPEL de la télécommande ou de l écran Minuterie arrêt Minuterie marche RGB INSTRUCTIONS CONCERNANT L OPÉRATION suite Bouton RAPPEL Diagramme de sélection de l aire d affichage Entrée RGB Résolution Affichage Complet Affichage circulaire Affichage Complet Normale Réel Zoom 1 Zoom 2...

Страница 67: ...ans au maximum Le N ID 2 de la télécommande initialement N ID 1 peut être réglé en pressant durant 2 secondes ou plus sur le bouton REGLER ID tout en maintenant le bouton ID enfoncé Le numéro augmentera selon la séquence 2 6 7 12 si ce bouton est pressé continuellement La télécommande du N ID est effectuée en appuyant sur les différents boutons tout en maintenant enfoncé le bouton ID tout en maint...

Страница 68: ...ccentuées en couleur rougeâtre Les scènes claires sont accentuées en couleur rougeâtre Ajuster la température originale des couleurs verdâtre ou bleuâtre selon les préférences de l utilisateur Ces réglages sont enregistrés indépendamment dans chacun des 4 modes de la Température Couleur Vert Les scènes claires sont accentuées en couleur rougeâtre Les scènes claires sont accentuées en couleur rouge...

Страница 69: ...te fonction ajustera automatiquement le volume sonore de telle sorte que chaque canal et entrée possède le même niveau de volume sonore moyen Réini pas de fonction en attente de réinitialisation Les réglages d origine pour les rubriques et items de cette page Menu peuvent être restaurés en pressant sur le bouton OK Image Audio Minuterie Fonction Rég Init Langue Choisir OK Régler Audio Mode Audio F...

Страница 70: ... d origine pour les rubriques et items de cette page Menu peuvent être restaurés en pressant sur le bouton OK Vie du panneau Normale Extension 1 Extension 2 Cette fonction vise à supprimer le contraste de l écran sans tenir compte du réglage Contraste dans le Menu Image Grâce à cette commande la consommation d énergie peut être réduite ou la dégradation du panneau peut être limitée L ordre de la c...

Страница 71: ...juster Position Horizontale 0 Position Verticale 31 Horloge Horizontale 20 Phase 10 Réini Réini Choisir Retour Sortie Rég Init Niveau D Entrée 0 7V Fréquence d affichage Off type WVGA Off Mode WXGA Off Filtre Vertical On Mode de fréquence Film RGB1 DVI PC RGB2 RGB Choisir Régler Retour OK MENU Position Horizontale 0 Proch Pré Ajuster Retour OK Rég Init Réglage Automatique Ajuster Position Horizont...

Страница 72: ... OK AUTRES CARACTÉRISTIQUES Enregistrement Automatique Environ une seconde après que l ajustement est achevé les ajustements seront enregistrés comme indiqué sur le tableau ci dessous Les éléments enregistrés précédemment seront perdus Le mode de signal peut être identifié par la fréquence sync horizontale verticale et la polarité de signal sync Les signaux différents dont les éléments sont identi...

Страница 73: ... Freq Fréquence de balayage non valide Vérifier de nouveau les caractéristiques concernant le signal d entrée 30 32 No Sync Signal Les modifications de l état des signaux sont affichées sur l écran au fur et à mesure qu elles apparaissent AUTRES CARACTÉRISTIQUES suite RGB2 RGB H 48 4kHz V 60 1 Hz Min OFF RGB Invalid Scan Freq Mode D économie de L énergie Lorsque l entrée RGB1 RGB2 est choisie Lors...

Страница 74: ... que du temps d affichage Plus les images et les caractères affichées sont lumineux plus le phosphore a tendance à se dégrader Dans le cas d images ayant des niveaux de luminosité différents comme indiqué sur la Figure B sont affichées continuellement durant une période de temps prolongé les marques d images sont plus facilement décelables aux endroits ayant les images les plus lumineuses Les imag...

Страница 75: ...can Freq Fréquence de balayage non valide est affiché Invalid Scan Freq Un signal d entrée n est pas reçu normalement Vérifier si le signal d entrée correspond bien aux caractéristiques techniques de l écran Vérifier de quelle manière est connecté le câble des signaux Le voyant indicateur d alimentation est allumé mais il n y a pas d image Vérifier les réglages du contraste et de la luminosité les...

Страница 76: ...DÉPISTAGE DES DÉRANGEMENTS ET CONTRE MESURES suite Symptômes Pouvant Indiquer des Dérangements suite ...

Страница 77: ...e horizontale 6 Appuyer sur les boutons AJUSTER ou et rechercher les caractères clairs sur l ensemble de l écran 7 Exécuter l ajustement pour le symptôme ci dessous lorsque les caractères sont flous sur l ensemble de l écran L image affichée peut être momentanément troublée durant l ajustement de l horloge mais ceci n est pas un dérangement Symptôme 2 Le texte affiché sur l écran apparaît flou dan...

Страница 78: ...exion 12 SDA 13 H Sync ou H V composite sync 14 V Sync V CLK 15 SCL Panneau de l écran Dimensions de l écran d affichage Approximativement 42 pouces 920 H x 518 V diagonale 1059 mm Résolution 852 H x 480 V pixels Dimensions nettes sans les haut parleurs et le support de l écran 1030 largeur x 636 hauteur x 91 profondeur mm Poids net sans les haut parleurs et le support de l écran 33 2 kg Condition...

Страница 79: ...S Donnée2 15 Terre pour 5V 3 T M D S Donnée2 4 Ecran 16 Prise Chaude Détecter 4 4T M D S Donnée4 17 T M D S Donnée0 5 T M D S Donnée4 18 T M D S Donnée0 6 Horloge DDC 19 T M D S Donnée0 5 Ecran 7 Donnée DDC 20 T M D S Donnée5 8 Pas de connexion 21 T M D S Donnée5 9 T M D S Donnée1 22 T M D S Ecran Horloge 10 T M D S Donnée1 23 T M D S Horloge 11 T M D S Donnée1 3 Ecran 24 T M D S Horloge 12 T M D ...

Страница 80: ... Hz L écran fait la différentiation des modes de signal selon les fréquences horizontale et verticale et les polarités des signaux Sync verticaux et horizontaux Veuillez noter que des signaux différents ayant tous ces éléments identiques seront traités comme des signaux similaires Les images affichées avec plus de 480 lignes de résolution verticale en affichage Plein affichage compressé peut résul...

Страница 81: ...N A R F Ç S A SUPPLÉMENTS Pour l écran de visualisation avec l option visuelle CMPAVW1VKA d unité ...

Страница 82: ...iorité Si le terminal de SORTIE ECRAN est connecté à un écran externe avec un terminal 75 Ohm il est possible de visualiser la même image que sur l unité principale Mais il est possible de contrôler uniquement le signal vidéo composite à partir des entrées AV1 AV2 AV3 ou AV4 affichées à l écran à ce moment là Avec l installation des composants DVI STB et RGB Vers équipement vidéo Veuillez utiliser...

Страница 83: ...gramme de la sélection de la taille d affichage Bouton TAILLE Lorsque vous souhaitez Régler la taille sur Signal d entrée Ecran d affichage Remarques Affiche fidèlement une image 4 3 sur un écran 16 9 4 3 Blanc des deux côtés Affiche une image 4 3 sur un écran 16 9 avec la hauteur et la largeur du milieu de l écran élargi en échelles égales avec les deux côtés apparaissant un peu agrandis Panorami...

Страница 84: ...e Lorsqu une image normale 4 3 est affichée sur l ensemble de l écran en mode Panoramic certaines parties de la périphérie de l image peuvent disparaître et ou apparaître comme déformées dans certains cas Utiliser le mode 4 3 pour visualiser des images créées en mode 4 3 Ce mode permet de visualiser un contenu 4 3 sans distorsion de l image Presser La position verticale de l image peut être ajusté...

Страница 85: ...ée vers la gauche ou vers le droite en appuyant sur les boutons choisir et la source audio de la vidéo sortira du côté où l icône du haut parleur est situé Le même mode d entrée vidéo ne peut être choisi pour les deux écrans en même temps Si on appuie de nouveau sur le bouton PinP ou sur le bouton RETOUR annulera l affichage des deux images Lorsque l entrée vidéo est réglée sur RGB Vidéo le mode S...

Страница 86: ... Contrôle des Couleurs Décodage des Couleurs Choisir Régler Retour OK Image Jour Ajust Temp Couleur Contrôle des Couleurs Décodage des Couleurs Choisir Régler Retour OK Image Contrôle des Couleurs On Magenta 60 Rouge 30 Jaune 0 Vert 60 Cyan 30 Bleu 0 Réini Réini Choisir On Off Retour OK OK Image Décodage des Couleurs RGB R G B Rouge 0 Vert 60 Couleur 0 Teinte 31 Réini Réini Choisir Retour Sortie M...

Страница 87: ...r Les réglages initiaux d usine pour les rubriques et items de cette page Menu peuvent être restaurés en appuyant sur le bouton OK YNR Off Bas Haut Réalise la réduction des bruits des signaux de luminosité Opère pour réduire les bruits CNR Réalise la réduction des bruits des signaux de couleur Opère pour réduire les bruits Et sera spécifié comme OFF uniquement lorsque l on choisit le mode DVI STB ...

Страница 88: ...lit le rouge uniquement Cette fonction ajuste le niveau R G B ou la teinte afin de rendre l apparence de la couleur naturelle en fonction des préférences de l utilisateur Ces réglages sont enregistrés indépendamment dans chacun des 4 modes de Temp Couleur Vert Fonce le vert uniquement Affaiblit le vert uniquement Couleur Fonce les couleurs uniquement Affaiblit les couleurs Teinte Accentue le rouge...

Страница 89: ...Auto HDTV SDTV DVD Cette étape ne doit être réglée uniquement lorsque Composite Composante est choisie lors de la 1ère phase En outre la procédure est la même que pour AV1 AV4 REMARQUE Le réglage de l entrée AV3 n est pas disponible en raison d une entrée à composantes fixe L entrée AV3 est automatiquement sélectionnée lors de l utilisation des entrées composites ou S Vidéo Si les entrées composit...

Страница 90: ... Auto Le mode signal du signal d entée sera reconnu automatiquement Si le signal d entrée contient beaucoup de bruits ou a un niveau en mode Auto et si l opération n est pas normale régler afin de s adapter au signal d entrée Menu Affichage Conditions d enregistrement Image Mode D Image 1 réglage enregistré Contraste Pour chaque fonction d entrée et pour chaque mode d image 1 réglage d enregistré ...

Страница 91: ...pération 5 C 35 C Entreposage 15 C 60 C Humidité relative En opération 20 80 Entreposage 20 90 sans condensation Alimentation électrique C A 100 240 V 50 60 Hz Consommation d énergie en veille 310W 3W Sortie audio 12W 12W 6Ω Entrée RGB Signaux d entreé Terminaux d entrée Terminal d entrée RGB1 DVI DVI D Terminal d entrée audio RGB1 Mini jack stéréo 3 5mm Terminal d entrée RGB analogique RGB2 D sub...

Страница 92: ... Terminal RGB Connecteur 15 broches D sub Lorsque différentes sortes de signaux d entrée sont entrés simultanément dans l écran via une carte graphique ou un média similaire l écran choisira automatiquement les signaux selon l ordre de priorité suivant Même dans le cas des signaux recommandés indiqués à la page suivante il peut y avoir des cas om l affichage correct n est pas possible Dans ce cas ...

Страница 93: ...t MHz Remarques Nom du signal Résolution Fréquence verticale Hz 1 576i 576 50 00 15 63 2 480i 480 59 94 15 73 3 576p 576 50 00 31 26 4 480p 480 59 94 31 47 5 1080i 50 1080 50 00 28 13 6 1080i 60 1080 60 00 33 75 7 720p 60 720 59 94 44 96 Avec entrée composante AV1 AV2 et RGB2 Entrée composante L écran différencie les modes des signaux selon les fréquences verticales et horizontales et les polarité...

Страница 94: ...e sur le fonctionnement ou pour de l assistance technique communiquez avec HITACHI CANADA LTD 1 800 HITACHI 1 800 448 2244 Hitachi Canada Ltd Digital Media Division 6740 Campobello Road Mississauga Ontario L5N 2L8 Hitachi America LTD Home Electronics Division 900 Hitachi Way Chula Vista CA 91914 3556 ...

Страница 95: ...NOTES ...

Страница 96: ...QR63512 ...

Отзывы: