background image


16 

EN
G

L

IS

H


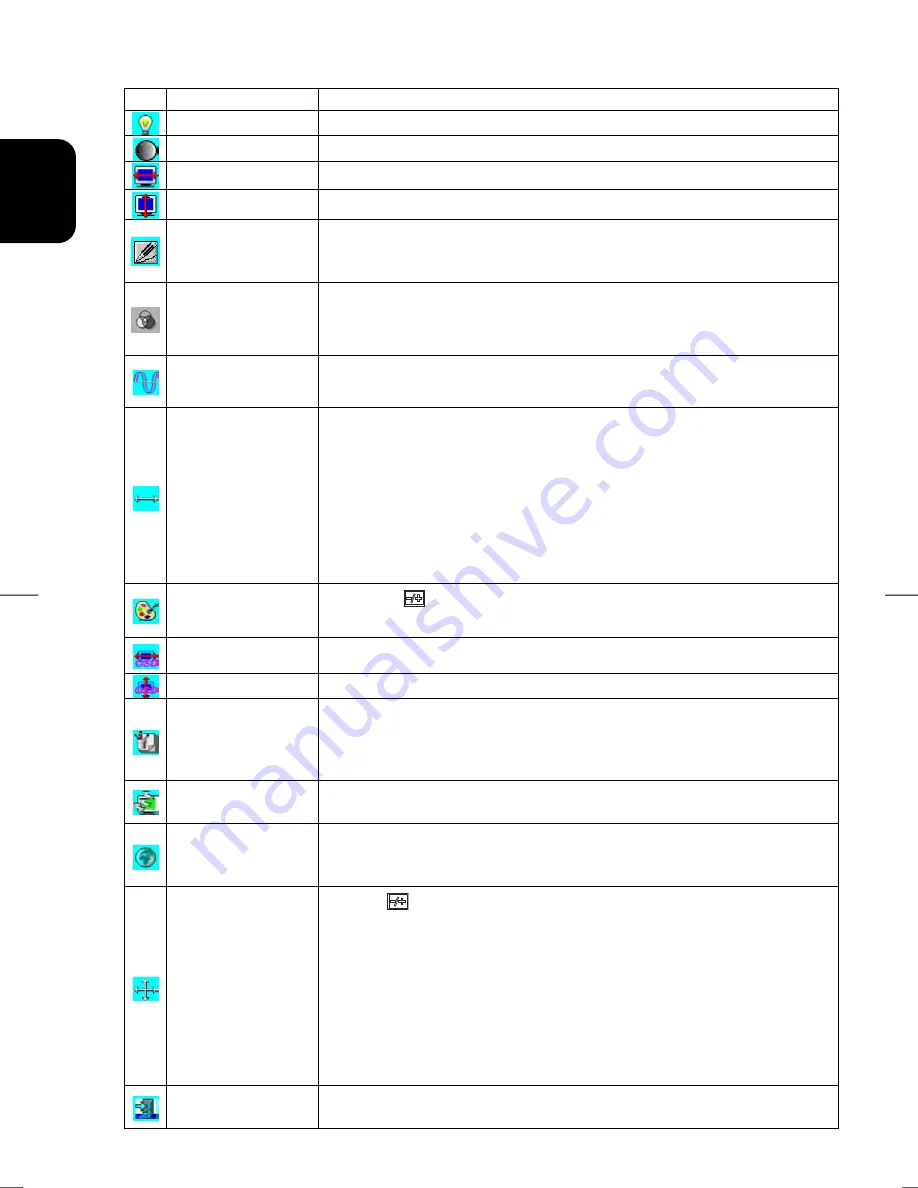
Function Descriptions 

Icon Function 

Function 

Description 

Brightness 

101 scales of brightness are available to choose from (0 to 100). 

Contrast 

101 scales of contrast are available to choose from (0 to 100). 


H. Position 

This function let's you adjust the display's horizontal position 


V. Position 

This function let's you adjust the display's vertical position. 


Sharpness 

This function let's you select the images sharpness. Three 
selections are available. A smoother setting is more suitable for 
pictures, while a sharper setting is more suitable for text. 


OSD 

Transparency 

This function let's you set the transparency of the OSD menu. 
The transparency is adjustable from 0 to 10. 11 scales are 
available. 


Phase 

A total of 256 scales (0 to 255) are available to adjust the focus and 
clarity of the display. 


Clock 

This function carries a frequency-tracking feature that offers 
users better stability and clarity. 101 scales (from -50 to +50) are 
available on the mode that is currently running. The adjustable 
range can be variable in different modes. This function records 
the deviated number of clock period between input timing and 
supported timing. The clock value may not be”0” after Auto 
Adjustment when the input timing is different from supported 
timing. 


Color 

Temperature 

Push the (

) button to select a different color temperature. 

Please see the diagram below for function and description. 


OSD H. Position 

This function moves the OSD menu window horizontally. 

OSD V. Position 

This function moves the OSD menu window vertically. 


Graph / Text 

Because the H and V-Frequencies of both 640 x 400 70Hz, and 
720 x 400 70Hz, are the same, this function let's you manually 
select either 640 x 400 (graphics mode), or 720 x 400 (text 
mode).


Recall 

The recall function will return all adjusted parameters to factory 
preset values. 


Language 

Five OSD language options are available: English, German, 
French, Spanish, and Italian. Press the left or right adjustment 
control button to select other language. 


Auto and Input 

Select 

Press ”


” button to activate the selected function, Auto 

Adjustment, Use Analog Input or Use Digital Input. 
The Auto Adjustment function let you adjust the display size, 
clock and phase to obtain the best viewing settings. This 
process will take 3 ~ 5 seconds to complete.   

Attention : 

After 

Auto Adjustment, the display might display wrong position or 
size, if it has received a pattern which has no screen border. 
You may select either Analog or Digital Input video when VGA 
input or/and DVI Input is/are available. 


Exit 

Saves the values of this setting and exits the OSD menu 

function. 


Содержание CML174

Страница 1: ...he rear of the monitor This monitor is ENERGY STAR compliant when used with a computer equipped with VESA DPMS The ENERGY STAR emblem does not represent EPA endorsement of any product or service As an ENERGY STAR Partner Hitachi Ltd has determined that this product meets the ENERGY STAR guidelines for energy efficiency USER MANUAL MANUEL D UTILISATION BEDIENUNGSANLEITUNG MANUAL DE USUARIO MANUALE ...

Страница 2: ...rovide parts ONLY free of charge through its Authorized Monitor Service Center All additional charges INCLUDING ANY ALL MANDATORY LABOR CHARGES TO REPLACE ANY COVERED PARTS will be your responsibility You will be responsible for paying Hitachi s authorized service center directly for all labor and associated shipping charges FOR ALL HITACHI MONITORS Hitachi America Ltd may repair your monitor with...

Страница 3: ...TAGE AND POSSIBLE SEVERE ELECTRICAL SHOCKS AND VOID ALL WARRANTIES ANY IMPLIED WARRANTY OF MERCHANTABILITY OR FITNESS FOR A PARTICULAR PURPOSE ON THIS MONITOR IS LIMITED TO THE 12 36 or 60 MONTH DURATION OF THIS WRITTEN WARRANTY AS APPLICABLE ALL WARRANTIES SET FORTH IN THIS WARRANTY ARE LIMITED TO 12 36 OR 60 MONTHS FROM THE DATE OF PURCHASE AS INDICATED IN THIS WARRANTY NO WARRANTIES WHATSOEVER ...

Страница 4: ...ontents is not permitted without express written authority TRADEMARK ACKNOWLEDGEMENT VGA is a registered trademark of International Business Machines Corporation VESA is a trademark of a nonprofit organization Video Electronics Standard Association ENERGY STAR is a trademark of Environmental Protection Agency EPA CONTENTS Using this Display Safely 5 Warning 6 Caution 9 FCC Statement Warning 11 For...

Страница 5: ...agement System 14 Chapter 2 Display Controls 15 User Controls 15 Adjusting the Monitor s Display 15 Function Descriptions 16 Chapter 3 Technical Information 18 Specifications 18 Standard Timing Table 21 Troubleshooting 22 ...

Страница 6: ...t Notice example 1 Shock Caution This Ì symbol indicates that caution should be taken and within the triangle Ì is a picture depicting Shock caution Notice Example 2 Disassembly Prohibited In the barred circle is an action that must not be done and the picture in this one depicts Disassembly Prohibited Notice Example 3 Unplug power Cord from Socket In the z symbol is an action that should be taken...

Страница 7: ... This will cause the internal temperature to rise and result in fire or malfunction Do place on racks that fix the display in leaning position This will change the flow of air through the air vents and cause the internal temperature to rise resulting in fire or malfunction Placing Objects in Device DO NOT put paper clips pins metallic objects or combustible items in the ventilation holes Using the...

Страница 8: ...olonged periods unplug the power cord Leaving it plugged in may result in fire When unplugging or plugging in the power cord insure that your hands are dry Handling with wet hands may result in electrical shock Poor Electrical Contact in Electric Plug etc The following must be done to prevent bad contact in the electrical plug that may result in fire Insure that electric plug is inserted in fully ...

Страница 9: ... replace the AC adapter Leakage or drying up of the electrolyte liquid may result in fire electrical shock This may also cause the device itself to malfunction Damage to the Display Unit Liquid may leak out of the display when damaged DO NOT touch the liquid If you should touch the liquid wash your hands thoroughly with water If the liquid should get into your mouth or eyes gargle or rinse your ey...

Страница 10: ...ng may break and cause damage to the devices that are connected Stand When adjusting the angle hold the top left and right edges with both hands and move slowly Using only one hand may cause it to fall DO NOT place your hand near the stand when adjusting the LCD forward or back Your fingers may get caught and cause injury Eyestrain When continuously looking at the display while working keep the wo...

Страница 11: ...televisions noise may enter their sound reception If this should happen try the following Place in a location as far away from radios and televisions as possible Change the facing of the antenna on the radio or television Use a different electrical socket Storing the Plastic Bag Keep the plastic bag used to wrap the display away from young children The bag may cause suffocation ...

Страница 12: ... on the user is encouraged to try to correct the interference by one or more of the following measures Reorient or relocate the receiving antenna Increase the separation between the equipment and receiver Connect the equipment into an outlet on a circuit different from that to which the receiver is connected Consult the dealer or an experienced radio TV technician for help INSTRUCTIONS TO USERS Th...

Страница 13: ...n obtain an appropriate safety approved extension lead or consult your dealer Should it be necessary to change the mains plugs this must be carried out by a competent person preferably a qualified electrician If there is no alternative to cutting off the mains plug ensure that you dispose of it immediately having first removed the fuse to avoid a possible shock hazard by inadvertent connection to ...

Страница 14: ...g Angle Adjustment The LCD Monitor is designed to allow the users to have a comfortable viewing angle The viewing angle can be adjusted as follows Top 5 30 WARNING Figure 1 1 Do not force the LCD Monitor over the maximum viewing angle settings as stated above In such an event you will damage the Monitor and a Monitor stand Connecting the Display to your Computer 1 Power off your computer 2 Connect...

Страница 15: ...en power surges may damage your monitor Setting Up the LCD Monitor 1 Turn on the LCD monitor s hard power switch located on the back of the monitor See Fig 1 4 2 Turn on the LCD Monitor s soft power switch located on the bezel of the monitor Figure 1 4 Power Management System This LCD Monitor complies with the VESA DPMS version 1 0 Power Management guidelines The VESA DPMS provides four power savi...

Страница 16: ...ton to decrease the value or the right button to increase the value of the chosen OSD setting Press the left button for one second then Auto Adjustment will be active Adjusting the Monitor s Display The monitor has four function control keys among the functions shown on the OSD menu designed to create an easy user viewing environment OSD Function Menu To access the OSD Main menu simply press one o...

Страница 17: ...to Adjustment when the input timing is different from supported timing Color Temperature Push the button to select a different color temperature Please see the diagram below for function and description OSD H Position This function moves the OSD menu window horizontally OSD V Position This function moves the OSD menu window vertically Graph Text Because the H and V Frequencies of both 640 x 400 70...

Страница 18: ...o 9300K 7500 CIE coordinated Color Temperature of 7500 K Sets the CIE coordinate color temperature to 7500 K 6500 CIE coordinated Color Temperature of 6500K Sets the CIE coordinate color temperature to 6500K User Three colors Red Green Blue can be adjusted from the OSD menu Sets the settings to a by user defined CIE Temperature ...

Страница 19: ...s typical Viewing Angle CR 5 Vertical 80 80 Horizontal 80 80 ISO 13406 2 Pixel fault class Class II Video Input Signal Input Impedance Polarity Amplitude Multi mode Supported Analog RGB 0 7Vp p 75 Ohm 2 Positive 0 0 7 0 05 Vp Horizontal Frequency 24 80 KHz Vertical Frequency 56 75 Hz Digital TMDS Control Power switch hard and soft types ON OFF switch with LED indicator OSD Brightness Contrast Hori...

Страница 20: ...l and vertical synchronization TMDS Polarity Positive and negative Plug Play Supports VESA DDC1 and DDC2B functions External Connection Power Input AC socket Video Cable 1 8M with 15 pin D sub connector 1 8M with 24 pin DVI D connector Environment Operating Temperature 5 C to 40 C 41 F to 104 F Relative Humidity 20 to 80 non condensing Storage or Shipping Temperature 20 C to 60 C 4 F to140 F Relat...

Страница 21: ...4 V Sync 1 5 6 10 11 15 5 Digital GND 10 Hot Plug Detect 15 SCL For Digital DVI D connector Signal Signal Signal PIN Description PIN Description PIN Description 1 RX2 10 RX1 19 Shield for TMDS Channel 0 2 RX2 11 Shield for TMDS Channel 1 20 NC 3 Shield for TMDS Channel 2 12 NC 21 NC 4 NC 13 NC 22 Shield for TMDS Channel clock 5 NC 14 5V 23 RXC 6 SCL 15 Hot Plug Detect 24 RXC 7 SDA 16 HPD C5 NC 8 N...

Страница 22: ... x 600 37 879 60 317 40 000 VESA 600 60 Hz 800 x 600 48 077 72 188 50 000 VESA 600 72 Hz 800 x 600 46 875 75 000 49 500 VESA 600 75 Hz 832 x 624 49 725 74 55 57 283 APPLE MAC 800 1024 x 768 48 363 60 004 65 000 XGA 1024 x 768 53 964 66 132 71 664 COMPAQ XGA 1024 x 768 56 476 70 069 75 000 VESA 600 70 Hz 1024 x 768 60 023 75 029 78 750 VESA 768 75 Hz 1024 x 768 60 04 75 02 80 00 APPLE MAC 768 1280 ...

Страница 23: ...or is ON all connections are secured and the system is running on the correct timing Refer to Chapter 3 for information on timing 2 Turn off the LCD Monitor and then turn it back on again Press the right Function Select Control button once and then press either the left or right Adjustment Control button several times If there is still no picture press the other Adjustment Control button several t...

Страница 24: ... ITALY Tel 39 02 487861 Tel 39 02 38073415 Servizio Clienti Fax 39 02 48786381 2 Email customerservice italy hitachi eu com HITACHI Europe AB Box 77 S 164 94 Kista SWEDEN Tel 46 0 8 562 711 00 Fax 46 0 8 562 711 13 Email csgswe hitachi eu com HITACHI EUROPE S A S Lyon Office B P 45 69671 BRON CEDEX FRANCE Tel 04 72 14 29 70 Fax 04 72 14 29 99 Email france consommateur hitachi eu com HITACHI EUROPE...

Отзывы: