background image

15

program 

swap

program, 

sound 

and 

vision 

adjustment

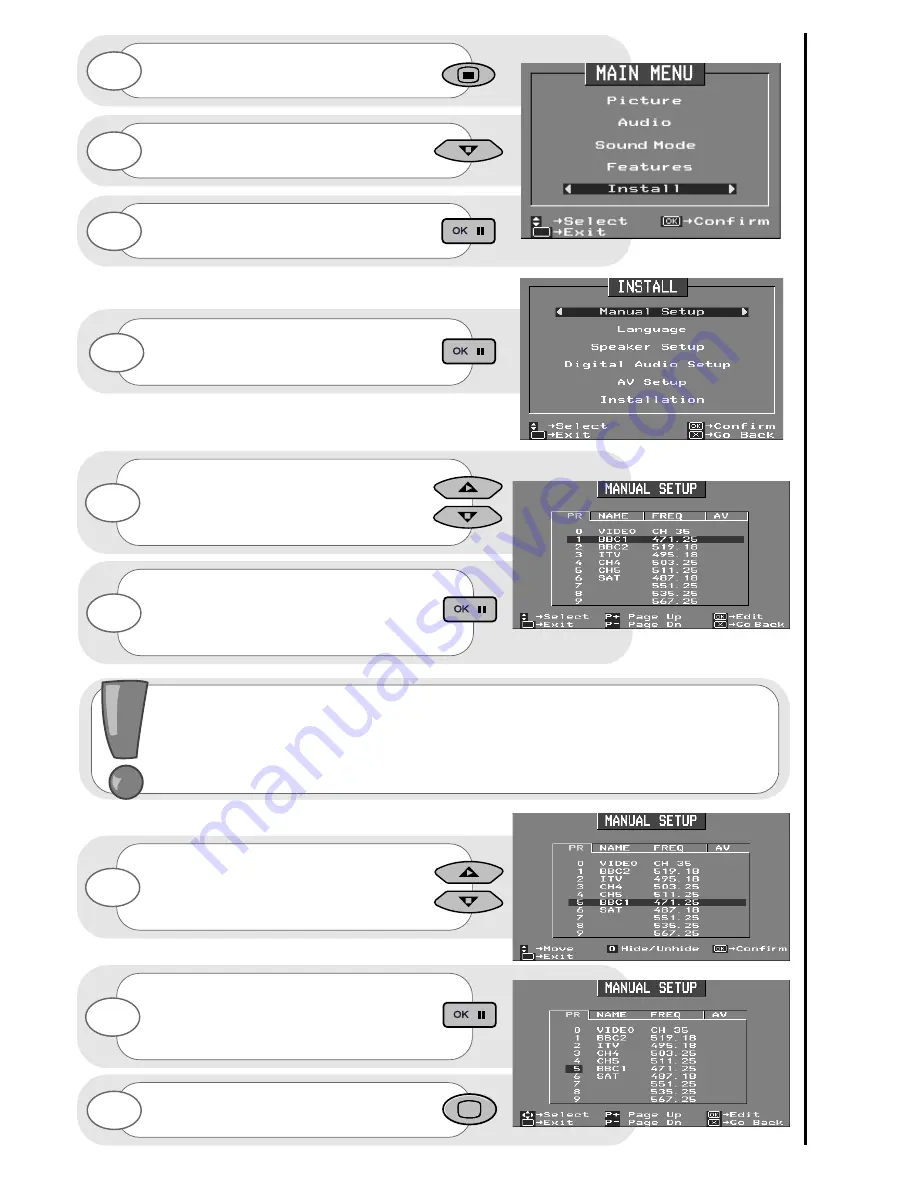
Press and hold the MENU button for 5

seconds. The INSTALL option in the 

MAIN MENU appears.

Press the cursor down button to select

INSTALL.

Once highlighted, accept selection.

The INSTALL menu highlights the MANUAL

SETUP option automatically - press OK to

select.

Once highlighted, accept the selection

and you will see the selection bar

turn red - it is ready to be swapped.

Using the up/down buttons again  you can

move the selection to occupy a new

position of your choice.

Once this has been done, accept selection

and the chosen programs will now occupy

its new position  - repeat if necessary.

To return to normal TV operation press the

television button on your handset. 

Select your program to swap by moving

the selection bar using the 

up/down cursor buttons over a channels

PR number, highlighted in blue.

1

2

3

4

5

6

7

8

9

When a channel has been selected, you also have the option to ‘hide’ a program - this

makes your TV skip the hidden channel when the program controls are used to change

channels. Press the ‘0’ digit on your handset and you will see the text within your chosen

selection turn red. Your selection is hidden. Pressing  the ‘0’ button again to ‘unhide’ the

selection. If a hidden channel is to be viewed, this can be achieved by entering the channel

number with the handset digits 0 to 9. 

Содержание C32WF810N

Страница 1: ...Users Guide C32WF810N C36WF810N S C R E E N S C R E E N C36WF830N ...

Страница 2: ... digital sounds sonic realism and listener involvement will change the way you experience sound from your Hitachi television Digital sound works by delivering at maximum 5 separate audio channels left right centre left surround right surround and also a LFE Low Frequency Effects channel These independent channels allow for a more precise localisation of sounds and a more convincing realistic ambie...

Страница 3: ...ital audio setup 26 digital audio status decode mode 27 digital audio status display format 28 television features wide screen viewing 29 sleep timer and default viewing controls 31 teletext operation 32 teletext dual page 33 progressive scan and 100Hz picture 34 multi picture 35 other equipment connection rear socket and scart details 36 DVD CD and laserdisc connection 37 external speaker socket ...

Страница 4: ...r equipment DO NOT use makeshift stands and NEVER fix legs with wood screws to ensure complete safety always fit the manufacturers approved stand or legs with the fixings provided according to the instructions DO NOT allow electrical equipment to be exposed to rain or moisture NEVER let anyone especially children push anything into holes slots or any other opening in the case this could result in ...

Страница 5: ...new batteries of different types since this can result in leakage or in extreme cases fire or explosion always Store unused batteries in their packaging and away from metal objects which may cause a short circuit resulting in leakage or in extreme cases fire or explosion always Remove dead batteries from equipment and all batteries from equipment that is to be left for long periods of time without...

Страница 6: ...o the analogue in socket marked 1 2 connect aerial connection lead to the analogue in socket marked 1 aerial wall socket receiving aerial Video Cassette Recorder this should be plugged into a mains socket IMPORTANT NOTE The best way to connect your VCR to the television is via one of the Audio Visual sockets When you connect your VCR to your television the Audio Visual value has to be set correctl...

Страница 7: ...V and VCR to enhance your picture and sound quality Scart leads are essential if you have a stereo TV and VCR and wish to obtain stereo sound from your equipment These leads can also be purchased from your Hitachi dealer or any good High Street electrical retailer connect VCR out to analogue TV socket in marked scart leads are an optional extra aerial wall socket receiving aerial Video Cassette Re...

Страница 8: ...ed press the OK button on your handset and AUTOTUNE will begin By using the up and down buttons you can view all the programs found and stored during AUTOTUNE To make your program tuning easier HITACHI have installed an automatic tuning procedure to find the programs Switch your TV on 1 2 4 To finish the installation process and return to normal TV operation press the menu button on your handset t...

Страница 9: ... is ready to be changed Use the cursor keys to move the selection bar over the program FREQUENCY required to be adjusted entry method 1 The first option will be to fine tune the chosen frequency either up or down 1 2 3 4 5 6 7 Select your choice of FREQUENCY entry method using the left right cursor keys 8 notes on manual tuning As well as an automatic tuning procedure your HITACHI television also ...

Страница 10: ...option you can search either up or down 9 10 entry method 3 If the right cursor key is pressed again you can enter a two digit channel number CH using the buttons 0 9 entry method 4 If the right cursor key is pressed again you can enter a two digit S Band number using the buttons 0 9 entry method 5 If the right cursor key is pressed again you can manually input a five digit frequency using the num...

Страница 11: ... cursor down cursor up go back accept menu exit cursor right The handset controls shown below are used when programming your TV and to adjust the sound and picture features cursor left Use this button to move the menu selection box left Use this button to move the menu selection box up This button is used to confirm a highlighted selection Use these buttons for control of your VCR Digital TV and S...

Страница 12: ...e channels either up or down programme controls Use this button to change the scanning mode of your TV from 100Hz to Progressive scan Progressive Scan info Used to enter program numbers or frequency CH entry in manual setup 0 9 digit entry If you are receiving a stereo signal this button selects between stereo and mono channels or different languages if you are receiving dual languages nicam langu...

Страница 13: ... and the next in the magazine press again to view current page and TV picture Used in Teletext mode to show hidden information eg quiz pages answers reveal dual page television expand subtitles Pressing this button will take you to the index page index When in dual teletext mode this acts as a copy button to copy the right hand side page to the left and side OK Use this to freeze the teletext page...

Страница 14: ... and sound values moving the cursor left will decrease values whilst moving the cursor right will increase values Also note that in the COLOUR adjustment the first two steps of the control bar will have a dramatic effect This is normal operation Noise Reduction Helps reduce the noise interference visible on your television especially in weaker signal reception areas White Point NORMAL gives an equ...

Страница 15: ...chosen programs will now occupy its new position repeat if necessary To return to normal TV operation press the television button on your handset Select your program to swap by moving the selection bar using the up down cursor buttons over a channels PR number highlighted in blue 1 2 3 4 5 6 7 8 9 When a channel has been selected you also have the option to hide a program this makes your TV skip t...

Страница 16: ... characters to change each character use the up down cursor buttons To move from character to character use the right left cursor buttons Once the new NAME has been chosen and entered confirm your entry to be stored and repeat if necessary To return to normal TV operation press the television button on your handset Use the cursor keys to move the selection bar over the NAME required to be adjusted...

Страница 17: ...d source when chosen will be stored with the program number being viewed channel 1 When this symbol is displayed channel 1 of a dual language broadcast is being received Use the button to access this mode while receiving a dual language broadcast channel 2 When this symbol is displayed channel 2 of a dual language broadcast is being received Use the button to access this mode while receiving a dua...

Страница 18: ...3 4 5 6 7 equalizer The EQUALIZER menu is used to adjust the tonal ranges of your TV s sound LFE Volume Low Frequency Effects controls Only available when your TV is in Dolby Digital DTS or MPEG decode modes see SOUND MODE and receiving a dedicated LFE channel This adjusts the contribution the LFE channel makes to your TV s bass response Please Note On broadcasts where there is no dedicated LFE ch...

Страница 19: ...gh adjust this control to enhance the TV s sound 1kHz mid range Use this control to adjust the mid range voice area of your TV s sound 3 5kHz mid high range When this control is increased it emphasises the flute and string instruments of your TV s sound when decreased it has a soothing effect on the sound 10kHz high range The sharp sound of triangles and cymbals are emphasised if this control is i...

Страница 20: ...e surround sound can be created using the TV s internal amplifiers This mode is particularly suitable for films and programmes that display the Dolby Pro Logic caption This mode is recommended for the viewing movies stereo When stereo mode is selected your TV produces high quality stereo sound Select this mode when viewing general TV and music programs Press the MENU button to obtain MAIN MENU Pre...

Страница 21: ...EG Multichannel In this mode surround sound can be created using the five audio channels from your left speaker right speaker centre speaker left surround speaker and right surround speaker and also the LFE channel MPEG Stereo Stereo mode which provides signals for your televisions internal left and right speakers Stereo Stereo mode which provides a downmix of the multi channel signal through your...

Страница 22: ...tation of your living area and its contents are explained on the following page notes on speaker setup The Speaker Setup menu allows you to customise the televisions audio performance to your own requirements These requirements might be the use of external amplifiers on one or more sound channels or to use alternative speakers This menu can help you organise the bass or boom re direction by specif...

Страница 23: ...ble Speaker Setup menus will also show an accompanying display and this will also be affected by the adjustments you make to the available controls To return to normal TV operation without viewing other options press the television button on your handset front right external speaker front left external speaker seating position see notes on seating position rear right external speaker rear left ext...

Страница 24: ...ion control accommodates the position of the speakers with regard to your seating position and so further creates an atmosphere where improved sound qualities are obtained from your TV If you are seated near the front speakers adjust the seating position to FRONT If you are seated between the front and rear speakers but closer to the front speakers adjust the seating position to MID FRONT If you a...

Страница 25: ...cted If your connected speakers low frequency response the bass or boom sound is poor adjust the chosen speaker value to SMALL If the low frequency response is good set the speaker value to LARGE this allows the bass performance to be optimised The Centre Speaker and Surround Speaker s also have a setting of NONE Use this as the setting if you have no centre or surround speakers connected or you d...

Страница 26: ...o decoder in your television to be assigned to the AV scart input that your DVD CD player is connected to notes on digital audio setup The Digital Audio Setup menu allows you to control the sound output of any external equipment you have connected through the Audio Visual sockets For example if the connection from your external equipment to the television is via AV1 the Digital Audio source should...

Страница 27: ...oded track DTS Digital Theater Systems This is the decode mode for a digital signal encoded by DTS This has the same capabilities as Dolby Digital and is displayed when receiving a DTS encoded digital source MPEG Moving Pictures Experts Group This is the decode mode for digital signals encoded by MPEG MPEG tracks are either encoded as stereo or as having 5 main channels plus a LFE channel digital ...

Страница 28: ...ailable Main channels but no LFE channel Surround mono in this case no LFE channel No surround or LFE channels available All channels except centre Left Right mono surround and LFE Left right and LFE only Centre and LFE only All channels except centre and LFE Left right and mono surround only Left and right channels only may be encoded in ProLogic Centre channel only mono This chart explains what ...

Страница 29: ...t on player and software please refer to player instructions For a full 16 9 picture Hitachi recommend using the 16 9 mode Note Your TV will automatically switch to 16 9 mode when it receives a true 16 9 Wide Screen Signal through the external RF aerial or external AV sockets You can override this change by pressing the 16 9 button on your handset to switch to the desired aspect ratio The picture ...

Страница 30: ...een picture format This type of picture fills the entire TV screen The true 14 9 format is the medium between the 4 3 and 16 9 ratio signals The 4 3 broadcast signal gives black bars to the sides of the screen which is consistent with screen compression 16 9 14 9 4 3 4 3 4 3 C14 9L C16 9L This broadcast signal is letterbox with black bars at the top and bottom of the screen C14 9L This broadcast s...

Страница 31: ...xternal equipment with on screen displays incorrect operation of the Auto WS switching may occur while performing certain operations For example while watching a 16 9 cinema scope format film on a DVD player pressing the pause button may result in the TV switching from the C16 9L mode to the default zoom Visual forward and rewind operations may result in similar results This action will also show ...

Страница 32: ... notes on favourite pages Your TV is capable of storing up to four of your favourite Teletext pages per program maybe the sports page cookery page or gardening page the choice is yours These are accessed like Fastext by pressing the colour coded buttons on your handset Follow the steps below to enter your favourite pages Enter Teletext by pressing the Teletext button Enter favourite page mode by p...

Страница 33: ...of our televisions capabilities One of the features developed for the benefit of you the customer is the expansion of the Teletext service from a one page screen display to a feature that can be manipulated in a number of ways The instructions below show how to take advantage of this excellent feature whatever your viewing environment or demands dual teletext page operation This option splits the ...

Страница 34: ...ad filling in all the 625 scan lines in one go to make up a complete frame This progressive addition of extra line information produces a picture that is brighter more detailed than conventional televisions and displays the picture without the line flicker often associated with 50Hz sets progressive scan and 100Hz picture television features 100Hz Natural Scan Our 100Hz TV s create double the numb...

Страница 35: ...ighlighted accept selection 1 2 3 4 Press the OK button on your handset to accept selection 5 Use the up and down buttons to select an option use the left and right keys to adjust values 6 display This determines the amount of channels which can be viewed at one time either 4 12 or 16 To return to normal TV operation press the television button on your handset 7 mode Use this to show multi picture...

Страница 36: ...l speakers to these sockets Obtain speakers with DIN sockets from your HITACHI dealer notes on audio equipment If you have purchased your TV complete with Hitachi s power console please refer to the Users Guide that is supplied with the equipment Your HITACHI dealer can also advise you on the correct amplifier and speaker choice for your TV AV2 scart input AV1 scart input RF aerial socket DIN sock...

Страница 37: ...extra Disc playing equipment this should be plugged into a mains socket Remove the dust covers from the optical output of the external disc player you wish to connect to your television Store these in a safe place Using a special optical lead available from high street retailers make the connection between the two points You are now ready to view the contents of your chosen disc optical connection...

Страница 38: ...kets external speaker terminal block These sockets are used in conjunction with an external amplifier Their volume output can be controlled via the main volume control and also the Speaker Setup menu see Speaker Setup in the program sound and vision adjustment section amplifier The plastic dust cap protecting the optical digital in socket has to be removed before connection with external equipment...

Страница 39: ...the dialog reproduced by your television This piece of equipment is triangular in shape NOTE The CENTRE speaker should be positioned either on top of your television or beneath it to achieve the best audio results The sub woofer is responsible for the bass sound reproduced by your television This piece of equipment is rectangular in shape NOTE The position of the SUB WOOFER speaker is less importa...

Страница 40: ...er permanently like a VCR or temporary like a camcorder it is important that your TV recognises which kind of equipment is connected For VCR s camcorders and LaserDiscs the appropriate AV VCR mode should be set to ON in the menu This helps to provide a steady picture when playing back a recorded picture If an S VHS or Hi8 piece of equipment is to be used these should be connected to either AV2 or ...

Страница 41: ... the TV AV button on your handset until AV3 is displayed on your TV screen Now begin playback operation of your equipment Alternatively you could allocate an individual channel number for your camcorder equipment see signal source entry connecting to the mains socket Important Please read television safety before connecting your television and external equipment headphone connection S VHS socket a...

Страница 42: ...signal source used when connecting external equipment eg VCR through a scart lead to the AV1 socket at the rear of your TV 1 2 3 4 5 6 7 8 notes on signal source entry Each piece of external equipment connected to your TV must have its own input socket It would also be easier and more organised if the external equipment connected also had its own program number Signal Source entry allows us to tel...

Страница 43: ... is the signal source used when connecting digital video broadcasting equipment or home entertainment systems to your TV through the AV2 scart lead at the rear of your TV Once the signal source for each relevant program number has been decided this can be stored in your TV s memory by pressing the conformation button To return to normal TV operation press the television button on your handset 9 10...

Страница 44: ...et is for use with external equipment Used with headphones 3 5mm stereo jack plug required Used to access your on screen MAIN MENU for TV features adjustment Used to change the TV channel up or down or cursor up and down when using the On Screen Display menus Used to increase or decrease your TV s sound or cursor right and left when in On Screen Display menus on off button TV mode light infra red ...

Страница 45: ...Refer to external equipment instructions on how to enable the digital audio output 2 Digital audio works but only PCM mode is available even when playing a DTS Dolby Digital or MPEG encoded disc Your external equipment has not been configured to output a digital bitstream does not support DTS Dolby Digital or MPEG output or the correct format is not enabled on the external equipment 3 No sound eve...

Страница 46: ...8 No digital mode options available in Sound Mode Menu Are headphones inserted into front control panel Remove headphones to adjust Surround Mode You are playing a disc with a high sample rate This is normal operation 9 Only left and right speakers are working You are in stereo mode Change the mode in the Sound Mode menu The Rear Centre and Subwoofer speakers are set to NONE or the Rear Centre and...

Страница 47: ...fluorescent lights portable radios etc Check devices for shielding and renew if necessary or move further from TV TV may be in AV mode Picture sound controls set to minimum TV in standby mode Press television button or to buttons on your handset to return to normal TV mode Check picture sound controls go to MAIN MENU press one of the buttons to Why doesn t my remote control handset work Why won t ...

Страница 48: ...guarantee does not cover the replacement of exhausted batteries the adjustment of user controls or aerial alignment any parts replaced under this guarantee shall become the property of Hitachi Home Electronics Europe Ltd please note that evidence of the date of purchase will be required before any service under this guarantee is carried out Use the boxes provided below to record your TV s Model an...

Страница 49: ... TV Reducing volume settings to sensible levels can reduce power consumption as well as reducing noise pollution and reducing contrast can provide a more pleasing picture as well as reducing power consumption Hitachi Home Electronics Europe Ltd manufacturing site in Wales is a BSI Registered Company and has been assessed to ISO 9001 Quality Management Standard certificate FM32366 Your television h...

Страница 50: ...D NOT USED NOT USED CHROMINANCE GROUND NOT USED CHROMINANCE INPUT S VHS NOT USED GROUND VIDEO GROUND VIDEO COMPOSITE VIDEO OUTPUT COMPOSITE VIDEO OR COMPOSITE LUMINANCE S VHS GROUND 1 2 3 4 5 6 7 8 9 10 11 12 13 14 15 16 17 18 19 20 21 AUDIO OUT RIGHT AUDIO INPUT RIGHT AUDIO OUT LEFT GROUND AUDIO GROUND BLUE AUDIO INPUT LEFT BLUE INPUT SWITCHING INPUT GROUND GREEN NOT USED GREEN INPUT NOT USED GRO...

Страница 51: ...51 notes ...

Страница 52: ...47 Milano Italia ITALY Tel 39 02 487861 Tel 39 02 38073415 Servizio Clienti Fax 39 02 48786381 2 Email customerservice italy hitachi eu com HITACHI Europe AB Box 77 S 164 94 Kista SWEDEN Tel 46 0 8 562 711 00 Fax 46 0 8 562 711 13 Email csgswe hitachi eu com HITACHI EUROPE S A S Lyon Office B P 45 69671 BRON CEDEX FRANCE Tel 04 72 14 29 70 Fax 04 72 14 29 99 Email france consommateur hitachi eu co...

Отзывы: