background image

GB   

- 13 -

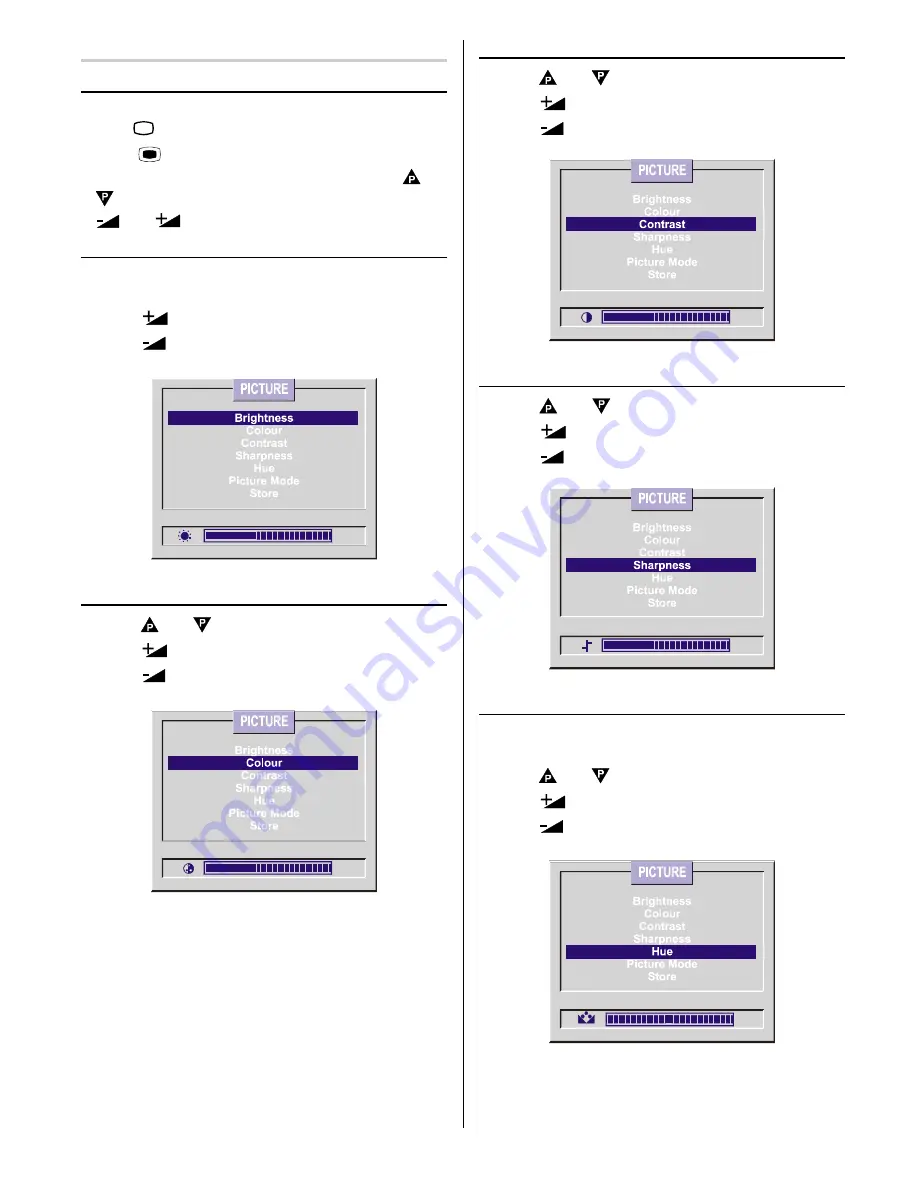
Picture Menu

To change picture settings:

• Enter the Picture Menu directly, pressing the 

GREEN

button “

” or,

• Press “

 MENU

” button, now you are in main menu.

In the main menu, select 

PICTURE

 using “

” or

“

” button, then enter the picture menu pressing

“

” or “

” button.

Setting Brightness:

• As you enter the picture menu, Brightness will be the

first selected option.

• Press “

” button to increase brightness.

• Press “

” button  to decrease brightness.

Setting Colour:

• Using “ ” or “ ” button select Colour.
• Press “

” button to increase colour level.

• Press “

” button to decrease colour level.

Setting  Contrast:

• Using “ ” or “ ” button select Contrast.
• Press “

” button to increase contrast level.

• Press “

” button to decrease contrast level.

Setting Sharpness:

• Using “

” or “ ” button select Sharpness.

• Press “

” button to increase sharpness level.

• Press “

” button to decrease sharpness level.

Setting Hue:

(If your TV set has a Playback NTSC system, this will

appear) (In AV mode only) :
• Using “ ” or “ ” button select Hue.
• Press “

” button to increase hue level.

• Press “

” button to decrease hue level.

Содержание C2142N

Страница 1: ...USERS GUIDE C2142N S CL2142AN S CP2142AN S C2842N S CL2842AN S CP2842AN S ...

Страница 2: ...o Store the Settings 12 To Change Headphone Sound Settings 12 Setting Headphone Volume 12 Setting Headphone Sound Mode 12 To Store the Settings 12 Picture Menu 13 To change picture settings 13 Setting Brightness 13 Setting Colour 13 Setting Contrast 13 Setting Sharpness 13 Setting Hue 13 Picture Mode Menu 14 To Store the Settings 14 Feature Menu 14 Sleep Timer 14 Child Lock 14 Installation Menu 14...

Страница 3: ...amme Up Cursor Up Cursor Right Volume TV TV Quit Menu Red Sound Menu Green Picture Menu F Yellow Feature Menu Blue Installation Menu Teletext Buttons Time Hold Reveal Index Page Teletext AV External Source AV1 AV2 AV3 Programme Down Cursor Down Cursor Left Volume Two Digit Program Number Entry Mute ...

Страница 4: ...GB 3 Control Panel Buttons Power On Off Volume Volume P Program P Program H PHONE Headphone 3 6 mm Ø Front AV input AUDIO L Audio left white AUDIO R Audio right red VIDEO VCR yellow ...

Страница 5: ...REAR PANEL 21 REAR PANEL Connect Peripheral Equipment There is a wide range of audio and video equipment that can be connected to your TV The following connection diagrams show you where the different equipment should be connected at the back or the front side of the TV ...

Страница 6: ... TV Then press AV button to select AV 1 AV 2 or AV3 NTSC 4 43 system can be watched at this mode automatically CopyFacility Source selection for VCR recording Select TV Setup Menu in the Installation Menu Select AV 2 OUTPUT source pressing or button Searchforandstorethetestsignalofthe videorecorder Unplug the aerial cable from the aerial socket ANT of your video recorder Switch on your TV and put ...

Страница 7: ...NONOPERATINGYOURTV Do s and Don ts DO s This Television has been designed and manufactured to meet international safety standards but like any electrical equipment care must be taken if you are to obtain the best results and safety is to be assured DO read the operating instructions before you attempt to use the equipment DO consult your dealer if you are in any doubt about installation operation ...

Страница 8: ...anufacturers approved stand with the fixings provided DON T allow electrical equipment to be exposed to rain or moisture ABOVEALL NEVER let anyone especially children push anything into holes slots or any other opening in the case this could result in a fatal electric shock NEVER guess or take chances with electrical equipment of any kind it is better to be safe than sorry 1 PowerSource The receiv...

Страница 9: ...packaging aids are recyclable and should principally be recycled Packaging materials such as foil bag must be kept away from children RISK OF ELECTRIC SHOCK CAUTION The lightning flash with arrowhead symbol within an equilateral triangle is intended to alert the user to the presence of uninsulated dangerous voltage within the product s enclosure that may be of sufficient magnitude to constitute a ...

Страница 10: ... switch on the TV from stand by mode either Press a digit button on the remote control so that a programme number is selected or Press Programme Up and Down buttons on the front of the TV or on the remote control respectively so the TV will switch on and the RED Led will turn GREEN ToswitchtheTVoff Press the stand by button on the remote control so the TV will switch to stand by mode and the GREEN...

Страница 11: ...t next programme or Programme Down button to select the previous programme OperatingwithRemoteControl The remote control handset of your TV is designed to control all the functions of the model you selected The functions will be described in accordance with the menu system of your TV Funtions which you can use out of menu system are described below Volume Setting Press button to increase volume Pr...

Страница 12: ...en If the button is pressed when none of the menus activated the TV status including Program number name and Sound Mode will be displayed In all the menus pressing or button one of the items can be selected pressing or button item can be changed or you can go to submenu pressing the MENU button you can go to the previous menu and by pressing the TV button you will exit the menu SoundMenu To change...

Страница 13: ... all the programmes To Change Headphone Sound Settings When you connect headphones you can change the headphone sound settings entering the headphone menu To do this select headphone using or button then enter headphone menu pressing or button Setting Headphone Volume As you enter the Headphone sound menu Volume will be the first selected option Press button to increase volume Press button to decr...

Страница 14: ...to decrease brightness Setting Colour Using or button select Colour Press button to increase colour level Press button to decrease colour level Setting Contrast Using or button select Contrast Press button to increase contrast level Press button to decrease contrast level Setting Sharpness Using or button select Sharpness Press button to increase sharpness level Press button to decrease sharpness ...

Страница 15: ...Use or button to change the value of the sleep timer between Off 0 15 0 30 0 45 1 00 1 15 1 30 1 45 2 00 hours Your TV will get into standby mode when the period you selected passes after you make the selection Child Lock You can use this feature to prevent display of any programme you do not want to be watched The Child Lock feature may be set to either On or Off When Off is selected there will b...

Страница 16: ...l not change to C12 anymore and keep C4 Defined channels for different standards are given as following B G C01 C69 S01 S41 D K C01 C12 C21 C69 S01 S19 S22 S41 I C21 C69 I C01 C17 C21 C69 S01 S19 S22 S41 L L C01 C11 C21 C69 S01 S41 K1 C04 C09 U K I UHF IRELAND I VHF UHF Direct Channel Access If you know the broadcast band and channel number of the station you want to tune you do not need to make s...

Страница 17: ...you want to run APS at any other time Press BLUE button Now you are in the Auto Tune menu Select Program menu using or button Press either the or button to enter the Program menu In the program menu enter the Auto Tune menu by pressing the BLUE button Now a warning message is displayed If you do not want the channels to be stored automatically cancel by pressing the TV but ton If you want to conti...

Страница 18: ...tton To open the Installation Menu directly do not enter the main menu but only press the BLUE but ton In the installation menu select TV Setup using or button Open the TV Setup menu using or but ton In the TV Setup menu select AV 2 Output using or button Then select the source you want to be output at scart2 pressing or button one of the sources TV AV 1 Scart1 or AV 3 Front AV Other Features Soun...

Страница 19: ...fter a period of time Press button to stop the automatic page change Press button again to allow the next page to be displayed ToSelectaSubpagePage Subpage pages are subsections of long Teletext pages that can only be displayed on the screen one section at a time Select the required Teletext page Press button Select the required Subpage page number by press ing four digit buttons e g 0001 Teletext...

Страница 20: ... pictures or ghost images Sometimes you can improve the picture quality by changing the direction of the aerial The picture quality may degrade when two peripherals are connected to the TV at the same time In such a case disconnect one of the peripherals NoPicture Is the aerial connected properly Are the plugs connected tightly to the aerial socket Is the aerial cable damaged Are suitable plugs us...

Страница 21: ...RFAERIAL INPUT 75 Ohm unbalanced OPERATING VOLTAGE 220 240V AC 50 Hz AUDIO OUTPUT Stereo German Nicam or German Nicam FOR 21 AUDIO OUTPUT POWER WRMS 10 THD 2 x 8 POWER CONSUMPTION W nom 65 ST BY POWER CONSUMPTION W 5 PICTURE TUBE 21 51 cm DIMENSIONS mm D 473 L 563 H 442 WEIGHT kg 18 5 FOR 28 AUDIO OUTPUT POWER WRMS 10 THD 2 x 8 POWER CONSUMPTION W nom 90 ST BY POWER CONSUMPTION W 5 PICTURE TUBE 28...

Страница 22: ... ITALY Tel 39 02 487861 Tel 39 02 38073415 Servizio Clienti Fax 39 02 48786381 2 Email customerservice italy hitachi eu com HITACHI Europe AB Box 77 S 164 94 Kista SWEDEN Tel 46 0 8 562 711 00 Fax 46 0 8 562 711 13 Email csgswe hitachi eu com HITACHI EUROPE S A S Lyon Office B P 45 69671 BRON CEDEX FRANCE Tel 04 72 14 29 70 Fax 04 72 14 29 99 Email france consommateur hitachi eu com HITACHI EUROPE...

Отзывы: