

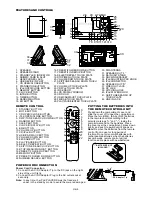


OPERATING THE UNIT
When you first plug the unit into the AC outlet, the unit will be in standby mode, the black light of standby is red.
You can now press the STANDBY/ON button on the unit or remote control to switch the unit ON. The black light of
the standby and multi function touch plate will light on blue. Pull the AC plug out of the wall socket if you want to
switch off completely.
POWER/STANDBY
1. Press the STANDBY/ON button on the unit or or press the STANDBY button on remote control to switch the
unit on.
2. Select the sound source (CD, iPod), (USB, CARD, AUX) and (DAB or TUNER) by touch the (CD, iPod),
(USB, CARD, AUX) and (DAB or TUNER) touch plate separately or press the (CD, iPod), (USB, CARD,
AUX) and (DAB or TUNER) button separately on remote control. The corresponding display will light up.
3. Adjust the volume with the VOLUME (UP or DOWN) touch plate on the unit or press the VOLUME buttons
on the remote control.
4. Press the STANDBY/ON button on the unit or press the STANDBY button on the remote control again to
turn off the unit.
Note:
1. If there is no signal under the CD/USB DEVICES/ SD & MMC CARD/iPod mode, the main unit will be
switched off within 15 minutes automatically.
2. During in the iPod mode, there is not insert the iPod Player on the iPod docking bracket. The main unit
will also turn off within15 minute automatically. Please turn the main switch off to save energy, when
you do not use it.
CLOCK SETTING
The clock will be automatically synchronized to the DAB clock if you can receive DAB signals in your location.
If you can only receive FM, then you have to set the clock manually. The manual clock setting must be done in
standby mode.
1. When the unit is first connected to the AC mains outlet, it will be in standby mode, and the display will show
“00:00” and flash.
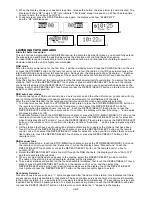
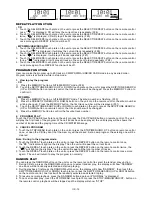
2. During standby, press and hold the CLOCK/DISPLAY button on the remote control/unit the hour digits flash
in the display, t
to set to the correct hour, then press the
CLOCK/DISPLAY button on the remote control/unit again to confirm.(F1)
3. After the hour is set, the minute digits will then flash, T
to set to the correct
minute.(F2)
4. When the display shows the correct time, press the CLOCK/DISPLAY button on the remote control/unit
again to confirm, the manual clock setting is now completed.
1. Press the POWER button on the unit or press the STANDBY button on the remote control once to switch
the unit on.
2. T
Press the FM/DAB button
to select DAB mode.
3. Tune to a DAB station and the clock will be automatically synchronized to the DAB local time.
TIMER SETTING
This function allows you to switch on and off the system at your desired time and mode:
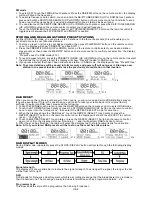
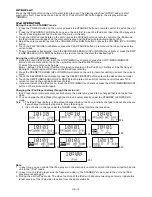
1. Press the TIMER button to toggle the timer function between on and off, the display will show “Timer On” or
“Timer Off”. The display will show “ ” to indicate timer function on.(F3)
2. To set the on timer clock, press and hold the TIMER button until the display shows “On Timer” and the “hour”
digit of the timer clock will flash.(F4)
3. Touch the SKIP/TUNE SEARCH (UP or DOWN) touch plate or press the SKIP/TUNE SEARCH(UP or DOWN)
button on the remote control to set to the desired hour, then press the TIMER button to confirm, first set the
hour and finally the minute, the on timer clock is set.
4. T hen you will enter into the off timer clock setting, the display will show “Off Timer” and the “hour” digit will
flash. Touch the SKIP/TUNE SEARCH (UP or DOWN) touch plate or press the SKIP/TUNE SEARCH (UP or
DOWN) button on the remote control to set to the desired hour, then press the TIMER button to confirm, first
set the hour and finally the minute, the off timer clock is set.
5. Finally
t
ouch the SKIP/TUNE SEARCH (UP or DOWN) touch plate or press the SKIP/TUNE SEARCH(UP or
DOWN) button on the remote control to select the timer on mode - CD, DAB, FM, USB, SD CARD or iPod,
then press the TIMER button to confirm. The timer setting is now completed.
6. To check the timer setting, repeatedly press the CLOCK button until the display shows the on timer and the
off timer setting.
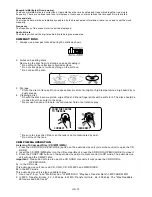
TO SET SLEEP FUNCTION (on the remote control)
This function allows you to program the system to switch off itself after a set period of time. You can set your
sleep time in power on mode:
1. T
o activate the sleep function, press the SLEEP button on the remote, the display will show “SLEEP-90”
and flash.
2. R
epeatedly press the SLEEP button to select the sleep time, it will change in sequence on every press:
Manual clock setting
ouch the SKIP/TUNE SEARCH (UP or DOWN) touch plate or press the
SKIP/TUNE SEARCH(UP or DOWN) button on the remote control
ouch the SKIP/TUNE SEARCH (UP or DOWN) touch
plate or press the SKIP/TUNE SEARCH(UP or DOWN) button on the remote control
Synchronise the clock to DAB local time
ouch the FM/DAB touch plate or
on the remote control
UK-7


