background image

Important

Color 

Temperature Selection

Selecting a degree of whiteness color temperature is the unit for representing
whiteness. Two typical color temperatures (6550K + 7MPCD and 9300K 

 are preadjusted at the factory, and the user can select one of them.

Color temperature 3 allows adjustment of red, green and blue, according to
the R.G.B. color balance adjustment in MODE 2 (see page E   

1 6550K + 7MPCD (reddish white)

2 9300K + BMPCD (default) (bluish white)

3 9300K + BMPCD (adjustable by the color balance adjustment in MODE 

Ref. page 


 2 


If 


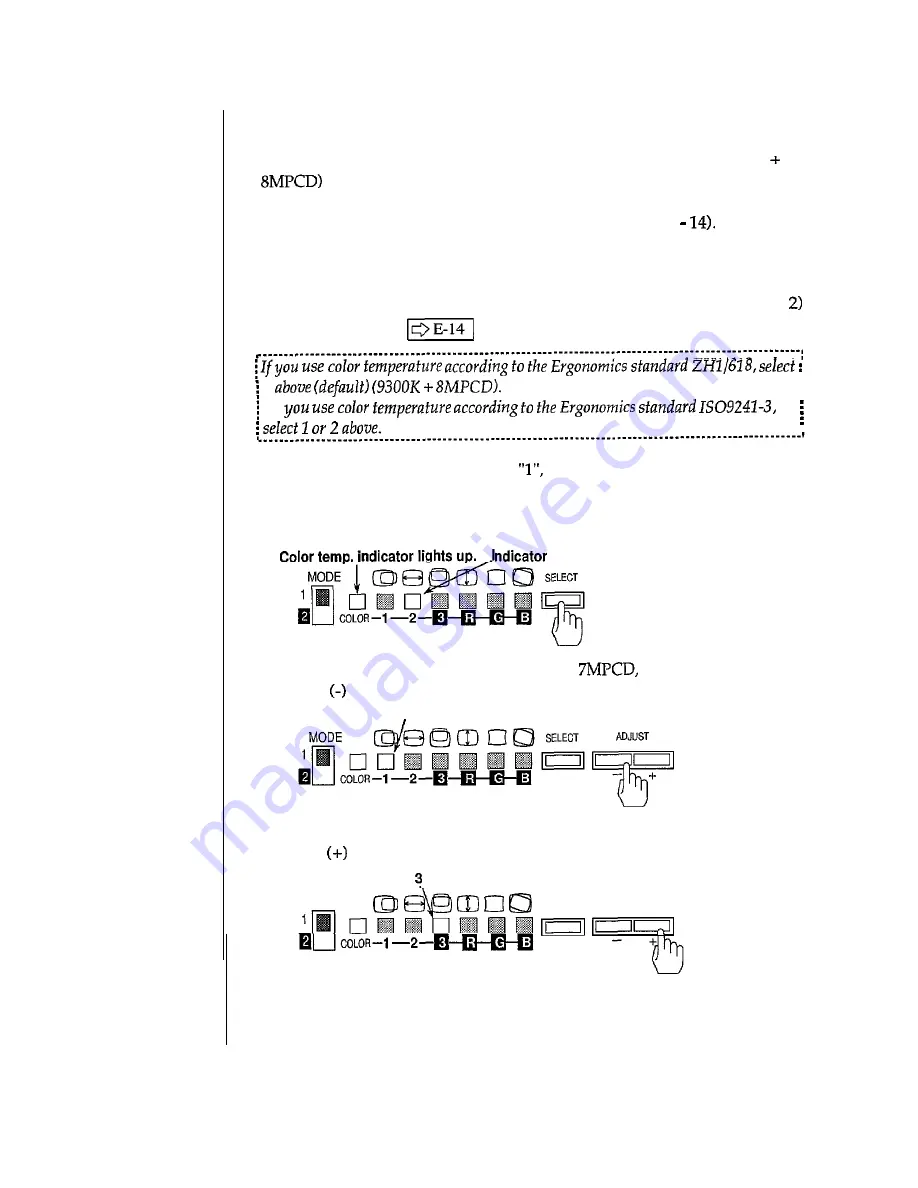
1. Set the MODE selection switch to 

 then press the SELECT button as

many times as necessary until the color temperature indicator 

comes on.

Indicator 2 also lights in the default setting, indicating that the color

temperature is 9300K + BMPCD.

 2 lights up.

2. To change the color temperature to 6550K + 

 press the

ADJUST   button once, and make sure indicator 1 comes on.

Indicator 1 lights up.

3. To set the white screen into preadjusted color balance, press the

ADJUST   button once, and make sure indicator 3 comes on.

Indicator   lights up.

MODE


 SELECT

ADJUST


E-13

Содержание Accuvue HM-4721-D

Страница 1: ...COLOR MONITOR HMm4721 D HM 4787 D USER S MANUAL ...

Страница 2: ...t or relocate the receiving antenna Increase the separation between the equipment and receiver Connect the equipment into an outlet on a circuit different from that to which the receiver is connected Consult the dealer or an experienced radio TV technician for help CAUTION Any changes or modifications not expressly approved by the guaranfee of this device could void the user s authority to operate...

Страница 3: ...English ...

Страница 4: ...not be construed as a commitment by Hitachi Ltd Hitachi Ltd assumes no responsibility for any errors that may appear in this manual VESA and DPMS are trademarks of the Video Electronics Standards Association Accuvue is a trademark of Hitachi Ltd Copyright 0 Hitachi Ltd 1996 All rights reserved lmportan t READ SAFETY INSTRUCTIONS CAREFULLY AND UNDERSTAND THEM BEFORE USING YOUR COLOR MONITOR RETAIN ...

Страница 5: ...ion or maintenance 1 Read and understand all of these instructions before installing this monitor 2 Save this manual for later use 3 Follow all warnings cautions and instructions marked on the monitor Leaving the unit connected to mains while cleaning or servicing may cause an electric shock Unplug the monitor from the outlet before you clean or service the monitor Spray and moisture may cause an ...

Страница 6: ...rd use only the fuse specified and which is identical in type voltage rating and current rating Action if a fault occurs Beware as a fault can cause electric shock or injury Unplug the monitor from the power outlet and contact qualified service personnel if the following conditions occur A The power cord or plug is damaged or frayed B Liquid has been spilled into the monitor C The monitor has been...

Страница 7: ...t the video cable to the monitor Solvents may cause damage to the cabinet DO NOT use liquid cleaners or aerosol cleaners directly on the surface of the cabinet Wet a damp cloth with cleaner and apply it to the cabinet Ergonomics for User and Manufacturer A For ergonomical reasons it is recommended not to use the primary color blue on dark background bad visibility strain for eyes because of low ch...

Страница 8: ...urity D Has Microprocessor based Front Controls for easy set up E Offers wider range of horizontal scanning frequencies HM 4721 D 30 95 kHz HM 4787 D 30 87 161 F Has 10 video timings addresses include 4 preset timings HM4721 D 3 preset timings HM 4787 D 1 for storing various resolutions G Meets the Swedish MPR II standards for low magnetic and electric emissions H Has an lNVAR bright shadow mask a...

Страница 9: ...om lighting from shining onto the CRT screen in order to prevent eye fatigue 2 2 INSTALLATION OF MONITOR Lifting the monitor The weight of color monitor is approx 34 kg 75 Ibs To avoid injury lift the monitor by two people Positioning Install the monitor on a level and stable surface Unpacking Take out the monitor from the packing box carefully Save this packing material if you need to ship the mo...

Страница 10: ...D Sub input connector L_______________________________________ SYNC SELECTION Synchronization input is possible for composite sync on green signal H V mixed external sync signal and H V separate external sync signal Auto selection Connection composite sync on green signal and H V separate external sync signal causes green line on the fop of the picture REMOTE CONTROL INTERFACE PORT This port is us...

Страница 11: ...for a long time turn off this switch 2 Front Power switch When this switch is pressed while the Main Power switch is on and the power indicator is green the indicator turns to orange and nothing is displayed on the screen Pressing this switch again turns on the screen display and changes the indicator to green 3 Power indicator The screen can display while this indicator is green but not when it i...

Страница 12: ... which you want to adjust and see ref page How to store the adjusted display setting data Press the STORE button after adjusting display setting How to RESET factory setting Press the RESET button 111 Contrast button Adjusts the screen contrast difference between lightest and darkest parts Press the button to increase the contrast and the 1 button to decrease it Press the two buttons simultaneousl...

Страница 13: ...once turned off If this button is pressed in adjustment mode the mode is changed to normal operation mode and all indicators go out c l 5 SELECT button When this button is pressed the indicator lights up as follows MODE 1 7 ED Horizontal centering t L e Horizontal width t L lg Vertical centering t 1 m Vertical height t L m Side pincushion f 4 0 Rotation T 1 COLOR Color temperature fJ I Holding dow...

Страница 14: ...etting 1 Select MODE 1 with the mode selection switch and press the SELECT button until the WIDTH indicator lights up MODE 0 e i J a 0 a SELECT 2 Adjust the horizontal width by pressing the ADJUST button i or 1 Vertical Centering Setting 1 Select MODE 1 with the mode selection switch and press the SELECT button until the V CENT indicator lights up 2 Adjust the vertical centering by pressing the AD...

Страница 15: ...n or SPC Setting 1 Select MODE 1 with the mode selection switch and press the SELECT button until the WC indicator lights up 2 Adjust the side pincushion by pressing the ADJUST button or Rotation Setting 1 Select MODE 1 with the mode selection switch and press the SELECT button until the ROTATION indicator lights up 2 Adjust the rotation by pressing the ADJUST button or ADJUST ADJUST E 12 ...

Страница 16: ...ture according to the Ergonomics standard ZHl 618 select i 2 above default 9300K 8MPCD i If you use color femperafure according to the Ergonomics standard IS092413 i i select 1 or 2 above 1 Set the MODE selection switch to l then press the SELECT button as many times as necessary until the color temperature indicator comes on Indicator 2 also lights in the default setting indicating that the color...

Страница 17: ...able Indicator 3 lights up Color indicator lights up Iydicator R lights up 2 Press the button to weaken red and to intensify it ADJUST ADJUST 7 I 7 9 3 Press the SELECT button as many times as necessary until the Indicator G comes on Indicator G lights up 4 Press the 1 button to weaken green and to intensify it ADJUST ADJUST T Y J 5 Press the SELECT button as many times as necessary until the Indi...

Страница 18: ...perature 3 in mode 1 Color balance is preset to maximum in each color at fhe facto y Therefore if an attempt is made to initially adjust the color balance or if the RESET button is pressed to go back to fhe default setting pressing fhe button cannof intens red green nor blue E 15 ...

Страница 19: ...e is automatically set when the data is unlocked To go back to the normal operation mode press the STORE button DO NOT change the input signal or turn off the power before storing new adjustment data Otherwise the data will be lost the screen will return to the state before adjustment The monitor has four preset data areas in ifs memory Tke preset data is the factory preset adjustment data and the...

Страница 20: ...ally controlled depending on the states input signals In this substate the monitor consumes 8 W or less off2 The front POWER switch is turned off In this substate the monitor consumes 8 W or less Off 3 The main POWER switch is turned off In this substate the monitor consumes no power While the monitor is in standby suspend or off state the indicator is orange or off nothing is displayed on the scr...

Страница 21: ... overholder standard specifikationer H05W F skal anvendes En natkabel motsvrande specifikation H05W F eller battre miste anvandas En nettkabel tilsvarende overgar specifikasjonen HO5W F eller bedre mibenyttes Verkkojohdon tulee olla spesifikaation H05W F mukainen tai parempi ____________________ Table 3 3 Power cord and plug identification Three wire power cord with a two pole three 1 IEC Internat...

Страница 22: ...s used both as the clock signal VCLK that used in DDCl and the vertical sync signal I __ ____ ___ I Improper video signal cable connection causes failure of the dafa communicafion I in DDC firncfion Turn ofi the main pozuer switch before connecting video signaI 1 cable I _ ____ Table 3 4 Pin Assignment of the 15 pin mini D SUB input connector female i5 ii Fig 3 2 Pin Assignment in 1 2 3 4 5 6 7 8 ...

Страница 23: ...ed l Make sure that the monitor main power switch is on l Make sure the video cord connections are securely fastened No Disp ay image and the power indicator is lit l Press any key on the keyboard to interrupt the power save mode l Press the front power switch to interrupt the power save mode l Check the contrast and brightness levels E 20 ...

Страница 24: ...4787 D Up to 1600 x 1200 75Hz Up to 1600 x 1200 70Hz 21 inch FST Flatter Screen Tube 406 x 305 mm 15 98 x 12 00 inch Typ 380 x 285 mm 14 96 x 11 22 inch Typ at 1600 x 1200 356 x 285 mm 14 02 x 10 63 inch Typ at 1280 x 1024 506 mm 19 92 inch Horizontal 0 22mm Vertical 0 16mm 30 95 kHz Auto Tracking 30 87 kHz Auto Tracking 50 152 Hz Auto Tracking Analog R G B G composite H V mix H V separate auto se...

Страница 25: ... 017 above fimirlgs This monitor was testedto X0 9242 3 crgowtvirs fcsf on above Tinrirrg 3 HM 4787 D I IBP 13 232 12 235 1 837 I N Hi 9 75 000 75 029 75 025 PERIOD 625 800 1066 DISP 600 768 1024 V BLK 25 32 42 tines Fp 1 1 1 SYNC 3 3 3 BP 21 28 38 Polarity H P P r P I r Remarks Tlzis monitor was tested to ZHlj618 ergvnomics test on above timings This monitor was tested fo 150 9241 3 ergonomics te...

Страница 26: ...15 s more than 2 4 s l 50 to 152Hz 5 to loops 10 to loop 400 to 7OOp at 50 to 80Hz Vertical Scanning Frequency 400 to 5OOps at 80 to 120Hz Vertical Scanning Frequency 400 to 45Ous at 120 to 152Hz Vertical Scanning Frequency W If is recommended more tharr 2 6 s Ilorizonfal blarlking the to avoid leff side rasfer ringing To obtain fill1 screen size pirtwr lrorizorrfal blurking time should be in fhe ...

Страница 27: ...3 Fax 49 89 991 80 224 Email rplan hitachi eu com Hotline 49 180 551 25 51 12ct min Email HSE DUS Service Hitachi eu com HITACHI EUROPEAB HITACHI EUROPE SRL Box 77 Via T Gulli n 39 S 164 94 KISTA 20147 MILAN SWEDEN ITALY Tel 08 562 711 00 Tel 02 487861 Fax 08 562 711 11 Fax 02 48786381 Servizio Clienti Email csgswe hitachi eu com Tel 02 38073415 Email customerservice italy hitachi eu com HITACHI E...

Отзывы: