background image

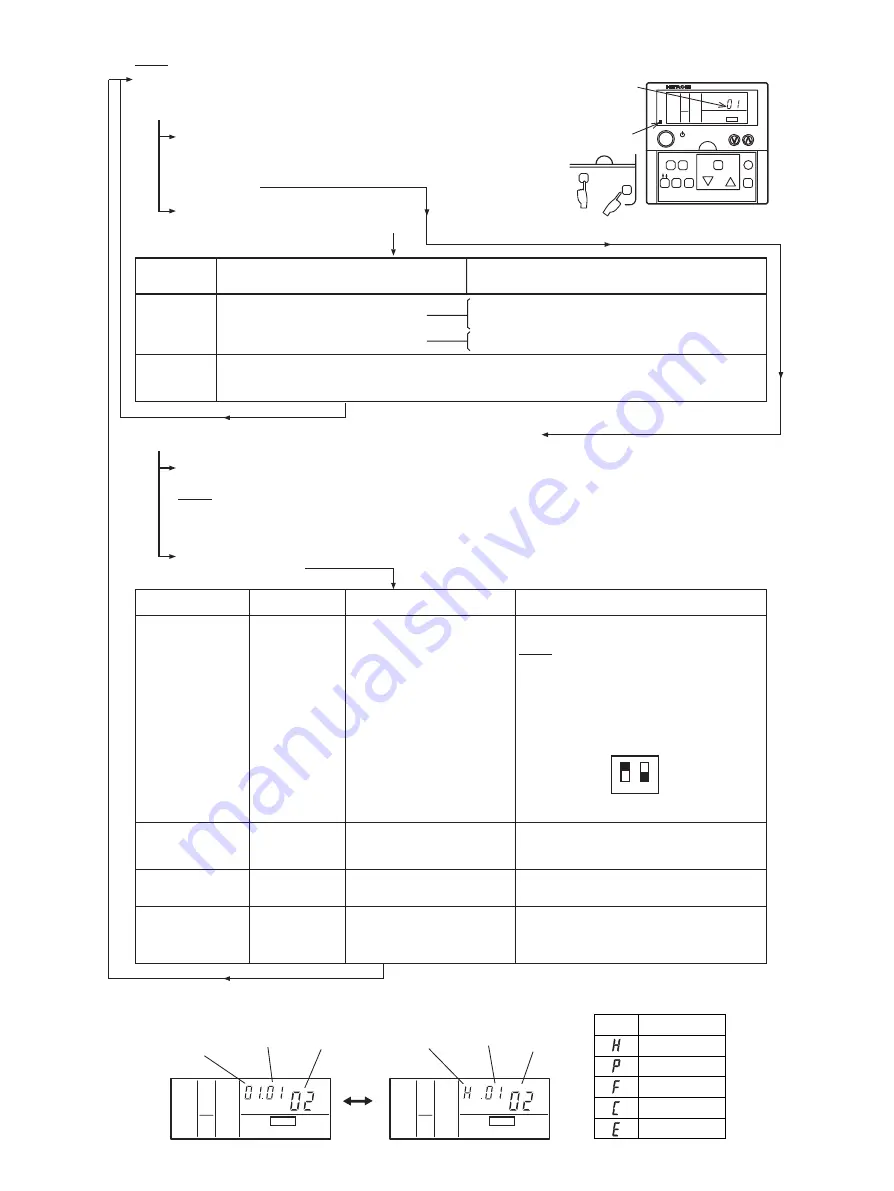
Table 7.2  Checking of Wire Connection by Test Run

COOL

MED

A/C

ADDS.  RN

ALARM

COOL

MED

A/C

ADDS.  RN

ALARM

Indicated
for a second
alternately

Abnormal Indoor
Unit No.

Abnormal Ref.
Cycle No.

Alarm Code

Alarm Code

Model Code

Connected No.
of Indoor Units

Model Code

Indication

Model

Inverter

Multi

Heat-pump

Cooling Only

Others

(1)  Turn ON the power source of the units.
(2)  Procedure for "TEST RUN" mode of remote control switch.
 

Depress the "MODE" and the "CHECK" switches together


for more than 3 seconds.


If "TEST RUN" and the counting number of the


connected units with the remote control switch


(for example "05") are indicated on the remote


control switch, the connection of remote control


cable is correct.


If no indication appears or the number of the units


indicated is smaller than the actual number of


the units, some abnormalities exist.

(3)

Back to (1) after checking

Back to (1) after checking

(4)  Select TEST RUNNING MODE by depressing "MODE" switch.  (COOL or HEAT)
(5)  Depress "RUN/STOP" switch.


The "TEST RUN" operation will be started.  (The 2 hours OFF-TIMER will be set and the "TEST RUN" operation


will be finished after 2 hours unit operation or by depressing the "RUN/STOP" switch again.)


NOTE:


The "TEST RUN" operation ignores the temperature limitation and ambient temperature during heating


operation to have a continuous operation, but the protections are alive.


Therefore, the protection may activate when the heating "TEST RUN" operation is performed in high ambient temperature.


If the units do not start or the operation lamp on the remote control switch is flashed,


some abnormalities exist.

(6)

Remote
Control Switch
Indication

No Indication

* The power source of outdoor unit is not turned ON.
* The connection of the remote control cable
  is incorrect.
* The connecting wires of power supply line
  are incorrect or loosed.

1. Connecting Points of Remote Control Cable Terminal
  Board of Remote Control Switch and Indoor Unit
2. Contact of Terminals of Remote Control Cable
3. Connecting Order of each Terminal Boards
4. Screw Fastening of each Terminal Boards

* The power source of outdoor unit is not turned ON.
* The operating line wiring between indoor unit and
  outdoor unit is not connected.

Counting
number of
connected units
is incorrect.

Inspection Points after the Power Source OFF

NOTE:  "TEST RUN" shall be performed with each refrigerant cycle (each outdoor unit).

Remote Control
Switch Indication

The operation lamp
flashes. (1 time/1 sec.)
And the Unit No. and
Alarm Code "03" flash.

The unit does not
start.

The power source of outdoor unit
is not turned ON.
The connecting wires of operating
line are incorrect or loosed.

The unit does not
start.

Remote control cable is broken.
Contact of connectors is not good.
The connection of remote control
cable is incorrect.

This is the same as items (3)-1 and 2.

The unit does not
start, or starts once
and then stops.

The connection of the thermistors
or other connectors are incorrect.
Tripping of protector exists, or elses.

Check by the abnormality mode table 7.3 and 

(Do it by service people.)

1. Connecting Order of each Terminal Boards
2. Screw Fastening of each Terminal Boards
NOTE:
Recovering method of FUSE for operating circuit.
There is a fuse ("FUSE4" on Indoor Unit PCB1, "EF1"
on Outdoor Unit PCB1) to protect operating circuit
on the PCB, when the power lines are connected to
operating lines.
If fuse is melted, operating circuit can be recovered
once by setting the dip switch on the PCB, as below.

The operation lamp
flashes. (1 time/2 sec.)

Indication or flash
except above.

The unit does not
start.

The connection of the remote
control cable between indoor units
is incorrect.

The operation lamp
flashes. (1 time/1 sec.)
And the Unit No. 

00

.

Alarm Code 

dd

 and

Unit Code 

E.00

 flash.

Unit Condition

Wrong Portions

Wrong Portions

Inspection Points after the Power Source OFF

  * Set the switch #1 to ON position to recover the
  operation circuit.

ON

OFF

Indoor Unit PCB1

DSW7

1 2

TEMP.

RUN / STOP

MODE FAN SPEED

VENTI

RESET

CHECK

LOUVER

ON/OFF TIMER

TIME

COOL

HIGH

A/C

SET TEMP.

CHECK

UNIT

CHECK

MODE

Setting Temperature

Operation Lamp

Remote Control Switch

Alarm Code Indication of Remote Control Switch

24

table 7.4.

Check by the abnormality mode table 7.3 and 

(Do it by service people.)

table 7.4.

Содержание 3HRNM1Q

Страница 1: ...4HRNM1Q 5HRNM1Q 3HRNM1Q P 0 0 6 9 1 Q 5HYNM1Q ORIGINAL INSTRUCTIONS Model Outdoor Unit INVERTER DRIVEN MULTI SPLIT SYSTEM HEAT PUMP AIR CONDITIONERS IVX mini R410A ...

Страница 2: ......

Страница 3: ...23WB 43 DB 30 DB 17 WB 15WB 5 DB 15 DB 20 WB ...

Страница 4: ...it is not used G Do not install the outdoor unit where there is a high level of oil mist flammable gases salty air or harmful gases such as sulphur G Do not use any sprays such as insecticide lacquer hair spray or other flammable gases within approximately one 1 meter from the system G If circuit breaker or fuse is often activated stop the system and contact your service contractor G Do not perfor...

Страница 5: ... to 4 hours G The heating capacity of the heat pump unit is decreased according to the outdoor air temperature Therefore it is recommended that auxiliary heating equipment be used in the field when the unit is installed in a low temperature region Children should be supervised they do not play with the appliance their safety supervision or instruction concerning use of the appliance by a person re...

Страница 6: ...these instructions is not recommended Please contact your local agent as the occasion arises HITACHI s liability shall not cover defects arising from the alteration performed by a customer without HITACHI s consent in a written form This product shall not be mixed with general household waste at the end of its life and it shall be retired according to the appropriated local or national regulations...

Страница 7: ... 4 1 Factory Supplied Accessories 6 4 2 Initial Check 6 4 3 Service Space 7 4 4 Installation Work 8 5 Refrigerant Piping Work 10 5 1 Piping Materials 5 2 Refrigerant Piping Work 11 5 3 Piping Connection 12 5 4 Air Tight Test 13 5 5 Vacuum Pumping 14 5 6 Caution of the Pressure by Check Joint 16 5 7 Collecting Refrigerant 17 6 Electrical Wiring 17 6 1 General Check 17 6 2 Electrical Wiring Connecti...

Страница 8: ...RAS 3HRNM1Q 1 Safety Summary 2 Structure Electronic Four way ...

Страница 9: ...ter Control Expansion Valve Accumulator Electrical Box Oil Separator Check Joint for High Low Pressure Cool Heat High Pressure Switch for Protection Strainer Solenoid Valve SVF Solenoid Valve SVA Pressure Sensor of High Pressure Pressure Sensor of Low Pressure ...

Страница 10: ...efrigerant Piping Refrigerant Flow Direction Heating Operation Refrigerant Flow Direction Cooling Operation Four Way Valve Check Valve Stop Valve for Gas Line Stop Valve for Liquid Line High Pressure Switch for Protection SVA Capilary Tube Distributor Strainer Electronic Expansion Valve Heat Exchanger Compressor Part Name Mark Check Joint Solenoid Valve Pressure Switch for Control ...

Страница 11: ...trogen during brazing Prevention from Oxidation during Brazing Lubrication Oil for Flare Surface Use a synthetic oil which is equivalent to the oil used in the refrigeration cycle Applying Oil to the Flared Surface Synthetic oil absorbs moisture quickly Check refrigerant cylinder color Refrigerant Charging Liquid refrigerant charging is required regarding zeotoropic refrigerant Vacuum Pump Vacuum ...

Страница 12: ...ng the unit using the handles pay attention to the following points 1 Do not remove the wooden base from outdoor unit 2 To prevent the unit from overturning pay attention to the center of gravity as shown in the below figure 3 Two or more personnel should be used to move the unit Do not remove the plastic band or the corrugated paper frame Pass the wire ropes through each lifting hole in the woode...

Страница 13: ...nd the inlet side of the heat exchanger Install the outdoor unit where it is in the shade or it will not be exposed to direct sunshine or direct radiation from high temperature heat source Do not install the outdoor unit where dust or other contamination could block the outdoor heat exchanger Install the outdoor unit in a space with limited access to general public NOTE Direction of Strong Wind Do...

Страница 14: ...and wall The dimension in is for the model of 4 H P and 5H P Above of two sides of the unit is open Occasion of obstacles in the obverse side of the units Keep a distance of more than 100mm between other units Obstacles in Above When obstacles is in above it is should be ensured that the distance between the top of units and obstacles is more than 500mm besides the space for installation and maint...

Страница 15: ...le Hole for Anchor Bolt 4 Fix the outdoor unit firmly so that declining making noise and falling down by strong wind or earthquake is avoided Fixing Plate Field Supplied Both sides on the unit fixing can be possible When vibration measures are necessary add vibration proof rubber Field Supplied Fig 4 5 Additional Fixing Arrangement 5 When installing the unit on a roof or a veranda drain water some...

Страница 16: ...utdoor Unit is Unstable Metal Plate 100mm or more Metal Plate Correct Frame Base Width of Outdoor Unit 75mm Outdoor Unit is Stable Recommended Metal Plate Size Field Supplied Material Hot Rolled Mild Steel Plate SPHC Plate Thickness 4 5T Fig 4 6 Frame and Base Installation Hole unit mm ...

Страница 17: ...dry air to remove any dust or foreign materials before connecting pipes NOTE Cautions for Refrigerant Pipe Ends When installing pipe through the wall secure a cap at the end of the pipe Correct Correct Incorrect Incorrect Correct Incorrect Hole Hole Attach a cap or vinyl tape Attach a cap or vinyl tape Attach a cap or vinyl bag with rubber band Do not place the pipe directly on the ground Rain wat...

Страница 18: ...ize mm Maximum Piping Length Actual Length Applicable Range Within Within Within Within Within Within Within Within Oil Trap is recommended at every 10 meters lift Indoor Unit Indoor Unit Indoor Unit Unit Indoor 3HRNM1Q 4HRNM1Q 5HR Y NM1Q 60 3HRNM1Q 4HRNM1Q 5HR Y NM1Q 11 Actual Length 40 2 3 6 0 1 8 2 0 0 8 1 5 Within 3HRNM1Q 5HR Y NM1Q 3HRNM1Q 4HRNM1Q Within Within 4HRNM1Q Within 5HR Y NM1Q HP I ...

Страница 19: ... a knock out hole in the front pipe cover or bottom base to pass through the hole After removing the pipe cover from the unit punch out the holes following the guide line with screwdriver and a hammer Then cut the edge of the holes and attach insulation Field Supplied for cables and pipes protection a Front and Right Side Piping Work Select the correct knock out size depending on whether it is for...

Страница 20: ...r elbow Field Supplied for bending work when connecting pipe c Rear Piping Work After removing rear piping cover punch out the C holes along the guide line Rear Cover C Completion of Ref Piping Repairing of Leakage Part Check of Pressure Decrease Applying Nitrogen Gas Pass Procedure Do not apply an abnormal big force to the spindle valve at the end of opening 5 0N m or smaller The back seat constr...

Страница 21: ...r forming agent Use the foaming agent which does not generate the ammonia NH3 by chemical reaction The recommended forming agent are as shown below Do not use general household detergent for checking Liquid Line Gas Line Liquid Line Stop Valve Gas Line Stop Valve Nitrogen Tank for Air Tight Test and Nitrogen Blow during Brazing Vacuum Pump Manifold Gauge Wind tape from outside of thermal insulatio...

Страница 22: ...m W1 W0 This System kg Charge refrigerant R410A into the system as follows 1 For charging refrigerant connect the gauge mani fold using charging hoses with a refrigerant cylinder to the check joint of the liquid line stop valve 2 Fully open the gas line stop valve and slightly open the liquid line stop valve Charge refrigerant by opening the gauge mani fold valve 3 Charge the required refrigerant ...

Страница 23: ...S R410A R410A is an incombustible and non toxic gas However if leakage occurs and gas fills a room it may cause suffocation The maximum permissible concentration of HCFC gas R410A in air is 0 3kg m3 according to the refrigeration and air conditioning facility standard KHK S 0010 by the KHK High Pressure Gas Protection Association Japan Therefore some effective measure must be taken to lower the R4...

Страница 24: ...Check to ensure that the capacity of power supply is enough If not the compressor will be not able to operate because of abnormal voltage drop at starting 4 Check to ensure that the earth wire is connected 5 Check to ensure that the electrical resistance is more than 1 megohm by measuring the resistance between ground and the terminal of the electrical parts If not do not operate the system until ...

Страница 25: ...ine and N line If applied from L1 L2 L1 L3 the electrical parts will be damaged to outdoor unit and indoor unit Fig 6 1 Connector of Transformer of Outdoor Unit PCN2 CN11 23V CN2 CN1 TF1 Connector 0V 1 2 PCB1 1 2 4 In case that the power source is 240V change CN1 connector to CN2 of transformer in the electrical control box as shown in Fig 6 1 source wiring of each terminal board AC220 240V betwee...

Страница 26: ...d any polarity Do not apply an excessively high voltage to this cable Rated Voltage 5V Shielded Twist Pair Cable 0 75mm 2 x 2 This cable dose not need any polarity Do not apply an excessively high voltage to this cable Rated Voltage 12V Control Cable Power Source Cable Pay an attention to the phase of power source when wiring Main Switch Remote Control Switch Option Remote Control Switch Option Re...

Страница 27: ...ed fixible cord cord designation H05RN F or ordinary polychloroplene sheathed flexible cord cord designation H05RN F 220 240V 50HZ 220V 60HZ 380 415V 3N 50HZ 380V 3N 60HZ EN 60335 1 EN 60335 1 220 240V 50HZ 220V 60HZ 380 415V 3N 50HZ 380V 3N 60HZ 1 5 4 1 2 5 2 5 6 4 10 6 16 10 25 50 50 50 50 50 50 1 2 5 1 2 5 EN60335 1 rated mm EN60335 1 1 Cable Size Power Source Cable Size Power Source Transmitti...

Страница 28: ...gerant cycle in the outdoor unit it may cause to damage them Rubber Bush Accessory Earth Wire Power Supply Cable Control Cable Earth Wire Rear Cover Wiring Method with Clamp 1 Insert the wires by into the cord clamp and clamp them as shown in the figure 2 Perform wiring so that wires do not touch the compressor refrigerant pipes or edge of the covers Field Minimum Wire Sizes for Power Source of In...

Страница 29: ...eck to ensure that the stop valves of the outdoor unit are fully opened and then start the system C Check to ensure that the switch on the main power source has been ON for more than 12 hours to warm the compressor oil by the oil heater Pay attention to the following items while the system is running A Do not touch any of the parts by hand at the discharge gas side since the compressor chamber and...

Страница 30: ...B o C 7 Check Refrigerant Temperature Liquid Temperature o C Discharge Gas Temperature o C 8 Check Pressure Discharge Pressure MPa Suction Pressure MPa 9 Check Voltage Rated Voltage V Operating Voltage V Starting Voltage V 10 Check Compressor Input Running Current Input kW Running Current A 11 Is the refrigerant charge adequate 12 Do the operation control devices operate correctly 13 Do the safety...

Страница 31: ...crew Fastening of each Terminal Boards The power source of outdoor unit is not turned ON The operating line wiring between indoor unit and outdoor unit is not connected Counting number of connected units is incorrect Inspection Points after the Power Source OFF NOTE TEST RUN shall be performed with each refrigerant cycle each outdoor unit Remote Control Switch Indication The operation lamp flashes...

Страница 32: ...rmality of Protective Circuit in outdoor Unit Failure of Protection detecting Circuit 41 Overload cooling Possibility of high pressure device activation O U Pipe Thermistor Temp is Higher than 55o C and the Comp Top Temp is Higher than 95o C when O U Protection Device is activated 42 Overload heating Possibility of high pressure device activation I U Freeze Protection Thermistor Temp is Higher tha...

Страница 33: ...ination 31 System Incorrect Setting of I U No Duplication of Indoor Unit No 35 Incorrect Combination of I U No Refrigerant of Indoor Unit No 36 Abnormality of Protective Circuit in O U Failure of Protection Detecting Circuit 38 Activation of Low Pressure Detective Compression Failure of Compressor 43 Decrease Protection Device of Inverter Loose Power Supply Connection Activation of Low Pressure Ov...

Страница 34: ...setting motor output is decreased The other way when the is cancelled RAS 3HRNM1Q 25 V 415V Hz V Hz 5 5 5 A Fuse Capacity on PCB1 For Control Circuit 3 3 3 min CCP Timer Setting Time 50 50 32 A Fuse MPa MPa Automatic Reset Non Adjustable For Compressor Pressure Switch Model MPa MPa For Control Pressure Switch _ _ _ _ _ _ 3 _ _ _ _ 5 380 415V 3N 50HZ 380V 3N 60HZ 220 240V 50HZ 220V 60HZ RAS 4HRNM1Q...

Страница 35: ......

Страница 36: ...P00691Q 2013 11 V00 ...

Отзывы: