background image

36

English

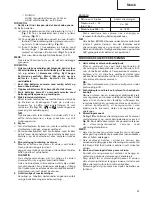
Lighting time
AAAA manganese batteries: approx. 15 hrs.
AAAA alkali batteries: approx. 30 hrs.

CAUTION:

Do not look directly into the light.
Such actions could result in eye injury.

(4) Replacing the batteries

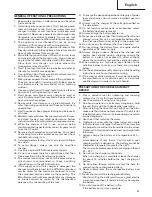
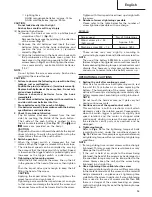
(a) Loosen the hook screw with a phillips-head

screwdriver (No. 1). (

Fig. 10

)

Remove the hook cover by pushing in the direction
of the arrow. (

Fig. 11

)

(b) Remove the old batteries and insert the new

batteries. Align with the hook indications and
position the plus (+) and minus (–) terminals
correctly. (

Fig. 12

)

(c) Align the indentation in the hook main body with

the protuberance of the hook cover, press the
hook cover in the direction opposite to that of the
arrow shown in 

Fig. 11

 and then tighten the screw.

Use commercially available AAAA batteries
(1.5 V).

NOTE:

Do not tighten the screw excessively. Such action
could strip the screw threads.

CAUTION:

Failure to observe the following can result in battery
leakage, rust or malfunction.
Position the plus (+) and minus (–) terminals correctly.
Replace both batteries at the same time. Do not mix
old and new batteries.
Remove exhausted batteries from the hook
immediately.

Do not discard batteries together with normal trash
and do not throw batteries into fire.

Store batteries out of the reach of children.

Use batteries correctly in accordance with the battery
specifications and indications.

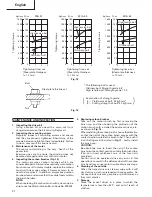
2. Check the rotational direction

The bit rotates clockwise (viewed from the rear
side) by pushing the R-side of the push button.
The L-side of the push button is pushed to turn
the bit counterclockwise. (See 

Fig. 13

) (The 

L

 and

R

 marks are provided on the body.)

CAUTION

The push button can not be switched while the impact
driver is turning. To switch the push button, stop the
impact driver, then set the push button.

3. Switch operation

When the trigger switch is depressed, the tool
rotates. When the trigger is released, the tool stops.

The rotational speed can be controlled by varying
the amount that the trigger switch is pulled. Speed
is low when the trigger switch is pulled slightly and
increases as the trigger switch is pulled more.

4. Tightening and loosening screws

Install the bit that matches the screw, line up the bit
in the grooves of the head of the screw, then tighten
it.
Push the impact driver just enough to keep the bit
fitting the head of the screw.

CAUTION

Applying the impact driver for too long tightens the
screw too much and can break it.
Tightening a screw with the impact driver at an angle
to that screw can damage the head of the screw and
the proper force will not be transmitted to the screw.

Tighten with this impact driver lined up straight with
the screw.

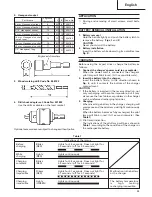
5. Number of screws tightenings possible

Please refer to the table below for the number of
screw tightened possible with one charge.

EB1430H

These values may vary slightly, according to
surrounding temperature and battery characteristics.

NOTE

The use of the battery EB1430H in a cold condition
(below 0 degree Centigrade) can sometimes result in
the weakened tightening torque and reduced amount
of work. This, however, is a temporary phenomenon,
and returns to normal when the battery warms up.

OPERATIONAL CAUTIONS

1. Resting the unit after continuous work

After use for continuous bolt-tightening work, rest
the unit for 15 minutes or so when replacing the
battery.  The temperature of the motor, switch, etc.,
will rise if the work is started again immediately after
battery replacement, eventually resulting in burnout.

NOTE:

Do not touch the hammer case, as it gets very hot
during continuous work.

2. Cautions on use of the speed control switch

This switch has a built-in, electronic circuit which
steplessly varies the rotation speed. Consequently,
when the switch trigger is pulled only slightly (low
speed rotation) and the motor is stopped while
continuously driving in screws, the components of
the electronic circuit parts may overheat and be
damaged.

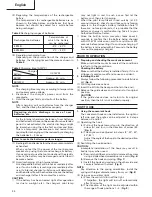
3. Tightening torque

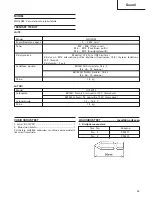
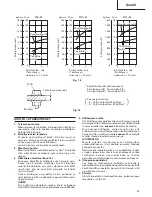
Refer to 

Figs. 18 

for the tightening torque of bolts

(according to size), under the conditions shown in

Fig. 19

. Please use this example as a general reference,

as tightening torque will vary according to tightening
conditions.

NOTE

If a long striking time is used, screws will be strongly
tightened. This may cause the screw to break, or may
damage the tip of the bit.

If the unit is held at an angle to the screw being
tightened, the head of the screw may be damaged, or
the specified torque may not be transmitted to the
screw. Always keep the unit and the screw being
tightened in a straight line.

4. Use a tightening time suitable for the screw

The appropriate torque for a screw differs according
to the material and size of the screw, and the material
being screwed etc., so please use a tightening time
suitable for the screw. In particular, if a long tightening
time is used in the case of screws smaller than M8,
there is a danger of the screw breaking, so please
confirm the tightening time and the tightening torque
beforehand.

Screw used

No. of tightenings

Wood screw ø4 

×

 50

Approx. 950

(Soft wood)

Machine screw M8 

×

 16

Approx. 1890

Содержание WH 14DM

Страница 1: ...DM Bruksanvisning Brugsanvisning Bruksanvisning Käyttöohjeet Handling Instructions Läs igenom bruksanvisningen noga före verktygets användning Læs instruktionerne nøje igennem før maskinen tages i brug Les grundig og forstå anvisningene før bruk Lue ohjeet huolellisesti ennen käyttöä Read through carefully and understand these instructions before use N 1 1 ...

Страница 2: ...3 2 1 5 4 7 6 9 8 B 1 F 2 1 d 7 6 1 8 3 2 1 4 5 9 A 0 E D C A B 5 4 3 2 1 ...

Страница 3: ...3 2 13 12 15 14 P Q R 3mm 11 5mm 11 10 N L R S O O 17 16 C G H I C K J L M L K 1 2 3 4 5 6 7 8 9 0 A B C D E F G H I J K L M N O P Q R S 1 2 3 4 5 6 7 8 9 0 A B C D E F G H I J K L M N O P Q R S ...

Страница 4: ...idgrænse Slitasjegrense Nagel på kolborste Kulbørstes søm Stift på kullbørste Utbuktning på kolborste Fremspring på kulbørste Utstikkende del på kullbørsten Kontaktdel på borstmunstyckets utsida Kontaktdel på udvendigt børsterør Kontaktpunkt utfenfor børsterøret Suomi English 14 4 V ladattava paristo 14 4 V Rechargeable battery Salpa Latch Kahva Handle Paina sisää Insert Vedä ulos Pull out Paina s...

Страница 5: ...ng som rekommenderas i denna bruksanvisning eller i HITACHI katalogen för att undvika personskador 20 Om nätkabeln till laddaren skadas så måste laddaren lämnas till en auktoriserad HITACHI reparatör för utbyte av nätkabel Låt endast en auktoriserad HITACHI reparatör reparatör utföra reparationer Tillverkaren åtar sig inget ansvar för eventuella materiella eller personliga skador som orsakats av e...

Страница 6: ...EGAT Den lämpligaste uppladdningstemperaturen ligger mellan 20 C och 25 C 8 Använd inte laddningsaggregatet kontinuer ligt Låt aggregatet vila i ca 15 minuter mellan varje laddning 9 Se till att inga främmande föremål hamnar i verktyget genom batteriöppningen eller uttagen 10 Ta aldrig isär varken det uppladdningsbara batteriet eller laddningsaggregatet 11 Se till att det uppladdningsbara batterie...

Страница 7: ... ex att laddningsuttaget deformeras 3 Laddning Laddningen sätts igång efter batteriets isättning i laddaren Signallampan lyser i rött Så fort batteriet har laddats upp helt blinkar signallampan i rött med ensekunds intervaller Se Tabell 1 1 Hur signallampan lyser blinkar till Hur signallampan lyser blinkar till före laddnings start under pågående laddning och efter slutförd laddning visas i nedans...

Страница 8: ...alna och starta sedan laddningen 䡬 Om signallampan blinkar i rött med 0 2 sekunders intervaller måste batteriets isättningsöppning kontrolleras för främmande ämnen som måste tagas bort När det inte finns några främmande ämnen i isättningsöppningen är det troliga felet fel i batteriet eller i laddaren För såväl batteriet som laddaren till Hitachis representant för kontroll 䡬 Det tar ca tre sekunder...

Страница 9: ...ar i skador när startomkopplaren trycks in lätt låg Använd skruv Antalet åtdragningar Träskruv ø4 50 mjukt trä Ca 950 Maskinskruv M8 16 Ca 1890 VARNING Slarvig montering av haken kan resultera i kroppsskada vid användning a Håll fast skruvdragaren ordentligt och skruva loss skruven med hjälp av en spårskruvmejsel ett mynt e dyl Bild 6 b Ta bort haken och fjädern Bild 7 c Montera haken och fjädern ...

Страница 10: ...örbruksartiklar och utsätts för slitage Byt alltid ut kolborsten mot en ny så snart den är sliten eller nära avnötningsgränsen eftersom en sliten kolborste kan vara orsak till motorfel Se också till att kolborstarna är rena och rör sig fritt i kolhållarna OBS Se till att använda en ny kolborste tillverkad av Hitachi kodnr 999054 vid byte av kolborste rotationshastighet och när motorn stannar vid k...

Страница 11: ...tt låst barnsäkert ställe där temperaturen inte överstiger 40 C 8 Servicelista A Det nr B Kodnr C Brukat nr D Anm OBSERVERA Reparationer modifieringar och inspektioner av Hitachis elverktyg får endast utföras av en av Hitachi auktoriserad serviceverkstad Vi rekommenderar att denna servicelista lämnas in tillsammans med verktyget som referens då verktyget lämnas in för reparation eller annat underh...

Страница 12: ...riginale HITACHI reservedele 18 Anvend ikke værktøjet eller opladeapparatet til andre formål end de der er nævnt i instruktionsbogen 19 For at undgå at komme til skade bør man kun anvende de i denne brugsanvisning eller i HITACHI kataloget anbefalede tilbehørsdele og ekstraudstyr 20 Hvis dette opladeapparats strømforsyningsledningen har lidt skade skal opladeapparatets sendes tilbage til et autori...

Страница 13: ...ts ventilationsåbninger Hvis metalgenstande eller brændbare stoffer kommer ind i ventilationsåbningerne kan det give elektriske stød og ødelægge opladeapparatet 14 Når batteriet er udslidt bring det tilbage til forhandleren hvor De har købt maskinen smid det ikke væk 15 Brug af et udslidt batteri vil forårsage beskadigelse at opladeapparatet Model UC14YF2 Opladetid EB14B Ca 60 minutter ved 20 C EB...

Страница 14: ...apparatet som f eks en deformeret opladeterminal 3 Opladning Nar et batteri sættes i opladeapparatet vil opladningen begynde og kontrollampen lyser konstant rødt Når batteriet er fuldt opladet vil kontrollampen blinke rødt et blink i sekundet Se Tabel 1 1 Kontrollampens indikering Kontrollampens indikeringer angives i Tabel 1 alt efter opladeapparatets eller det genopladelige batteris tilstand Tab...

Страница 15: ...e er noget er der mulighed for at batteriet eller opladeapparatet ikke fungerer korrekt Lad en autoriseret fagmand se på problemet 䡬 De den indbyggede microcomputer er omkring 3 sekunder kom at bekæfte at batteriet der oplades med UC14YF2 er taget ud skal du vente i mindst 3 sekunder før du sætter batteriet i igen for at fortsætte opladningen Hvis batteriet sætter i før der er gået 3 sekunder er d...

Страница 16: ...r lœnge vil skruen blive skruet for stramt i og kan brække Hvis skruetrækkeren ikke holdes lige ind på skruen vil skruehovedet blive beskadiget og kraften fra maskinen kan ikke overføres effektivt Hold altid skruetrækkeren lige ind på skruen 5 Muligt antal skruestramninger Vi henviser til nedenstående skema angående antallet af mulige skruestramninger med en enkelt opladning EB1430H Disse værdier ...

Страница 17: ...ktøjets hjerte Sørg for at denne ikke beskadiges og holdes fri for fugt og olie 4 Eftersyn af kulbørsterne Fig 14 Maskinen anvender kulbørster som er skiddele Da en udslidt kulbørste kan forårsage maskinskade udskift kulbørsterne når de er slidt ned til slidgrænsen Hold desuden altid kulbørsterne rene og sørg for at de glider frit i kulholderne BEMÆRK Når der kulbørsten skiftes ud med en ny skal H...

Страница 18: ...se af el værktøj skal de sikkerhedsregler og standarder som gælder i hvert enkelt land nøje overholdes MODIFIKATIONER Hitachi el værktøj undergår konstant forbedringer og modifikationer så teknologiske nyheder hele tiden kan inkorporeres Som et resultat heraf kan nogle dele f ex kodenumre og eller design ændres uden varsel BEMÆRK Grundet HITACHI s løbende forskning og udvikling kan bemeldte specif...

Страница 19: ...ruksanvisningen 19 For å unngå personskader må det bare brukes tilbehør eller utstyr som er anbefalt i denne bruksanvisningen eller i HITACHI katalogen 20 Hvis ledningen til denne laderen er skadet må laderen returneres til HITACHI autoriserte serviceverksted slik at ledningen kan skiftes ut Reparasjonsarbeid må bare utføres av et autorisert serviceverksted Produsenten kan ikke påta seg ansvar for...

Страница 20: ... min 1 Kapasitet M4 M8 Liten skrue M6 M14 Vanlig bolt M6 M12 Høyspenningsbolt Stamningsmoment Maks 135 N m 1380 kgf cm Stramming er M12 høystrekkbolt hardhetsgrad 12 9 når helt oppladet ved 20 C Strammingstid 3 sek Oppladbant batteri EB14B Ni Cd batteri 14 4 V 2 0 Ah 12 celler EB1430H Ni MH batteri 14 4 V 3 0 Ah 12 celler Vekt 1 9 kg LADEAPPARAT TILLEGGSUTSTYR selges separat 1 Plussbits MODELL WH1...

Страница 21: ...nke rødt med 1 sek mellomrom se Tabell 1 1 Pilotlysets indikasjon Pilotlysets indikasjoner blir som vist i Tabell 1 i samsvar med ladeapparatets eller det oppladbare batteriets tilstand Tabell 1 Pilotlysets indikasjoner Før lading Blinker Lyser i 0 5 sekunder Er slukket i 0 5 RØD sekunder av i 0 5 sekunder Mens lading Lyser Lyser kontinuerlig pågår RØD Lading ferdig Blinkar Lyser i 0 5 sekunder Er...

Страница 22: ...r fremmedlegemer er det sannsynligvis noe galt med enten batteriet eller ladeapparatet Få begge deler sjekket hos en autorisert fagmann 䡬 Den innbygde computeren tar ca 3 sekunder for å bekrefte at batteriet som lades opp med UC14YF2 er tatt ut oh du må derfor vente i minst 3 sekunder før det settes i igjen for videre lading Hvis batteriet settes i innen det er gått 3 sekunder kan det skje at ladi...

Страница 23: ...r ødelegges i tillegg til at trykket som overføres på skruen ikke blir korrekt Hold maskinen i rett vinkel på skruen 5 Antall mulige skruestramninger Vennligst se tabellen nedenunder angående antall mulige boltstramninger med en ladning EB1430H Disse verdiene kan variere noe avhengig av temperaturforhold og batteriegenskaper NB Hvis batteri EB1430H brukes under kalde værforhold under 0 grader Cels...

Страница 24: ...e kontroll med at viklinger ikke er skadet og eller våte av olje eller vann 4 Inspeksjon av kullbørster Fig 14 Motoren forbruker kullbørster Da en utslitt kullbørste kan resultere i motorproblemer må en kullbørste skiftes ut før den blir helt nedslitt eller begynner å nærme seg slitegrensen Kullbørstene må dessuten alltid holdes rene og det må passes på at de beveger seg fritt i børsteholderen MER...

Страница 25: ...oldes ved drift og vedlikehold av elektroverktøy MODIFIKASJONER Hitachi elektroverktøy er under konstant utbedring og modifisering for å inkorporere de siste nye teknologiske fremskritt Følgelig vil enkelte deler f eks kodenr og eller design kunne endres uten forvarsel NB På grunn av HITACHIs kontinuerlige forsknings og utviklingsprogram kan spesifikasfonene i dette heftet endres uten forvarsel In...

Страница 26: ...t seurausta valtuuttamattamoman henkilön tekemistä korjauksista tai työkalun väärinkäytöstä 21 Välttääksesi vahingoittamasta poraa tai laturia älä poista asennettuja kuoria tai ruuveja 22 Käytä aina nimilaatassa mainittua jännitettä 23 Älä koske liikkuviin osiin varmistumatta että virta on kytketty pois päältä 24 Lataa paristo aina ennen käyttöä 25 Älä koskaan käytä muuta kuin suositeltua voimanlä...

Страница 27: ...4 Tavallinen pultti M6 M12 Suurjännitepultti Kiristysvoima Maksimi 135 N m 1380 kgf cm Kiristys on M12 erikoislujaa pulttia käyttöen Kovuusjako 12 9 täyteen ladattuna 20 C lämpöt Kiristysaika 3 sek Ladattava paristo EB14B Ni Cd paristo 14 4 V 2 0 Ah 12 kennoa EB1430H Ni MH paristo 14 4 V 3 0 Ah 12 kennoa Paino 1 9 kg LATURI LISÄVARUSTEET myydään erikseen 1 Ristipää ruuvausterä Model UC14YF2 Lataus...

Страница 28: ... paristo asetetaan laturiin lataus alkaa ja merkkivalo palaa jatkuvasti punaisena Kun akku on latautunut merkkivalo vilkkuu punaisena 1 sekunnin välein Katso taulukkoa 1 1 Merkkivalon tiedotukset Merkkivalon tiedotukset näkyvät Taulukosta 1 laturin ja ladattavan parison kunnon mukaan Taulukko 1 Merkkivalon tiedotukset Ennen Vilkkuu Palaa 0 5 sekunnin ajan Ei pala 0 5 latausta PUNAINEN sekunnin aja...

Страница 29: ...mistaa että laturilla UC14YF2 ladattava paristo on ulkona odata ainakin 3 sekuntia ennen kuin laitat sen uudelleen sisään ja jatkat lataamista Jso paristo laitetaan sisään 3 sekunnin kuluessa se ei lataudu kunnolla ENNEN KÄYTTÖÄ 1 Työympäristön valmistelu ja tarkastus Varmista että työympäristö täyttää kaikki sille asetetut vaatimukset 2 Pariston tarkastus Varmista että paristo on asetettu lujasti...

Страница 30: ...ttua eikä oikea voima välity ruuvin Kiristä niin että iskutaltta on suorassa ruuviin nähden 5 Mahdollinen ruuvien kiristysten lukumäärä Katso alla olevasta taulukosta yhdellä latauksella mahdollinen ruuvien kiristysten lukumäärä EB1430H Nämä arvot saattavat hieman vaihdella riippuen ympäröivästä lämpötilasta ja pariston ominaisuuksista HUOM Kun paristoa EB1430H käytetään kylmissä ilmaolosuhteissa ...

Страница 31: ...n tai veteen 4 Hiiliharjojen tarkistus Kuva 14 Koneessa käytettävät hiiliharjat ovat kuluvia osia Koska liian kuluneet hiiliharjat voivat aiheuttaa moottorille häiriöitä on syytä vaihtaa vanhat hiilet uusiin heit kun ne ovat liian kuluneita tai lähellä kulumisrajaa Lisäksi hiiliharjat on pidettävä aina puhtaina ja varmistettava että ne pääsevät vapaasti liikkumaan harjapitimissä HUOM Kun hiiliharj...

Страница 32: ...normeja MUUTOKSET Hitachi sähkötyökaluja parannetaan ja muutetaan jatkuvasti niin että niihin saadaan sisällytettyä uusin teknologia Tästä johtuen jotkut osat esim koodinumerot ja tai ulkonäkö saattavat muuttua ilman ennakkoilmoitusta HUOM Kostka HITACHI jatkuvasti kehittää tuotteiaan pidättää valmistaja oikeuden muuttaa teknisiä tietoja ilman eri ilmoitusta Tietoja ilmavälitteisestä melusta ja tä...

Страница 33: ...e repairing The Manufacturer will not be responsible for any damages or injuries caused by repair by the unauthorized persons or by mishandling of the tool 21 To ensure the designed operational integrity of power tools and charger do not remove installed covers or screws 22 Always use the charger at the voltage specified on the nameplate 23 Do not touch movable parts or accessories unless the batt...

Страница 34: ... Standard accessories are subject to change without notice OPTIONAL ACCESSORIES sold separately 1 Plus driver bit Bit No Code No No 2 992671 No 3 992672 13 Do not insert object into the air ventilation slots of the charger Inserting metal objects or inflammables into the charger air ventilation slots will result in electrical shock hazard or damaged charger 14 Bring the battery to the shop from wh...

Страница 35: ... Charging When inserting a battery in the charger charging will commence and the pilot lamp will light continuously in red When the battery becomes fully recharged the pilot lamp will blink in red At 1 second intervals See Table 1 1 Pilot lamp indication The indications of the pilot lamp will be as shown in Table 1 according to the condition of the charger or the rechargeable battery Lights for 0 ...

Страница 36: ...ation hole If there are no foreign objects it is probable that the battery or charger is malfunctioning Take it to your Authorized Service Center 䡬 Since the built in micro computer takes about 3 seconds to confirm that the battery being charged with UC14YF2 is taken out wait for a minimum of 3 seconds before reinserting it to continue charging If the battery is reinserted within 3 seconds the bat...

Страница 37: ...screw with the impact driver at an angle to that screw can damage the head of the screw and the proper force will not be transmitted to the screw Tighten with this impact driver lined up straight with the screw 5 Number of screws tightenings possible Please refer to the table below for the number of screw tightened possible with one charge EB1430H These values may vary slightly according to surrou...

Страница 38: ... or water 4 Inspecting the carbon brushes Fig 14 The motor employs carbon brushes which are consumable parts Since and excessively worn carbon brush can result in motor trouble replace the carbon brush with new ones when it becomes worn to or near the wear limit In addition always keep carbon brushes clean and ensure that they slide freely whthin the brush holders NOTE When replacing the carbon br...

Страница 39: ... observed MODIFICATIONS Hitachi Power Tools are constantly being improved and modified to incorporate the latest technological advancements Accordingly some parts i e code numbers and or design may be changed without prior notice NOTE Due to HITACHI s continuing program of reserch and development the specifications herein are subject to change without prior notice Information concerning airborne n...

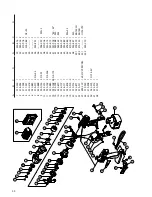
Страница 40: ...44 306 952 1 45 320 882 1 46 676 386 1 M4 25 47 319 926 1 48 320 881 1 M5 49 1 318 372 1 EB1430H 49 2 315 130 1 EB14B 501 1 UC14YF2 502 322 070 1 A B C D 1 317 530 1 2 318 394 1 3 317 528 1 4 317 527 1 5 320 418 1 6 320 889 1 7 319 917 4 D4 25 8 320 888 1 9 959 155 2 D3 97 10 322 072 1 11 959 154 2 D5 556 12 320 880 1 13 959 148 28 D3 175 14 315 978 1 15 320 879 1 16 316 172 1 17 316 171 1 18 320 ...

Страница 41: ...40 ...
Страница 42: ...tai EN55014 2 yhteisön ohjeiden 89 336 ETY ja tai 98 37 EY mukaisesti Tämä ilmoitus sovelletaan tuotekohtaiseen CE merkintään English EC DECLARATION OF CONFORMITY We declare under our sole responsibility that this product is in conformity with standards or standardized documents EN50144 HD400 and or EN55014 2 in accordance with Council Directives 89 336 EEC and or 98 37 EC This declaration is appl...

Отзывы: