background image

— 11 —

English

ADJUSTING AIR PRESSURE

WARNING

Do not exceed 120 psi (8.3 bar

8.5 kgf/cm

2

).

Adjust the air pressure at recommended operating
pressure 70 – 120 psi (4.9 – 8.3 bar

5 – 8.5 kgf/cm

2

)

according to the length of nails and the hardness of
workpiece.
The correct air pressure is the lowest pressure which will
do the job. Using the Nailer at a higher than required air
pressure unnecessarily over stresses the Nailer.

LOADING NAILS

WARNING

When loading nails into Nailer,
1) do not pull trigger;
2) do not depress push lever; and
3) keep Nailer pointed downward.

(1) Press the magazine stopper and open the magazine

cover.

(2) Adjust the position of the nail holder according to the

nail length.
The nail will not feed smoothly if the nail holder is not
correctly adjusted.

1

Turn the nail holder about 90 degrees
counterclockwise.

2

Move the nail holder up and down to align the top
of the nail holder with a mark on the holder shaft
in accordance with the length of the nails being
used.

3

Turn the nail holder 90 degrees clockwise until
you hear "click".

(2) Adjust the air pressure to 70 psi (4.9 bar

5 kgf/cm

2

).

Connect the air hose.
Do not load any nails in the Nailer.

THE NAILER MUST NOT LEAK AIR.

Hold the Nailer downward and pull the trigger.

THE NAILER MUST NOT OPERATE.

(3) With finger off the trigger, depress the push lever

against the workpiece.

THE NAILER MUST NOT OPERATE.

(4) Without touching the trigger, depress the push lever

against the workpiece.
Pull the trigger.

THE NAILER MUST OPERATE.

(5) With the Nailer off the workpiece, pull the trigger.

Depress the push lever against the workpiece.

THE NAILER MUST OPERATE.

(6) If no abnormal operation is observed, you may load

nails in the Nailer.
Drive nails into the workpiece that is the same type to
be used in the actual application.

THE NAILER MUST OPERATE PROPERLY.

Magazine Cover

Nail Holder

Magazine Stopper

Nail Holder

Holder Shaft

Pull Trigger

Do not pull Trigger

Depress Push Lever

1

2

3

Содержание NV 65AH

Страница 1: ...raîner la mort ou des blessures graves Ce manuel renferme des instructions importantes sur la sécurité de l outil Lire et bien assimiler ce manuel avant d utiliser le cloueur Conserver ce manuel à l intention des autres utilisateurs du cloueur Nailer Cloueur Clavador MANUAL DE INSTRUCCIONES E INSTRUCCIONES DE SEGURIDAD PELIGRO La utilización inadecuada e insegura de este clavador puede resultar en...

Страница 2: ...RETIEN ENTRETIEN ET INSPECTION 31 ENTRETIEN ET REPARATIONS 32 LISTA DES PIÈCES 50 Page Página INDICE Español INFORMACIÓN IMPORTANTE 34 DEFINICIÓN DE LAS PALABRAS CLAVE 34 SEGURIDAD INSTRUCCIONES IMPORTANTES DE SEGURIDAD PARA LA UTILIZACIÓN DEL CLAVADOR 35 INSTRUCCIONES IMPORTANTES DE SEGURIDAD PARA UTILIZAR EL CLAVADOR DE RISTRA NV 65AH 37 RESPONSABILIDADES DEL EMPRESARIO 37 OPERACIÓN NOMENCLATURA...

Страница 3: ...e outlined in the SAFETY section of this Manual and in the sections which contain the operation and maintenance instructions Hazards that must be avoided to prevent bodily injury or machine damage are identified by DANGERS and WARNINGS on the Nailer and in this Manual Never use this Nailer for applications other than those specified in this Manual DEFINITIONS OF SIGNAL WORDS DANGER indicates an im...

Страница 4: ...RSELF OR OTHERS IN WORK AREA Always assume the Nailer contains fasteners Never point the Nailer at yourself toward yourself or others whether it contains fasteners or not If fasteners are mistakenly driven it can lead to severe injuries Never engage in horseplay with the Nailer Respect the Nailer as a working implement 4 KEEP FINGERS AWAY FROM TRIGGER WHEN NOT DRIVING FASTENERS TO AVOID ACCIDENTAL...

Страница 5: ...se 1 do not pull the trigger 2 do not depress the push lever and 3 keep the Nailer pointed downward 17 KEEP HANDS AND FEET AWAY FROM FIRING HEAD DURING USE Never place your hands or feet closer than 8 inches 200 mm from the firing head A serious injury can result if the fasteners are deflected by the workpiece or are driven away from the point of entry 18 PLACE NAILER PROPERLY ON WORKPIECE Do not ...

Страница 6: ... HOSE FROM NAILER There is a possibility that a nail may discharge accidentally and it becomes the cause of an injury EMPLOYER S RESPONSIBILITIES 1 Ensure that this MANUAL is available to operators and personnel performing maintenance 2 Ensure that Nailers are used only when operators and others in work area are wearing EYE PROTECTOR 3 Enforce the use of EYE PROTECTOR by operators and others in wo...

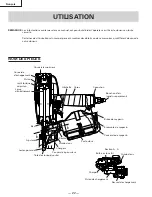
Страница 7: ...ose Adjuster Push Lever Firing Head Outlet Dust Cover Feeder Nail Guide Knob Nail Holder Magazine Assembly Magazine Stopper Magazine Cover A A OPERATION NOTE The information contained in this Manual is designed to assist you in the safe operation of the Nailer Some illustrations in this Manual may show details or attachments that differ from those on your own Nailer NAME OF PARTS ...

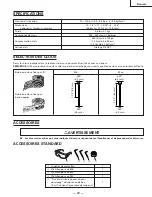
Страница 8: ...ble below can be driven with this Nailer NOTE Use only genuine Hitachi nails to assure nail quality and driving ease ACCESSORIES WARNING 䢇 Accessories other than those shown below can lead to malfunction and resulting injuries STANDARD ACCESSORIES 1 Eye protector 1 2 Allen wrench for M6 screw 1 3 Allen wrench for M5 screw 1 4 Allen wrench for M4 screw 1 5 Nose cap No mar push lever attachment It i...

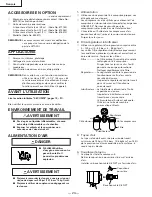
Страница 9: ...n of ANSI Standard B 19 3 Safety Standard For Compressors For Process Industries 䡬 Moisture or oil in the air compressor may accelerate wear and corrosion in the Nailer Drain daily 2 Filter Regulator Lubricator 䡬 Use a regulator with a pressure range of 0 120 psi 0 8 3 bar 0 8 5 kgf cm2 䡬 Filter regulator lubricator units supply an optimum condition for the Nailer and extend the Nailer life These ...

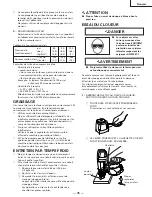
Страница 10: ...Hitachi pneumatic tool lubricant 䡬 If a lubricator is not available supply a few drops approximately 2 cc 12 in3 of Hitachi pneumatic tool lubricant into the air plug on the Nailer twice a day COLD WEATHER CARE 䡬 Do not store the Nailer in a cold weather environment Keep the Nailer in a warm area until beginning the work 䡬 If the Nailer is already cold bring it in a warm area and allow the Nailer ...

Страница 11: ...op of the nail holder with a mark on the holder shaft in accordance with the length of the nails being used 3 Turn the nail holder 90 degrees clockwise until you hear click 2 Adjust the air pressure to 70 psi 4 9 bar 5 kgf cm2 Connect the air hose Do not load any nails in the Nailer 䡺 THE NAILER MUST NOT LEAK AIR Hold the Nailer downward and pull the trigger 䡺 THE NAILER MUST NOT OPERATE 3 With fi...

Страница 12: ...m the collated wires and not to disengage the nails with the guide surface Otherwise the nail guide will not close correctly 4 Pulling the nails to the right swing the nail guide closed 7 Lock the knob completely NAILER OPERATION Read section titled SAFETY pages 4 6 DANGER 䢇 Operators and others in work area MUST wear safety glasses with side shields which conforms to ANSI Z87 1 specifications WAR...

Страница 13: ... been driven remove finger from the trigger WARNING 䢇 Keep your finger off the trigger except during fastening operation because serious injury could result if the push lever accidentally contacts you or others in work area 䢇 Keep hands and body away from the discharge area The nailer with contact trip mechanism may bounce from the recoil of driving a fastener and unwanted subsequent fastener may ...

Страница 14: ... a nailing test 4 Connect the air hose ALWAYS WEAR EYE PROTECTOR Perform a nailing test 5 DISCONNECT AIR HOSE FROM NAILER 6 Choose a suitable position for the adjuster CHANGING THE EXHAUST DIRECTION The direction of the exhaust vent can be changed by turning the top cover CUTTING OFF THE SHEET Tear off the output sheet in the direction of the arrow when using the sheet collated nails USING THE NOS...

Страница 15: ...owing order 1 DISCONNECT AIR HOSE 2 Open the nail guide 3 Insert a rod into the outlet Tap the rod with a hammer 4 Remove the jammed nail with a slotted screw driver 5 Cut the deformed collated wire with nippers Correct the deformation 6 In case of frequent jam contact a Hitachi authorized service center 2 Inspecting the push lever 1 DISCONNECT AIR HOSE 2 Clean the push lever sliding part Lubricat...

Страница 16: ...be stored in a warm and dry place Keep out of reach children 6 WARNING LABEL Change the WARNING LABEL if missing or damaged A new WARNING LABEL is available from a Hitachi authorized service center 7 Maintenance chart See page 17 8 Operator troubleshooting See page 17 Nail guide Nail Stopper A Nail Stopper B Feeder Nose Shaft Warning Label SERVICE AND REPAIRS WARNING 䢇 Only service personnel train...

Страница 17: ... Hitachi authorized service center for assistance CHECK METHOD CORRECTION Check for a jam Clear a jam per page 15 Check function of feeder per Clean and lubricate page 15 Check for proper nails Use only recommended nails Check air pressure Increase air pressure Do not exceed 120 psi 8 3 bar 8 5 kgf cm2 Use Hitachi pneumatic tool lubricant Driver blade worn Contact Hitachi for replacement Piston O ...

Страница 18: ...ires sont données dans la section SECURITE du manuel et dans les sections relatives aux instructions d utilisation et d entretien Les dangers à éviter pour empêcher tout risque de blessures ou de dommage de l outil sont identifiés par les mots DANGER et AVERTISSEMENT sur le cloueur et dans ce manuel Ne jamais utiliser ce cloueur pour des applications autres que celles qui sont spécifiées dans ce m...

Страница 19: ... NE JAMAIS DIRIGER L OUTIL VERS SOI NI VERS QUELQU UN D AUTRE DANS L AIRE DE TRAVAIL Toujours supposer que le cloueur renferme des clous Ne jamais diriger le cloueur vers soi ni vers quelqu un d autre qu il renferme des clous ou non Si l on enfonce des clous par erreur cela risque de provoquer des blessures graves Ne jamais s amuser avec le cloueur Le cloueur est un instrument de travail Le respec...

Страница 20: ...IR EST ENFONCE Quand on charge des clous dans le cloueur ou qu on raccorde le tuyau d air 1 ne pas tirer sur la gâchette 2 ne pas actionner le levier poussoir et 3 diriger le cloueur vers le bas 17 ELOIGNER LES MAINS ET LES PIEDS DE LA TETE DE CLOUAGE PENDANT L UTILISATION Ne jamais approcher les mains ni les pieds à moins de 8 pouces 200 mm de la tête de clouage Il y a risque de blessures graves ...

Страница 21: ...LUSIVEMENT DES PIECES ACCESSOIRES OU CLOUS FOURNIS OU RECOMMANDES PAR HITACHI Des pièces accessoires ou clous non autorisés pourraient annuler la garantie entraîner un mauvais fonctionnement et provoquer des blessures Les réparations du cloueur seront confiées exclusivement au personnel d entretien formé par Hitachi au distributeur ou à l employeur Ne jamais modifier ni altérer un cloueur Cela pou...

Страница 22: ...eux de votre cloueur NOM DES PIECES Ressort de chargement Guide clous Section A A Piston Corps Gâchette Capuchon Ajusteur Tête de clouage sortie Couvercle à poussière Chargeur Guide clous Porte clous Ensemble de magasin Butée de magasin Couvercle de magasin A A Bouton Chargeur Butée à clous A Couvercle d échappement Couvercle supérieur Joint torique du piston Lame d entraînement Bec Levier poussoi...

Страница 23: ...pour vis M6 1 3 Clé Allen pour vis M5 1 4 Clé Allen pour vis M4 1 5 Fixation du levier poussoir sans dommage du capuchon de bec 1 Il est fixé dans l ensemble de magasin 090 2 3 mm 209 5 3 mm 1 1 2 38 mm 099 2 5 mm 252 6 4 mm 2 1 2 64 mm Bobine de clous fixés par fil Bobine de clous fixés par bande papier 1 2 4 3 5 SPECIFICATIONS Pression d utilisation 70 120 psi 4 9 8 3 bars 5 8 5 kgf cm2 Dimensio...

Страница 24: ...usivement de l air comprimé propre sec et régulé avec ce cloueur 䡬 Les compresseurs d air utilisés pour alimenter l air comprimé au cloueur devront respecter les exigences ANSI B19 3 Normes de sécurité pour les compresseurs des industries de transformation 䡬 L humidité ou l huile dans le compresseur d air peuvent accélérer l usure et la corrosion du cloueur Purger tous les jours 2 Filtre régulateu...

Страница 25: ...s fonctionnant à 100 psi et enfonçant 30 clous par minute Quantité d air requise 2 30 049 1 4 1 2 3 5 CFM ft3 mn 101 l mn Effectuer le calcul ci dessus pour obtenir un compresseur fournissant les 3 5 CFM d air nécessaires GRAISSAGE Il est essentiel que le cloueur soit graissé correctement Si le cloueur est mal graissé il ne fonctionnera pas correctement et les pièces s useront prématurément 䡬 Util...

Страница 26: ...mmandée de 70 120 psi 4 9 8 3 bars 5 8 5 kgf cm2 en fonction de la longueur des clous et de la dureté du matériau La pression d air correcte est la pression la plus basse capable d effectuer le travail L utilisation d une pression d air supérieure à la pression nécessaire fatiguera inutilement le cloueur CHARGEMENT DES CLOUS AVERTISSEMENT 䢇 Lors du chargement des clous dans le cloueur 1 ne pas tir...

Страница 27: ... de clous pour atteindre le trou de clouage 2 Insérer le premier clou dans le trou de clouage et le second clou entre les deux cliquets du chargeur 3 Ajuster la tête du clou dans la fente guide REMARQUE Faire attention de ne pas déformer les fils de fixation et de ne pas désengager les clous de la surface du guide Sinon le guide clous ne fermera pas correctement 4 En tirant les clous sur la droite...

Страница 28: ...ne fonctionne pas tant que le levier poussoir n est pas enfoncé position supérieure Il y a deux façons d enfoncer des clous avec le cloueur Ces deux méthodes sont 1 Fonctionnement intermittent déclenchement par gâchette 2 Fonctionnement continu déclenchement par levier poussoir 1 Fonctionnement intermittent déclenchement par gâchette 1 Placer l orifice de sortie des clous sur la pièce en enlevant ...

Страница 29: ...loueur 3 mettre quelques gouttes environ 2 cc 12 in3 d huile de machine pneumatique Hitachi dans le bouchon d air du cloueur et 4 ouvrir le robinet de purge du réservoir du compresseur d air pour purger toute l humidité REGLAGE DE LA PROFONDEUR DE CLOUAGE Pour que les clous s enfoncent tous à la même profondeur s assurer que 1 la pression d air du cloueur reste constante le régulateur est installé...

Страница 30: ...oussoir fixer le capuchon de bec sur le levier poussoir 1 DEBRANCHER LE TUYAU D AIR DU CLOUEUR 2 Placer le capuchon de bec sur le sabot du levier poussoir REMARQUE 䢇 Du fait de son épaisseur le capuchon de bec peut réduire la profondeur de clouage Re régler la profondeur de clouage Capuchon de bec Ne pas brancher le tuyau d air 2 1 Levier poussoir ...

Страница 31: ...pour but d aider l opérateur à utiliser le cloueur en toute sécurité Certaines des illustrations du manuel peuvent montrer des détails ou des accessoires qui diffèrent de ceux de votre cloueur 1 Débrancher le tuyau d air Bec Levier poussoir Lubrifier 1 Guide clous Bouton Débrancher le tuyau d air ENTRETIEN ET INSPECTION Lire la section intitulée SECURITE pages 19 21 AVERTISSEMENT 䢇 Débrancher le t...

Страница 32: ...ETTE D AVERTISSEMENT Remplacer l ETIQUETTE D AVERTISSEMENT si elle manque ou qu elle est endommagée Se procurer une nouvelle ETIQUETTE D AVERTISSEMENT auprès d un service après vente Hitachi agréé 7 Tableau d entretien voir page 33 8 Guide de dépannage de l opérateur voir page 33 ENTRETIEN ET REPARATIONS AVERTISSEMENT 䢇 Les réparations du cloueur seront confiées exclusivement au personnel d entret...

Страница 33: ...e mais les clous ne s enfoncent pas Entraînement faible Cycle lent Les clous s enfoncent trop profondément Certains clous sont sautés Alimentation intermittente Des clous se coincent Les clous enfoncés sont tordus Les clous s enfoncent bien normalement mais pas complètement à des vitesses supérieures VERIFICATION CORRECTION Vérifier si un clou est coincé Dégager le clou coincé page 31 Vérifier le ...

Страница 34: ...de seguridad apropiados Las precauciones básicas de seguridad se describen en la sección SEGURIDAD de este manual y en las secciones que contienen las instrucciones sobre operación y mantenimiento Los riesgos que habrá que eludir para evitar lesiones o el daño de la máquina se identifican mediante PELIGRO y ADVERTENCIA en el clavador y en este manual No utilice nunca este clavador para aplicacione...

Страница 35: ...embotellados es peligrosa ya que el clavador podría explotar Utilice solamente aire comprimido limpio seco y regulado ADVERTENCIA 3 NO DIRIJA NUNCA LA HERRAMIENTA HACIA SÍ MISMO O HACIA OTRAS PERSONAS DEL ÁREA DE TRABAJO Piense siempre que el clavador puede tener clavos cargados No dirija nunca el clavador hacia sí mismo o hacia otras personas independientemente de que contenga o no clavos Si util...

Страница 36: ...O APRETADO NI CON LA PALANCA DE EMPUJE PRESIONADA Cuando cargue clavos en el clavador o cuando conecte la manguera de aire 1 no apriete el gatillo 2 no presione la palanca de empuje ni 3 mantenga el clavador aclavodo hacia abajo 17 MANTENGA LAS MANOS Y LOS PIES ALEJADOS DE LA CABEZA DE SALIDA DE LOS CLAVOS DURANTE LA UTILIZACIÓN No coloque sus manos ni pies a menos de 8 200 mm de la cabeza de sali...

Страница 37: ...ridad 33 UTILICE SOLAMENTE LAS PIEZAS ACCESORIOS Y CLAVOS QUE SUMINISTRE O RECOMIENDE HITACHI Las piezas accesorios o clavos no autorizados pueden anular la garantía y provocar el mal funcionamiento lo que podría resultar en lesiones El clavador solamente deberá ser reparado por Hitachi un distribuidor o el empresario No modifique ni altere nunca el clavador Si li hicese podría funcionar mal y pro...

Страница 38: ...ubierta superior Cubierta de escape Anillo O del pistón Cuchilla impulsora Toma de aire Vendida aparte Cabeza de salida de los clavos Ajustador Morro Resorte de alimentación Pistón de alimentación OPERACIÓN NOTA La información contenida en este manual ha sido diseñada para ayudarle a utilizar con seguridad este clavador Algunas de las ilustraciones de este manual pueden mostrar detalles o accesori...

Страница 39: ...a asegurar la calidad y la facilidad de clavado utilice solamente clavos genuinas de Hitachi Mín Máx 1 Gafas protectoras para los ojos 1 2 Llave Allen para tornillos M6 1 3 Llave Allen para tornillos M5 1 4 Llave Allen para tornillos M4 1 5 Tapa de la manguera Accesorio de la palanca de empuje resistente al desgaste 1 Se encuentra fijada al conjunto del cartucho ACCESORIOS ADVERTENCIA 䢇 Los acceso...

Страница 40: ... de propulsión 䡬 Utilice solamente aire comprimido limpio seco y regulado como fuente de propulsión para este clavador 䡬 Los compresores de aire para suministrar aire comprimido a este clavador deberán cumplir los requisitos de la última versión de la norma B 19 3 ANSI Normas de Seguridad para Compresores para Industrias de Procesos 䡬 La humedad o el aceite en el compresor de aire puede acelerar e...

Страница 41: ... filtro regulador lubricador Mantenga el lubricador lleno con lubricante para herramientas neumáticas Hitachi 䡬 Si no dispone de lubricador aplique algunas gotas de lubricante para herramientas neumáticas Hitachi aproximadamente 2 cc 12 pul3 a la entrada de aire del clavador dos veces al día CUIDADOS PARA CLIMAS FRÍOS 䡬 No guarde el clavador en un lugares fríos Déjelo en un lugar cálido antes de c...

Страница 42: ...abajo usted podrá cargar clavos en el mismo Inserte los clavos en la pieza de trabajo adecuadas a la aplicación 䡺 EL CLAVADOR DEBERÁ FUNCIONAR 6 Si no observa nada anormal cargue clavos en el clavador Clave en la pieza de trabajo los mismos clavos que vaya a utilizar en la aplicación real 䡺 EL CLAVADOR DEBERÁ FUNCIONAR ADECUADAMENTE AJUSTE DE LA PRESIÓN DE AIRE ADVERTENCIA 䢇 No sobrepase 120 psi 8...

Страница 43: ...del soporte de clavos de acuerdo con la longitud de las mismas Los clavos no se alimentarán uniformemente si el soporte de las mismas no está correctamente ajustado 1 Gire el soporte de clavos unos 90 grados hacia la izquierda 2 Mueva el soporte de clavos hacia arriba y hacia abajo hasta alinear la parte superior del mismo con la marca del eje del soporte de acuerdo con la longitud de los clavos q...

Страница 44: ... clavador por la pieza de trabajo con un movimiento de rebote Con cada presión de la palanca de empuje se clavará un clavo 4 Empujando los clavos hacia la derecha oscile la guía de clavos para cerrarla 7 Bloquee completamente la perilla OPERACIÓN DEL CLAVADOR Lea la sección titulada SEGURIDAD páginas 35 37 PELIGRO 䢇 Los operadores y demás personas que se encuentren en el área de trabajo DEBEN usar...

Страница 45: ...anismo de disparo por contacto estándar NOTA 䢇 Tanto el MECANISMO DE DISPARO POR CONTACTO ESTÁNDAR como el MECANISMO DE DISPARO SECUENCIAL OPCIONAL serán seguros si se utilizan como se ha descrito y de acuerdo con todas las advertencias e instrucciones 䢇 Maneje con cuidado el paquete de clavos Si lo dejase caer los clavos continuas podrían romperse o aflojarse En tales casos no utilice los clavos ...

Страница 46: ...ndo la cubierta superior CORTE DE LA CINTA Cuando utilice clavos unidas con cinta rompa la cinta de salida en el sentido de la flecha UTILIZACIÓN DE LA TAPA PARA EL MORRO Si desea proteger la superficie de la pieza de trabajo contra rascaduras o marcas de la palanca de empuje instale la tapa para el morro accesoria en dicha palanca 1 DESCONECTE LA MANGUERA DE AIRE DEL CLAVADOR 2 Coloque la tapa pa...

Страница 47: ...eformación 6 En caso de atasco frecuente póngase en contacto con un centro de reparaciones autorizado por Hitachi 2 Inspección de la palanca de empuje 1 DESCONECTE LA MANGUERA DE AIRE 2 Limpie la parte deslizable de la palanca de empuje Lubríquela con lubricante para herramientas neumáticas Hitachi 3 Inspección de los alimentadores 1 DESCONECTE LA MANGUERA DE AIRE 2 Limpie la parte deslizable de l...

Страница 48: ...ador deberá guardarlo en un lugar cálido y fresco Mantenga el clavador fuera del alcance de los niños 6 ETIQUETA DE PRECAUCIÓN Si la ETIQUETA DE PRECAUCIÓN se pierde o daña cámbiela por otra Solicite la nueva ETIQUETA DE PRECAUCIÓN a un centro de reparaciones autorizado por Hitachi 7 Tabla de mantenimiento Consulte la página 49 8 Solución de problemas por parte del operador Consulte la página 49 S...

Страница 49: ... lento Los clavos penetran demasiado Salto de clavos Alimentación intermitente Puntas atascadas Los clavos se clavan dobladas El funcionamiento es normal pero no es posible clavar a gran velocidad Compruebe si está atascado Desatásquelo de acuerdo con la página 47 Compruebe el funcionamiento del Limpie y lubrique alimentador de acuerdo con la página 47 Compruebe si los clavos son las Utilice solam...

Страница 50: ... 50 501A 505 502 503 504 20A 19A ...

Страница 51: ...8 344 Nose Cap No mar push lever attchment 1 Parts are subject to change without any obligation on the part of the HITACHI due to improvements Item Code No Part Name Q ty No 1 949 755 Hex Socket Hd Bolt M6 16 1 2 880 515 Plate 1 3 880 514 Top Cover 1 4 949 822 Hex Socket Hd Bolt M5 35 4 5 880 670 Exhaust Cover 1 6 880 358 Gasket 1 7 881 761 Exhaust Valve Rubber A 1 8 880 356 Head Valve Spring 1 9 ...

Страница 52: ...d by Hitachi Koki Co Ltd Shinagawa Intercity Tower A 15 1 Konan 2 chome Minato ku Tokyo 108 6020 Japan Distributed by Hitachi Koki U S A Ltd 3950 Steve Reynolds Blvd Norcross GA 30093 Hitachi Koki Canada Co 6395 Kestrel Road Mississauga ON L5T 1Z5 ...

Отзывы: