background image

16

English

SPECIFICATIONS

Model

G12SE

G13SE

Voltage (by areas)*

(110V, 115V, 220V, 230V, 240V)

Input*

1020W

No-load speed

10000/min

Wheel

Outer dia 

×

 inner dia

115 

×

 22 mm

125 

×

 22 mm

peripheral speed

4800m/min

Weight (main body only)

1.9 kg

*Be sure to check the nameplate on product as it is subject to change by areas.

STANDARD ACCESSORIES

(1) Depressed center wheel .......................................... 1
(2) Wrench ........................................................................ 1
(3) Side Handle ............................................................... 1
Standard accessories are subject to change without
notice.

APPLICATIONS

Removal of casting fin and finishing of various types
of steel, bronze and aluminum materials and castings.

Grinding of welded sections or sections cut by means
of an acetylene torch.

Grinding of synthetic resins, slate, brick, marble, etc.

Cutting of synthetic concrete, stone, brick, marble,
and similar materials.

PRIOR TO OPERATION

1. Power source

Ensure that the power source to be utilized conforms
to the power requirements specified on the product
nameplate.

2. Power switch

Ensure that the power switch is in the OFF position.
If the plug is connected to a power receptacle while
the power switch is in the ON position, the power
tool will start operating immediately, inviting serious
accident.

3. Extension cord

When the work area is removed from the power
source, use an extension cord of sufficient thickness
and rated capacity. The extension cord should be
kept as short as practicable.

4. Fitting and adjusting the wheel guard

The wheel guard is a protective device to prevent
injury should the depressed center wheel be
shattered during operation. Ensure that the wheel
guard is properly fitted and fastened before
commencing grinding operation.

[How to attach and adjusts the wheel guard] 

(Fig. 2)

Set the wheel ass’y to the packing gland.

Tighten M5 screw to secure the wheel guard
while the lever is in closed position.

Perform the adjustment of the wheel guard while
the lever is released. (Loosen M5 screw and
readjust if the wheel guard does not rotate
smoothly .

After adjustment, if machine operation is
required, perform the operation only after setting
the lever in closed position.

Lubricate the sliding section of the set piece (B)
and the lever if the lever does not move
smoothly.

5.

Ensure that the depressed center wheel to be utilized
is the correct type and free of cracks or surface
defects. Also ensure that the depressed center wheel
is properly mounted and the wheel nut is securely
tightened. Refer to the section on “ASSEMBLING
AND DISASSEMBLING THE DEPRESSED CENTER
WHEEL”.

6. Conducting a trial run

Before commencing grinding operation, the machine
should be given a trial run in a safe area to ensure
that it is properly assembled and that the depressed
center wheel is free from obvious defects.
Recommended trial run durations are as follows:
After replacing depressed center wheel ………  3
minutes or more
Prior to starting routine work ……… 1 minute or
more

7. Confirm the spindle lock mechanism.

Confirm that the spindle lock is disengaged by
pushing push button two or three times before
switching the power too on. (See 

Fig. 1

)

8. Fixing the side handle

Screw the side handle into the gear cover.

PRACTICAL GRINDER APPLICATION

1. Pressure:

To prolong the life of the grinder and ensure a first
class finish, it is important that the grinder should
not be overloaded by applying too much pressure.
In most applications, the weight of the grinder alone
is sufficient for effective grinding.
Too much pressure will result in reduced rotation
speed, inferior surface finish, and overloading which
could reduce the lift of the grinder.

2. Grinding angle

Do not apply the entire surface of the depressed
center wheel to the material to be ground. As shown
in 

Fig. 3

, the grinder should be held at an angle

of 15°–30° so that the external edge of the grinding
wheel contacts the workpiece at an optimum angle.

3.

To prevent a new grinding wheel from digging into
the workpiece, initial grinding should be performed

Содержание G 12SE

Страница 1: ... verktygets användning Læs instruktionerne nøje igennem før maskinen tages i brug Les grundig og forstå anvisningene før bruk Lue ohjeet huolellisesti ennen käyttöä Read through carefully and understand these instructions before use VINKELSLIP VINKELSLIBER VINKELSLIPER KULMAHIOMAKONE DISC GRINDER G 12SE G 13SE G13SE G13SE G13SE ...

Страница 2: ...1 2 3 4 5 6 7 8 9 0 A B C D E F G H I J 2 1 3 5 1 4 6 2 9 A 0 E B J F G 1 2 3 4 6 5 7 8 1 2 3 4 5 6 7 8 9 0 A B C D E F G H I J I H DC ...

Страница 3: ...r Møtrik il slibeskive Mutter til slipeskiven Slipskiva Slibeskive Slipeskive Mellanlägg Spændeskive Underlagskive til slipeskive Sprängskydd Beskyttelseskappe Vernedeksel Spindel Slibespindel Spindel Tryckknapp Trykknap Trykknapp Diamanthjul Diamantskive Diamanthjul M5 skruv M5 skrue M5 skrue Spak Arm Hendel Ställdel B Indstillings del B Stillestykke B Bakstycke Pinoldæksel Haledeksel Spärrspak S...

Страница 4: ... 15 Se alltid till att alla lösa föremål såsom justernycklar och skruvnycklar har tagits bort innan du startar maskinen 16 Se till att maskinen inte startar oavsiktligt Transportera aldrig en nätansluten maskin med fingret på startomkopplaren Se till att maskinen är frånslagen innan du ansluter den till ett strömuttag 17 När du använder maskinen utomhus skall du kontrollera att förlängningskabeln ...

Страница 5: ...ar jämnt och smidigt 䡬 Ställ alltid spaken i stängt läge innan arbetet påbörjas då slipmaskinen ska användas efter slutförd inställning 䡬 Smörj glidytan mellan ställdelen B och spaken då spaken inte rör sig jämnt och smidigt 5 Kontrollera att slipskivan är av rätt typ och utan fel och sprickor Kontrollera att slipskivan är rätt monterad i maskinen och att skivmutern är ordentligt åtdragen Hänvisas...

Страница 6: ...ndeln 䡬 Kontrollera att tryckknappen inte är låst genom att trycka in den och ut ett par gånger innan du slår på maskinen UNDERHÅll och ÖVERSYN 1 Kontroll av slipskiva Kontrollera att slipskivan är felfri och utan sprickor 2 Kontroll av monteringsskruvar Se till att varje monteringsskruv är ordentligt åtdragen Kontrollera skruvarna med jämna mellanrum Slarv kanr esultera i olycksfall 3 Kontroll av...

Страница 7: ...for at håndtagene holdes tørre rene og frie for olie og fedt 14 Tag stikket ud af stikkontakten når værktøjet ikke er i brug og når der skal skiftes redskab som f eks klin ger bits og skær 15 Fjern skruetrækkere og justernøgler igen gør det til en vane at checke efter at der ikke sidder justernøgler o l i maskinen før den sættes i gang 16 Når det elektriske værktøj er tilsluttet strømmen bør man s...

Страница 8: ...uen og juster igen hvis beskyttelseskappen ikke roterer jævnt 䡬 Efter justering Hvis anvendelse af maskinen er påkrævet må det kun ske efter at armen er sat i lukket stilling 䡬 Smør glidesektionen på indstillings delen B og armen hvis armen ikke bevæger sig korrekt 5 Forvis Dem om at den slibeskive der anvendes er af korrekt type og at den er fri for revner og overfladefejl Forvis Dem ligeledes om...

Страница 9: ...kinen startes VEDLIGEHOLDELSE OG EFTERSYN 1 Eftersyn af slibeskive Kontroller at slibeskiven er fri for revner og overfladedefekter 2 Eftersyn af monteringsskruerne Efterse regelmæssigt alle monteringsskruer og sørg for at de er ordentligt strammet Er nogen af skruerne løse bør de strammes øjeblikkeligt Forsømmelse i så henseende kan medføre alvorlig risiko 3 Eftersyn af kulbørsterne Fig 5 I motor...

Страница 10: ... 14 Fjern alle verktøyene når maskinen ikke er i bruk før service når du skifter utstyr som blader bor sagblader etc 15 Fjern justeringsnøklene Gjør det til en vane å kontrollere at nøklene er fjernet fra maskinen før du starter den 16 Unngå tilfeldig starting Bær aldri maskinen med fingrene på bryteren Pass på at bryteren er slått av når stikkontakten settes i 17 Ved utendørs bruk med skjøteledni...

Страница 11: ...eringen må hendelen settes i lukket posisjon først 䡬 Smør glideseksjonen på stillestykket B og hendelen hvis hendelen ikke beveger seg friksjonsløst 5 Se etter ar slipeskiven som skal benyttes er av riktig type og at den er fri for sprekker og overflatedefekter pass også på at alipeskiven er korrekt montert og at mutteren til slipeskiven er godt festet Se avsnittet MONTERING OG DEMONTERING AV SLIP...

Страница 12: ...OLD OG INSPEKSJON 1 Inspeksjon av slipeskiven Se godt etter at slipeskiven er fri for sprekker og andre overflatedefekter 2 Inspeksjon av monteringsskruene Kontroller alle monteringsskruene regelmessig og pass på at de er skikkelig skrudd til Hvis noen av skruene er løse må de skrus til omgående Hvis dette ikke gjøres kan det forårsake alvorlige skader 3 Inspeksjon av kullbørster Fig 5 Motoren ben...

Страница 13: ...etaan kun vaihdetaan osia kuten teriä po ranteriä leikkureita jne 15 Poista säätöön tarvitut avaimet koneesta ennen sen käynnistämistä Ota tavaksi tarkistaa aina ennen laitteen käynnistämistä että kaikki avaimet ja muut säätöön tarvittavat työkalut on poistettu koneesta 16 Varo käynnistämästä konetta vahingossa Älä kanna pistokkeella kytkettävää konetta pitäen sormea kytkimellä Varmista että kytki...

Страница 14: ...uuvi ja säädä uudelleen jos laikansuojus ei pyöri tasaisesti 䡬 Jos konetta käytetään säädön jälkeen aloita käyttö vasta säädettyäsi vivun suljettuun asentoon 䡬 Voitele asennuskappaleen B liukuosa ja vipu jos vipu ei liiku tasaisesti 5 Varmista että käyttämäsi kiekko on aina sopivaa tyyppiä ja että siinä ei ole halkeamia tai koloja Varmista myös että kiekko on oikein asennettu ja kiristysmutteri ku...

Страница 15: ...ä lukitusnuppi on vapautettu painamalla sitä kaksi tai kolme kertaa ennen kuin käynnistät laitteen HUOLTO JA TARKISTUS 1 Hiomalaikan tarkistus Tarkista ettei hiomalaikassa ole halkeamia tai koloja 2 Kiinnitysruuvien tarkistus Tarkista säännöllisesti kaikki kiinnitysruuvit ja varmista että ne ovat tiukassa Mikäli joku ruuveista on löystynyt kiristä se välittömästi Laiminlyönti voi aiheuttaa vaarati...

Страница 16: ...d wrenches Form habit of checking to see that keys and adjusting wrenches are removed from tool before turning it on 16 Avoid unintentional starting Don t carry plugged in tool with finger on switch Be sure switch is off when plugging in 17 Outdoor use extension cords When tool is used outdoors use only extension cords intended for use for outdoors and so marked 18 Stay alert Watch what you are do...

Страница 17: ...the lever is released Loosen M5 screw and readjust if the wheel guard does not rotate smoothly 䡬 After adjustment if machine operation is required perform the operation only after setting the lever in closed position 䡬 Lubricate the sliding section of the set piece B and the lever if the lever does not move smoothly 5 Ensure that the depressed center wheel to be utilized is the correct type and fr...

Страница 18: ...ism is disengaged by pushing push button two or three times before switching the grinder on MAINTENANCE AND INSPECTION 1 Inspecting the depressed center wheel Ensure that the depressed center wheel is free of cracks and surface defects 2 Inspecting the mounting screws Regularly inspect all mounting screws and ensure that they are properly tightened Should any of the screws be loosened retighten th...

Страница 19: ...18 English ...

Страница 20: ...19 ...

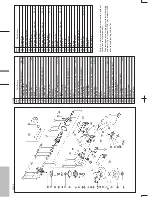
Страница 21: ...ring 629T12DDC3PS2 L 10 Rubber Ring 11 Felt 12 Bearing Cover 13 Armature 14 Fan Guide 15 Hex Hd Tapping Screw D4 70 16 Stator 17 Thrust Washer 18 Dust Seal A 19 Ball Bearing 608VVMC2EPS2L 20 Lock Pin 21 Gear 22 Seal Lock Screw W Sp Washer M4 8 23 Bearing Cover B 24 Ball Bearing 6201DDUCMAV2S 25 Felt Packing 26 Seal Packing 27 Packing Gland 28 Seal Lock Screw W Sp Washer M5 16 29 Feather Key 3 3 8 ...

Страница 22: ...000 3 in accordance with Council Directives 73 23 EEC 89 336 EEC and 98 37 EC This declaration is applicable to the product affixed CE marking Dansk EF DEKLARATION OM ENSARTETHED Vi erlkærer os fuldstændige ansvarlige for at dette produkt modsvarer gældende standard eller de standardiserede dokumenter EN50144 EN55014 og EN61000 3 i overensstemmelse med EF direktiver 73 23 EØF 89 336 EØS og 98 37 E...

Отзывы: