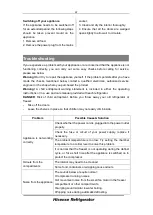
background image

23 


Clicking noise before the compressor starts. 

 Clicking noise when you get the water. 

The motor running noises when you get ice. 

Other  unusual noises  are  due  to  the  reasons  below  and may 

need you to check and take action: 

The cabinet is not level. 

The back of appliance is touching the wall. 

Bottles or containers have fallen or are rolling. 

The motor runs 

continuously 

It  is  normal  to  frequently  hear  the  sound  of  the  motor,  it  will 

need to run more when in following circumstances: 

Temperature setting is set colder than necessary 

Large quantity of warm food has recently been stored within 

the appliance. 

The temperature outside the appliance is high. 

Doors are kept open too long or too often. 

After installing the appliance or it has been switched off for a 

long time. 

A layer of frost occurs in 

the compartment 

Check that the air outlets are not blocked by food and ensure 

food  is  placed  within  the  appliance  to  allow  sufficient 

ventilation.  Ensure  that  door  is  fully  closed.  To  remove  the 

frost, please refer to 

the“Cleaning and Care” chapter. 

Temperature inside is 

too warm 

You may have left the doors open too long or too frequently; or 

the doors are kept open by some obstacle; or the appliance is 

located with insufficient clearance at the sides, back and top   

Temperature inside is 

too cold 

Increase  the  temperature  by  following  the  “Display  Controls” 
chapter. 

Doors  can’t  be  closed 
easily 

Check  whether  the  top  of  the  refrigerator  is  tilted  back  by 

10-15mm to allow the doors to self-close, or if something inside 

is preventing the doors from closing. 

The light is not working 

The LED light may be damaged. Refer to replace LED lights 

in

“ Cleaning and Care” chapter. 

The  control  system  has  disabled  the  lights  due  to  the  door 

being  kept  open  too  long.  Close  and  reopen  the  door  to 

reactivate the lights. 

Ice is not dispensing 

Did you wait for 12 hours after installation of the water supply 

line before making ice? If it is not sufficiently cool, it may take 

longer to make ice, such as when first installed. 

Is the water line connected and the water supply open? 

Did  you  manually  stop  the  ice  making  function?  Make  sure 

you do not set the 

“ice off” mode.   

Is  there  any  ice  blocked  within  the  ice  maker  bucket  or  ice 

chute? 

Содержание RF208N6CSE

Страница 1: ...RF208N6CSE...

Страница 2: ...applications This appliance is not intended for use by persons including children with reduced physical sensory or mental capabilities or lack of experience and knowledge unless they have supervision...

Страница 3: ...on the doors racks shelves and drawers etc Electrical Safety To avoid the risks that are always present when using an electric appliance we recommend that you pay attention to the instructions about...

Страница 4: ...is not functioning correctly consult a qualified registered electrician or replace it in accordance with the cleaning and care chapter Refrigerant The refrigerant isobutene R600a is contained within...

Страница 5: ...r there to be at least 75mm 3 of clearance from the back of the fridge to the wall at least 100mm 4 of clearance from its top at least 100mm 4 from its side to the wall and a clear space in front to a...

Страница 6: ...s shown in the picture cannot be found in your appliance please ignore the relevant description 1 With the door closed remove the 3 screws holding the top cover A with Philips screwdriver and then rem...

Страница 7: ...eaks the water line should be fully inserted into the center of the coupler until the guide lines are coincided exactly with the head of the movable part Note Arrow on the water line coupler should po...

Страница 8: ...ganisms You may need to purchase a water purifying system to do that In order for the ice maker to operate properly a water line is required the maximum inlet water pressure is 689KPa the minimum inle...

Страница 9: ...included to the shutoff valve 4 Turn the main water supply back on then turn on the shutoff valve and flush out the tubing until the water runs clear Note The initial dark discoloration of water is n...

Страница 10: ...compression nut on the copper tubing not supplied 2 Tighten the compression nut onto the compression fitting Do not over tighten the compression nut 3 Connecting the 1 4 tube assembled with compressi...

Страница 11: ...oom into the connector 3 Insert two clips in the install pack as shown below and then confirm that each clip holds the water line firmly Note The water line must be fully inserted into the center of t...

Страница 12: ...immediately and tighten the connector or make the water lines fully inserted into the connector Flush one gallon of water approximately five minutes through the filter before drinking or using the wa...

Страница 13: ...different from this instruction manual but its functions and using methods remain the same To get the best energy efficiency of this product please place all shelves drawers and baskets on their orig...

Страница 14: ...igerator may be slightly different from this instruction manual but its functions and using methods remain the same To get the best energy efficiency of this product please place all shelves drawers a...

Страница 15: ...n to control the ice maker When the Ice On Off function light is on the ice maker is working If you want to lock the ice maker please touch the Ice On Off button again until the button light is off Fr...

Страница 16: ...gy Saving buttons for 3 seconds Water Filter Only applicable for models with ice maker In general you should change the water filter every 6 months to ensure the highest possible water quality After t...

Страница 17: ...ever close the refrigerator door while the shelves crisper and or telescopic slides are extended It may damage both them and the refrigerator Glass shelves and Door racks The refrigerator compartment...

Страница 18: ...sults in gas bubbles The water may temporarily look misty or cloudy due to these oxygen bubbles After a few seconds the water will look clear 3 Using the freezer compartment The freezer compartment is...

Страница 19: ...ay cause fire Interior cleaning You should clean the appliance interior regularly It will be easier to clean when food stocks are low Wipe the inside of the fridge freezer with a weak solution of bica...

Страница 20: ...acing the LED light Warning The LED light must be replaced by a competent person If the LED light is damaged follow the steps below 1 Unplug the refrigerator from the electrical outlet 2 Locate the LE...

Страница 21: ...follow food storage times and use by dates suggested by manufacturers Cooked food cold dishes etc They should be covered and may be placed on any shelf Fruit and vegetables They should be stored in t...

Страница 22: ...in a use and care manual provided with each refrigerator DANGER Risk of child entrapment Before you throw away your old refrigerator or freezer Take off the doors Leave the shelves in place so that c...

Страница 23: ...fer to the Cleaning and Care chapter Temperature inside is too warm You may have left the doors open too long or too frequently or the doors are kept open by some obstacle or the appliance is located...

Страница 24: ...e symbol are recyclable Dispose of the packaging into a suitable waste collection container to recycle it Before disposal of the appliance 1 Pull out the main plug from the main socket 2 Cut off the p...

Отзывы: