Hisense LTDN40V86MH Скачать руководство пользователя страница 11

9

Connecting a home theater system

Connecting using a digital audio cable

To connect using a digital coaxial cable:

1

Make sure that your TV’s power cord is unplugged and the home 

2

Connect one end of a digital 

coaxial

 audio cable (not included) to 

the

 DIGITAL AUDIO OUT 

jack on the back of the TV.

3

Connect the other end of the audio cable to the digital 

coaxial


input jack on the home theater system.

Note:

 The 

DIGITAL OUTPUT

 jack only works with DTV and HDMI output 

To play TV sound through a home theater system:

1

Turn on the TV and select a program to watch.

2

Turn on the home theater system and select the TV sound source, 
then adjust the volume to a comfortable level.

Connecting headphones

Warning:

 When using headphones, adjust the headphone volume to 

avoid excessively loud volume which can damage your hearing.

To connect headphones:

Plug the headphones (not included) into the   (headphone) 
jack on the back of the TV.

Note

: The TV sound automatically mutes when headphones are 

connected?

DIGITAL 

AUDIO OUT 

Home theater 
system

Digital 

coaxial

 cable

Understanding the basics

1

Plug the power cord into an AC power outlet.

2

Press 

 (power). Your TV turns on.

3

goes into standby mode.

Warning:

 When your TV is in standby mode, it is still receiving power. To 

completely disconnect power, unplug the power cord.

Note:

 If your TV does not receive an input signal for several minutes, it 

automatically goes into standby mode.

Understanding the basics

Selecting the video input source

To select the video input source:

1

Turn on your TV, then press 

INPUT

 on the remote control or on 

the TV. The 

INPUT SOURCE 

menu opens.

2

Press   or   to highlight the video source you want, then press 

ENTER

. Options include 

TV,Video,Component1,Component2,


Selecting a channel

Tip

: If you are using a cable or satellite box, use the remote control that 

came with that device to change channels. 

To select a channel:

Press 

CH

 /CH

 to go to the next or previous channel.

Press the number buttons to enter the channel number you want, 
then wait for the channel to change, or press 

ENTER

 to change 

the channel immediately.

To select a digital channel, press the number buttons to 
select the main digital channel, then press the dash(-). button, 
then the number buttons again to select the sub-channel. 
Wait for the channel to change or press 

ENTER

 to change the 

channel.

Note: 

Button presses must be within three seconds of each other.

Press 

LAST

 to go to the last channel viewed.

Press 

GUIDE 

 to display a list of memorized channels, press  or 


to select the channel you want from the list, then press ENTER to 

go to that channel.

Note

: If the list has more than one page, press   or   to scroll through 

the pages.

Adjusting the volume

To adjust the volume:

Press 

VOL

 /VOL


to increase or decrease the volume.

Press 

MUTE

MUTE

 again 

to restore the sound.

only.

LTDN40V86MH

HDMI2

COMP 2

HEADPHONE

AUDIO OUT

VIDEO

L

R

L

R

AV

DIGITAL

AUDIO OUT

Y

P

B

P

R

L

R

HDMI1

SERVICE

ANT IN

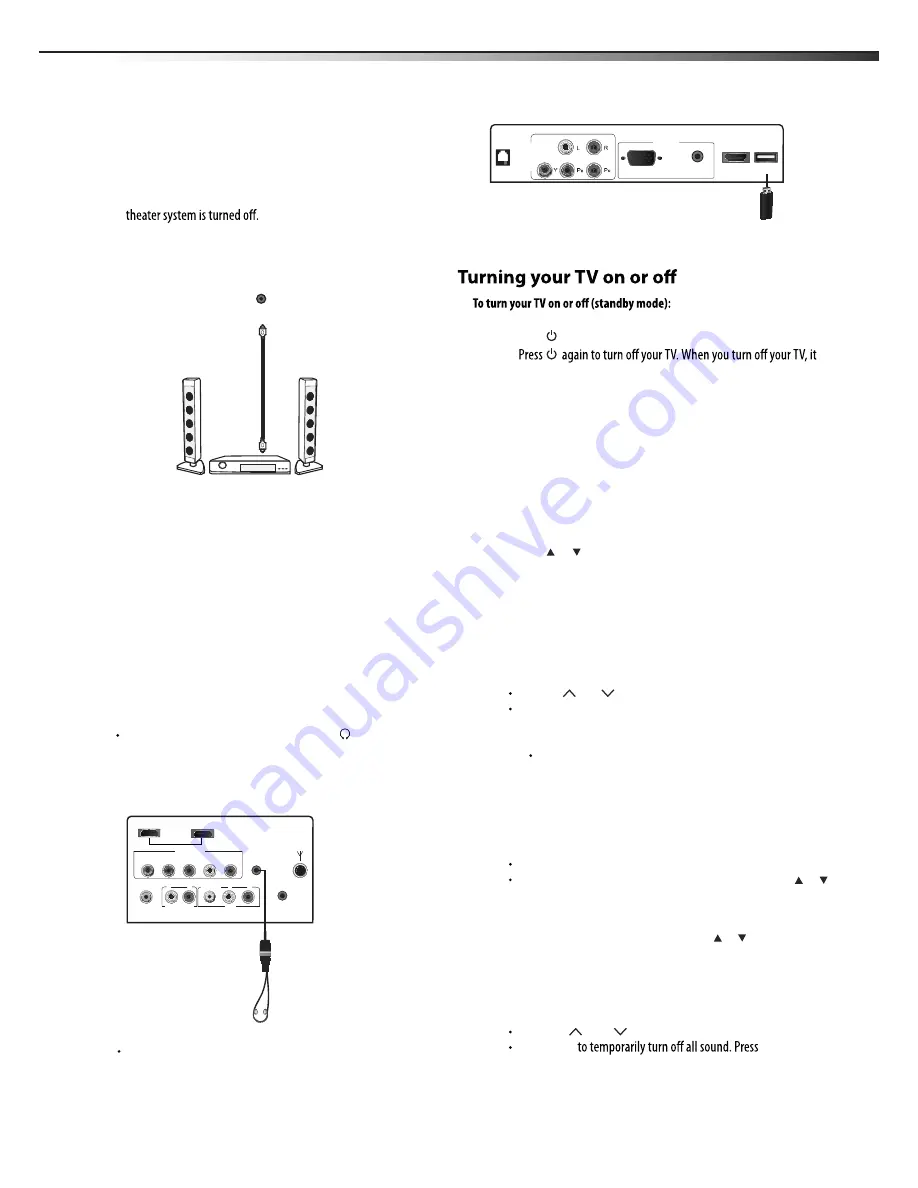
Connecting devices with USB interface

                    You can either use the USB connection cord or directly insert the 
                   USB port at the side of TV.

HDMI3

COMP1

PC AUDIO

RJ12

PC

USB

VGA

PC(computer),HDMI1,HDMI2,HDMI3,DMP.

Содержание LTDN40V86MH

Страница 1: ...ES Innovation for life MODEL NO LTDN40V86MH HOSPITALITY LCD TELEVISION...

Страница 2: ...ice Connecting an antenna cable TV or satellite TV box Connecting a VCR camcorder or game console Connecting a computer Connecting a home theater system Connecting headphones Understanding the basics...

Страница 3: ...watching a program especially on a larger than life TV Make sure that you place or install the TV where it cannot be pushed pulled over or knocked down Make sure that you route all cords and cables so...

Страница 4: ...ot remove any cover or expose the device to rain or moisture No user serviceable parts are Lightning For added protection for your device receiver during a lightning storm or when it is left unattende...

Страница 5: ...new surroundings for about an hour before switchingiton ormakesurethattheroomtemperaturerisesgradually Condensation may also form duringthe summer if the TV is exposed to the breeze from an air condi...

Страница 6: ...ing a wall mount bracket IfyouwanttoattachtheTVtoawall mountbracket notprovided you Warning only Toreducetheriskofhazards donotperformanyservicingother thanthatcontainedintheoperatinginstructionsunles...

Страница 7: ...SAP SLEEP SOUND EXIT TV 1 2 3 5 6 4 7 8 9 0 LAST PICTURE MUTE 1 2 VOL VOL Press to increase or decrease the volume CCD SOUND more information Press to select the sound mode You can select Standard Cu...

Страница 8: ...appear with explanations in the on screen display OSD Follow the steps shown in the OSD TV Press to select the TV as the video input source Selectscreenmode INPUT Press to open the INPUT SOURCE menu...

Страница 9: ...green and blue color coded video connectors and red and white audio connectors Match the colors when making connections To connect a component video device 1 Make sure that your TV s power cord is un...

Страница 10: ...TV then pressINPUT The INPUTSOURCE menu opens 2 Press or to select Video then press ENTER 3 Turn on the device then start playback on the device Connecting a computer To connect a computer 1 Make sure...

Страница 11: ...eo input source To select the video input source 1 Turn on your TV then pressINPUT on the remote control or on the TV The INPUTSOURCEmenu opens 2 Press or to highlight the video source you want then p...

Страница 12: ...resolution Digital signal information Displays channel number station name channel label if preset broadcast program name signal type audio information resolution and current program start and end ti...

Страница 13: ...ench and Espana settings and daylight saving Adjust the clock used to synchronizing the image Lets you set the slide time long medium or short Adjust the time takes the OSD to disappear when no operat...

Страница 14: ...ease the brightness of the picture Increasing the brightness can add more light to dark areas of the picture while decreasing the brightness can add more darkness to light areas of the picture Brightn...

Страница 15: ...ss or tohighlightanoption thenpress or toaccess theoption Press or tohighlightaratingandpress to ENTER ENTER lock all other lower ratings theratingandallotherhigherratingsorunlocktheratingand U S TV r...

Страница 16: ...You can select the mode of RF input and search the channels automatically Time Lets you set the exact time You can setup date time time zone and daylight saving Source Labels Lets you name each input...

Страница 17: ...ssed If a setting is grayed the setting is not available in the current video input mode TV cabinet creaks When the TV is in use the temperature rises naturally and may cause the cabinet to expand or...

Страница 18: ...aratus complies with Canadian ICES 003 CetappareilnumeriquedelaclasseBestconformealanormeNMB 003 du Canada Standard Television Receiving Apparatus Appareil de r ception t l vision ordinaire Canada BET...

Страница 19: ...TV picture defaults to Normal viewing mode Normal Audio OFF Installer can go to and adjust settings and Zoom Aspect is full screen User Save Lock FUNCTION Lock Allows installer to lock the following...

Страница 20: ...Feature menu adjustment in menu Locks Installation menu adjustment in menu Locks DMP menu adjustment in menu Installation Lock DMP Lock V Chip Locks V Chip function in menu Hotel mute Hotel Channel Se...

Страница 21: ......

Отзывы: